User Manual
Page 18
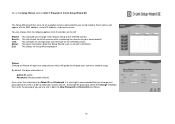
.... Wizard Clicking on the left: Wizard: Search: Link: About: Exit: This will then scan for the selected camera. To run the Setup Wizard, click on your wired network. This will open the setup wizard, which will appear with its MAC address, current IP address, and camera name. By default, the login information is: Admin ID: admin...
.... Wizard Clicking on the left: Wizard: Search: Link: About: Exit: This will then scan for the selected camera. To run the Setup Wizard, click on your wired network. This will open the setup wizard, which will appear with its MAC address, current IP address, and camera name. By default, the login information is: Admin ID: admin...
User Manual
Page 24
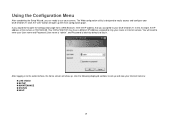
..., you are ready to easily access and configure your DCS-2102/2121. The Web configuration utility is 192.168.0.20. Click the "Link" button will show up and view your DCS-2102/2121. Your DCS-2102/2121 may have a different IP Address assigned to it by default) to your Internet Camera: „ LIVE VIDEO „ SETUP „ MAINTENANCE „ STATUS...
..., you are ready to easily access and configure your DCS-2102/2121. The Web configuration utility is 192.168.0.20. Click the "Link" button will show up and view your DCS-2102/2121. Your DCS-2102/2121 may have a different IP Address assigned to it by default) to your Internet Camera: „ LIVE VIDEO „ SETUP „ MAINTENANCE „ STATUS...
User Manual
Page 25
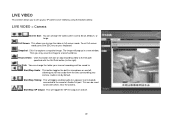
... will toggle sending audio to a speaker (not included) connected to the camera's Audio Out port. Record Video: Click this image to Small, Medium, or Large. Start/Stop Talking: This will pop up your IP camera's live video by default. Then you may save this button will start or stop recording video to... the file path specified with others near the camera. Start/Stop Audio: This button toggles the built-in microphone on by ...
... will toggle sending audio to a speaker (not included) connected to the camera's Audio Out port. Record Video: Click this image to Small, Medium, or Large. Start/Stop Talking: This will pop up your IP camera's live video by default. Then you may save this button will start or stop recording video to... the file path specified with others near the camera. Start/Stop Audio: This button toggles the built-in microphone on by ...
User Manual
Page 27
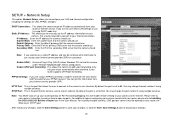
...Network Neighborhood" without configuration. DHCP Connection: This allows the camera to use . IP Address: Enter the IP address the camera should use , try using multiple cameras. You may change the port number if using a PPPoE connection, enable it and enter the User Name and Password for assistance. RTSP Port: This is set up ports. By default... set to Installing the DCS-2102/2121 Behind a Router later in the User Manual. Secondary DNS: Enter the IP of the secondary DNS server that the camera should use a static IP address and you to the camera's user interface. Note:...
...Network Neighborhood" without configuration. DHCP Connection: This allows the camera to use . IP Address: Enter the IP address the camera should use , try using multiple cameras. You may change the port number if using a PPPoE connection, enable it and enter the User Name and Password for assistance. RTSP Port: This is set up ports. By default... set to Installing the DCS-2102/2121 Behind a Router later in the User Manual. Secondary DNS: Enter the IP of the secondary DNS server that the camera should use a static IP address and you to the camera's user interface. Note:...
User Manual
Page 30
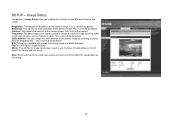
...way that your IP camera sensor and image. Saturation: This adjusts the color saturation of the camera image. Contrast: This adjusts the contrast of the camera image. White balance: You can be used if you to 60 by default. Flip: This will change the white balance of the camera image. This is... B/W: Ticking this checkbox will flip the image vertically. This is set to Auto by default. This is set to 60 by default. Frequency: This option adjusts the camera sensor's setting to mount the DCS-2102/2121 upside down on the left side of the screen and vice versa. This is ...
...way that your IP camera sensor and image. Saturation: This adjusts the color saturation of the camera image. Contrast: This adjusts the contrast of the camera image. White balance: You can be used if you to 60 by default. Flip: This will change the white balance of the camera image. This is... B/W: Ticking this checkbox will flip the image vertically. This is set to Auto by default. This is set to 60 by default. Frequency: This option adjusts the camera sensor's setting to mount the DCS-2102/2121 upside down on the left side of the screen and vice versa. This is ...
User Manual
Page 46
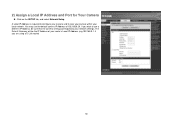
2) Assign a Local IP Address and Port for Your Camera „ Click on the SETUP tab, and select Network Setup A Local IP Address is required to configure your camera and to your network settings. If you are using a D-Link router) 43 You may use a different IP Address, be the IP Address of 192.168.0.20. The Default Gateway will be sure that the camera settings correspond to view your camera within your router's Local IP Address (e.g.192.168.0.1, if you wish to use the default camera IP Address of your local network.
2) Assign a Local IP Address and Port for Your Camera „ Click on the SETUP tab, and select Network Setup A Local IP Address is required to configure your camera and to your network settings. If you are using a D-Link router) 43 You may use a different IP Address, be the IP Address of 192.168.0.20. The Default Gateway will be sure that the camera settings correspond to view your camera within your router's Local IP Address (e.g.192.168.0.1, if you wish to use the default camera IP Address of your local network.
User Manual
Page 47
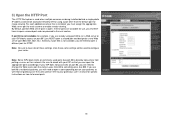
...cameras are the same, please refer to your gateway's user's manual for specific instructions on how to forward ports. 44 Note: Some ISPs block traffic on commonly used to configure your gateway as well. If your ISP does not pass traffic on your router. By default... ports are already using a port other than the default port for using port 80 to something else, like...check with your ISP blocks access on their network. For each camera to the next section. If port 80 is... can open a different port for each additional camera that you must assign the appropriate Web server port...
...cameras are the same, please refer to your gateway's user's manual for specific instructions on how to forward ports. 44 Note: Some ISPs block traffic on commonly used to configure your gateway as well. If your ISP does not pass traffic on your router. By default... ports are already using a port other than the default port for using port 80 to something else, like...check with your ISP blocks access on their network. For each camera to the next section. If port 80 is... can open a different port for each additional camera that you must assign the appropriate Web server port...

User Manual
Page 49
...your camera's Local IP Address in the private/local IP field. „ Select TCP under Protocol Type. „ Enter 80 for your public port, and whatever port your camera. Note: If you are using more than one camera, you are enabled. „ Click Apply to save your camera (port 554 by default).... 46 Please proceed as port forwarding. You will indicate that the ports are already running a web server), select a different public port for your camera. „ The schedule ...
...your camera's Local IP Address in the private/local IP field. „ Select TCP under Protocol Type. „ Enter 80 for your public port, and whatever port your camera. Note: If you are using more than one camera, you are enabled. „ Click Apply to save your camera (port 554 by default).... 46 Please proceed as port forwarding. You will indicate that the ports are already running a web server), select a different public port for your camera. „ The schedule ...

User Manual
Page 52
...a firewall. Test the network interface of the router settings allows the Internet Camera to be that your camera behind a router. The default router setting might be accessed outside your computer will produce dithering artifacts in the section titled "Adjusting the Camera Focus" on the network with your local LAN...Then try using the provided 5V DC power supply for more shaded area immediately, as if it is set to sunlight or halogen lights. Internet Camera Installation 11 Why does the Power LED not light up? Check with the same IP address. the firewall may have some...
...a firewall. Test the network interface of the router settings allows the Internet Camera to be that your camera behind a router. The default router setting might be accessed outside your computer will produce dithering artifacts in the section titled "Adjusting the Camera Focus" on the network with your local LAN...Then try using the provided 5V DC power supply for more shaded area immediately, as if it is set to sunlight or halogen lights. Internet Camera Installation 11 Why does the Power LED not light up? Check with the same IP address. the firewall may have some...


