User Manual
Page 2
...Power Adapter ...8 Autorun Installation ...9 Software Installation ...10 Adjusting the Camera Focus ...19 Setting up a Wireless Connection with WPS (DCS-2121 only)...20 Using the Configuration Menu ...21 LIVE VIDEO...22 LIVE VIDEO > Camera ...22 SETUP ...23 SETUP > Wizard ...23 SETUP > Network Setup...24 SETUP > Wireless (DCS-2121 only) ...25 SETUP > Dynamic DNS...26 SETUP > Image... Device Management...36 MAINTENANCE > Backup and Restore ...37 MAINTENANCE > Firmware Upgrade ...38 STATUS ...39 STATUS> Device Info...39 STATUS> Log...40 HELP ...41 Installing the DCS-2102/2121 Behind a Router...42 i
...Power Adapter ...8 Autorun Installation ...9 Software Installation ...10 Adjusting the Camera Focus ...19 Setting up a Wireless Connection with WPS (DCS-2121 only)...20 Using the Configuration Menu ...21 LIVE VIDEO...22 LIVE VIDEO > Camera ...22 SETUP ...23 SETUP > Wizard ...23 SETUP > Network Setup...24 SETUP > Wireless (DCS-2121 only) ...25 SETUP > Dynamic DNS...26 SETUP > Image... Device Management...36 MAINTENANCE > Backup and Restore ...37 MAINTENANCE > Firmware Upgrade ...38 STATUS ...39 STATUS> Device Info...39 STATUS> Log...40 HELP ...41 Installing the DCS-2102/2121 Behind a Router...42 i
User Manual
Page 3
1) Identify Your Camera on the Network ...42 2) Assign a Local IP Address and Port for Your Camera ...43 3) Open the HTTP Port ...44 4) Open Virtual Server Ports to Enable Remote Image Viewing ...46 Viewing Your Camera Over the Internet ...47 Viewing Your Camera Over the Internet Behind a Router...47 Frequently Asked Questions...48 Internet Camera Features ...48 Internet Camera Installation ...49 How to Ping Your IP Address...51 Time Zone Table ...53 DI/DO Input specifications ...54 Technical Specifications...55 ii
1) Identify Your Camera on the Network ...42 2) Assign a Local IP Address and Port for Your Camera ...43 3) Open the HTTP Port ...44 4) Open Virtual Server Ports to Enable Remote Image Viewing ...46 Viewing Your Camera Over the Internet ...47 Viewing Your Camera Over the Internet Behind a Router...47 Frequently Asked Questions...48 Internet Camera Features ...48 Internet Camera Installation ...49 How to Ping Your IP Address...51 Time Zone Table ...53 DI/DO Input specifications ...54 Technical Specifications...55 ii
User Manual
Page 5
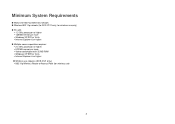
Minimum System Requirements „ Wired (10/100 Fast Ethernet) network „ Wireless 802.11g network (for DCS-2121 only, for wireless use only) „ PC with: y 1.3 GHz processor or higher y 128 MB memory or more y Windows XP SP2 or Vista y Internet Explorer 6 or higher „ Multiple camera operation requires: y 2.4 GHz processor or higher y 512 MB memory or more y Video card/chipset with 32 MB RAM y Windows XP SP2 or Vista y Internet Explorer 6 or higher „ Wireless use requires (DCS-2121 only): y 802.11g Wireless Router or Access Point (for wireless use) 2
Minimum System Requirements „ Wired (10/100 Fast Ethernet) network „ Wireless 802.11g network (for DCS-2121 only, for wireless use only) „ PC with: y 1.3 GHz processor or higher y 128 MB memory or more y Windows XP SP2 or Vista y Internet Explorer 6 or higher „ Multiple camera operation requires: y 2.4 GHz processor or higher y 512 MB memory or more y Video card/chipset with 32 MB RAM y Windows XP SP2 or Vista y Internet Explorer 6 or higher „ Wireless use requires (DCS-2121 only): y 802.11g Wireless Router or Access Point (for wireless use) 2
User Manual
Page 6
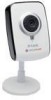
...DCS-2102/2121 Megapixel Internet Camera! no software required „ Includes D-ViewCam 2.0 for multi-camera monitoring and Management „ Motion detection to trigger recording and send e-mail alerts „ DDNS support for web access using and easy to Local hard Drive - The DCS-2102/2121 also comes with your Ethernet/Fast Ethernet or 802.11g wireless network... detection features for your purchase of Office over local network or through the Internet via a web browser. Introduction Congratulations on your small office or home. The DCS-2102/2121 is a complete system with a built-in ...
...DCS-2102/2121 Megapixel Internet Camera! no software required „ Includes D-ViewCam 2.0 for multi-camera monitoring and Management „ Motion detection to trigger recording and send e-mail alerts „ DDNS support for web access using and easy to Local hard Drive - The DCS-2102/2121 also comes with your Ethernet/Fast Ethernet or 802.11g wireless network... detection features for your purchase of Office over local network or through the Internet via a web browser. Introduction Congratulations on your small office or home. The DCS-2102/2121 is a complete system with a built-in ...
User Manual
Page 7
.... This means you to view and connect to nearby wireless networks. 4 The Internet Camera allows remote access from a Web browser for live video images over the Intranet and Internet for storing recorded video. „ Low Light Recording: The DCS-2102/2121's 0.5 lux light sensitivity allows you to capture video in the world. For the...
.... This means you to view and connect to nearby wireless networks. 4 The Internet Camera allows remote access from a Web browser for live video images over the Intranet and Internet for storing recorded video. „ Low Light Recording: The DCS-2102/2121's 0.5 lux light sensitivity allows you to capture video in the world. For the...
User Manual
Page 11
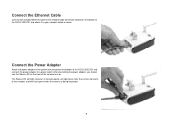
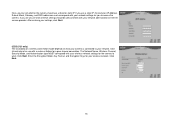
..., you should see the Status LED on the front of the camera turn on the bottom of the DCS-2102/2121 and attach it receives power, will light green after the camera connects to the network, and will light red when it to your network switch or router. Connect the Power Adapter Attach the power adapter...
..., you should see the Status LED on the front of the camera turn on the bottom of the DCS-2102/2121 and attach it receives power, will light green after the camera connects to the network, and will light red when it to your network switch or router. Connect the Power Adapter Attach the power adapter...
User Manual
Page 18
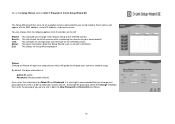
... at this information for all available cameras connected to your wired network. You can choose from the following options from the buttons on Wizard will open the configuration web interface for cameras on StartÆ ProgramsÆ D-Link Setup Wizard SE. Wizard Clicking on the left: Wizard: Search: Link: About: Exit: This will guide you...
... at this information for all available cameras connected to your wired network. You can choose from the following options from the buttons on Wizard will open the configuration web interface for cameras on StartÆ ProgramsÆ D-Link Setup Wizard SE. Wizard Clicking on the left: Wizard: Search: Link: About: Exit: This will guide you...
User Manual
Page 19
Click Next. 16 After entering your settings, click Next. (DCS-2121 only) The availability of what these settings should use a static IP, the camera's IP Address, Subnet Mask, Gateway, and DNS addresses must correspond with your wireless network. Click Next. Click Infrastructure for use with your network. Enter the Encryption Mode, Key Format, and Encryption...
Click Next. 16 After entering your settings, click Next. (DCS-2121 only) The availability of what these settings should use a static IP, the camera's IP Address, Subnet Mask, Gateway, and DNS addresses must correspond with your wireless network. Click Next. Click Infrastructure for use with your network. Enter the Encryption Mode, Key Format, and Encryption...

User Manual
Page 23
... lights up solid blue, then reboot. Now press the WPS button on the back of the camera for further assistance. After WPS is successfully activated, the WPS LED on your camera will stop flashing, and will light up , hold down the WPS button on your router or.... Note: On some routers/access points, you can quickly configure your wireless network and camera without using the camera's web interface. After pressing the button, it should start flashing blue. Setting up a Wireless Connection with WPS (DCS-2121 only) If your wireless access point or router supports push-button Wireless ...
... lights up solid blue, then reboot. Now press the WPS button on the back of the camera for further assistance. After WPS is successfully activated, the WPS LED on your camera will stop flashing, and will light up , hold down the WPS button on your router or.... Note: On some routers/access points, you can quickly configure your wireless network and camera without using the camera's web interface. After pressing the button, it should start flashing blue. Setting up a Wireless Connection with WPS (DCS-2121 only) If your wireless access point or router supports push-button Wireless ...

User Manual
Page 26
... to quickly set up or change the configuration of your IP camera. You can use the Internet Connection Setup Wizard for initial network setup, and you can also see these settings by clicking on the left side (Network Setup / Wireless Setup / Motion Detection / Snapshot). Simply follow... the instructions given in Audio and Video, Motion Detection and Motion Triggered Snapshots are disabled. 23 SETUP This section allows you to further set up your camera. SETUP > Wizard The setup...
... to quickly set up or change the configuration of your IP camera. You can use the Internet Connection Setup Wizard for initial network setup, and you can also see these settings by clicking on the left side (Network Setup / Wireless Setup / Motion Detection / Snapshot). Simply follow... the instructions given in Audio and Video, Motion Detection and Motion Triggered Snapshots are disabled. 23 SETUP This section allows you to further set up your camera. SETUP > Wizard The setup...
User Manual
Page 27
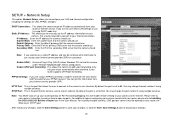
Subnet Mask: Enter the subnet mask that the camera uses to stream video to find this camera under "Network Neighborhood" without configuration. By default the port is the port that the camera should use . RTSP Port: This is set to 554. Note: You MUST also set the IP... viewing of the primary DNS server that the camera should use , contact your Internet service provider (ISP) for your router, please refer to Installing the DCS-2102/2121 Behind a Router later in the User Manual. SETUP > Network Setup This option, Network Setup, allows you to configure your Internet service...
Subnet Mask: Enter the subnet mask that the camera uses to stream video to find this camera under "Network Neighborhood" without configuration. By default the port is the port that the camera should use . RTSP Port: This is set to 554. Note: You MUST also set the IP... viewing of the primary DNS server that the camera should use , contact your Internet service provider (ISP) for your router, please refer to Installing the DCS-2102/2121 Behind a Router later in the User Manual. SETUP > Network Setup This option, Network Setup, allows you to configure your Internet service...
User Manual
Page 28
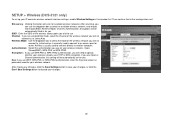
...(also known as password) used to connect to , or select Auto. SETUP > Wireless (DCS-2121 only) To set for available wireless networks. SSID: Enter the SSID of the wireless access point you wish to use on your IP camera's wireless network interface settings, enable Wireless Settings in for you wish to connect to an...
...(also known as password) used to connect to , or select Auto. SETUP > Wireless (DCS-2121 only) To set for available wireless networks. SSID: Enter the SSID of the wireless access point you wish to use on your IP camera's wireless network interface settings, enable Wireless Settings in for you wish to connect to an...
User Manual
Page 34
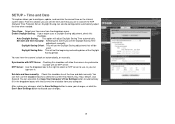
... type one in and set the NTP (Network Time Protocol) Server. Enable Daylight Saving: If your changes. 31 You can then use , or you can set the time zone that will allow the camera to automatically adjust the time when needed. You can have the camera's clock set automatically, or manually. After making...
... type one in and set the NTP (Network Time Protocol) Server. Enable Daylight Saving: If your changes. 31 You can then use , or you can set the time zone that will allow the camera to automatically adjust the time when needed. You can have the camera's clock set automatically, or manually. After making...
User Manual
Page 35
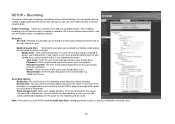
...option allows you to an SD Card inserted into the SD card slot, or you can have the camera delete old recordings to free space for verification. Note: If the camera is required to a Samba network drive on . After enabling recording, you will need to select a location to record to (SD ...Card or Samba network drive), and you will need to SXGA mode in Audio and Video, recordings will allow you require...
...option allows you to an SD Card inserted into the SD card slot, or you can have the camera delete old recordings to free space for verification. Note: If the camera is required to a Samba network drive on . After enabling recording, you will need to select a location to record to (SD ...Card or Samba network drive), and you will need to SXGA mode in Audio and Video, recordings will allow you require...
User Manual
Page 41
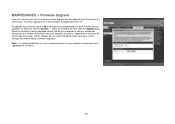
... save your system configuration before doing a firmware upgrade. Note: It is being upgraded, do not turn off your computer or camera, and do not disconnect your network connection from your computer and camera when upgrading the firmware. 38 To upgrade your firmware, go to support.dlink.com.tw and download the latest firmware... button. Upgrading the firmware will not change any of your system settings, but it is recommended that you use a wired connection for your computer or camera. Firmware upgrades are made available at support.dlink.com.tw.
... save your system configuration before doing a firmware upgrade. Note: It is being upgraded, do not turn off your computer or camera, and do not disconnect your network connection from your computer and camera when upgrading the firmware. 38 To upgrade your firmware, go to support.dlink.com.tw and download the latest firmware... button. Upgrading the firmware will not change any of your system settings, but it is recommended that you use a wired connection for your computer or camera. Firmware upgrades are made available at support.dlink.com.tw.
User Manual
Page 45
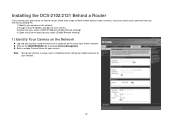
Installing the DCS-2102/2121 Behind a Router If you connect your cameras to an Internet router, follow these steps to allow remote access to your cameras, so you can access your cameras from any Internet-connected PC: 1) Identify your camera on the network 2) Assign a local IP address and port for your camera 3) Determine your router's WAN IP Address (Enable...
Installing the DCS-2102/2121 Behind a Router If you connect your cameras to an Internet router, follow these steps to allow remote access to your cameras, so you can access your cameras from any Internet-connected PC: 1) Identify your camera on the network 2) Assign a local IP address and port for your camera 3) Determine your router's WAN IP Address (Enable...
User Manual
Page 46
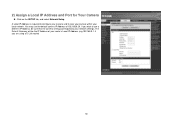
The Default Gateway will be the IP Address of your router's Local IP Address (e.g.192.168.0.1, if you wish to use the default camera IP Address of 192.168.0.20. 2) Assign a Local IP Address and Port for Your Camera „ Click on the SETUP tab, and select Network Setup A Local IP Address is required to configure your camera and to view your camera within your network settings. If you are using a D-Link router) 43 You may use a different IP Address, be sure that the camera settings correspond to your local network.
The Default Gateway will be the IP Address of your router's Local IP Address (e.g.192.168.0.1, if you wish to use the default camera IP Address of 192.168.0.20. 2) Assign a Local IP Address and Port for Your Camera „ Click on the SETUP tab, and select Network Setup A Local IP Address is required to configure your camera and to view your camera within your network settings. If you are using a D-Link router) 43 You may use a different IP Address, be sure that the camera settings correspond to your local network.
User Manual
Page 47
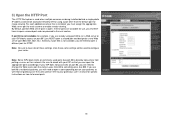
... port 80 is not available (for RTSP. Note: Be sure to take note of these settings since these ports are available for each additional camera that you MUST open a corresponding port on commonly used to configure your ISP does not pass traffic on port 80, you will need to open... port) is open a different port for example, if you are already using a port other than the default port for specific instructions on their network. For each camera to enable remote viewing. Note: Some ISPs block traffic on your gateway's user's manual for image viewing. Similarly, if port 554 is not ...
... port 80 is not available (for RTSP. Note: Be sure to take note of these settings since these ports are available for each additional camera that you MUST open a corresponding port on commonly used to configure your ISP does not pass traffic on port 80, you will need to open... port) is open a different port for example, if you are already using a port other than the default port for specific instructions on their network. For each camera to enable remote viewing. Note: Some ISPs block traffic on your gateway's user's manual for image viewing. Similarly, if port 554 is not ...

User Manual
Page 48
Note: Because a dynamic WAN IP address can use to access your camera from a remote location. Your WAN IP Address information will be more convenient for you to use DDNS to obtain an IP address, please refer to .... 45 A Static IP address is used as an example to clarify the configuration process. You can change over time and will be listed on your network. Router Setup The following steps generally apply to any router that will not change from time to time depending on your ISP, you have on...
Note: Because a dynamic WAN IP address can use to access your camera from a remote location. Your WAN IP Address information will be more convenient for you to use DDNS to obtain an IP address, please refer to .... 45 A Static IP address is used as an example to clarify the configuration process. You can change over time and will be listed on your network. Router Setup The following steps generally apply to any router that will not change from time to time depending on your ISP, you have on...
User Manual
Page 50
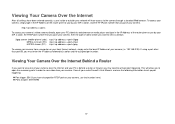
..., a colon, and the HTTP port number that number here) „ Ports to the camera through a standard Web browser. Viewing Your Camera Over the Internet After all settings have been entered correctly, a user inside or outside your network will allow you to open the necessary ports in the IP Address of the router... to set up port triggering: „ Port trigger: 554 (if you have changed the RTSP port on your local (home) network, simply enter the local IP Address of your cameras over the Internet and your PC is behind a router or firewall, you may need to you by a colon and the assigned...
..., a colon, and the HTTP port number that number here) „ Ports to the camera through a standard Web browser. Viewing Your Camera Over the Internet After all settings have been entered correctly, a user inside or outside your network will allow you to open the necessary ports in the IP Address of the router... to set up port triggering: „ Port trigger: 554 (if you have changed the RTSP port on your local (home) network, simply enter the local IP Address of your cameras over the Internet and your PC is behind a router or firewall, you may need to you by a colon and the assigned...


