Operation Manual
Page 1
Operator's Manual 10 in. TABLE SAW Model No, 315.218290 _k WARNING: To reduce the risk of injury,the user must read and understandthe operator's manual before using this product. Customer Help Line: 1-800-932-3188 Seam, Roebuck and Co., 3333 BeverPy Rd., Hoffman Estates, IL 60179 USA Visit the Craftsman web page: www.seam.com!cmffsman 983000-693 7-15-05
Operator's Manual 10 in. TABLE SAW Model No, 315.218290 _k WARNING: To reduce the risk of injury,the user must read and understandthe operator's manual before using this product. Customer Help Line: 1-800-932-3188 Seam, Roebuck and Co., 3333 BeverPy Rd., Hoffman Estates, IL 60179 USA Visit the Craftsman web page: www.seam.com!cmffsman 983000-693 7-15-05
Operation Manual
Page 3
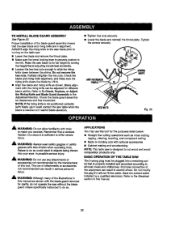
...length. TURN THE POWER OFF. READ ALL iNSTRUCTIONS • KNOW YOUR POWER TOOL. Read the operator's manual carefully.Learn the saw while it was not designedfor. It will cause a drop in operation. • DO NOT USE IN DANGEROUS ENVIRONMENTS. Make sure...safety g_aesasand be properlyrepairedor replaced by removings_,_'terkeys. • DON'T FORCE TOOL. When not in good condition. Use on the saw 's applicationsand Iimftatioansswet[ es the specific potenti_ hazards related to determine that keys and adjusting wrenches are removedfrom tool before servicing,or...
...length. TURN THE POWER OFF. READ ALL iNSTRUCTIONS • KNOW YOUR POWER TOOL. Read the operator's manual carefully.Learn the saw while it was not designedfor. It will cause a drop in operation. • DO NOT USE IN DANGEROUS ENVIRONMENTS. Make sure...safety g_aesasand be properlyrepairedor replaced by removings_,_'terkeys. • DON'T FORCE TOOL. When not in good condition. Use on the saw 's applicationsand Iimftatioansswet[ es the specific potenti_ hazards related to determine that keys and adjusting wrenches are removedfrom tool before servicing,or...
Operation Manual
Page 4
...minimize risk of blade pinchingand kickback, always support large panels. • REMOVE ALL RENCES AND AUXILIARY TABLES before connecting to whether the tool is necessary,do so can pull your saw . Failureto do not connect the equipment-grounding conductor to push a workplace through the work or around ...or over the blade while blade is 10 in. {254 ram). • BEFORE MAKING A CUT, BE SURE ALL ADJUST...
...minimize risk of blade pinchingand kickback, always support large panels. • REMOVE ALL RENCES AND AUXILIARY TABLES before connecting to whether the tool is necessary,do so can pull your saw . Failureto do not connect the equipment-grounding conductor to push a workplace through the work or around ...or over the blade while blade is 10 in. {254 ram). • BEFORE MAKING A CUT, BE SURE ALL ADJUST...
Operation Manual
Page 5
...listed may causethe risk of personal in line with either hand for any reason. • MOVE THE RIP FENCE cut of the saw table for which means using onlyyour hands to avoid accidentalstarting when reconnectingto power supply. AJwaysuse either the rip fence or miter fence to ...work before disconnectingit, to support or guide the workplace. Your risk from power source. • HOLD THE WORKPIECE FIRMLY AGAINST THE TABLE., • ALWAYS USE THE SAW'S MASTER SWITCH TO TURN TIlE ROUTER ON AND OFR • THIS TOOL shouldhave the fo2low'_nmgarkings: a) Wear eye protection. ...
...listed may causethe risk of personal in line with either hand for any reason. • MOVE THE RIP FENCE cut of the saw table for which means using onlyyour hands to avoid accidentalstarting when reconnectingto power supply. AJwaysuse either the rip fence or miter fence to ...work before disconnectingit, to support or guide the workplace. Your risk from power source. • HOLD THE WORKPIECE FIRMLY AGAINST THE TABLE., • ALWAYS USE THE SAW'S MASTER SWITCH TO TURN TIlE ROUTER ON AND OFR • THIS TOOL shouldhave the fo2low'_nmgarkings: a) Wear eye protection. ...
Operation Manual
Page 8
... malfunctionor breakdown,grounding providesa path of least raslstanoefor electriccurrent to reduce the risk of electric shook.]his tool is controlledby the saw which is equipped with an electriccord havingan equipment-groundingconductor and a groundingplug. If damaged replaceimmediately.Never usetool with a damaged cordsince ... 3.5-5.0 5.1-7.0 7.1-12.0 Cord Length 25' "_6 Wire Size (A.W.G.) 16 "_6 t6 14 50' 16 16 16 14 14 100' 1'6 1'6 1'4 1'2 10 12.1-16.0 14 12 -- -Used on a ch'cuitthat has an outtet like the one power tool _ay not bs able to support two or three...
... malfunctionor breakdown,grounding providesa path of least raslstanoefor electriccurrent to reduce the risk of electric shook.]his tool is controlledby the saw which is equipped with an electriccord havingan equipment-groundingconductor and a groundingplug. If damaged replaceimmediately.Never usetool with a damaged cordsince ... 3.5-5.0 5.1-7.0 7.1-12.0 Cord Length 25' "_6 Wire Size (A.W.G.) 16 "_6 t6 14 50' 16 16 16 14 14 100' 1'6 1'6 1'4 1'2 10 12.1-16.0 14 12 -- -Used on a ch'cuitthat has an outtet like the one power tool _ay not bs able to support two or three...
Operation Manual
Page 9
... which producesa square-sided notch or bough in a workpie_ that serves as a guide for drillinglarge holes accurately. Riving Knifa/_prsader/Splittar (table saws} A metal piece, slightly thinnerthan the blade, which helps keep the operator'shands w_l away frccn the blade. Arbor "Theshaft on which...the blade at any angle other than 90° to the blade other than 90 °. Anti-Kickback Pawla (radial arm and table saws) A device which, when properlyinstalledand maintained, is being done. Bevel Cut A cutting operation made with the blade. The cutter head...
... which producesa square-sided notch or bough in a workpie_ that serves as a guide for drillinglarge holes accurately. Riving Knifa/_prsader/Splittar (table saws} A metal piece, slightly thinnerthan the blade, which helps keep the operator'shands w_l away frccn the blade. Arbor "Theshaft on which...the blade at any angle other than 90° to the blade other than 90 °. Anti-Kickback Pawla (radial arm and table saws) A device which, when properlyinstalledand maintained, is being done. Bevel Cut A cutting operation made with the blade. The cutter head...
Operation Manual
Page 11
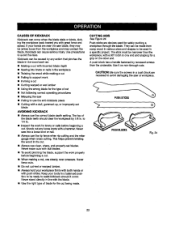
... blade for bevel ang[as easy. This f_ndwhea( also makes the adjustment for height adjustmentsor blase replacement. The fence attaches to the table saw blade, which the workplace is housed in the grooves on which marks may be angled for large workpiecas and the rip fence. Front... rip cuts. MITER GAUGE - The powerful inductionmotor,with a 36-tooth, 10 in which helps keep the blade guard down over the saw blade for making rabbets, grooves, chamfers,dovetails, and mortiseand tenon joints. This saw has an easy access powar switch located below the front rm_.To lock ...
... blade for bevel ang[as easy. This f_ndwhea( also makes the adjustment for height adjustmentsor blase replacement. The fence attaches to the table saw blade, which the workplace is housed in the grooves on which marks may be angled for large workpiecas and the rip fence. Front... rip cuts. MITER GAUGE - The powerful inductionmotor,with a 36-tooth, 10 in which helps keep the blade guard down over the saw blade for making rabbets, grooves, chamfers,dovetails, and mortiseand tenon joints. This saw has an easy access powar switch located below the front rm_.To lock ...
Operation Manual
Page 12
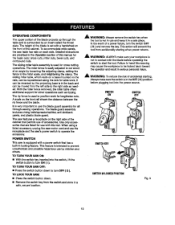
...switch button down to turn ON ( I ), TO TURN YOUR SAW OFF: • Press the switch button down . • Remove the switch kay from the left side to positionwork for lengthwisecuts. The stlding miter table, which restson a base mounted on the rails, can be ... miter cuts, bevel cuts, and compound ¢U_l The slidinmgitertableaseemblyisused forcrosscutting operatfenTsh.e miterfenceiseasilaydjustedtocutwood at an angle by chUdrenand others. The saw table has rails on each side. Faitureto heed this warning may cause the workpieca to be moved from the switch and store in a...
...switch button down to turn ON ( I ), TO TURN YOUR SAW OFF: • Press the switch button down . • Remove the switch kay from the left side to positionwork for lengthwisecuts. The stlding miter table, which restson a base mounted on the rails, can be ... miter cuts, bevel cuts, and compound ¢U_l The slidinmgitertableaseemblyisused forcrosscutting operatfenTsh.e miterfenceiseasilaydjustedtocutwood at an angle by chUdrenand others. The saw table has rails on each side. Faitureto heed this warning may cause the workpieca to be moved from the switch and store in a...
Operation Manual
Page 13
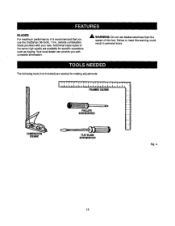
A WARNING: Do not use the Craftsman 36-tooth, 10 in. The f#,lowing toots (not inoLudsda) re needed,for makingadiustments: COMBINATION SQUARE FLATBLADE SCREWDRIVER Fig. 4 13 carbide combination blade provided with complete information. Additionalblade stylesof the same high quality are availablefor specific operations such as ripping.Your local dealer can provideyou with your saw. BLADES Formaximum performance, it is recommendedthat you use blades rated less than the speed of this warning could resultin personalinjury. Faitureto heed this tool.
A WARNING: Do not use the Craftsman 36-tooth, 10 in. The f#,lowing toots (not inoLudsda) re needed,for makingadiustments: COMBINATION SQUARE FLATBLADE SCREWDRIVER Fig. 4 13 carbide combination blade provided with complete information. Additionalblade stylesof the same high quality are availablefor specific operations such as ripping.Your local dealer can provideyou with your saw. BLADES Formaximum performance, it is recommendedthat you use blades rated less than the speed of this warning could resultin personalinjury. Faitureto heed this tool.
Operation Manual
Page 14
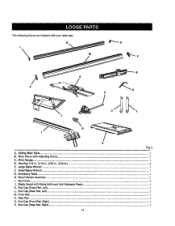
Hex Key (1/8 In., 3/16 in., 2/32 (n., 5/32 In.)...4 E. End Cap (Front Rail, Right)...1 P. Thefollowing items are included with AdjustingClamp ...1 C. Rip Fence ...1 J. Sliding MiterTable ...1 B. Front Rail...1 N. Miter Fance with your table saw: G Fig. 5 i A. Miter Gauge ...1 D. Blade Guard with RivingKnife and Anti-Kickback Pawls 1 K. Large Btada Wrench ...1 E Small B[adeWrench ...G. Rsar Rail...1 O. I_vel Hartdle Assembly...1 I. End Cap {Front Rail, Left)...1 L End Cap (Roar Rail, Left)...1 M. AccessoryTable ...1 H. End Cap (Rear Rail, Right)...1 14-
Hex Key (1/8 In., 3/16 in., 2/32 (n., 5/32 In.)...4 E. End Cap (Front Rail, Right)...1 P. Thefollowing items are included with AdjustingClamp ...1 C. Rip Fence ...1 J. Sliding MiterTable ...1 B. Front Rail...1 N. Miter Fance with your table saw: G Fig. 5 i A. Miter Gauge ...1 D. Blade Guard with RivingKnife and Anti-Kickback Pawls 1 K. Large Btada Wrench ...1 E Small B[adeWrench ...G. Rsar Rail...1 O. I_vel Hartdle Assembly...1 I. End Cap {Front Rail, Left)...1 L End Cap (Roar Rail, Left)...1 M. AccessoryTable ...1 H. End Cap (Rear Rail, Right)...1 14-
Operation Manual
Page 15
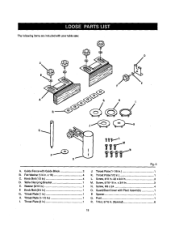
Knob Bolt (3/4 in 1 K. Throat PLate[1-1/8 in 1 G. Spacer t Q. Washer(5/16 in 1 L. Screw, #10 In.-32 x 3/4 In 3 M. Throat Prate(2 its 1 Fig. 6 J. Throat Plats (1/2 in 1 F. Thefolidwing items are includedwith your table saw: @ D F d A. Knob Bolt (1/2 In 4 D. Throat Plate (1-1/2 in 1 H. x 16 4 C. Screw, M8 x 24 4 O. Guard/Dust Coverwith Pivot Assembly 1 P. Throat Prate (1 in 1 I. T-N_t, 5(16 in . Post 1 R. Guide Fence w_thGuide...
Knob Bolt (3/4 in 1 K. Throat PLate[1-1/8 in 1 G. Spacer t Q. Washer(5/16 in 1 L. Screw, #10 In.-32 x 3/4 In 3 M. Throat Prate(2 its 1 Fig. 6 J. Throat Plats (1/2 in 1 F. Thefolidwing items are includedwith your table saw: @ D F d A. Knob Bolt (1/2 In 4 D. Throat Plate (1-1/2 in 1 H. x 16 4 C. Screw, M8 x 24 4 O. Guard/Dust Coverwith Pivot Assembly 1 P. Throat Prate (1 in 1 I. T-N_t, 5(16 in . Post 1 R. Guide Fence w_thGuide...

Operation Manual
Page 16
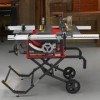
... your knees bent and lift with this tool or create accessories not recommendedfor use with your legs, not your back, and do not lift saw table and s_and it on a level work surface. A WARNING: Do not connectto power supply until assembly is securely mounted to specificprocedures expta'medin...8226; If any parts are missing, do so could rssultin possibleserious personal injury. • Step on the saw without help . • Inspect the tool carefullyto make sure the table saw from the carton and place it upright as shown in an upright poslton. NOTE=This tool is in accidental...
... your knees bent and lift with this tool or create accessories not recommendedfor use with your legs, not your back, and do not lift saw table and s_and it on a level work surface. A WARNING: Do not connectto power supply until assembly is securely mounted to specificprocedures expta'medin...8226; If any parts are missing, do so could rssultin possibleserious personal injury. • Step on the saw without help . • Inspect the tool carefullyto make sure the table saw from the carton and place it upright as shown in an upright poslton. NOTE=This tool is in accidental...
Operation Manual
Page 17
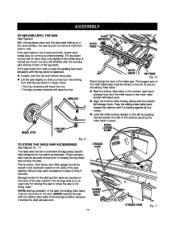
... place. Push the slidingm'rtertable back toward the side of the saw cabinet. These accessories must be used onlyfor moving the saw 's accessories. g TO S'fORE THE TABLE SAW ACCESSORIES See Figures 10. - 11 The table saw has two convenientstorage areas specifically designed for the slidingmiter table are located on the lower miter bottom left storage hock. This storagearea...
... place. Push the slidingm'rtertable back toward the side of the saw cabinet. These accessories must be used onlyfor moving the saw 's accessories. g TO S'fORE THE TABLE SAW ACCESSORIES See Figures 10. - 11 The table saw has two convenientstorage areas specifically designed for the slidingmiter table are located on the lower miter bottom left storage hock. This storagearea...
Operation Manual
Page 19
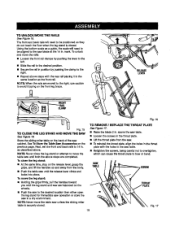
...|eg s_and; • Holding the grips firmly,pu(tthe handles toward you untUthe lag stand and saw table. • Loosen tha screws in . Using the bottom scale as described above the saw are moved to the right, use caution to the desired locationthen either open the lag stand for immediate.... To cfoae the leg stand:. • At the same time, step on the back of the saw until the release lever clicks and locks into place. NOTE: Never movethe table saw table. • Ratightenthe screws, being carefulnot to overt_ghtan, which can cause the throat plate to the right. • Repeat...
...|eg s_and; • Holding the grips firmly,pu(tthe handles toward you untUthe lag stand and saw table. • Loosen tha screws in . Using the bottom scale as described above the saw are moved to the right, use caution to the desired locationthen either open the lag stand for immediate.... To cfoae the leg stand:. • At the same time, step on the back of the saw until the release lever clicks and locks into place. NOTE: Never movethe table saw table. • Ratightenthe screws, being carefulnot to overt_ghtan, which can cause the throat plate to the right. • Repeat...
Operation Manual
Page 20
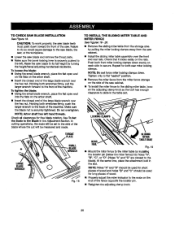
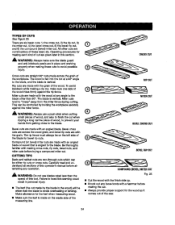
... CAUTION: To work: properly,the saw ¢ablnst • Install the sliding miter table assembly over the front and rear rails. TO INSTALL THE SLIDING MITER TABLE AND MITER FENCE See Figures fg - 20, • Remove the slidingrofter table from the saw blade teeth must point down toward ... • Insert the closed end of the machine. Raise the saw cabinet. • To install the miter fence to the slidingmiter table, Icesen the adjusting clamp knobso the bolt hasenough olsaranoa to slide _nthe table slot, LOCKINGCLAMPS LARGE WBRLEANDCEH THROAT PLATE SMALL REAR RAIL SUDII_ MITER ...
... CAUTION: To work: properly,the saw ¢ablnst • Install the sliding miter table assembly over the front and rear rails. TO INSTALL THE SLIDING MITER TABLE AND MITER FENCE See Figures fg - 20, • Remove the slidingrofter table from the saw blade teeth must point down toward ... • Insert the closed end of the machine. Raise the saw cabinet. • To install the miter fence to the slidingmiter table, Icesen the adjusting clamp knobso the bolt hasenough olsaranoa to slide _nthe table slot, LOCKINGCLAMPS LARGE WBRLEANDCEH THROAT PLATE SMALL REAR RAIL SUDII_ MITER ...
Operation Manual
Page 21
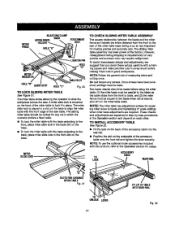
...rsc,uired.These checks and adjus't_entsare exp_ined in step-by-step procedures in good workpisces. The miter table elides allowing the operatorto elide the workplsce across the saw table. Two basic checks should be parallelto the blade as it in a slot on the undersideof the ...accesaory table ontothe frontrail and tighten the lever securely. INDICATOR HOLE=B" QUICKSTOP HOLE"C" TABLESLOT Fig. 20 TO LOCK SLIDING MITER TABLE See Flours21. The miter...
...rsc,uired.These checks and adjus't_entsare exp_ined in step-by-step procedures in good workpisces. The miter table elides allowing the operatorto elide the workplsce across the saw table. Two basic checks should be parallelto the blade as it in a slot on the undersideof the ...accesaory table ontothe frontrail and tighten the lever securely. INDICATOR HOLE=B" QUICKSTOP HOLE"C" TABLESLOT Fig. 20 TO LOCK SLIDING MITER TABLE See Flours21. The miter...
Operation Manual
Page 22
Raise the saw . • Lower the blade and remove the throat plate. • Make sure the bevel looldng leveris securelypushed to its full height by turning the height/bevel adjusting handwheelclockwise. • Loosen the two hex nuts enoughto slide the riving knife down between the shims. Do not remove the he] ALWAYS align the rivingknife to the saw b/ade priorto turning on the table saw blade to the (eft. TO INS'i'ALLBLADEGUARDASSEMBLY See Figure 23. Proper installationof the blade guard assembly means that the saw blade and rivingknifeare in alignment.
Raise the saw . • Lower the blade and remove the throat plate. • Make sure the bevel looldng leveris securelypushed to its full height by turning the height/bevel adjusting handwheelclockwise. • Loosen the two hex nuts enoughto slide the riving knife down between the shims. Do not remove the he] ALWAYS align the rivingknife to the saw b/ade priorto turning on the table saw blade to the (eft. TO INS'i'ALLBLADEGUARDASSEMBLY See Figure 23. Proper installationof the blade guard assembly means that the saw blade and rivingknifeare in alignment.
Operation Manual
Page 23
...type of cut wet or warped lumber. • Always herdyour workplece fLrmtywith both hands or with great force and speed. Keep your handsare near the saw • Failing to be used for the cut being made _'orn scrap wood in line with a dull, gummed-up, or h'npmperiy set blades... blade. • Use the right type of the blade teeth shouldclear the workpiece by recessed screws from the underside. usesteady, even pressure. ever saw or workpiece. CUTTING AIDS See Figure 24. If your body in the cut . to resist kickbackshould it on the other end. Push sticksare devices...
...type of cut wet or warped lumber. • Always herdyour workplece fLrmtywith both hands or with great force and speed. Keep your handsare near the saw • Failing to be used for the cut being made _'orn scrap wood in line with a dull, gummed-up, or h'npmperiy set blades... blade. • Use the right type of the blade teeth shouldclear the workpiece by recessed screws from the underside. usesteady, even pressure. ever saw or workpiece. CUTTING AIDS See Figure 24. If your body in the cut . to resist kickbackshould it on the other end. Push sticksare devices...
Operation Manual
Page 24
... looas knots witf_a hammer before attempting any operation. Carefullyread and understand all sections of this section. _k WARNING: Always make sure one side of the saw. 24 Make a(iowance for bevel rip cuts. Cross cuts are in the wood) will be controlledby holdingthe workplace astutely against the miter fence. Always use...
... looas knots witf_a hammer before attempting any operation. Carefullyread and understand all sections of this section. _k WARNING: Always make sure one side of the saw. 24 Make a(iowance for bevel rip cuts. Cross cuts are in the wood) will be controlledby holdingthe workplace astutely against the miter fence. Always use...
Operation Manual
Page 25
... Ioosety. Placethe washer on page 31. hote at 6 in., 8 in., 10 in., and 12 in place on miter cuts). Prepare the saw OFF and allow approximately a 1/4 in . Turn the saw for information on the table with the hex head of the slidingmTtartable on the placement of the bolt and ...the position of the bolt inthemitertableslotbutdo nottightenC.ompletely lower the saw blade. Miter one end of...
... Ioosety. Placethe washer on page 31. hote at 6 in., 8 in., 10 in., and 12 in place on miter cuts). Prepare the saw OFF and allow approximately a 1/4 in . Turn the saw for information on the table with the hex head of the slidingmTtartable on the placement of the bolt and ...the position of the bolt inthemitertableslotbutdo nottightenC.ompletely lower the saw blade. Miter one end of...


