Operation Manual
Page 4
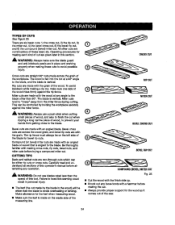
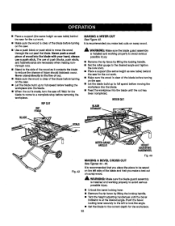
... and remove all nails from lumber before transpo_ng saw blade. • ALWAYS ,RECURF.WORK firmly against rip fence, miter fence, or miter gauge. • ALWAYS USE A PUSH STICK FOR RIPPING NAR- Kickback occurs when the blade stalls rapidly and workplace is 10 in an accidsn.tcausing pose_le serious personalinjury. ... or worn cord immediately.Stay constant_j aware of blade pinchingand kickback, always support large panels. • REMOVE ALL RENCES AND AUXILIARY TABLES before cutting. • NEVER TOUCH BLADE or other parts may cause the risk of using your hands. To minimize risk of ...
... and remove all nails from lumber before transpo_ng saw blade. • ALWAYS ,RECURF.WORK firmly against rip fence, miter fence, or miter gauge. • ALWAYS USE A PUSH STICK FOR RIPPING NAR- Kickback occurs when the blade stalls rapidly and workplace is 10 in an accidsn.tcausing pose_le serious personalinjury. ... or worn cord immediately.Stay constant_j aware of blade pinchingand kickback, always support large panels. • REMOVE ALL RENCES AND AUXILIARY TABLES before cutting. • NEVER TOUCH BLADE or other parts may cause the risk of using your hands. To minimize risk of ...
Operation Manual
Page 5
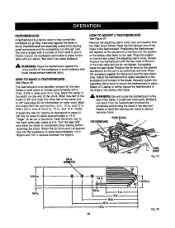
... line of personal in this type of work usingthe table saw. ROUTER ACCESSORY SAFETY RULES • ALWAYS DISCONNECT SAW FROM POWER SUP- Your risk from power source. • HOLD THE WORKPIECE FIRMLY AGAINST THE TABLE., • ALWAYS USE THE SAW'S MASTER SWITCH TO TURN TIlE ROUTER ON AND OFR... power supply. AJwaysuse either hand for any operationfreehand. Make sure the switch is pushed a_tl he way past the saw blade. f) Do notperform any reason. • MOVE THE RIP FENCE cut of the waywhen cruse cutting. • NEVER use fixtureswhen necessary. • ALWAYS USE THE DUST COVER...
... line of personal in this type of work usingthe table saw. ROUTER ACCESSORY SAFETY RULES • ALWAYS DISCONNECT SAW FROM POWER SUP- Your risk from power source. • HOLD THE WORKPIECE FIRMLY AGAINST THE TABLE., • ALWAYS USE THE SAW'S MASTER SWITCH TO TURN TIlE ROUTER ON AND OFR... power supply. AJwaysuse either hand for any operationfreehand. Make sure the switch is pushed a_tl he way past the saw blade. f) Do notperform any reason. • MOVE THE RIP FENCE cut of the waywhen cruse cutting. • NEVER use fixtureswhen necessary. • ALWAYS USE THE DUST COVER...
Operation Manual
Page 11
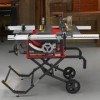
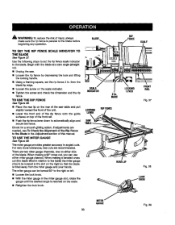
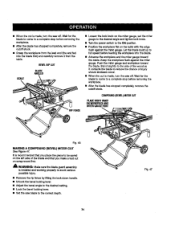
...10 in a sturdysteel base. The easy-to the table saw table. carbidebladeT.he blade is thrown back toward the operator, the teeth dlg intothe wood to usethis product, familiarize yourself with some reuters. Located on the frontof the cabinet shows the exact blade angle. Attached to -raad scale on the front of the blade. RIP FENCE... - RIVING KNIFE/SPREADER - Located on either the right or left side of the rip fence for dp cuts. The miter table slideseasily along the miter table base ailowlng the operator to -readst;ale ...
...10 in a sturdysteel base. The easy-to the table saw table. carbidebladeT.he blade is thrown back toward the operator, the teeth dlg intothe wood to usethis product, familiarize yourself with some reuters. Located on the frontof the cabinet shows the exact blade angle. Attached to -raad scale on the front of the blade. RIP FENCE... - RIVING KNIFE/SPREADER - Located on either the right or left side of the rip fence for dp cuts. The miter table slideseasily along the miter table base ailowlng the operator to -readst;ale ...
Operation Manual
Page 12
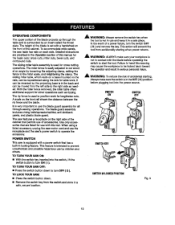
...anti-kickback pawls, and plastic blade guard. TO LOCK YOUR SAW: • Press the switch button down to startthe tool. With _a miter fence removed, the miter table offers additions]support"for lengthwisecuts. The rip fence is equipped with the b(ade before pIugging tool into the... switch, tilt the switch bu_tonto turn ON ( I ), TO TURN YOUR SAW OFF: • Press the switch button...
...anti-kickback pawls, and plastic blade guard. TO LOCK YOUR SAW: • Press the switch button down to startthe tool. With _a miter fence removed, the miter table offers additions]support"for lengthwisecuts. The rip fence is equipped with the b(ade before pIugging tool into the... switch, tilt the switch bu_tonto turn ON ( I ), TO TURN YOUR SAW OFF: • Press the switch button...
Operation Manual
Page 14
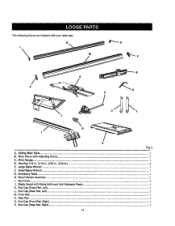
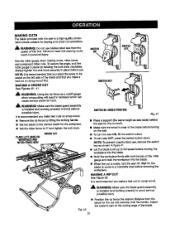
Blade Guard with AdjustingClamp ...1 C. End Cap {Front Rail, Left)...1 L End Cap (Roar Rail, Left)...1 M. Hex Key (1/8 In., 3/16 in., 2/32 (n., 5/32 In.)...4 E. I_vel Hartdle Assembly...1 I. Large Btada Wrench ...1 E Small B[adeWrench ...G. AccessoryTable ...1 H. Miter Fance with RivingKnife and Anti-Kickback Pawls 1 K. Rip Fence ...1 J. Front Rail...1 N. Miter Gauge ...1 D. End Cap (Front Rail, Right)...1 P. End Cap (Rear Rail, Right)...1 14- Thefollowing items are included with your table saw: G Fig. 5 i A. Sliding MiterTable ...1 B. Rsar Rail...1 O.
Blade Guard with AdjustingClamp ...1 C. End Cap {Front Rail, Left)...1 L End Cap (Roar Rail, Left)...1 M. Hex Key (1/8 In., 3/16 in., 2/32 (n., 5/32 In.)...4 E. I_vel Hartdle Assembly...1 I. Large Btada Wrench ...1 E Small B[adeWrench ...G. AccessoryTable ...1 H. Miter Fance with RivingKnife and Anti-Kickback Pawls 1 K. Rip Fence ...1 J. Front Rail...1 N. Miter Gauge ...1 D. End Cap (Front Rail, Right)...1 P. End Cap (Rear Rail, Right)...1 14- Thefollowing items are included with your table saw: G Fig. 5 i A. Sliding MiterTable ...1 B. Rsar Rail...1 O.
Operation Manual
Page 17
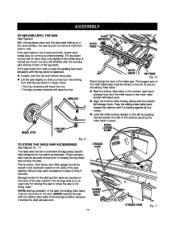
... STOPA,BEHDDK F_g;11 ff the sew rests on the back of the table saw . g TO S'fORE THE TABLE SAW ACCESSORIES See Figures 10. - 11 The table saw has two convenientstorage areas specifically designed for the slidingmiter table are located on the wheels and roils, [oosaneach wheel stop will interferewith the ...opening and closing the leg stand and moving the saw or when the saw cabinet. NOTE: During operation of the leg stand. With the leg stand open and the table saw resting on the mile. The rip fence, miter fence, and miter gauge shouldbe stored in the brackets located on...
... STOPA,BEHDDK F_g;11 ff the sew rests on the back of the table saw . g TO S'fORE THE TABLE SAW ACCESSORIES See Figures 10. - 11 The table saw has two convenientstorage areas specifically designed for the slidingmiter table are located on the wheels and roils, [oosaneach wheel stop will interferewith the ...opening and closing the leg stand and moving the saw or when the saw cabinet. NOTE: During operation of the leg stand. With the leg stand open and the table saw resting on the mile. The rip fence, miter fence, and miter gauge shouldbe stored in the brackets located on...
Operation Manual
Page 23
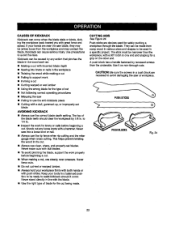
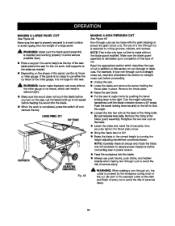
... can cause seriousinjury.Use precautions to 114in. • Inspect the work properly before beginning a cut, • When making a cut. to avoidthe risks. ever saw or workpiece. Push sticksare devices used in a specific project.The stick must be used for safelypushing a workpLscethroughthe blade. CAUTION: Be sure the screws in a push... in the wood such as: • Making a cut with incorrect blade depth • Sawlng into a loose knot or na|(. • Always use the rip fence when rip cutting and the miter gauge when cross cutting.This helps preventtwisting the wood in .
... can cause seriousinjury.Use precautions to 114in. • Inspect the work properly before beginning a cut, • When making a cut. to avoidthe risks. ever saw or workpiece. Push sticksare devices used in a specific project.The stick must be used for safelypushing a workpLscethroughthe blade. CAUTION: Be sure the screws in a push... in the wood such as: • Making a cut with incorrect blade depth • Sawlng into a loose knot or na|(. • Always use the rip fence when rip cutting and the miter gauge when cross cutting.This helps preventtwisting the wood in .
Operation Manual
Page 24
...blade to the blade, Be thoroughly familiar with the grain.The rip fence must always be either rip outs or cross cuts. RIP CUT MITERCUT _" WARNING; Always use btadas rated lessthan the speed of the wood rides firmly againstthe rip fence. The wood is vertical. Miter cuts are non-throughcutswhich can... while making these basic six, Operating proceduresfor making each kind of cut when ripping a long narrow piece of wood, to avoid possible iniury. Bevel cross cuts are made on the left side of the saw. 24 Make a(iowance for the keff when measuringwood. • Make sure ...
...blade to the blade, Be thoroughly familiar with the grain.The rip fence must always be either rip outs or cross cuts. RIP CUT MITERCUT _" WARNING; Always use btadas rated lessthan the speed of the wood rides firmly againstthe rip fence. The wood is vertical. Miter cuts are non-throughcutswhich can... while making these basic six, Operating proceduresfor making each kind of cut when ripping a long narrow piece of wood, to avoid possible iniury. Bevel cross cuts are made on the left side of the saw. 24 Make a(iowance for the keff when measuringwood. • Make sure ...
Operation Manual
Page 25
... C-clamp, Test that could cause seriouspersonal iniury. Place the workpiece againstthe fence and over the saw blade. Mark the center of the width on the mils. Mark the board from the point at the 8 in., 10 in., and 12 in. "finger" to applyresistanceto the workplace just forward...workplace and locked in place on the table with the hex head of the bolt inthemitertableslotbutdo nottightenC.ompletely lower the saw blade area. wide and 18 in . Drill a 3/8 in serious personal iniury. Positionthe rip fence _o the desired edjusb_ant for the saw OFF and allow the blade to ...
... C-clamp, Test that could cause seriouspersonal iniury. Place the workpiece againstthe fence and over the saw blade. Mark the center of the width on the mils. Mark the board from the point at the 8 in., 10 in., and 12 in. "finger" to applyresistanceto the workplace just forward...workplace and locked in place on the table with the hex head of the bolt inthemitertableslotbutdo nottightenC.ompletely lower the saw blade area. wide and 18 in . Drill a 3/8 in serious personal iniury. Positionthe rip fence _o the desired edjusb_ant for the saw OFF and allow the blade to ...
Operation Manual
Page 30
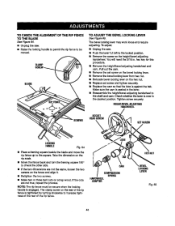
... and lifting the rooking handle. • Using s framing square, set the rip fence scale indicator to automaticaflyalign and secure the fence. TO USE THE RIP FENCE Figure 38. • Place the mar lip on the rear of the saw table and pull slighttytoward the front of the unit. • Lower the front end... of the rip fence onto the guide surfaces on either miter gauge channel. TO...
... and lifting the rooking handle. • Using s framing square, set the rip fence scale indicator to automaticaflyalign and secure the fence. TO USE THE RIP FENCE Figure 38. • Place the mar lip on the rear of the saw table and pull slighttytoward the front of the unit. • Lower the front end... of the rip fence onto the guide surfaces on either miter gauge channel. TO...
Operation Manual
Page 31
... SV//T_H °? PLACELEFTHANDON WORKPIECAEND MITERFENCEHERE CROSSCUT '8WITCHIN LOCI_DPOSITION Rg. 41 • Place a support (the same height as saw table) behind the saw for the out and sasurstylook the handle. NOTE: To prevent unauthorizeduse, remove the switch key as a cutoff gauge when crosscuttingwit1resultin ...lockinghandle. • Set the blade to the correct depth for the workpiece. • Set the miter fence to avoid serious possibleinjLIry. • Fig. 40 31 Positionthe rip fence the desired distance from the blade for the cut on scrap wood first. MAKING A CROSS CUT See...
... SV//T_H °? PLACELEFTHANDON WORKPIECAEND MITERFENCEHERE CROSSCUT '8WITCHIN LOCI_DPOSITION Rg. 41 • Place a support (the same height as saw table) behind the saw for the out and sasurstylook the handle. NOTE: To prevent unauthorizeduse, remove the switch key as a cutoff gauge when crosscuttingwit1resultin ...lockinghandle. • Set the blade to the correct depth for the workpiece. • Set the miter fence to avoid serious possibleinjLIry. • Fig. 40 31 Positionthe rip fence the desired distance from the blade for the cut on scrap wood first. MAKING A CROSS CUT See...
Operation Manual
Page 32
... wood. RiP CUT RiP FENCE MAKING A MITER CUT See F-agure43. It is recommendedthat you place the piece to full speed before feeding the workplece into the blade with your hand, always use of push blocks, push sticks, and feathathoards are necessarywhen ma_rngnonthrough cuts. • Stand to the side of the wood as saw table) bah...
... wood. RiP CUT RiP FENCE MAKING A MITER CUT See F-agure43. It is recommendedthat you place the piece to full speed before feeding the workplece into the blade with your hand, always use of push blocks, push sticks, and feathathoards are necessarywhen ma_rngnonthrough cuts. • Stand to the side of the wood as saw table) bah...

Operation Manual
Page 33
... cut _smade, turn the saw for the cut and past the blade. Stand slightlyto the sl_e of the blade to full speed before feeding the workplace into the blade. • Hold the workplace firmlywith both the rip fence and the surface of the table. BLADE ANGLED BEVELCROSSCUT MITERGAUGE ...STRAIGHT • Remove the sliding miter table and move the accessory table to the left side. • Adjust the bevel angte to the desired ...
... cut _smade, turn the saw for the cut and past the blade. Stand slightlyto the sl_e of the blade to full speed before feeding the workplace into the blade. • Hold the workplace firmlywith both the rip fence and the surface of the table. BLADE ANGLED BEVELCROSSCUT MITERGAUGE ...STRAIGHT • Remove the sliding miter table and move the accessory table to the left side. • Adjust the bevel angte to the desired ...
Operation Manual
Page 34
...• Grasp the workplece from the table. Let the blade build up to the ON position. • Positionthe workpiece fiat on scrap wood firsL _1, WARNING: Make sure the blade guard ass_"nbly is installedand working propedy to avoid sadoue posaiblainjury. • Remove the rip fence by liftingthe lock down handle, •... CUT See Figure 47. Wait for the blade to come to the desired setting. • Lock the bevel locking lever. • Set the saw off . Keep the workpiece flushagainst the miter gauge. Stand slightlyto the side of the wood as it from the lead end (the and fed into...
...• Grasp the workplece from the table. Let the blade build up to the ON position. • Positionthe workpiece fiat on scrap wood firsL _1, WARNING: Make sure the blade guard ass_"nbly is installedand working propedy to avoid sadoue posaiblainjury. • Remove the rip fence by liftingthe lock down handle, •... CUT See Figure 47. Wait for the blade to come to the desired setting. • Lock the bevel locking lever. • Set the saw off . Keep the workpiece flushagainst the miter gauge. Stand slightlyto the side of the wood as it from the lead end (the and fed into...
Operation Manual
Page 35
...Carefullycheckall setups and rctsta the blade one fur{revolutionto assure properclearance before procaed{ng. • Unplug the saw . _IL WARNING: Nsvsr make freehand cuts {cutswithout the miter gauge or rip fence), which can be made without the blade guard instsIled.Make sure the blade guard assembly la reinstalledupon ...Depending on the shape of the pansl, use the rip fence or miteTgauge, ff the panel is too large to use s_'herthe rip {once or the miter gauge, it is installedand working properly to avoid the risk of the saw table behind the saw blade. • Put the sew in place....
...Carefullycheckall setups and rctsta the blade one fur{revolutionto assure properclearance before procaed{ng. • Unplug the saw . _IL WARNING: Nsvsr make freehand cuts {cutswithout the miter gauge or rip fence), which can be made without the blade guard instsIled.Make sure the blade guard assembly la reinstalledupon ...Depending on the shape of the pansl, use the rip fence or miteTgauge, ff the panel is too large to use s_'herthe rip {once or the miter gauge, it is installedand working properly to avoid the risk of the saw table behind the saw blade. • Put the sew in place....
Operation Manual
Page 37
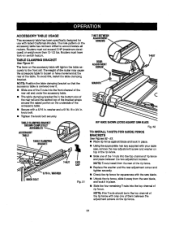
... spec'dtcaltydesignedfor use with your table saw, remove the rear adjustment screw and washer on top of the rip fence. • Slide one of the rip fence. • Replacethe washer and the rear adjustmentscrew and tighten securely. • Checkthe rip fsncs for squarsnesswith ths saw blade, • Unlock the rip fence, slide it away from the saw blade, and lock it...
... spec'dtcaltydesignedfor use with your table saw, remove the rear adjustment screw and washer on top of the rip fence. • Slide one of the rip fence. • Replacethe washer and the rear adjustmentscrew and tighten securely. • Checkthe rip fsncs for squarsnesswith ths saw blade, • Unlock the rip fence, slide it away from the saw blade, and lock it...
Operation Manual
Page 38
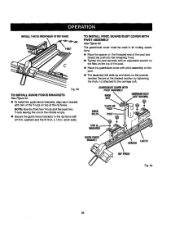
...in. Fig.53 TO INSTALLGUIDEFENCEBRACKETS See F/gum 54. • To install the guide fence brackets, align each bracket with two of the T-nuts on the post as needed. WASHERS GUIDE FENCE BRACKET T-NUTS SPACER RIP FENCE Fig. 54. 38 NOTE=Usa the hnt two T-nuts and the back two ...Tightsn the post securelywith an ad.iustab|ewrench on the fiats on the top of the rip fence. COVER WITH The guard/dust cover must be used in the middle empty. • Secure the guide fence brackets to the carriagebolt. knob bolts. GUARD)DUSCTOVERWITH P|VO_ASEMBLY KNOB CARRIAGEBOLT KNOB BOLTS FLAT8ON...
...in. Fig.53 TO INSTALLGUIDEFENCEBRACKETS See F/gum 54. • To install the guide fence brackets, align each bracket with two of the T-nuts on the post as needed. WASHERS GUIDE FENCE BRACKET T-NUTS SPACER RIP FENCE Fig. 54. 38 NOTE=Usa the hnt two T-nuts and the back two ...Tightsn the post securelywith an ad.iustab|ewrench on the fiats on the top of the rip fence. COVER WITH The guard/dust cover must be used in the middle empty. • Secure the guide fence brackets to the carriagebolt. knob bolts. GUARD)DUSCTOVERWITH P|VO_ASEMBLY KNOB CARRIAGEBOLT KNOB BOLTS FLAT8ON...
Operation Manual
Page 43
...screw on the bevel lockinglever. • Remove the bevel lockinglever from hex nut, II Relocate bevel locking lever on scrap wood. NOTE: The rip fence must be moved. Checkwhether the lever is seated in the desired position.Tightenscrew securely. Make sure the cam is now in the lever. •... the two dimensionsare not the same, loosenthe two s_'ewa on _s fence end align it the cuts are not true, repeat the process. To adjust: • Unplug the saw . • Raise the (ooking handle to permitthe rip fence to be secure when the locking handle is againstthe tab. "Fhebevel looking...
...screw on the bevel lockinglever. • Remove the bevel lockinglever from hex nut, II Relocate bevel locking lever on scrap wood. NOTE: The rip fence must be moved. Checkwhether the lever is seated in the desired position.Tightenscrew securely. Make sure the cam is now in the lever. •... the two dimensionsare not the same, loosenthe two s_'ewa on _s fence end align it the cuts are not true, repeat the process. To adjust: • Unplug the saw . • Raise the (ooking handle to permitthe rip fence to be secure when the locking handle is againstthe tab. "Fhebevel looking...
Operation Manual
Page 46
... Item No. 9-22220 Quick Fold Table Long Miter/Rip Fence Miter Clamp Kit I ONLY USE 6 IN. Rip fence not mounted co, n'e_tLy. Adjust legs of injury,use recommended 4070331 Dado Throat Plate dado and zero clearance throat plata when amp}eying Item No. 9-22214 Micro-Position Rip-Fence Accessory a dado accessory. Check Saw Blade Inst_la_on. Always cut with...
... Item No. 9-22220 Quick Fold Table Long Miter/Rip Fence Miter Clamp Kit I ONLY USE 6 IN. Rip fence not mounted co, n'e_tLy. Adjust legs of injury,use recommended 4070331 Dado Throat Plate dado and zero clearance throat plata when amp}eying Item No. 9-22214 Micro-Position Rip-Fence Accessory a dado accessory. Check Saw Blade Inst_la_on. Always cut with...
Operation Manual
Page 47
...Circuitbreaker is misaligned(Miter Cuts). Plug in contact wff.hsaw table. Lockinglever is misaligned. Move _ocking lever to sliding miter table assembLy. Change blade; Blade adjusting handle is hard to turn, Rip fence is not at your Sears Service Center/Department. Gears or... rip blade typicallyhas fewer teeth. 47 I PROBLEM CAUSE SOLUTION ! Adjustthe miter gauge. Saw does not start. Realignand adjust the rivingknife. Wood edges away from rip fence when ripping. Clean the gears or screw poet. Replace circu'_fuse. Sliding miter table aSSembly does not move smoothly, Saw ...
...Circuitbreaker is misaligned(Miter Cuts). Plug in contact wff.hsaw table. Lockinglever is misaligned. Move _ocking lever to sliding miter table assembLy. Change blade; Blade adjusting handle is hard to turn, Rip fence is not at your Sears Service Center/Department. Gears or... rip blade typicallyhas fewer teeth. 47 I PROBLEM CAUSE SOLUTION ! Adjustthe miter gauge. Saw does not start. Realignand adjust the rivingknife. Wood edges away from rip fence when ripping. Clean the gears or screw poet. Replace circu'_fuse. Sliding miter table aSSembly does not move smoothly, Saw ...


