Owners Manual
Page 1
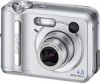
K866PCM2DKX Digital Camera E QV-R41/QV-R51 User's Guide Thank you for future reference. • For the most up-to the QV-R41, unless specifically noted otherwise. The same procedures also apply to -date information about this User's Guide are based on the QV-R51. All example procedures in a safe place for purchasing this CASIO Product. • Before using it, be sure to read the precautions contained in this User's Guide. • Keep the User's Guide in this product, visit the CASIO Website at http://world.casio.com/.
K866PCM2DKX Digital Camera E QV-R41/QV-R51 User's Guide Thank you for future reference. • For the most up-to the QV-R41, unless specifically noted otherwise. The same procedures also apply to -date information about this User's Guide are based on the QV-R51. All example procedures in a safe place for purchasing this CASIO Product. • Before using it, be sure to read the precautions contained in this User's Guide. • Keep the User's Guide in this product, visit the CASIO Website at http://world.casio.com/.
Owners Manual
Page 2
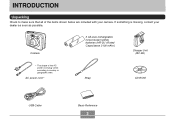
AC power cord * Strap CD-ROM USB Cable Basic Reference 2 INTRODUCTION INTRODUCTION Unpacking Check to make sure that all of the AC power cord plug varies according to country or geographic area. Camera 2 AA-size rechargeable nickel-metal hydride batteries (HR-3U ) Charger Unit (BC-5H) * The shape of the items shown below are included with your dealer as soon as possible. If something is missing, contact your camera.
AC power cord * Strap CD-ROM USB Cable Basic Reference 2 INTRODUCTION INTRODUCTION Unpacking Check to make sure that all of the AC power cord plug varies according to country or geographic area. Camera 2 AA-size rechargeable nickel-metal hydride batteries (HR-3U ) Charger Unit (BC-5H) * The shape of the items shown below are included with your dealer as soon as possible. If something is missing, contact your camera.
Owners Manual
Page 3
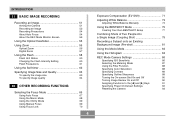
... Lamps 31 Attaching the Strap 32 Power Requirements 32 Charging Batteries 33 To load batteries 37 To remove the batteries from the camera 37 Using AC Power 41 Turning the Camera On and Off 42 Configuring Power Saving Settings 44 Using the On-screen Menus 45 Configuring Display Language and Clock Settings...
... Lamps 31 Attaching the Strap 32 Power Requirements 32 Charging Batteries 33 To load batteries 37 To remove the batteries from the camera 37 Using AC Power 41 Turning the Camera On and Off 42 Configuring Power Saving Settings 44 Using the On-screen Menus 45 Configuring Display Language and Clock Settings...
Owners Manual
Page 4
INTRODUCTION 51 BASIC IMAGE RECORDING Recording an Image 51 Aiming the Camera 51 Recording an Image 52 Recording Precautions 54 About Auto Focus 54 About the REC Mode Monitor... a Subject onto an Existing Background Image (Pre-shot 81 Using the Movie Mode 83 Using the Histogram 84 REC Mode Camera Settings 86 Specifying ISO Sensitivity 86 Selecting the Metering Mode 87 Using the Filter Function 88 Specifying Color Saturation 88 Specifying Contrast...Assigning Functions to the [̇] and [̈] Keys 91 Specifying Power On Default Settings 92 Resetting the Camera 93
INTRODUCTION 51 BASIC IMAGE RECORDING Recording an Image 51 Aiming the Camera 51 Recording an Image 52 Recording Precautions 54 About Auto Focus 54 About the REC Mode Monitor... a Subject onto an Existing Background Image (Pre-shot 81 Using the Movie Mode 83 Using the Histogram 84 REC Mode Camera Settings 86 Specifying ISO Sensitivity 86 Selecting the Metering Mode 87 Using the Filter Function 88 Specifying Color Saturation 88 Specifying Contrast...Assigning Functions to the [̇] and [̈] Keys 91 Specifying Power On Default Settings 92 Resetting the Camera 93
Owners Manual
Page 6
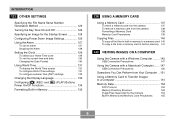
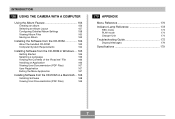
...-in Memory 135 136 USING A MEMORY CARD Using a Memory Card 137 To insert a memory card into the camera 137 To remove a memory card from the camera 138 Formatting a Memory Card 138 Memory Card Precautions 139 Copying Files 140 To copy all the files in built-... copy a file from a memory card to built-in memory 141 142 VIEWING IMAGES ON A COMPUTER Using the Camera with a Windows Computer ........ 142 USB Connection Precautions 147 Using the Camera with a Macintosh Computer ....... 147 USB Connection Precautions 150 Operations You Can Perform from Your Computer .. 151 Using ...
...-in Memory 135 136 USING A MEMORY CARD Using a Memory Card 137 To insert a memory card into the camera 137 To remove a memory card from the camera 138 Formatting a Memory Card 138 Memory Card Precautions 139 Copying Files 140 To copy all the files in built-... copy a file from a memory card to built-in memory 141 142 VIEWING IMAGES ON A COMPUTER Using the Camera with a Windows Computer ........ 142 USB Connection Precautions 147 Using the Camera with a Macintosh Computer ....... 147 USB Connection Precautions 150 Operations You Can Perform from Your Computer .. 151 Using ...
Owners Manual
Page 7
INTRODUCTION 156 USING THE CAMERA WITH A COMPUTER Using the Album Feature 156 Creating an album 156 Selecting an Album Layout 157 Configuring Detailed Album Settings 158 Viewing Album Files 160 ...
INTRODUCTION 156 USING THE CAMERA WITH A COMPUTER Using the Album Feature 156 Creating an album 156 Selecting an Album Layout 157 Configuring Detailed Album Settings 158 Viewing Album Files 160 ...

Owners Manual
Page 9
INTRODUCTION Features • Effective Pixels QV-R41: 4.00 million pixels (4.13 million total pixels) QV-R51: 5.00 million pixels (5.25 million total pixels) • 2.0-inch TFT color LCD monitor screen • 12X seamless zoom 3X optical zoom, 4X digital zoom &#... friend, even if you can select from among 162 cities in the BESTSHOT mode. • Slideshow Feature Images are displayed automatically one-by connecting the camera with a USB cable. • BESTSHOT Simply select the sample scene that include you and your current location. You can create images that matches the type...
INTRODUCTION Features • Effective Pixels QV-R41: 4.00 million pixels (4.13 million total pixels) QV-R51: 5.00 million pixels (5.25 million total pixels) • 2.0-inch TFT color LCD monitor screen • 12X seamless zoom 3X optical zoom, 4X digital zoom &#... friend, even if you can select from among 162 cities in the BESTSHOT mode. • Slideshow Feature Images are displayed automatically one-by connecting the camera with a USB cable. • BESTSHOT Simply select the sample scene that include you and your current location. You can create images that matches the type...
Owners Manual
Page 10
... can also be incorporated into Web pages quickly and easily. • Calendar screen A simple operation displays a full-month calendar on the camera's monitor screen. When connected directly to a printer that supports USB DIRECT-PRINT, you can select images to print and start the print ... developed by professional print services. • PRINT Image Matching II Compatible Images include PRINT Image Matching II data (mode setting and other camera setup information). Album contents can also have a specific image appear on the monitor screen when the alarm time is reached. • Album...
... can also be incorporated into Web pages quickly and easily. • Calendar screen A simple operation displays a full-month calendar on the camera's monitor screen. When connected directly to a printer that supports USB DIRECT-PRINT, you can select images to print and start the print ... developed by professional print services. • PRINT Image Matching II Compatible Images include PRINT Image Matching II data (mode setting and other camera setup information). Album contents can also have a specific image appear on the monitor screen when the alarm time is reached. • Album...
Owners Manual
Page 11
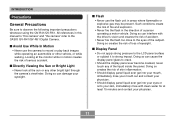
... Avoid Use While In Motion • Never use the flash unit in this manual to "this camera" and "the camera" refer to observe the following important precautions whenever using the QV-R41/QV-R51. Doing so can interfere with clean water for at least 15 minutes and contact your skin,... the display panel ever become cracked, never touch any other vehicle, or while walking. INTRODUCTION Precautions General Precautions Be sure to the CASIO QV-R41/QV-R51 Digital Camera. Looking at the sun or any of eyesight. I Display Panel • Do not apply strong pressure to the LCD panel surface...
... Avoid Use While In Motion • Never use the flash unit in this manual to "this camera" and "the camera" refer to observe the following important precautions whenever using the QV-R41/QV-R51. Doing so can interfere with clean water for at least 15 minutes and contact your skin,... the display panel ever become cracked, never touch any other vehicle, or while walking. INTRODUCTION Precautions General Precautions Be sure to the CASIO QV-R41/QV-R51 Digital Camera. Looking at the sun or any of eyesight. I Display Panel • Do not apply strong pressure to the LCD panel surface...
Owners Manual
Page 12
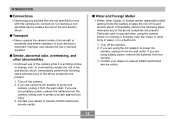
... wall outlet. If you are using battery power, remove the batteries from the camera. 3. Contact your dealer or nearest CASIO authorized service center. 12 If you are using the AC adaptor to power the camera, unplug it from the wall outlet. I Water and Foreign Matter • ... where operation of fire and electric shock. Contact your dealer or nearest CASIO authorized service center. If you are using the camera where it is restricted. I Transport • Never operate the camera inside the camera creates the risk of fire and electric shock. Improper use with this...
... wall outlet. If you are using battery power, remove the batteries from the camera. 3. Contact your dealer or nearest CASIO authorized service center. 12 If you are using the AC adaptor to power the camera, unplug it from the wall outlet. I Water and Foreign Matter • ... where operation of fire and electric shock. Contact your dealer or nearest CASIO authorized service center. If you are using the camera where it is restricted. I Transport • Never operate the camera inside the camera creates the risk of fire and electric shock. Improper use with this...
Owners Manual
Page 13
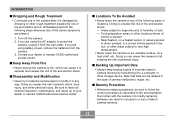
...correct procedure as described in the documentation that data can be deleted in the case of camera malfunction, repair, etc. Near heaters, on a high shelf, etc. Contact your dealer or nearest CASIO authorized service center. Food preparation areas or other personal injury. I Locations To Be ... • Never try to take the camera apart or modify it in camera memory. 13 I Dropping and Rough Treatment • Continued use of the camera after it is present - Doing so can cause the camera to your dealer or nearest CASIO authorized service center. Be sure to leave...
...correct procedure as described in the documentation that data can be deleted in the case of camera malfunction, repair, etc. Near heaters, on a high shelf, etc. Contact your dealer or nearest CASIO authorized service center. Food preparation areas or other personal injury. I Locations To Be ... • Never try to take the camera apart or modify it in camera memory. 13 I Dropping and Rough Treatment • Continued use of the camera after it is present - Doing so can cause the camera to your dealer or nearest CASIO authorized service center. Be sure to leave...
Owners Manual
Page 14
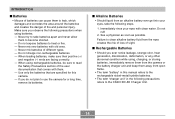
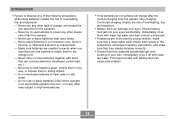
..., strange odor, heat generation, discoloration, deformation, or any other abnormal condition while using, charging, or storing batteries, immediately remove them from the camera or the battery charger unit and keep them away from open flame. • The term "battery" in this... camera. - Do not rub! 2. Failure to use the camera for this manual refers to the rechargeable nickel-metal hydride batteries. • The term "charger unit" in the following precautions refers to the CASIO BC-5H Charger Unit. 14 I Alkaline Batteries • ...
..., strange odor, heat generation, discoloration, deformation, or any other abnormal condition while using, charging, or storing batteries, immediately remove them from the camera or the battery charger unit and keep them away from open flame. • The term "battery" in this... camera. - Do not rub! 2. Failure to use the camera for this manual refers to the rechargeable nickel-metal hydride batteries. • The term "charger unit" in the following precautions refers to the CASIO BC-5H Charger Unit. 14 I Alkaline Batteries • ...
Owners Manual
Page 15
... it into fire, or otherwise expose it off with battery fluid can damage your eyes. Never place batteries in any other device other than this camera. - Do not use any way, or expose them with items that they handle batteries correctly. • Should fluid from batteries accidentally get onto clothing or.... - Never use batteries to the charger unit. - Do not immerse batteries in any other area subject to intense heat. - Should battery fluid get into the camera or attach them aware of overheating, fire, and explosion. -
... it into fire, or otherwise expose it off with battery fluid can damage your eyes. Never place batteries in any other device other than this camera. - Do not use any way, or expose them with items that they handle batteries correctly. • Should fluid from batteries accidentally get onto clothing or.... - Never use batteries to the charger unit. - Do not immerse batteries in any other area subject to intense heat. - Should battery fluid get into the camera or attach them aware of overheating, fire, and explosion. -

Owners Manual
Page 16
... pull on the charger unit. Doing so creates the risk of fire and electric shock. 16 Use only the optional AC adaptor specified for this camera. - Never plug the power cord into a wall outlet that is shared by other devices, or into a shared extension cord. • Misuse of the AC ...AC adaptor creates the risk of fire, malfunction, and electric shock. • Never plug in or unplug the charger unit while your dealer or nearest CASIO authorized service center. • Use the AC adaptor where it . Doing so creates the risk of fire and electric shock. Doing so creates the risk...
... pull on the charger unit. Doing so creates the risk of fire and electric shock. 16 Use only the optional AC adaptor specified for this camera. - Never plug the power cord into a wall outlet that is shared by other devices, or into a shared extension cord. • Misuse of the AC ...AC adaptor creates the risk of fire, malfunction, and electric shock. • Never plug in or unplug the charger unit while your dealer or nearest CASIO authorized service center. • Use the AC adaptor where it . Doing so creates the risk of fire and electric shock. Doing so creates the risk...
Owners Manual
Page 17
...nickel-metal hydride batteries or lithium batteries is greatly affected by the battery brand, battery production date, and ambient temperature. • Leaving the camera on can lead to battery leakage and data corruption. • Though you observe the following precautions when using it will be very short.... values until power fails, based on the AC adaptor power cord. Unplug the AC adaptor from the wall outlet and clean off the camera whenever you will go. - Doing so creates the risk of electric shock. • Misuse of the optional AC adaptor creates the ...
...nickel-metal hydride batteries or lithium batteries is greatly affected by the battery brand, battery production date, and ambient temperature. • Leaving the camera on can lead to battery leakage and data corruption. • Though you observe the following precautions when using it will be very short.... values until power fails, based on the AC adaptor power cord. Unplug the AC adaptor from the wall outlet and clean off the camera whenever you will go. - Doing so creates the risk of electric shock. • Misuse of the optional AC adaptor creates the ...

Owners Manual
Page 18
... from 0°C to 40°C (32°F to direct sunlight - Operating conditions • This camera is designed for use or keep the camera in temperatures ranging from the camera while a USB data communication operation is manufactured using precision digital components. Near air conditioners, heaters, or ...areas subject to temperature extremes - Charge the batteries or replace the batteries with new ones as soon as possible after you turn off the camera - Any of the following areas. - Inside of the error. In areas subject to eliminate the cause of a closed vehicle, especially ...
... from 0°C to 40°C (32°F to direct sunlight - Operating conditions • This camera is designed for use or keep the camera in temperatures ranging from the camera while a USB data communication operation is manufactured using precision digital components. Near air conditioners, heaters, or ...areas subject to temperature extremes - Charge the batteries or replace the batteries with new ones as soon as possible after you turn off the camera - Any of the following areas. - Inside of the error. In areas subject to eliminate the cause of a closed vehicle, especially ...
Owners Manual
Page 19
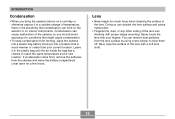
...you should avoid exposing it into a location that is the possibility that might cause condensation. • To keep condensation from forming, place the camera into a plastic bag before moving it to reach the same temperature as the new location. Lens • Never apply too much warmer or...surface by using a lens blower to a sudden change of temperature, there is much force when cleaning the surface of the camera, so you bring the camera indoors on interior components. Never touch the lens with your current location. Condensation can cause malfunction of the lens. Leave ...
...you should avoid exposing it into a location that is the possibility that might cause condensation. • To keep condensation from forming, place the camera into a plastic bag before moving it to reach the same temperature as the new location. Lens • Never apply too much warmer or...surface by using a lens blower to a sudden change of temperature, there is much force when cleaning the surface of the camera, so you bring the camera indoors on interior components. Never touch the lens with your current location. Condensation can cause malfunction of the lens. Leave ...
Owners Manual
Page 20
INTRODUCTION Other • The camera may become slightly warm during use. This does not indicate malfunction. • If the exterior of the camera needs cleaning, wipe it with a soft, dry cloth. 20
INTRODUCTION Other • The camera may become slightly warm during use. This does not indicate malfunction. • If the exterior of the camera needs cleaning, wipe it with a soft, dry cloth. 20
Owners Manual
Page 21
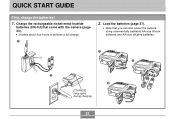
Charge the rechargeable nickel-metal hydride batteries (HR-3U) that you can also power the camera using commercially available AA-size lithium batteries and AA-size alkaline batteries. 1 2 2 3 [CHARGE] lamp lights during charging. 21 Load the batteries (page 37). • Note that come with the camera (page 33). • It takes about four hours to achieve a full charge. 1 2. QUICK START GUIDE QUICK START GUIDE First, charge the batteries! 1.
Charge the rechargeable nickel-metal hydride batteries (HR-3U) that you can also power the camera using commercially available AA-size lithium batteries and AA-size alkaline batteries. 1 2 2 3 [CHARGE] lamp lights during charging. 21 Load the batteries (page 37). • Note that come with the camera (page 33). • It takes about four hours to achieve a full charge. 1 2. QUICK START GUIDE QUICK START GUIDE First, charge the batteries! 1.

Owners Manual
Page 22
... press [SET]. 5. QUICK START GUIDE To configure display language and clock settings • Be sure to configure the following settings before using the camera to turn on the camera. 2. Use [̆] and [̄] to select the city you want . 3. Use and [̈] to select the date format setting you want , and then...
... press [SET]. 5. QUICK START GUIDE To configure display language and clock settings • Be sure to configure the following settings before using the camera to turn on the camera. 2. Use [̆] and [̄] to select the city you want . 3. Use and [̈] to select the date format setting you want , and then...


