Owners Manual
Page 1
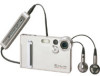
Digital Camera EX-S2/EX-M2 User's Guide Thank you for purchasing this manual show the EX-M2. Before using it, be sure to read the precautions contained in this User's Guide, and keep the User's Guide in this CASIO Product. All the illustrations in a safe place for information about how the EX-S2 and EX-M2 differ from each other. E EX-M2 See the text that accompanies the illustrations for future reference.
Digital Camera EX-S2/EX-M2 User's Guide Thank you for purchasing this manual show the EX-M2. Before using it, be sure to read the precautions contained in this User's Guide, and keep the User's Guide in this CASIO Product. All the illustrations in a safe place for information about how the EX-S2 and EX-M2 differ from each other. E EX-M2 See the text that accompanies the illustrations for future reference.
Owners Manual
Page 2
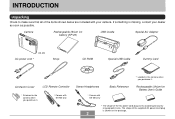
... of the supplied AC power cord plug is missing, contact your camera. If something is shown on the package. 2 Camera Rechargeable lithium ion battery (NP-20) USB Cradle Special AC Adaptor AC power cord * EX-M2 Strap CD-ROM Special USB Cable Dummy Card Connector Cover LCD Remote... Controller * Attached to the camera when you purchase it . INTRODUCTION INTRODUCTION Unpacking Check to make sure that all of the items shown below are included with EX-M2 only Basic Reference * Loaded in the camera when you purchase it . * Comes with EX-M2 only Stereo Headphones * Comes ...
... of the supplied AC power cord plug is missing, contact your camera. If something is shown on the package. 2 Camera Rechargeable lithium ion battery (NP-20) USB Cradle Special AC Adaptor AC power cord * EX-M2 Strap CD-ROM Special USB Cable Dummy Card Connector Cover LCD Remote... Controller * Attached to the camera when you purchase it . INTRODUCTION INTRODUCTION Unpacking Check to make sure that all of the items shown below are included with EX-M2 only Basic Reference * Loaded in the camera when you purchase it . * Comes with EX-M2 only Stereo Headphones * Comes ...
Owners Manual
Page 3
... Clock Settings ... 15 To record an image 15 To view a recorded image 16 To delete an image 16 17 GETTING READY General Guide 17 Camera 17 USB Cradle 18 Using the Controller 19 Monitor Screen Contents 20 Indicator Lamps 22 Attaching the Strap 22 Power Requirements 23 To load the... battery 23 To charge the battery 24 Power Supply Precautions 28 Turning the Camera On and Off 29 Auto Power Off (APO) 29 Using the On-screen Menus 30 Configuring Display Language and Clock Settings ... 32 34 BASIC ...
... Clock Settings ... 15 To record an image 15 To view a recorded image 16 To delete an image 16 17 GETTING READY General Guide 17 Camera 17 USB Cradle 18 Using the Controller 19 Monitor Screen Contents 20 Indicator Lamps 22 Attaching the Strap 22 Power Requirements 23 To load the... battery 23 To charge the battery 24 Power Supply Precautions 28 Turning the Camera On and Off 29 Auto Power Off (APO) 29 Using the On-screen Menus 30 Configuring Display Language and Clock Settings ... 32 34 BASIC ...
Owners Manual
Page 4
...White Balance Manually 44 Using the Best Shot Mode 45 Using the Movie Mode 46 Recording Audio (EX-M2 Only 48 Adding Audio to a Snapshot 48 Recording Your Voice 49 REC Mode Camera Settings 51 Turning the Monitor Screen On and Off 51 Turning Image Review On and Off 51 Assigning... Functions to the Controller 52 Specifying Power On Default Settings 53 54 PLAYBACK Basic Playback Operation 54 Playing an Audio Snapshot (EX-M2 Only) 55 Zooming the...
...White Balance Manually 44 Using the Best Shot Mode 45 Using the Movie Mode 46 Recording Audio (EX-M2 Only 48 Adding Audio to a Snapshot 48 Recording Your Voice 49 REC Mode Camera Settings 51 Turning the Monitor Screen On and Off 51 Turning Image Review On and Off 51 Assigning... Functions to the Controller 52 Specifying Power On Default Settings 53 54 PLAYBACK Basic Playback Operation 54 Playing an Audio Snapshot (EX-M2 Only) 55 Zooming the...
Owners Manual
Page 5
... 74 Formatting Built-in Memory 75 5 76 USING A MEMORY CARD Using a Memory Card 77 To insert a memory card into the camera 77 To remove a memory card from the camera 77 Formatting a Memory Card 78 Memory Card Precautions 79 Copying Files 79 To copy all the files in built-in memory to... a memory card 79 To copy a file from a memory card to built-in memory 80 81 USING THE CAMERA WITH A COMPUTER Installing the Software from the CD-ROM 81 About the bundled CD-ROM 81 Computer System Requirements 82 Installing Software from the CD...
... 74 Formatting Built-in Memory 75 5 76 USING A MEMORY CARD Using a Memory Card 77 To insert a memory card into the camera 77 To remove a memory card from the camera 77 Formatting a Memory Card 78 Memory Card Precautions 79 Copying Files 79 To copy all the files in built-in memory to... a memory card 79 To copy a file from a memory card to built-in memory 80 81 USING THE CAMERA WITH A COMPUTER Installing the Software from the CD-ROM 81 About the bundled CD-ROM 81 Computer System Requirements 82 Installing Software from the CD...
Owners Manual
Page 6
... Built-in Memory and Memory Card Precautions 95 96 PLAYING AN AUDIO FILE (EX-M2 Only) Transferring Audio Files to the Camera 96 Preparing the Camera for Audio Player Operation ... 97 Using the Camera as an Audio Player 98 General Guide 98 Basic Remote Controller Operations 100 Specifying ...Remote Control Error Messages 105 Audio Playback Precautions 105 106 APPENDIX Menu Reference 106 Indicator Lamp Reference 107 Camera Indicator Lamps 107 USB Cradle Indicator Lamps 109 Troubleshooting Guide 110 Display Messages 113 Specifications 114 Main Specifications 114 6
... Built-in Memory and Memory Card Precautions 95 96 PLAYING AN AUDIO FILE (EX-M2 Only) Transferring Audio Files to the Camera 96 Preparing the Camera for Audio Player Operation ... 97 Using the Camera as an Audio Player 98 General Guide 98 Basic Remote Controller Operations 100 Specifying ...Remote Control Error Messages 105 Audio Playback Precautions 105 106 APPENDIX Menu Reference 106 Indicator Lamp Reference 107 Camera Indicator Lamps 107 USB Cradle Indicator Lamps 109 Troubleshooting Guide 110 Display Messages 113 Specifications 114 Main Specifications 114 6
Owners Manual
Page 8
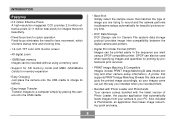
... need for lens movement, which shortens startup time and shooting time. • 1.6-inch TFT color LCD monitor screen • 4X digital zoom • 12MB flash memory Images can be used when specifying images and quantities for printing by professional print services. •...are trying to record and the camera performs troublesome setups automatically for beautiful pictures every time. • DCF Data Storage DCF (Design rule for Camera File system) data storage protocol provides image inter-compatibility between the digital camera and printers. • Digital Print Order Format (DPOF) ...
... need for lens movement, which shortens startup time and shooting time. • 1.6-inch TFT color LCD monitor screen • 4X digital zoom • 12MB flash memory Images can be used when specifying images and quantities for printing by professional print services. •...are trying to record and the camera performs troublesome setups automatically for beautiful pictures every time. • DCF Data Storage DCF (Design rule for Camera File system) data storage protocol provides image inter-compatibility between the digital camera and printers. • Digital Print Order Format (DPOF) ...
Owners Manual
Page 9
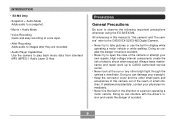
... service center. • Never look at the sun or any other small parts and accessories of this camera" and "the camera" refer to the CASIO EX-S2/EX-M2 Digital Camera. • Never try to open the case of the camera or attempt your physician immediately. • Never fire the flash in display while operating a motor vehicle or while...
... service center. • Never look at the sun or any other small parts and accessories of this camera" and "the camera" refer to the CASIO EX-S2/EX-M2 Digital Camera. • Never try to open the case of the camera or attempt your physician immediately. • Never fire the flash in display while operating a motor vehicle or while...
Owners Manual
Page 10
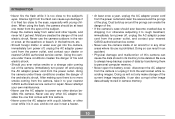
...you ever notice smoke or a strange odor coming from the camera, take it from the power outlet, and contact your nearest CASIO authorized service center for repair. Using the camera under these conditions creates the danger of the camera, immediately turn power off and unplug the AC adaptor power cord... in an accident. • Physical damage and malfunction of fire. • If the camera's case should be deleted. Never attempt your nearest CASIO authorized service center. • Never use the camera inside of the plug. Dust build up around the prongs of an aircraft or in any...
...you ever notice smoke or a strange odor coming from the camera, take it from the power outlet, and contact your nearest CASIO authorized service center for repair. Using the camera under these conditions creates the danger of the camera, immediately turn power off and unplug the AC adaptor power cord... in an accident. • Physical damage and malfunction of fire. • If the camera's case should be deleted. Never attempt your nearest CASIO authorized service center. • Never use the camera inside of the plug. Dust build up around the prongs of an aircraft or in any...
Owners Manual
Page 11
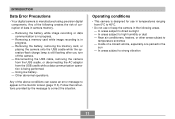
...Removing a memory card while image recording is designed for use in camera memory. - Using low battery. - In areas subject to temperature extremes - Removing the battery while image recording or data communication is manufactured using precision digital components. Near air conditioners, heaters, or other areas subject to strong... vibration 11 INTRODUCTION Data Error Precautions • Your digital camera is in progress. - In areas subject to direct sunlight - In areas subject to high humidity or dust - Any of ...
...Removing a memory card while image recording is designed for use in camera memory. - Using low battery. - In areas subject to temperature extremes - Removing the battery while image recording or data communication is manufactured using precision digital components. Near air conditioners, heaters, or other areas subject to strong... vibration 11 INTRODUCTION Data Error Precautions • Your digital camera is in progress. - In areas subject to direct sunlight - In areas subject to high humidity or dust - Any of ...
Owners Manual
Page 12
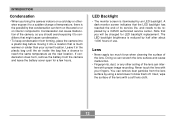
...any other soiling of the lens. INTRODUCTION Condensation • When you bring the camera indoors on a cold day or otherwise expose it in the plastic bag until ...fingers. Next, wipe the surface of the camera, so you should avoid exposing it to conditions that might cause condensation. •...; To keep condensation from forming, place the camera into a plastic bag before moving it into a location that... exterior or on interior components. Condensation can remove dust particles from the camera and leave the battery cover open for LED backlight replacement. You can ...
...any other soiling of the lens. INTRODUCTION Condensation • When you bring the camera indoors on a cold day or otherwise expose it in the plastic bag until ...fingers. Next, wipe the surface of the camera, so you should avoid exposing it to conditions that might cause condensation. •...; To keep condensation from forming, place the camera into a plastic bag before moving it into a location that... exterior or on interior components. Condensation can remove dust particles from the camera and leave the battery cover open for LED backlight replacement. You can ...
Owners Manual
Page 13
This does not indicate malfunction. 13 INTRODUCTION Other • The camera may become slightly warm during use.
This does not indicate malfunction. 13 INTRODUCTION Other • The camera may become slightly warm during use.
Owners Manual
Page 14
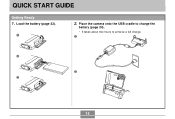
QUICK START GUIDE QUICK START GUIDE Getting Ready 1. Place the camera onto the USB cradle to charge the battery (page 24). • It takes about two hours to achieve a full charge. 1 2 2 3 14 Load the battery (page 23). 1 2.
QUICK START GUIDE QUICK START GUIDE Getting Ready 1. Place the camera onto the USB cradle to charge the battery (page 24). • It takes about two hours to achieve a full charge. 1 2 2 3 14 Load the battery (page 23). 1 2.
Owners Manual
Page 15
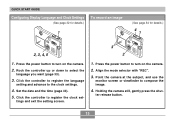
... the language setting and advance to register the clock set- Click the controller to the clock settings. 4. Align the mode selector with "REC". 3. Holding the camera still, gently press the shut- Set the date and the time (page 33). 5. Press the power button to turn on the... camera. 2. Point the camera at the subject, and use the monitor screen or viewfinder to select the language you want (page 33). 3. QUICK START GUIDE Configuring Display Language and ...
... the language setting and advance to register the clock set- Click the controller to the clock settings. 4. Align the mode selector with "REC". 3. Holding the camera still, gently press the shut- Set the date and the time (page 33). 5. Press the power button to turn on the... camera. 2. Point the camera at the subject, and use the monitor screen or viewfinder to select the language you want (page 33). 3. QUICK START GUIDE Configuring Display Language and ...
Owners Manual
Page 16
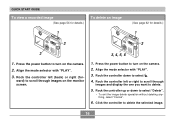
... through images on the monitor screen. 3, 4, 5, 6 1. Rock the controller left (back) or right (for details.) 1 3 1. Rock the controller up or down to turn on the camera. 2. QUICK START GUIDE To view a recorded image (See page 54 for details.) To delete an image 1 (See page 62 for - Press the power button to... with "PLAY". 3. Click the controller to scroll through images and display the one you want to delete. 5. Rock the controller down to turn on the camera. 2. ward) to delete the selected image. 16
... through images on the monitor screen. 3, 4, 5, 6 1. Rock the controller left (back) or right (for details.) 1 3 1. Rock the controller up or down to turn on the camera. 2. QUICK START GUIDE To view a recorded image (See page 54 for details.) To delete an image 1 (See page 62 for - Press the power button to... with "PLAY". 3. Click the controller to scroll through images and display the one you want to delete. 5. Rock the controller down to turn on the camera. 2. ward) to delete the selected image. 16
Owners Manual
Page 17
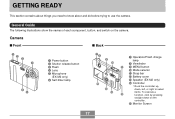
... to know about and do before trying to select items. To execute a B function, click by pressing straight down on the camera. Camera s Front s Back 12 3 4 6 5 1 Power button 2 Shutter release button 3 Flash 4 Lens 5 Microphone (EX-M2 only) 6 Self-timer lamp 78 9 0 E D C 7 Operation/Flash charge lamp 8 Viewfinder A 9 MENU button 0 Mode selector A Strap bar B Battery cover C Speaker...
... to know about and do before trying to select items. To execute a B function, click by pressing straight down on the camera. Camera s Front s Back 12 3 4 6 5 1 Power button 2 Shutter release button 3 Flash 4 Lens 5 Microphone (EX-M2 only) 6 Self-timer lamp 78 9 0 E D C 7 Operation/Flash charge lamp 8 Viewfinder A 9 MENU button 0 Mode selector A Strap bar B Battery cover C Speaker...
Owners Manual
Page 18
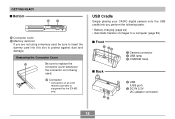
... the Connector Cover H Be sure to protect against dust and damage. USB Cradle Simply placing your CASIO digital camera onto the USB cradle lets you are not using a memory card, be sure to insert the dummy card into this slot to replace the connector cover whenever the connector is supported by the EX-M2 only.
... the Connector Cover H Be sure to protect against dust and damage. USB Cradle Simply placing your CASIO digital camera onto the USB cradle lets you are not using a memory card, be sure to insert the dummy card into this slot to replace the connector cover whenever the connector is supported by the EX-M2 only.
Owners Manual
Page 19
... items and to execute functions. Using the Controller The controller is on page 98 for information about the LCD remote controller that comes with the EX-M2. Rock Click • While a menu is used in this manual to describe controller operations. Term Rock Click Meaning Use your thumb to press straight down... , left, or right. GETTING READY NOTE • See "Using the Camera as an Audio Player" on the display, rock the controller to select a tab or menu item.
... items and to execute functions. Using the Controller The controller is on page 98 for information about the LCD remote controller that comes with the EX-M2. Rock Click • While a menu is used in this manual to describe controller operations. Term Rock Click Meaning Use your thumb to press straight down... , left, or right. GETTING READY NOTE • See "Using the Camera as an Audio Player" on the display, rock the controller to select a tab or menu item.
Owners Manual
Page 20
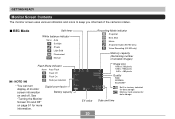
... On NOTE Red-eye reduction • You can turn display of monitor screen information on page 51 for data storage. Digital zoom factor Battery capacity EV value Recording Mode indicator Snapshot Best Shot Movie Snapshot Audio (EX-M2 only) Voice Recording (EX-M2 only) Memory capacity (Remaining number of the camera's status. Date and time 20
... On NOTE Red-eye reduction • You can turn display of monitor screen information on page 51 for data storage. Digital zoom factor Battery capacity EV value Recording Mode indicator Snapshot Best Shot Movie Snapshot Audio (EX-M2 only) Voice Recording (EX-M2 only) Memory capacity (Remaining number of the camera's status. Date and time 20
Owners Manual
Page 21
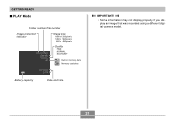
GETTING READY s PLAY Mode Folder number/File number Image protection indicator Image size 1600 x1200 pixels 1280 x 960 pixels 640 x 480 pixels Quality FINE NORMAL ECONOMY Built-in memory data Memory card data Battery capacity Date and time IMPORTANT! • Some information may not display properly if you display an image that was recorded using a different digital camera model. 21
GETTING READY s PLAY Mode Folder number/File number Image protection indicator Image size 1600 x1200 pixels 1280 x 960 pixels 640 x 480 pixels Quality FINE NORMAL ECONOMY Built-in memory data Memory card data Battery capacity Date and time IMPORTANT! • Some information may not display properly if you display an image that was recorded using a different digital camera model. 21


