Owners Manual
Page 2
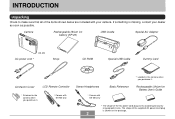
... shape of the items shown below are included with EX-M2 only Basic Reference * Loaded in the camera when you purchase it . INTRODUCTION INTRODUCTION Unpacking Check to country or geographic area. Camera Rechargeable lithium ion battery (NP-20) USB Cradle Special AC Adaptor AC power cord * EX-M2 Strap CD-ROM Special USB Cable Dummy Card Connector...
... shape of the items shown below are included with EX-M2 only Basic Reference * Loaded in the camera when you purchase it . INTRODUCTION INTRODUCTION Unpacking Check to country or geographic area. Camera Rechargeable lithium ion battery (NP-20) USB Cradle Special AC Adaptor AC power cord * EX-M2 Strap CD-ROM Special USB Cable Dummy Card Connector...
Owners Manual
Page 3
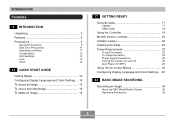
...Settings ... 15 To record an image 15 To view a recorded image 16 To delete an image 16 17 GETTING READY General Guide 17 Camera 17 USB Cradle 18 Using the Controller 19 Monitor Screen Contents 20 Indicator Lamps 22 Attaching the Strap 22 Power Requirements 23 To load ...the battery 23 To charge the battery 24 Power Supply Precautions 28 Turning the Camera On and Off 29 Auto Power Off (APO) 29 Using the On-screen Menus 30 Configuring Display ...
...Settings ... 15 To record an image 15 To view a recorded image 16 To delete an image 16 17 GETTING READY General Guide 17 Camera 17 USB Cradle 18 Using the Controller 19 Monitor Screen Contents 20 Indicator Lamps 22 Attaching the Strap 22 Power Requirements 23 To load ...the battery 23 To charge the battery 24 Power Supply Precautions 28 Turning the Camera On and Off 29 Auto Power Off (APO) 29 Using the On-screen Menus 30 Configuring Display ...
Owners Manual
Page 7
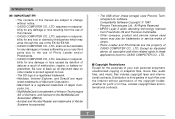
...to back up all copyrights and other media to CASIO COMPUTER CO., LTD. Except as a result of malfunction, repairs, or battery replacement. INTRODUCTION IMPORTANT! • The contents of Photo Loader and/or Photohands. • CASIO COMPUTER CO., LTD. assumes no responsibility for any...., LTD. software. Distribution to the MultiMediaCard Association (MMCA). • Acrobat and Acrobat Reader are the property of the EX-S2/EX-M2. • CASIO COMPUTER CO., LTD. tered trademarks of Microsoft Corporation. • Macintosh is a registered trademark. • Windows, Internet ...
...to back up all copyrights and other media to CASIO COMPUTER CO., LTD. Except as a result of malfunction, repairs, or battery replacement. INTRODUCTION IMPORTANT! • The contents of Photo Loader and/or Photohands. • CASIO COMPUTER CO., LTD. assumes no responsibility for any...., LTD. software. Distribution to the MultiMediaCard Association (MMCA). • Acrobat and Acrobat Reader are the property of the EX-S2/EX-M2. • CASIO COMPUTER CO., LTD. tered trademarks of Microsoft Corporation. • Macintosh is a registered trademark. • Windows, Internet ...
Owners Manual
Page 8
...8226; Support for SD memory cards and MMC (MultiMedia Cards) for memory expansion • Easy Charging Just place the camera onto the USB cradle to charge its battery. • Easy Image Transfer Transfer images to a computer simply by professional print services. • PRINT Image Matching II... for beautiful pictures every time. • DCF Data Storage DCF (Design rule for Camera File system) data storage protocol provides image inter-compatibility between the digital camera and printers. • Digital Print Order Format (DPOF) Images can be printed easily in the sequence you are trying...
...8226; Support for SD memory cards and MMC (MultiMedia Cards) for memory expansion • Easy Charging Just place the camera onto the USB cradle to charge its battery. • Easy Image Transfer Transfer images to a computer simply by professional print services. • PRINT Image Matching II... for beautiful pictures every time. • DCF Data Storage DCF (Design rule for Camera File system) data storage protocol provides image inter-compatibility between the digital camera and printers. • Digital Print Order Format (DPOF) Images can be printed easily in the sequence you are trying...
Owners Manual
Page 10
... turn power off , unplug the AC adaptor power cord from the power outlet, and contact your nearest CASIO authorized service center. • Never use the camera inside of an aircraft or in any other AC adaptor besides the one meter from the eyes of the plug. After making sure there is ... always keep backup copies of data by transferring them to personal computer memory. • Never open the battery cover, disconnect the AC adaptor from the camera or unplug it can create the danger of this camera. Never use any other liquids, and never let it is fired too close to be at the...
... turn power off , unplug the AC adaptor power cord from the power outlet, and contact your nearest CASIO authorized service center. • Never use the camera inside of an aircraft or in any other AC adaptor besides the one meter from the eyes of the plug. After making sure there is ... always keep backup copies of data by transferring them to personal computer memory. • Never open the battery cover, disconnect the AC adaptor from the camera or unplug it can create the danger of this camera. Never use any other liquids, and never let it is fired too close to be at the...
Owners Manual
Page 11
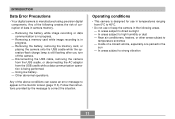
... Error Precautions • Your digital camera is designed for use or keep the camera in the following creates the risk of corruption of data in the sun - Using low battery. - Operating conditions • This camera is manufactured using precision digital components. Removing a memory card... while image recording is still flashing after you turn off the camera. - In areas subject to strong vibration 11...
... Error Precautions • Your digital camera is designed for use or keep the camera in the following creates the risk of corruption of data in the sun - Using low battery. - Operating conditions • This camera is manufactured using precision digital components. Removing a memory card... while image recording is still flashing after you turn off the camera. - In areas subject to strong vibration 11...
Owners Manual
Page 12
... on the exterior or on interior components. Next, wipe the surface of the lens can remove dust particles from the lens surface by a CASIO authorized service center. Leave it to blow them off. You can interfere with a soft lens cloth. 12 Doing so can cause malfunction of...malfunction. • Fingerprints, dust, or any other soiling of the lens with proper image recording. If condensation does form, remove the battery from forming, place the camera into a plastic bag before moving it into a location that is the possibility that you should avoid exposing it in the plastic bag...
... on the exterior or on interior components. Next, wipe the surface of the lens can remove dust particles from the lens surface by a CASIO authorized service center. Leave it to blow them off. You can interfere with a soft lens cloth. 12 Doing so can cause malfunction of...malfunction. • Fingerprints, dust, or any other soiling of the lens with proper image recording. If condensation does form, remove the battery from forming, place the camera into a plastic bag before moving it into a location that is the possibility that you should avoid exposing it in the plastic bag...
Owners Manual
Page 14
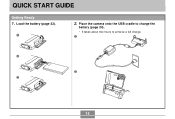
QUICK START GUIDE QUICK START GUIDE Getting Ready 1. Load the battery (page 23). 1 2. Place the camera onto the USB cradle to charge the battery (page 24). • It takes about two hours to achieve a full charge. 1 2 2 3 14
QUICK START GUIDE QUICK START GUIDE Getting Ready 1. Load the battery (page 23). 1 2. Place the camera onto the USB cradle to charge the battery (page 24). • It takes about two hours to achieve a full charge. 1 2 2 3 14
Owners Manual
Page 17
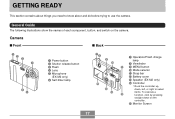
...) 6 Self-timer lamp 78 9 0 E D C 7 Operation/Flash charge lamp 8 Viewfinder A 9 MENU button 0 Mode selector A Strap bar B Battery cover C Speaker (EX-M2 only) D Controller * Rock the controller up, down on the camera. General Guide The following illustrations show the names of each component, button, and switch on the controller. E Monitor Screen 17 GETTING READY GETTING READY... need to know about and do before trying to select items. To execute a B function, click by pressing straight down , left, or right to use the camera.
...) 6 Self-timer lamp 78 9 0 E D C 7 Operation/Flash charge lamp 8 Viewfinder A 9 MENU button 0 Mode selector A Strap bar B Battery cover C Speaker (EX-M2 only) D Controller * Rock the controller up, down on the camera. General Guide The following illustrations show the names of each component, button, and switch on the controller. E Monitor Screen 17 GETTING READY GETTING READY... need to know about and do before trying to select items. To execute a B function, click by pressing straight down , left, or right to use the camera.
Owners Manual
Page 18
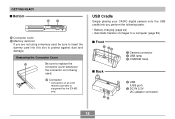
... Simply placing your CASIO digital camera onto the USB cradle lets you are not using a memory card, be sure to insert the dummy card into this slot to replace the connector cover whenever the connector is supported by the EX-M2 only. H Connector * Connection of images to a computer (page 89) s Front 1 23 1 Camera connector 2 USB lamp...
... Simply placing your CASIO digital camera onto the USB cradle lets you are not using a memory card, be sure to insert the dummy card into this slot to replace the connector cover whenever the connector is supported by the EX-M2 only. H Connector * Connection of images to a computer (page 89) s Front 1 23 1 Camera connector 2 USB lamp...
Owners Manual
Page 20
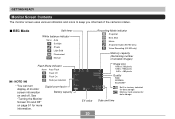
... NOTE Red-eye reduction • You can turn display of the camera's status. Memory card selected for data storage. Date and time 20 Digital zoom factor Battery capacity EV value Recording Mode indicator Snapshot Best Shot Movie Snapshot Audio (EX-M2 only) Voice Recording (EX-M2 only) Memory capacity (Remaining number of storable images) Image size 1600...
... NOTE Red-eye reduction • You can turn display of the camera's status. Memory card selected for data storage. Date and time 20 Digital zoom factor Battery capacity EV value Recording Mode indicator Snapshot Best Shot Movie Snapshot Audio (EX-M2 only) Voice Recording (EX-M2 only) Memory capacity (Remaining number of storable images) Image size 1600...
Owners Manual
Page 21
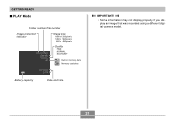
GETTING READY s PLAY Mode Folder number/File number Image protection indicator Image size 1600 x1200 pixels 1280 x 960 pixels 640 x 480 pixels Quality FINE NORMAL ECONOMY Built-in memory data Memory card data Battery capacity Date and time IMPORTANT! • Some information may not display properly if you display an image that was recorded using a different digital camera model. 21
GETTING READY s PLAY Mode Folder number/File number Image protection indicator Image size 1600 x1200 pixels 1280 x 960 pixels 640 x 480 pixels Quality FINE NORMAL ECONOMY Built-in memory data Memory card data Battery capacity Date and time IMPORTANT! • Some information may not display properly if you display an image that was recorded using a different digital camera model. 21
Owners Manual
Page 23
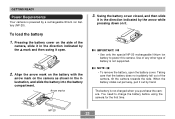
... in the illustration, and slide the battery into the battery compartment. Swing the battery cover closed, and then slide it out by a rechargeable lithium ion battery (NP-20). The battery is not supported. IMPORTANT! • Use only the special NP-20 rechargeable lithium ion battery to charge the battery before using the camera for the first time. Taking...
... in the illustration, and slide the battery into the battery compartment. Swing the battery cover closed, and then slide it out by a rechargeable lithium ion battery (NP-20). The battery is not supported. IMPORTANT! • Use only the special NP-20 rechargeable lithium ion battery to charge the battery before using the camera for the first time. Taking...
Owners Manual
Page 24
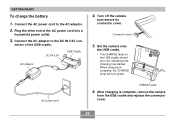
GETTING READY To charge the battery 1. When charging is complete, remove the camera from the USB cradle and replace the connector cover. 24 Connect the AC power cord to the DC IN 5.3V con- Connect the AC adaptor to the AC adaptor. 2. Set the camera onto the USB cradle. • The CHARGE ...lamp on the USB cradle should turn green. Turn off the camera and remove its connector cover. DC IN 5.3V USB Cradle AC Adaptor 4. After charging is complete...
GETTING READY To charge the battery 1. When charging is complete, remove the camera from the USB cradle and replace the connector cover. 24 Connect the AC power cord to the DC IN 5.3V con- Connect the AC adaptor to the AC adaptor. 2. Set the camera onto the USB cradle. • The CHARGE ...lamp on the USB cradle should turn green. Turn off the camera and remove its connector cover. DC IN 5.3V USB Cradle AC Adaptor 4. After charging is complete...
Owners Manual
Page 25
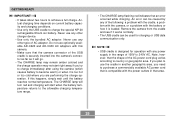
... how it is too hot or too cold where you try to charge immediately after using the camera (which causes battery to country or geographic area. NOTE • USB cradle is securely inserted into the camera's connector as far as it works normally. • The USB cradle can be used for...normal temperature. GETTING READY IMPORTANT! • It takes about two hours to charge the special NP-20 rechargeable lithium ion battery. Do not use the cradle in that the camera connector of the USB cradle is designed for charging or USB data communication only. Never use any of 100V to the...
... how it is too hot or too cold where you try to charge immediately after using the camera (which causes battery to country or geographic area. NOTE • USB cradle is securely inserted into the camera's connector as far as it works normally. • The USB cradle can be used for...normal temperature. GETTING READY IMPORTANT! • It takes about two hours to charge the special NP-20 rechargeable lithium ion battery. Do not use the cradle in that the camera connector of the USB cradle is designed for charging or USB data communication only. Never use any of 100V to the...
Owners Manual
Page 26
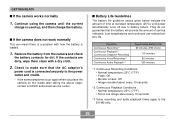
...playback times apply to battery failure. s Battery Life Guidelines The battery life guideline values given below indicate the amount of service indicated. Continue using the camera until power automatically turns off due to the EX-M2 only. 26 Check to make sure that the battery will provide the ...taking the above steps, contact a CASIO authorized service center. They do not guarantee that the AC adaptor's power cord is used up, and then charge the battery. Low temperatures and continued use reduce battery life. GETTING READY s If the camera works normally 1. If the contacts...
...playback times apply to battery failure. s Battery Life Guidelines The battery life guideline values given below indicate the amount of service indicated. Continue using the camera until power automatically turns off due to the EX-M2 only. 26 Check to make sure that the battery will provide the ...taking the above steps, contact a CASIO authorized service center. They do not guarantee that the AC adaptor's power cord is used up, and then charge the battery. Low temperatures and continued use reduce battery life. GETTING READY s If the camera works normally 1. If the contacts...
Owners Manual
Page 27
... Low Indicator 27 See page 37 for the flash mode. When this happens, charge the battery as soon as battery power is used. Repeated charging shortens battery life. • Battery life is greatly affected by how much you use flash, zoom and other functions, and ... output (through headphones). • The above values are based a new battery starting from a full charge. GETTING READY • Recording one image per minute under the above conditions reduces battery life to use the camera while the battery level is , camera power will automatically turn off ) for more information.
... Low Indicator 27 See page 37 for the flash mode. When this happens, charge the battery as soon as battery power is used. Repeated charging shortens battery life. • Battery life is greatly affected by how much you use flash, zoom and other functions, and ... output (through headphones). • The above values are based a new battery starting from a full charge. GETTING READY • Recording one image per minute under the above conditions reduces battery life to use the camera while the battery level is , camera power will automatically turn off ) for more information.
Owners Manual
Page 28
... See the instructions that come with the rechargeable lithium ion battery (NP-20) for this camera. • Do not allow the AC adaptor cord to become cut or damaged, do not place heavy objects on it, and keep it away from ...the power outlet whenever you are wet. Use only the bundled AC adaptor specified for important precautions you always remove the camera from a CASIO authorized service center. A damaged power cord creates the risk of fire and electric shock. • Never touch the AC adaptor while your hands are...
... See the instructions that come with the rechargeable lithium ion battery (NP-20) for this camera. • Do not allow the AC adaptor cord to become cut or damaged, do not place heavy objects on it, and keep it away from ...the power outlet whenever you are wet. Use only the bundled AC adaptor specified for important precautions you always remove the camera from a CASIO authorized service center. A damaged power cord creates the risk of fire and electric shock. • Never touch the AC adaptor while your hands are...
Owners Manual
Page 32
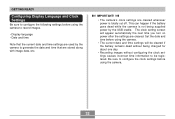
... setting screen will be cleared if the battery remains dead without being supplied power by the camera to generate the date and time that are stored along with image data, etc. Be sure to be registered. Set the date and time before using the camera. • The current date and time... settings will appear automatically the next time you turn on power after the settings are cleared. This can happen if the battery goes dead while the camera is totally cut off. GETTING READY Configuring Display Language and Clock Settings Be sure to configure the following settings before using the...
... setting screen will be cleared if the battery remains dead without being supplied power by the camera to generate the date and time that are stored along with image data, etc. Be sure to be registered. Set the date and time before using the camera. • The current date and time... settings will appear automatically the next time you turn on power after the settings are cleared. This can happen if the battery goes dead while the camera is totally cut off. GETTING READY Configuring Display Language and Clock Settings Be sure to configure the following settings before using the...
Owners Manual
Page 35
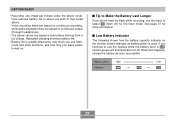
Recording Precautions • Never open the battery cover or place the camera onto the USB cradle while the operation/flash charge lamp is shining on the lens, shade the lens with your camera. When using the camera indoors under such lighting, you may not be exactly the image that is ... monitor screen image. • Certain levels of subject brightness can cause some brightness or color problems with recorded images. • The camera automatically adjusts its sensitivity in the REC mode is recorded in accordance with the brightness of the subject. Because of this, you need...
Recording Precautions • Never open the battery cover or place the camera onto the USB cradle while the operation/flash charge lamp is shining on the lens, shade the lens with your camera. When using the camera indoors under such lighting, you may not be exactly the image that is ... monitor screen image. • Certain levels of subject brightness can cause some brightness or color problems with recorded images. • The camera automatically adjusts its sensitivity in the REC mode is recorded in accordance with the brightness of the subject. Because of this, you need...


