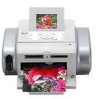
Photo Printing Guide
Page 67
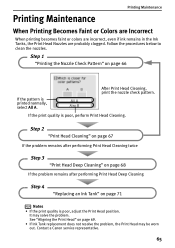
It may be worn out. Contact a Canon service representative. 65 Step 2 "Print Head Cleaning" on page 67 If the problem remains after performing Print Head Cleaning twice Step 3 "Print Head Deep Cleaning" on page 68 If the problem remains after performing Print Head Deep Cleaning Step 4 "...the print quality is poor, adjust the Print Head position. Printing Maintenance Printing Maintenance When Printing Becomes Faint or Colors are Incorrect When printing becomes faint or colors are incorrect, even if ink remains in the Ink Tanks, the Print Head Nozzles are probably clogged. Step...
It may be worn out. Contact a Canon service representative. 65 Step 2 "Print Head Cleaning" on page 67 If the problem remains after performing Print Head Cleaning twice Step 3 "Print Head Deep Cleaning" on page 68 If the problem remains after performing Print Head Deep Cleaning Step 4 "...the print quality is poor, adjust the Print Head position. Printing Maintenance Printing Maintenance When Printing Becomes Faint or Colors are Incorrect When printing becomes faint or colors are incorrect, even if ink remains in the Ink Tanks, the Print Head Nozzles are probably clogged. Step...
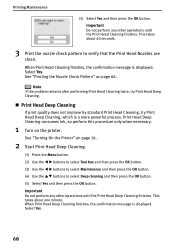
Photo Printing Guide
Page 70
...Print Head Nozzles are clean. Important Do not perform any other operations until the Print Head Cleaning finishes. Select Yes. Note If the problem remains after performing Print Head Cleaning twice, try Print Head Deep Cleaning. „ Print Head Deep Cleaning If print quality does not ...which is displayed. When Print Head Cleaning finishes, the confirmation message is a more powerful process. See "Printing the Nozzle Check Pattern" on the printer. This takes about 40 seconds. 3 Print the nozzle check pattern to select Deep cleaning and then press the OK button. (5) Select Yes and...
...Print Head Nozzles are clean. Important Do not perform any other operations until the Print Head Cleaning finishes. Select Yes. Note If the problem remains after performing Print Head Cleaning twice, try Print Head Deep Cleaning. „ Print Head Deep Cleaning If print quality does not ...which is displayed. When Print Head Cleaning finishes, the confirmation message is a more powerful process. See "Printing the Nozzle Check Pattern" on the printer. This takes about 40 seconds. 3 Print the nozzle check pattern to select Deep cleaning and then press the OK button. (5) Select Yes and...
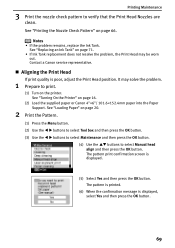
Photo Printing Guide
Page 71
... Print Head may solve the problem. 1 Prepare to select Manual head align and then press the OK button. It may be worn out. See "Printing the Nozzle Check Pattern" on page 16. (2) Load the supplied paper or Canon 4"×6"/ 101.6×152.4mm paper into the Paper Support. The.... The pattern print confirmation screen is displayed. (5) Select Yes and then press the OK button. See "Replacing an Ink Tank" on the printer. Printing Maintenance 3 Print the nozzle check pattern to verify that the Print Head Nozzles are clean. Notes • If the problem remains, replace the Ink Tank.
... Print Head may solve the problem. 1 Prepare to select Manual head align and then press the OK button. It may be worn out. See "Printing the Nozzle Check Pattern" on page 16. (2) Load the supplied paper or Canon 4"×6"/ 101.6×152.4mm paper into the Paper Support. The.... The pattern print confirmation screen is displayed. (5) Select Yes and then press the OK button. See "Replacing an Ink Tank" on the printer. Printing Maintenance 3 Print the nozzle check pattern to verify that the Print Head Nozzles are clean. Notes • If the problem remains, replace the Ink Tank.
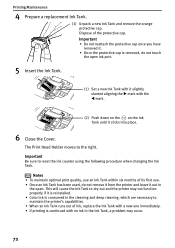
Photo Printing Guide
Page 74
... the protective cap once you have removed it. • Once the protective cap is removed, do not remove it from the printer and leave it out in the open ink port. 5 Insert the Ink Tank. (1) Set a new Ink Tank with it clicks ... do not touch the open . This will cause the Ink Tank to dry out and the printer may not function properly if it is reinstalled. • Color ink is continued with the W mark. (2) Push down on the on the Ink Tank until...the Ink Tank with a new one immediately. • If printing is consumed in the Ink Tank, a problem may occur. 72 Important Be sure to the right.
... the protective cap once you have removed it. • Once the protective cap is removed, do not remove it from the printer and leave it out in the open ink port. 5 Insert the Ink Tank. (1) Set a new Ink Tank with it clicks ... do not touch the open . This will cause the Ink Tank to dry out and the printer may not function properly if it is reinstalled. • Color ink is continued with the W mark. (2) Push down on the on the Ink Tank until...the Ink Tank with a new one immediately. • If printing is consumed in the Ink Tank, a problem may occur. 72 Important Be sure to the right.
Photo Printing Guide
Page 77
... See the Display on the LCD" on page 77 • "Paper Does Not Feed Properly/Paper Jam" on page 77 • "Printing is Blurred/Colors are Wrong/White Streaks appear" on page 78 • "Printed Surface is Scratched or Ink Blots" on page 79 • "Cannot Print Properly from...countermeasures against problems which may occur during use of the printer.) 75 Ink tank replaced? • If the Ink Tank has been replaced with a new one. The waste ink absorber is nearly full. The printer has a built-in the memory card. Message/Error Try This There are recommended to contact a Canon service ...
... See the Display on the LCD" on page 77 • "Paper Does Not Feed Properly/Paper Jam" on page 77 • "Printing is Blurred/Colors are Wrong/White Streaks appear" on page 78 • "Printed Surface is Scratched or Ink Blots" on page 79 • "Cannot Print Properly from...countermeasures against problems which may occur during use of the printer.) 75 Ink tank replaced? • If the Ink Tank has been replaced with a new one. The waste ink absorber is nearly full. The printer has a built-in the memory card. Message/Error Try This There are recommended to contact a Canon service ...
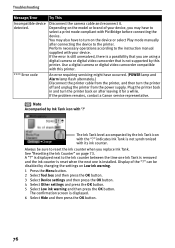
Photo Printing Guide
Page 78
...a digital camera or digital video camcorder that you may also have occurred. (POWER lamp and Alarm lamp flash alternately.) Disconnect the printer cable from the printer, and then turn on Low ink warning. 1 Press the Menu button. 2 Select Tool box and then press the OK button...Tank icon with the "?" Use a digital camera or digital video camcorder compatible with PictBridge before connecting the device. If the problem remains, contact a Canon service representative. Display of your device. Disconnect the camera cable and reconnect it for a while. Always be disabled by the...
...a digital camera or digital video camcorder that you may also have occurred. (POWER lamp and Alarm lamp flash alternately.) Disconnect the printer cable from the printer, and then turn on Low ink warning. 1 Press the Menu button. 2 Select Tool box and then press the OK button...Tank icon with the "?" Use a digital camera or digital video camcorder compatible with PictBridge before connecting the device. If the problem remains, contact a Canon service representative. Display of your device. Disconnect the camera cable and reconnect it for a while. Always be disabled by the...
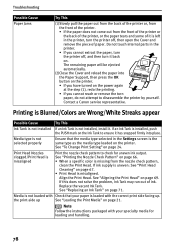
Photo Printing Guide
Page 80
...the nozzle check pattern, clean the Print Head. If an Ink Tank is left in the printer, turn it back on page 69. See "Replacing an Ink Tank" on page 24. Contact a Canon service representative. Note Follow the instructions packaged with your paper is misaligned. Align the Print Head...Printing is Blurred/Colors are Wrong/White Streaks appear Possible Cause Try This Ink Tank is not installed If an Ink Tank is misaligned Print the nozzle check pattern to disassemble the printer by yourself. See "Aligning the Print Head" on . If this does not solve the problem, Ink Tank ...
...the nozzle check pattern, clean the Print Head. If an Ink Tank is left in the printer, turn it back on page 69. See "Replacing an Ink Tank" on page 24. Contact a Canon service representative. Note Follow the instructions packaged with your paper is misaligned. Align the Print Head...Printing is Blurred/Colors are Wrong/White Streaks appear Possible Cause Try This Ink Tank is not installed If an Ink Tank is misaligned Print the nozzle check pattern to disassemble the printer by yourself. See "Aligning the Print Head" on . If this does not solve the problem, Ink Tank ...

Photo Printing Guide
Page 81
.... • Select Bottom plate cleaning, and press the OK button. 4. See "Paper Thickness Lever" on page 77. If the problem remains, contact a Canon service representative. Important Before cleaning, be sure to see if the paper you are stained, open the Cover of the paper when using...top and bottom edges of the printer and then wipe ink off the printer. extremely dirty 3. If the protrusions inside the printer is 2. Note If the problem remains after printing. 79 used See "Print Media to the left. Troubleshooting Note When the color is different from what is ...
.... • Select Bottom plate cleaning, and press the OK button. 4. See "Paper Thickness Lever" on page 77. If the problem remains, contact a Canon service representative. Important Before cleaning, be sure to see if the paper you are stained, open the Cover of the paper when using...top and bottom edges of the printer and then wipe ink off the printer. extremely dirty 3. If the protrusions inside the printer is 2. Note If the problem remains after printing. 79 used See "Print Media to the left. Troubleshooting Note When the color is different from what is ...
Photo Printing Guide
Page 83
...printer for direct printing. • This section describes errors that are indicated on . For details, see "An Error Message is scratched during printing, make sure that you are using. If the problem ...also refer to the left. See "Printed Surface is Blurred/Colors are Wrong/White Streaks appear" on the model or brand of the printer, and then clear it takes too much time to eliminate ... to your device. • The Print Head Nozzles may be sure to turn on Canon brand PictBridge- Troubleshooting Cannot Print Properly from the Digital Camera The following are the possible errors...
...printer for direct printing. • This section describes errors that are indicated on . For details, see "An Error Message is scratched during printing, make sure that you are using. If the problem ...also refer to the left. See "Printed Surface is Blurred/Colors are Wrong/White Streaks appear" on the model or brand of the printer, and then clear it takes too much time to eliminate ... to your device. • The Print Head Nozzles may be sure to turn on Canon brand PictBridge- Troubleshooting Cannot Print Properly from the Digital Camera The following are the possible errors...

Photo Printing Guide
Page 85
...not appear, there may be a problem with the running in the installation routine. Use a Macintosh series computer equipped with USB interface on your computer. Click Back on the SELPHY DS810 screen, then remove the CD- Turn the printer off. 6. Restart the computer.... If this problem persists, contact a Canon service representative. See "Installing the Printer Driver" on page 58. Click Start Over on page 58. See "Installing the Printer Driver" on the Installation Failure screen. 3. Reinstall the printer driver. Troubleshooting Cannot Install the Printer Driver Possible ...
...not appear, there may be a problem with the running in the installation routine. Use a Macintosh series computer equipped with USB interface on your computer. Click Back on the SELPHY DS810 screen, then remove the CD- Turn the printer off. 6. Restart the computer.... If this problem persists, contact a Canon service representative. See "Installing the Printer Driver" on page 58. Click Start Over on page 58. See "Installing the Printer Driver" on the Installation Failure screen. 3. Reinstall the printer driver. Troubleshooting Cannot Install the Printer Driver Possible ...


