Service Manual
Page 19
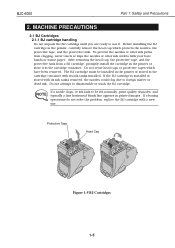
...or other ink outlets with a new one. To prevent the nozzles or other ink paths from a BJ cartridge, promptly install the cartridge in the printer or store it . BJC-6000 Part 1: Safety and Precautions 2. Do not reuse head caps or protective tapes which protects the nozzles, the protective tape, and the protective tank... Do not unpack the BJ cartridge until you are ready to disassemble or wash the BJ cartridge. If cleaning operations do not solve the problem, replace the BJ cartridge with your bare hands or tissue paper. Protective Tape Head Cap Figure 1-5 BJ Cartridges 1-5
...or other ink outlets with a new one. To prevent the nozzles or other ink paths from a BJ cartridge, promptly install the cartridge in the printer or store it . BJC-6000 Part 1: Safety and Precautions 2. Do not reuse head caps or protective tapes which protects the nozzles, the protective tape, and the protective tank... Do not unpack the BJ cartridge until you are ready to disassemble or wash the BJ cartridge. If cleaning operations do not solve the problem, replace the BJ cartridge with your bare hands or tissue paper. Protective Tape Head Cap Figure 1-5 BJ Cartridges 1-5

Service Manual
Page 21
..., suction of ink into the BJ cartridge could fail. BJC-6000 Part 1: Safety and Precautions 2.2 Ink Tanks 2.2.1 Unpacking the ink tank Do not unpack the ink tank until you are ready to use it. When installing it . If cleaning operations do not solve the problem, replace the BJ cartridge with a new one. 1-7 Do...
..., suction of ink into the BJ cartridge could fail. BJC-6000 Part 1: Safety and Precautions 2.2 Ink Tanks 2.2.1 Unpacking the ink tank Do not unpack the ink tank until you are ready to use it. When installing it . If cleaning operations do not solve the problem, replace the BJ cartridge with a new one. 1-7 Do...

Service Manual
Page 55
...the ink tank. If printing quality still does not improve, even with ink. If this does not solve the problem, replace the BJ cartridge. 2) Removing an ink tank Open the printer's front cover to have the carriage move to replace the ink tank Replace the ink tank with ink when ...or clothing stained with a new one if no ink can be individually replaced. 1) When to the cartridge replacement position. BJC-6000 Part 3: Operating Instructions e) Replacing the ink tanks For the Black, Color and Photo BJ cartridges, each ink tank can be seen inside, or as indicated by the ink-out alarm, or...
...the ink tank. If printing quality still does not improve, even with ink. If this does not solve the problem, replace the BJ cartridge. 2) Removing an ink tank Open the printer's front cover to have the carriage move to replace the ink tank Replace the ink tank with ink when ...or clothing stained with a new one if no ink can be individually replaced. 1) When to the cartridge replacement position. BJC-6000 Part 3: Operating Instructions e) Replacing the ink tanks For the Black, Color and Photo BJ cartridges, each ink tank can be seen inside, or as indicated by the ink-out alarm, or...
Service Manual
Page 58
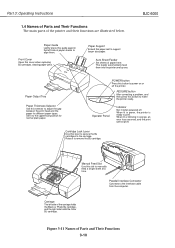
...Feeder Set sheets of the carriage holds the Black or Photo BJ cartridge, and the right side holds the Color BJ cartridge. POWER button Press this button to make the printer ready. When lit in orange, an error has occurred, and the print cannot print. Raise it to adjust...position for different paper types. Parallel Interface Connector Connects to align them into the printer one by one. BJC-6000 Paper Guide Lightly press this paper rest to power on or off . RESUME button After correcting a problem, and then press this button to support larger size paper. Cartridge Lock Lever ...
...Feeder Set sheets of the carriage holds the Black or Photo BJ cartridge, and the right side holds the Color BJ cartridge. POWER button Press this button to make the printer ready. When lit in orange, an error has occurred, and the print cannot print. Raise it to adjust...position for different paper types. Parallel Interface Connector Connects to align them into the printer one by one. BJC-6000 Paper Guide Lightly press this paper rest to power on or off . RESUME button After correcting a problem, and then press this button to support larger size paper. Cartridge Lock Lever ...
Service Manual
Page 64
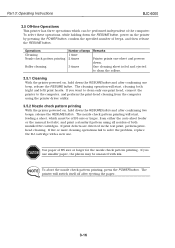
...16 If print defects are detected in the test print, perform printhead cleaning. If five or more cleaning operations fail to solve the problem, replace the BJ cartridge with ink. The cleaning operation will start , feeding a sheet, which can be performed independent of the ...print head, connect the printer to clean the rollers. 3.5.1 Cleaning With the printer powered on the printer by pressing the POWER button, confirm the specified number of beeps, and then release the RESUME button. Part 3: Operating Instructions BJC-6000 3.5 Off-line Operations This printer has three operations which ...
...16 If print defects are detected in the test print, perform printhead cleaning. If five or more cleaning operations fail to solve the problem, replace the BJ cartridge with ink. The cleaning operation will start , feeding a sheet, which can be performed independent of the ...print head, connect the printer to clean the rollers. 3.5.1 Cleaning With the printer powered on the printer by pressing the POWER button, confirm the specified number of beeps, and then release the RESUME button. Part 3: Operating Instructions BJC-6000 3.5 Off-line Operations This printer has three operations which ...
Service Manual
Page 88
... elapsed after ejection, printed paper is open . If the problem persists, the printer sees it will not power off . The next paper is enabled, the printer powers off if left to dry on each print mode and color to prevent bleeding. When Auto Power OFF is ejected before ... the color ink and black ink to be detected during internal print data processing so that, when detected, an appropriate pause will be imposed on plain paper, for which this , wait-time is ejected before continuing printing. Part 4: Technical Reference BJC-6000 2.4 Pause Between Scanning This printer features ...
... elapsed after ejection, printed paper is open . If the problem persists, the printer sees it will not power off . The next paper is enabled, the printer powers off if left to dry on each print mode and color to prevent bleeding. When Auto Power OFF is ejected before ... the color ink and black ink to be detected during internal print data processing so that, when detected, an appropriate pause will be imposed on plain paper, for which this , wait-time is ejected before continuing printing. Part 4: Technical Reference BJC-6000 2.4 Pause Between Scanning This printer features ...
Service Manual
Page 131
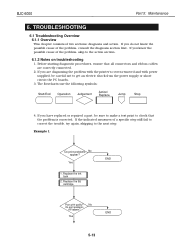
...repaired a part, be sure to make a test print to check that all connectors and ribbon cables are diagnosing the problem with the printer's covers removed and with power supplied, be careful not to get an electric shock from the power supply or shortcircuit...Before starting diagnostic procedures, ensure that the problem is corrected. If you know the possible cause of two sections: diagnosis and action. Yes END 5-13 Replace the BJ cartridge END Poor print quality? If you are correctly connected. 2. BJC-6000 Part 5: Maintenance 6. TROUBLESHOOTING 6.1 Troubleshooting ...
...repaired a part, be sure to make a test print to check that all connectors and ribbon cables are diagnosing the problem with the printer's covers removed and with power supplied, be careful not to get an electric shock from the power supply or shortcircuit...Before starting diagnostic procedures, ensure that the problem is corrected. If you know the possible cause of two sections: diagnosis and action. Yes END 5-13 Replace the BJ cartridge END Poor print quality? If you are correctly connected. 2. BJC-6000 Part 5: Maintenance 6. TROUBLESHOOTING 6.1 Troubleshooting ...

Service Manual
Page 132
...Maintenance BJC-6000 5. If the measure still fails to correct the problem, proceed to see if the problem is corrected. Replace the ink tank 2. CAUTION If you have taken to Part 3: 3.6.1 Service mode operations (page 3-18). 5-14 A step in place. Yes END 1. After concluding troubleshooting, ensure that the problem ... a test print for each measure you have replaced the EEPROM or the whole control board, you can take. Do print problems No appear? For details, refer to check that all connectors and screws are fixed in the flowcharts may indicate more than one ...
...Maintenance BJC-6000 5. If the measure still fails to correct the problem, proceed to see if the problem is corrected. Replace the ink tank 2. CAUTION If you have taken to Part 3: 3.6.1 Service mode operations (page 3-18). 5-14 A step in place. Yes END 1. After concluding troubleshooting, ensure that the problem ... a test print for each measure you have replaced the EEPROM or the whole control board, you can take. Do print problems No appear? For details, refer to check that all connectors and screws are fixed in the flowcharts may indicate more than one ...
Service Manual
Page 149
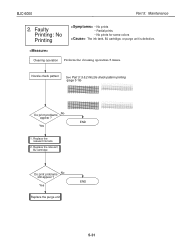
Replace the relevant ink tank 2. Yes 1. Replace the relevant BJ cartridge END Do print problems No still appear ? Cleaning operation Perform the cleaning operation 5 times. BJC-6000 Part 5: Maintenance 2. Yes Replace the purge unit END 5-31 Nozzle check pattern See Part 3: 3.5.2 Nozzle check pattern printing (page 3-16) Do print problems No appear ? Faulty Printing: No Printing • No prints • Partial prints • No prints for some colors The ink tank, BJ cartridge, or purge unit is defective.
Replace the relevant ink tank 2. Yes 1. Replace the relevant BJ cartridge END Do print problems No still appear ? Cleaning operation Perform the cleaning operation 5 times. BJC-6000 Part 5: Maintenance 2. Yes Replace the purge unit END 5-31 Nozzle check pattern See Part 3: 3.5.2 Nozzle check pattern printing (page 3-16) Do print problems No appear ? Faulty Printing: No Printing • No prints • Partial prints • No prints for some colors The ink tank, BJ cartridge, or purge unit is defective.

Service Manual
Page 150
Replace the relevant ink tank 2. Part 5: Maintenance BJC-6000 3. Cleaning operation Perform the cleaning operation 5 times. Replace the relevant BJ cartridge END Do print problems No still appear? Yes END To next page 5-32 Yes 1. Faulty Printing: Blank Lines Appear • Blurred prints • Blank lines • Specific dot missing ...(s), carriage ribbon cable, purge unit, control board or carriage board is defective. Nozzle check pattern See Part 3: 3.5.2 Nozzle check pattern printing (page 3-16) Do print problems No appear?
Replace the relevant ink tank 2. Part 5: Maintenance BJC-6000 3. Cleaning operation Perform the cleaning operation 5 times. Replace the relevant BJ cartridge END Do print problems No still appear? Yes END To next page 5-32 Yes 1. Faulty Printing: Blank Lines Appear • Blurred prints • Blank lines • Specific dot missing ...(s), carriage ribbon cable, purge unit, control board or carriage board is defective. Nozzle check pattern See Part 3: 3.5.2 Nozzle check pattern printing (page 3-16) Do print problems No appear?


