Users Manual - English
Page 1
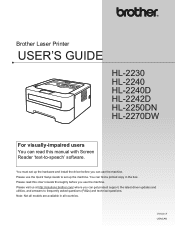
... must set up the hardware and install the driver before you use the machine. Note: Not all countries. Brother Laser Printer USER'S GUIDE HL-2230 HL-2240 HL-2240D HL-2242D HL-2250DN HL-2270DW For visually-impaired users You can read this manual with Screen Reader 'text-to-speech' software. Please ...visit us at http://solutions.brother.com/ where you can use the machine. Please use the Quick Setup Guide to set up the machine. Please read this User's Guide thoroughly before you can find a printed copy in all models are available in the box...
... must set up the hardware and install the driver before you use the machine. Note: Not all countries. Brother Laser Printer USER'S GUIDE HL-2230 HL-2240 HL-2240D HL-2242D HL-2250DN HL-2270DW For visually-impaired users You can read this manual with Screen Reader 'text-to-speech' software. Please ...visit us at http://solutions.brother.com/ where you can use the machine. Please use the Quick Setup Guide to set up the machine. Please read this User's Guide thoroughly before you can find a printed copy in all models are available in the box...
Users Manual - English
Page 3
...paper, thin paper or thick paper 10 Printing on labels or envelopes ...15 Duplex printing...20 Guidelines for printing on both sides of the paper 20 Automatic duplex printing (HL-2240D / HL-2242D / HL-2250DN / HL-2270DW only 21 Manual duplex printing ...22 2 Driver and Software 23 Printer... LEDs (Light Emitting Diodes)...53 Service call indications ...58 Go button...60 Print a test page ...61 Print a Printer Settings page...62 Print Fonts (HL-2250DN / HL-2270DW only 63 Print a WLAN report (HL-2270DW only 64 Default settings...64 4 Routine Maintenance 66 Replacing consumable items......
...paper, thin paper or thick paper 10 Printing on labels or envelopes ...15 Duplex printing...20 Guidelines for printing on both sides of the paper 20 Automatic duplex printing (HL-2240D / HL-2242D / HL-2250DN / HL-2270DW only 21 Manual duplex printing ...22 2 Driver and Software 23 Printer... LEDs (Light Emitting Diodes)...53 Service call indications ...58 Go button...60 Print a test page ...61 Print a Printer Settings page...62 Print Fonts (HL-2250DN / HL-2270DW only 63 Print a WLAN report (HL-2270DW only 64 Default settings...64 4 Routine Maintenance 66 Replacing consumable items......
Users Manual - English
Page 4
...the Status Monitor 100 Paper handling ...102 Paper jams and how to clear them ...104 Improving the print quality...111 Solving print problems ...118 Network problems (HL-2250DN / HL-2270DW only 119 Other problems ...119 For Macintosh with USB ...119 A Appendix 120 Machine specifications...120 ... sets list...130 Quick reference for bar code control commands (HL-2250DN / HL-2270DW only) ...132 Print bar codes or expanded characters 132 B Appendix (for Europe and Other Countries) 139 Brother numbers ...139 C Appendix (for USA and Canada) 140 Brother numbers ...140 D Index 143 iii
...the Status Monitor 100 Paper handling ...102 Paper jams and how to clear them ...104 Improving the print quality...111 Solving print problems ...118 Network problems (HL-2250DN / HL-2270DW only 119 Other problems ...119 For Macintosh with USB ...119 A Appendix 120 Machine specifications...120 ... sets list...130 Quick reference for bar code control commands (HL-2250DN / HL-2270DW only) ...132 Print bar codes or expanded characters 132 B Appendix (for Europe and Other Countries) 139 Brother numbers ...139 C Appendix (for USA and Canada) 140 Brother numbers ...140 D Index 143 iii

Users Manual - English
Page 5
1 Printing Methods About this machine Front view and Back view 1 2 3 4 5 6 1 Face-down output tray support flap 2 (support flap 2) 2 Face-down output tray support flap 1 (support flap 1) 3 Control panel 4 Manual feed paper guide 5 Manual feed slot 6 Manual feed slot cover 7 Paper tray 8 Front cover 9 Power switch 10 Ventilation hole 11 Face-down output tray 11 10 9 8 7 1 1 1 1 1
1 Printing Methods About this machine Front view and Back view 1 2 3 4 5 6 1 Face-down output tray support flap 2 (support flap 2) 2 Face-down output tray support flap 1 (support flap 1) 3 Control panel 4 Manual feed paper guide 5 Manual feed slot 6 Manual feed slot cover 7 Paper tray 8 Front cover 9 Power switch 10 Ventilation hole 11 Face-down output tray 11 10 9 8 7 1 1 1 1 1
Users Manual - English
Page 6
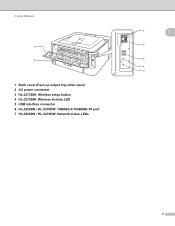
Printing Methods 1 2 1 Back cover (Face-up output tray when open) 2 AC power connector 3 HL-2270DW: Wireless setup button 4 HL-2270DW: Wireless Activity LED 5 USB interface connector 6 HL-2250DN / HL-2270DW: 10BASE-T/100BASE-TX port 7 HL-2250DN / HL-2270DW: Network status LEDs 7 1 6 5 4 3 2
Printing Methods 1 2 1 Back cover (Face-up output tray when open) 2 AC power connector 3 HL-2270DW: Wireless setup button 4 HL-2270DW: Wireless Activity LED 5 USB interface connector 6 HL-2250DN / HL-2270DW: 10BASE-T/100BASE-TX port 7 HL-2250DN / HL-2270DW: Network status LEDs 7 1 6 5 4 3 2
Users Manual - English
Page 7
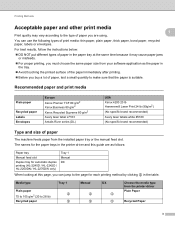
... by clicking p in the table. Printing Methods Acceptable paper and other print media 1 1 Print quality may vary according to the type of paper you are as follows: Paper tray Manual feed slot Duplex tray for automatic duplex printing (HL-2240D / HL-2242D / HL-2250DN / HL-2270DW only) Tray 1 Manual DX ...When looking at the same time because it may cause paper jams or misfeeds. For proper printing, you must choose the same paper size from your...
... by clicking p in the table. Printing Methods Acceptable paper and other print media 1 1 Print quality may vary according to the type of paper you are as follows: Paper tray Manual feed slot Duplex tray for automatic duplex printing (HL-2240D / HL-2242D / HL-2250DN / HL-2270DW only) Tray 1 Manual DX ...When looking at the same time because it may cause paper jams or misfeeds. For proper printing, you must choose the same paper size from your...

Users Manual - English
Page 8
... Edge), B6 (ISO), A6, Executive, Legal 1, Folio 1 250 sheets Manual DX Width: 76.2 to 216 mm (3 to 8.5 in some regions outside the USA and Canada. 4 Printing Methods Media type Bond paper Tray 1 Manual DX Choose the media type from the printer driver 1 Bond Paper Rough paper- 60 to 163 g/m2 p (16...
... Edge), B6 (ISO), A6, Executive, Legal 1, Folio 1 250 sheets Manual DX Width: 76.2 to 216 mm (3 to 8.5 in some regions outside the USA and Canada. 4 Printing Methods Media type Bond paper Tray 1 Manual DX Choose the media type from the printer driver 1 Bond Paper Rough paper- 60 to 163 g/m2 p (16...
Users Manual - English
Page 9
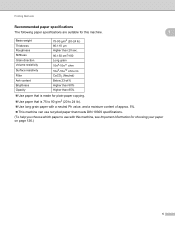
Printing Methods Recommended paper specifications The following paper specifications are suitable for this machine. 1 1 Basis weight Thickness Roughness Stiffness Grain direction Volume resistivity Surface resistivity Filler ...
Printing Methods Recommended paper specifications The following paper specifications are suitable for this machine. 1 1 Basis weight Thickness Roughness Stiffness Grain direction Volume resistivity Surface resistivity Filler ...
Users Manual - English
Page 10
...process 200 degrees centigrade (392 degrees Fahrenheit). If you use bond paper, paper having a rough surface or paper that is designed for inkjet printing If you use paper: • that is highly textured • that is extremely smooth or shiny • that is curled or warped 1 1 ...this guide • with tabs and staples • with most types of xerographic and bond paper. DO NOT use any Brother warranty or service agreement. 6 Printing Methods Handling and using low temperature dyes or thermography • that is multipart or carbonless • that is not covered ...
...process 200 degrees centigrade (392 degrees Fahrenheit). If you use bond paper, paper having a rough surface or paper that is designed for inkjet printing If you use paper: • that is highly textured • that is extremely smooth or shiny • that is curled or warped 1 1 ...this guide • with tabs and staples • with most types of xerographic and bond paper. DO NOT use any Brother warranty or service agreement. 6 Printing Methods Handling and using low temperature dyes or thermography • that is multipart or carbonless • that is not covered ...
Users Manual - English
Page 11
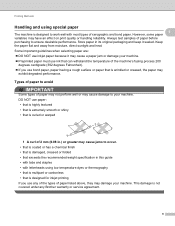
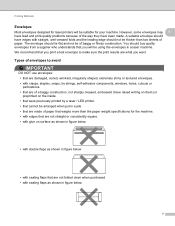
...buy quality envelopes from a supplier who understands that are not straight or consistently square. • with glue on the inside. • that were previously printed by a laser / LED printer. • that cannot be arranged when put in a pile. • that are made . A suitable envelope should ...on them) or preprinted on surface as shown in figure below • with double flaps as shown in a laser machine. We recommend that you print a test envelope to avoid 1 IMPORTANT DO NOT use envelopes: • that are damaged, curled, wrinkled, irregularly shaped, extremely shiny or textured...
...buy quality envelopes from a supplier who understands that are not straight or consistently square. • with glue on the inside. • that were previously printed by a laser / LED printer. • that cannot be arranged when put in a pile. • that are made . A suitable envelope should ...on them) or preprinted on surface as shown in figure below • with double flaps as shown in a laser machine. We recommend that you print a test envelope to avoid 1 IMPORTANT DO NOT use envelopes: • that are damaged, curled, wrinkled, irregularly shaped, extremely shiny or textured...
Users Manual - English
Page 12
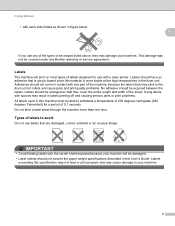
...drum unit or rollers and cause jams and print quality problems. No adhesive should not come in the fuser unit. Labels 1 The machine will be arranged so that are damaged, curled, wrinkled or an unusual shape. Using labels with any Brother warranty or service agreement. This damage may result... in labels peeling off and causing serious jams or print problems. All labels used in this material is acrylic-based since this machine must be ...
...drum unit or rollers and cause jams and print quality problems. No adhesive should not come in the fuser unit. Labels 1 The machine will be arranged so that are damaged, curled, wrinkled or an unusual shape. Using labels with any Brother warranty or service agreement. This damage may result... in labels peeling off and causing serious jams or print problems. All labels used in this material is acrylic-based since this machine must be ...
Users Manual - English
Page 13
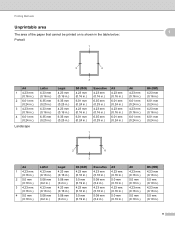
... area The area of the paper that cannot be printed on is shown in the table below: Portrait 1 1 1 2 4 A4 1 4.23 mm (0.16 in.) 2 6.01 mm (0.24 in.) 3 4.23 mm (0.16 in.) 4 6.01 mm (0.24 in.) ...
... area The area of the paper that cannot be printed on is shown in the table below: Portrait 1 1 1 2 4 A4 1 4.23 mm (0.16 in.) 2 6.01 mm (0.24 in.) 3 4.23 mm (0.16 in.) 4 6.01 mm (0.24 in.) ...
Users Manual - English
Page 14
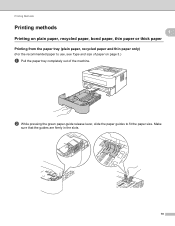
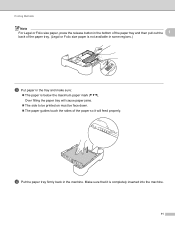
Printing Methods Printing methods 1 1 Printing on plain paper, recycled paper, bond paper, thin paper or thick paper 1 Printing from the paper tray (plain paper, recycled paper and thin paper only) 1 (For the recommended paper to fit the paper size. b While pressing the green paper-guide release lever, slide the paper guides to use, see Type and size of paper on page 3.) a Pull the paper tray completely out of the machine. Make sure that the guides are firmly in the slots. 10
Printing Methods Printing methods 1 1 Printing on plain paper, recycled paper, bond paper, thin paper or thick paper 1 Printing from the paper tray (plain paper, recycled paper and thin paper only) 1 (For the recommended paper to fit the paper size. b While pressing the green paper-guide release lever, slide the paper guides to use, see Type and size of paper on page 3.) a Pull the paper tray completely out of the machine. Make sure that the guides are firmly in the slots. 10
Users Manual - English
Page 15
Over filling the paper tray will feed properly. Make sure that it will cause paper jams. The side to be printed on must be face down. The paper guides touch the sides of the paper tray. (Legal or Folio size paper is not available in ...some regions.) c Put paper in the tray and make sure: The paper is completely inserted into the machine. 11 Printing Methods Note For Legal or Folio size paper, press the release button in the bottom of the paper tray and then pull out the 1 back...
Over filling the paper tray will feed properly. Make sure that it will cause paper jams. The side to be printed on must be face down. The paper guides touch the sides of the paper tray. (Legal or Folio size paper is not available in ...some regions.) c Put paper in the tray and make sure: The paper is completely inserted into the machine. 11 Printing Methods Note For Legal or Folio size paper, press the release button in the bottom of the paper tray and then pull out the 1 back...

Users Manual - English
Page 16
g Send the print data to prevent paper from sliding off the face-down output tray, or remove each page as soon as it comes out of the machine. 1 f ... and Canada. Media Type Plain Paper Paper Source Thin Paper Recycled Paper Tray 1 For any other settings, see Driver and Software in Chapter 2. Printing Methods e Lift up the support flap 1 to the machine. 12
g Send the print data to prevent paper from sliding off the face-down output tray, or remove each page as soon as it comes out of the machine. 1 f ... and Canada. Media Type Plain Paper Paper Source Thin Paper Recycled Paper Tray 1 For any other settings, see Driver and Software in Chapter 2. Printing Methods e Lift up the support flap 1 to the machine. 12
Users Manual - English
Page 17
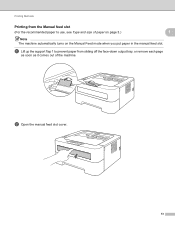
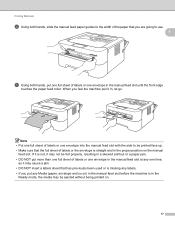
b Open the manual feed slot cover. 13 a Lift up the support flap 1 to prevent paper from the Manual feed slot (For the recommended paper to use, see Type and size of the machine. Printing Methods Printing from sliding off the face-down output tray, or remove each page as soon as it comes out of paper on page 3.) 1 1 Note The machine automatically turns on the Manual Feed mode when you put paper in the manual feed slot.
b Open the manual feed slot cover. 13 a Lift up the support flap 1 to prevent paper from the Manual feed slot (For the recommended paper to use, see Type and size of the machine. Printing Methods Printing from sliding off the face-down output tray, or remove each page as soon as it comes out of paper on page 3.) 1 1 Note The machine automatically turns on the Manual Feed mode when you put paper in the manual feed slot.
Users Manual - English
Page 18
... the manual feed slot. If it may cause a jam. • If you put any one piece of the paper touches the paper feed roller. Printing Methods c Using both hands, put one piece of paper in the manual feed slot until the front edge of paper in the manual feed slot ...at any media in the manual feed slot before the machine is in the Ready mode, the media may be printed face up. • Make sure that you feel the machine pull in the correct position on . 14 Note • Put the paper into the manual...
... the manual feed slot. If it may cause a jam. • If you put any one piece of the paper touches the paper feed roller. Printing Methods c Using both hands, put one piece of paper in the manual feed slot until the front edge of paper in the manual feed slot ...at any media in the manual feed slot before the machine is in the Ready mode, the media may be printed face up. • Make sure that you feel the machine pull in the correct position on . 14 Note • Put the paper into the manual...
Users Manual - English
Page 19
... the tray which you put in the next sheet of paper as in Chapter 2. Use this paper feed and output method when you want to print on labels or envelopes. (For the recommended paper to use . Media Type Plain Paper Thin Paper Thick Paper Thicker Paper Bond Paper Recycled ...Paper Paper Source Manual For any other print media on page 3 and Types of envelopes to avoid on page 7.) Note The machine automatically turns on labels or envelopes 1 When the face-up output...
... the tray which you put in the next sheet of paper as in Chapter 2. Use this paper feed and output method when you want to print on labels or envelopes. (For the recommended paper to use . Media Type Plain Paper Thin Paper Thick Paper Thicker Paper Bond Paper Recycled ...Paper Paper Source Manual For any other print media on page 3 and Types of envelopes to avoid on page 7.) Note The machine automatically turns on labels or envelopes 1 When the face-up output...
Users Manual - English
Page 20
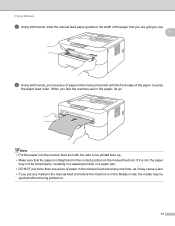
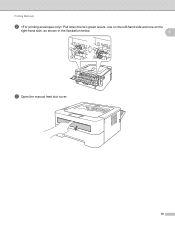
Printing Methods b Pull down the two green levers, one on the left-hand side and one on the right-hand side, as shown in the illustration below. 1 c Open the manual feed slot cover. 16
Printing Methods b Pull down the two green levers, one on the left-hand side and one on the right-hand side, as shown in the illustration below. 1 c Open the manual feed slot cover. 16
Users Manual - English
Page 21
Printing Methods d Using both hands, put one full sheet of labels or one envelope in the manual feed slot ...use. 1 e Using both hands, slide the manual feed paper guides to the width of the paper that you are going to be printed face up. • Make sure that has previously been used or is missing any Media (paper, envelope and so on . 17 When... paper jam. • DO NOT put any labels. • If you feel the machine pull it may not be ejected without being printed on ) in the manual feed slot before the machine is in the Ready mode, the media may be fed properly, resulting in , let ...
Printing Methods d Using both hands, put one full sheet of labels or one envelope in the manual feed slot ...use. 1 e Using both hands, slide the manual feed paper guides to the width of the paper that you are going to be printed face up. • Make sure that has previously been used or is missing any Media (paper, envelope and so on . 17 When... paper jam. • DO NOT put any labels. • If you feel the machine pull it may not be ejected without being printed on ) in the manual feed slot before the machine is in the Ready mode, the media may be fed properly, resulting in , let ...


