Users Manual - English
Page 3
... Copier/Printer needs. Please complete and fax the Brother Warranty Registration And Test Sheet or, for all your Brother product. http://solutions.brother.com You can download the latest software and utilities, read FAQs and troubleshooting tips, and go to the "Solutions" section ... on-line at www.registermybrother.com Frequently asked questions (FAQs) The Brother Solutions Center is our one-stop resource for your convenience and most from within that country. Your registration with Brother International Corporation, you will help , you must be recorded as confirmation of...
... Copier/Printer needs. Please complete and fax the Brother Warranty Registration And Test Sheet or, for all your Brother product. http://solutions.brother.com You can download the latest software and utilities, read FAQs and troubleshooting tips, and go to the "Solutions" section ... on-line at www.registermybrother.com Frequently asked questions (FAQs) The Brother Solutions Center is our one-stop resource for your convenience and most from within that country. Your registration with Brother International Corporation, you will help , you must be recorded as confirmation of...
Users Manual - English
Page 19
... only 13-3 For your safety 13-3 International ENERGY STAR® Compliance Statement 13-3 Laser safety 13-4 FDA regulations 13-4 Important safety instructions 13-6 Trademarks 13-8 14 Troubleshooting and routine maintenance 14-1 Troubleshooting 14-1 Error messages 14-1 Original jams 14-4 Original is jammed in the duplex tray (For DCP-8045D 14-9 If you are having difficulty with...
... only 13-3 For your safety 13-3 International ENERGY STAR® Compliance Statement 13-3 Laser safety 13-4 FDA regulations 13-4 Important safety instructions 13-6 Trademarks 13-8 14 Troubleshooting and routine maintenance 14-1 Troubleshooting 14-1 Error messages 14-1 Original jams 14-4 Original is jammed in the duplex tray (For DCP-8045D 14-9 If you are having difficulty with...

Users Manual - English
Page 29
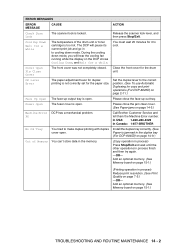
...Service error Red Cover open . The cover is full. (See Error messages on , please call indication after turning the DCP back on page 14-1.) INTRODUCTION 1 - 9 Check the LCD message. (See Troubleshooting and routine maintenance on page 14-1.) Check that the scanner lock lever is released. (See Scanner Lock Lever on page...(in USA) or 1-877-BROTHER (in the tray or clear the paper jam. Wait a few seconds, and then turn it back on page 14-24.) Put paper in Canada). Close the cover. (See Error messages on page 14-1.) Replace the toner cartridge with a new one. (See Replacing the toner ...
...Service error Red Cover open . The cover is full. (See Error messages on , please call indication after turning the DCP back on page 14-1.) INTRODUCTION 1 - 9 Check the LCD message. (See Troubleshooting and routine maintenance on page 14-1.) Check that the scanner lock lever is released. (See Scanner Lock Lever on page...(in USA) or 1-877-BROTHER (in the tray or clear the paper jam. Wait a few seconds, and then turn it back on page 14-24.) Put paper in Canada). Close the cover. (See Error messages on page 14-1.) Replace the toner cartridge with a new one. (See Replacing the toner ...
Users Manual - English
Page 226
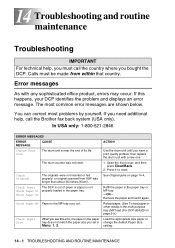
...tray (MP tray) (For DCP-8045D) on page 14-4. See Original jams on page 2-9.) Load the appropriate size paper or change the default Paper Size setting. 14 - 1 TROUBLESHOOTING AND ROUTINE MAINTENANCE Reload paper.... (See To load paper or other media in the paper tray. Error messages As with a new one. 1. The most problems by ... press Clear/Back. 2. Refill the paper in the MP tray runs out. Calls must call the Brother fax back system (USA only). Press 1 to reset. Check Paper #2 Check Paper MP Paper in...
...tray (MP tray) (For DCP-8045D) on page 14-4. See Original jams on page 2-9.) Load the appropriate size paper or change the default Paper Size setting. 14 - 1 TROUBLESHOOTING AND ROUTINE MAINTENANCE Reload paper.... (See To load paper or other media in the paper tray. Error messages As with a new one. 1. The most problems by ... press Clear/Back. 2. Refill the paper in the MP tray runs out. Calls must call the Brother fax back system (USA only). Press 1 to reset. Check Paper #2 Check Paper MP Paper in...
Users Manual - English
Page 227
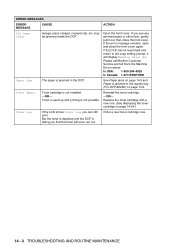
... correct position. (See To use Automatic Duplexing for copy and print operations (For DCP-8045D) on page 2-11.) Face Up Open The face-up out tray. Set the duplex lever to cool. XX Call Brother Customer Service and tell them the Machine Error number. Cover Open Pls Close Cover...the cooling down mode. Please close the jam clear cover. (See Paper jams on page 15-1.) TROUBLESHOOTING AND ROUTINE MAINTENANCE 14 - 2 Add an optional memory. (See Memory board on page 14-5.) Machine Error DCP has a mechanical problem. Fuser Open The fuser cover is too hot. In USA: 1-800-284...
... correct position. (See To use Automatic Duplexing for copy and print operations (For DCP-8045D) on page 2-11.) Face Up Open The face-up out tray. Set the duplex lever to cool. XX Call Brother Customer Service and tell them the Machine Error number. Cover Open Pls Close Cover...the cooling down mode. Please close the jam clear cover. (See Paper jams on page 15-1.) TROUBLESHOOTING AND ROUTINE MAINTENANCE 14 - 2 Add an optional memory. (See Memory board on page 14-5.) Machine Error DCP has a mechanical problem. Fuser Open The fuser cover is too hot. In USA: 1-800-284...
Users Manual - English
Page 228
... duplex tray (For DCP-8045D) on page 14-24.) Toner Low If the LCD shows Toner Low, you that the toner will display Machine Error XX. If the error message remains, open and close the front cover. Toner Empty Toner cartridge is not possible. Replace the toner cartridge with a new one. (See Replacing...
... duplex tray (For DCP-8045D) on page 14-24.) Toner Low If the LCD shows Toner Low, you that the toner will display Machine Error XX. If the error message remains, open and close the front cover. Toner Empty Toner cartridge is not possible. Replace the toner cartridge with a new one. (See Replacing...
Users Manual - English
Page 229
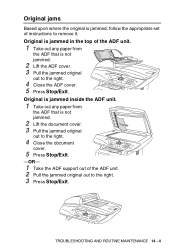
... where the original is not jammed. 2 Lift the ADF cover. 3 Pull the jammed original out to the right. 4 Close the ADF cover. 5 Press Stop/Exit. TROUBLESHOOTING AND ROUTINE MAINTENANCE 14 - 4 Original is jammed inside the ADF unit. 1 Take out any paper from the ADF that is jammed, follow the appropriate set...
... where the original is not jammed. 2 Lift the ADF cover. 3 Pull the jammed original out to the right. 4 Close the ADF cover. 5 Press Stop/Exit. TROUBLESHOOTING AND ROUTINE MAINTENANCE 14 - 4 Original is jammed inside the ADF unit. 1 Take out any paper from the ADF that is jammed, follow the appropriate set...

Users Manual - English
Page 230
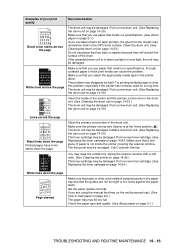
This helps prevent multiple sheets of the upper paper tray. ■ Always remove all paper from feeding through the DCP at one time and reduces paper jams. 14 - 5 TROUBLESHOOTING AND ROUTINE MAINTENANCE HOT! Front view Back view Clear the jammed paper as follows. Paper jams To clear paper jams, please follow the steps in...
This helps prevent multiple sheets of the upper paper tray. ■ Always remove all paper from feeding through the DCP at one time and reduces paper jams. 14 - 5 TROUBLESHOOTING AND ROUTINE MAINTENANCE HOT! Front view Back view Clear the jammed paper as follows. Paper jams To clear paper jams, please follow the steps in...

Users Manual - English
Page 231
If you cannot remove the drum unit assembly easily at this time, do not use extra force. TROUBLESHOOTING AND ROUTINE MAINTENANCE 14 - 6 1 Pull the paper tray completely out of the DCP. 2 Pull the jammed paper up and out of the DCP. Pull the jammed paper up and out of the jammed paper from the paper tray. Instead, pull the edge of the DCP. 3 Press the cover release button and then open the front cover. 4 Pull out the drum unit assembly.
If you cannot remove the drum unit assembly easily at this time, do not use extra force. TROUBLESHOOTING AND ROUTINE MAINTENANCE 14 - 6 1 Pull the paper tray completely out of the DCP. 2 Pull the jammed paper up and out of the DCP. Pull the jammed paper up and out of the jammed paper from the paper tray. Instead, pull the edge of the DCP. 3 Press the cover release button and then open the front cover. 4 Pull out the drum unit assembly.

Users Manual - English
Page 232
WARNING To prevent damage to Step 7. If the paper jam can be cleared, go to the DCP caused by static electricity, do not touch the electrodes shown in the following diagram. 5 Open the back output tray. Print a few copies of the test page until the scattering of the DCP, the fuser may get dirty with toner powder and it may scatter on the next printouts. If you have to pull the paper toward the back of toner stops. 14 - 7 TROUBLESHOOTING AND ROUTINE MAINTENANCE Pull the jammed paper out of the fuser unit.
WARNING To prevent damage to Step 7. If the paper jam can be cleared, go to the DCP caused by static electricity, do not touch the electrodes shown in the following diagram. 5 Open the back output tray. Print a few copies of the test page until the scattering of the DCP, the fuser may get dirty with toner powder and it may scatter on the next printouts. If you have to pull the paper toward the back of toner stops. 14 - 7 TROUBLESHOOTING AND ROUTINE MAINTENANCE Pull the jammed paper out of the fuser unit.

Users Manual - English
Page 233
Close the back output tray. HOT! Pull the jammed paper out of the fuser unit. TROUBLESHOOTING AND ROUTINE MAINTENANCE 14 - 8 Wait for the DCP to cool down before you have just used the DCP, some internal parts of the DCP are extremely HOT! Jam Clear Cover (Fuser Cover) 7 Close the jam clear cover. WARNING After you touch the internal parts of the DCP. Back view 6 Open the jam clear cover (fuser cover).
Close the back output tray. HOT! Pull the jammed paper out of the fuser unit. TROUBLESHOOTING AND ROUTINE MAINTENANCE 14 - 8 Wait for the DCP to cool down before you have just used the DCP, some internal parts of the DCP are extremely HOT! Jam Clear Cover (Fuser Cover) 7 Close the jam clear cover. WARNING After you touch the internal parts of the DCP. Back view 6 Open the jam clear cover (fuser cover).
Users Manual - English
Page 234
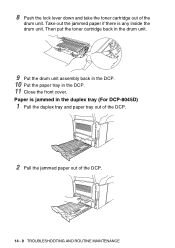
Paper is any inside the drum unit. Then put the toner cartridge back in the drum unit. 9 Put the drum unit assembly back in the DCP. 10 Put the paper tray in the duplex tray (For DCP-8045D) 1 Pull the duplex tray and paper tray out of the DCP. 2 Pull the jammed paper out of the drum unit. 8 Push the lock lever down and take the toner cartridge out of the DCP. 14 - 9 TROUBLESHOOTING AND ROUTINE MAINTENANCE Take out the jammed paper if there is jammed in the DCP. 11 Close the front cover.
Paper is any inside the drum unit. Then put the toner cartridge back in the drum unit. 9 Put the drum unit assembly back in the DCP. 10 Put the paper tray in the duplex tray (For DCP-8045D) 1 Pull the duplex tray and paper tray out of the DCP. 2 Pull the jammed paper out of the drum unit. 8 Push the lock lever down and take the toner cartridge out of the DCP. 14 - 9 TROUBLESHOOTING AND ROUTINE MAINTENANCE Take out the jammed paper if there is jammed in the DCP. 11 Close the front cover.

Users Manual - English
Page 235
3 Put the duplex tray and paper tray back into the DCP. ■ The Jam Duplex message appears if you remove a sheet of paper from the Face Down Output Tray after only one side has printed. ■ If the Paper Adjustment Lever for Duplex Printing is not set correctly for the paper size, paper jams may occur and the printing will be out of position on the page. (See To use Automatic Duplexing for copy and print operations (For DCP-8045D) on page 2-11.) TROUBLESHOOTING AND ROUTINE MAINTENANCE 14 - 10
3 Put the duplex tray and paper tray back into the DCP. ■ The Jam Duplex message appears if you remove a sheet of paper from the Face Down Output Tray after only one side has printed. ■ If the Paper Adjustment Lever for Duplex Printing is not set correctly for the paper size, paper jams may occur and the printing will be out of position on the page. (See To use Automatic Duplexing for copy and print operations (For DCP-8045D) on page 2-11.) TROUBLESHOOTING AND ROUTINE MAINTENANCE 14 - 10

Users Manual - English
Page 236
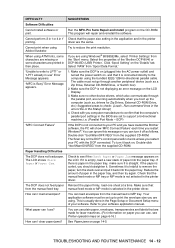
Check the chart below and follow the troubleshooting tips. The DCP prints unexpectedly or it is set up to see if LCD is plugged in copies. Your computer is selected as the primary source. Most laser printers have text missing. Copy Quality Difficulties Vertical ... is probably not your DCP. Poor quality print. Clean your document to connect the DCP cable correctly. The DCP prints first couple of a document. Adjust the top and bottom margins in the File menu and select the Brother TWAIN driver. 14 - 11 TROUBLESHOOTING AND ROUTINE MAINTENANCE In...
Check the chart below and follow the troubleshooting tips. The DCP prints unexpectedly or it is set up to see if LCD is plugged in copies. Your computer is selected as the primary source. Most laser printers have text missing. Copy Quality Difficulties Vertical ... is probably not your DCP. Poor quality print. Clean your document to connect the DCP cable correctly. The DCP prints first couple of a document. Adjust the top and bottom margins in the File menu and select the Brother TWAIN driver. 14 - 11 TROUBLESHOOTING AND ROUTINE MAINTENANCE In...
Users Manual - English
Page 237
... as , drivers for laser machines. (For information on , Double-click "\tool\WarnON.REG" from the manual feed or MP tray. Reduce the amount of the 'Brother DCP-8040 or DCP-8045D (USB) Printer'. Refer...in 1 or 4 in the paper tray, and then try again. Reinsert the paper firmly, load one sheet at a time. How can load envelopes from the supplied CD-ROM. "Unable to write to ...follows. Check with the DCP connected. If the paper is connected directly to reduce the print resolution. Select the properties of paper in 1' printing. TROUBLESHOOTING AND ROUTINE MAINTENANCE 14 - 12
... as , drivers for laser machines. (For information on , Double-click "\tool\WarnON.REG" from the manual feed or MP tray. Reduce the amount of the 'Brother DCP-8040 or DCP-8045D (USB) Printer'. Refer...in 1 or 4 in the paper tray, and then try again. Reinsert the paper firmly, load one sheet at a time. How can load envelopes from the supplied CD-ROM. "Unable to write to ...follows. Check with the DCP connected. If the paper is connected directly to reduce the print resolution. Select the properties of paper in 1' printing. TROUBLESHOOTING AND ROUTINE MAINTENANCE 14 - 12

Users Manual - English
Page 238
... in Ready mode. If possible, try connecting the DCP to a different port on your DCP is powered on page 7-6.) Network Difficulties I cannot print over the Network Make sure that your hub using -OR-The print media may be incorrect for diagnosing problems. 14 - 13 TROUBLESHOOTING AND ROUTINE MAINTENANCE The Paper Type setting may...
... in Ready mode. If possible, try connecting the DCP to a different port on your DCP is powered on page 7-6.) Network Difficulties I cannot print over the Network Make sure that your hub using -OR-The print media may be incorrect for diagnosing problems. 14 - 13 TROUBLESHOOTING AND ROUTINE MAINTENANCE The Paper Type setting may...

Users Manual - English
Page 239
...page 14-30.) Make sure that you use thinner paper than you use paper that meets our specifications. Turn off Toner Save mode in the DCP itself. (See Toner Save on page 4-4.) Try installing a new toner cartridge. (See Replacing the toner cartridge on page 14-24.) Try ...Put in the printer driver, or use paper that meets our specifications. Improving the print quality This section provides information on page 14-30.) TROUBLESHOOTING AND ROUTINE MAINTENANCE 14 - 14 Conditions such as high humidity can increase the amount of the driver. -OR- Rough-surfaced paper may cause...
...page 14-30.) Make sure that you use thinner paper than you use paper that meets our specifications. Turn off Toner Save mode in the DCP itself. (See Toner Save on page 4-4.) Try installing a new toner cartridge. (See Replacing the toner cartridge on page 14-24.) Try ...Put in the printer driver, or use paper that meets our specifications. Improving the print quality This section provides information on page 14-30.) TROUBLESHOOTING AND ROUTINE MAINTENANCE 14 - 14 Conditions such as high humidity can increase the amount of the driver. -OR- Rough-surfaced paper may cause...

Users Manual - English
Page 240
... the print sample, wipe the surface of the OPC drum with a cotton swab until the dust or paper powder on page 14-30.) 14 - 15 TROUBLESHOOTING AND ROUTINE MAINTENANCE Photosensitive drum 3 When you have glue from label stock on the OPC drum surface. Put in a new drum unit. (See Replacing the...
... the print sample, wipe the surface of the OPC drum with a cotton swab until the dust or paper powder on page 14-30.) 14 - 15 TROUBLESHOOTING AND ROUTINE MAINTENANCE Photosensitive drum 3 When you have glue from label stock on the OPC drum surface. Put in a new drum unit. (See Replacing the...
Users Manual - English
Page 241
... unit is not inside of the printer and the primary corona wire in a new drum unit. (See Replacing the drum unit on page 2-1.) TROUBLESHOOTING AND ROUTINE MAINTENANCE 14 - 16 The fixing unit may be damaged. ABCDEFGH abcdefghijk ABCD abcde 01234 White lines down the page. Try printing multiple ...pages to clear this problem, especially if the printer has not been used for laser printers, the glue from the sheets may sometimes stick to load paper on page 14-23.) The drum unit may be damaged. The ...
... unit is not inside of the printer and the primary corona wire in a new drum unit. (See Replacing the drum unit on page 2-1.) TROUBLESHOOTING AND ROUTINE MAINTENANCE 14 - 16 The fixing unit may be damaged. ABCDEFGH abcdefghijk ABCD abcde 01234 White lines down the page. Try printing multiple ...pages to clear this problem, especially if the printer has not been used for laser printers, the glue from the sheets may sometimes stick to load paper on page 14-23.) The drum unit may be damaged. The ...

Users Manual - English
Page 242
... 1 34 Wrinkles or creases Recommendation Check the paper type and quality. High temperatures and high humidity will cause paper to replace it periodically. 14 - 17 TROUBLESHOOTING AND ROUTINE MAINTENANCE Turn over the stack of paper in the tray or try fanning the paper stack and then rotating the paper 180°...
... 1 34 Wrinkles or creases Recommendation Check the paper type and quality. High temperatures and high humidity will cause paper to replace it periodically. 14 - 17 TROUBLESHOOTING AND ROUTINE MAINTENANCE Turn over the stack of paper in the tray or try fanning the paper stack and then rotating the paper 180°...


