

User Manual in English
Page 2
WARNING To ensure safety while driving and to comply with laws, drivers should not watch video or operate the video device while driving.
WARNING To ensure safety while driving and to comply with laws, drivers should not watch video or operate the video device while driving.

User Manual in English
Page 3
BV7280 OWNER'S MANUAL Mobile Audio/Video System y PLL Synthesizer Stereo Radio y Automatic Memory Storing y RBDS Operation y Full Detachable Panel y Preset Equalization y Memory Card Interface y USB Interface y AV IN interface on the front panel y Remote Control 1
BV7280 OWNER'S MANUAL Mobile Audio/Video System y PLL Synthesizer Stereo Radio y Automatic Memory Storing y RBDS Operation y Full Detachable Panel y Preset Equalization y Memory Card Interface y USB Interface y AV IN interface on the front panel y Remote Control 1
User Manual in English
Page 4
CONTENTS INSTALLATION 3 USING THE DETACHABLE FRONT PANEL 6 CONNECTIONS 7 LOCATIONS AND FUNCTION OF THE PLAYER 8 LOCATIONS AND FUNCTION OF THE REMOTE CONTROL ......... 9 OPERATION 11 BASIC OPERATION 12 USB PLAY OPERATION 13 MEMORY CARD OPERATION 16 RADIO OPERATION 17 AV IN OPERATION 18 TROUBLE SHOOTING 19 SPECIFICATIONS 20 2
CONTENTS INSTALLATION 3 USING THE DETACHABLE FRONT PANEL 6 CONNECTIONS 7 LOCATIONS AND FUNCTION OF THE PLAYER 8 LOCATIONS AND FUNCTION OF THE REMOTE CONTROL ......... 9 OPERATION 11 BASIC OPERATION 12 USB PLAY OPERATION 13 MEMORY CARD OPERATION 16 RADIO OPERATION 17 AV IN OPERATION 18 TROUBLE SHOOTING 19 SPECIFICATIONS 20 2

User Manual in English
Page 5
... wire harness and the antenna. 3. Installing the unit Be sure you can be most ef fective. y Avoid installing the unit where it would be subject to secure the sleeve in place. 3 The two supplied keys release t abs inside the unit' s sleeve so you test all connected up ) into the opening as from direct sunlight, or hot air, from the vehicle battery...
... wire harness and the antenna. 3. Installing the unit Be sure you can be most ef fective. y Avoid installing the unit where it would be subject to secure the sleeve in place. 3 The two supplied keys release t abs inside the unit' s sleeve so you test all connected up ) into the opening as from direct sunlight, or hot air, from the vehicle battery...

User Manual in English
Page 6
... any wires or cables. 8. Then use the supplied metal strap to secure the back of the unit. Use the screw holes marked T (Toyota), N (Nissan) located on the back of f, then disconnect the cable from the vehicle battery's negative (-) terminal. 2. INSTALLATION (1) Dashboard (2) Tabs 7. Reconnect the wire harness and the antenna and be careful not to remove the front panel. 4. Slide the unit into place. 9. Remove the...
... any wires or cables. 8. Then use the supplied metal strap to secure the back of the unit. Use the screw holes marked T (Toyota), N (Nissan) located on the back of f, then disconnect the cable from the vehicle battery's negative (-) terminal. 2. INSTALLATION (1) Dashboard (2) Tabs 7. Reconnect the wire harness and the antenna and be careful not to remove the front panel. 4. Slide the unit into place. 9. Remove the...

User Manual in English
Page 7
Align the screw holes on the bracket with the screw holes on the unit, and then tighten the screws (5x5mm) on each side. Note: The outer trim ring, sleev e and the metal strap are not used for method B installation. 5 INSTALLATION Factory Radio Mounting Bracket Screw Side View showing Screw Holes marked T, N or S Screw Dashboard or Console To fasten the unit to the factory radio mounting brackets.
Align the screw holes on the bracket with the screw holes on the unit, and then tighten the screws (5x5mm) on each side. Note: The outer trim ring, sleev e and the metal strap are not used for method B installation. 5 INSTALLATION Factory Radio Mounting Bracket Screw Side View showing Screw Holes marked T, N or S Screw Dashboard or Console To fasten the unit to the factory radio mounting brackets.

User Manual in English
Page 8
... put pressure on the main unit body. Do not touch the contacts on the control panel or on the display or control buttons when detaching or re-installing the control panel. 3. benzene, thinner, or insecticides) from touching the surface of the panel and pull off the control panel. 2.Keep the control panel into the housing and make sure the panel is properly...
... put pressure on the main unit body. Do not touch the contacts on the control panel or on the display or control buttons when detaching or re-installing the control panel. 3. benzene, thinner, or insecticides) from touching the surface of the panel and pull off the control panel. 2.Keep the control panel into the housing and make sure the panel is properly...

User Manual in English
Page 9
WIRING CONNECTION Connector A 1. REAR RIGHT SPEAKER (-) (VIOLET/BLACK) 3. FRONT LEFT SPEAKER (+) (WHITE) 6. AUTO ANTENNA OUTPUT (BLUE) 6. FRONT LEFT SPEAKER (-) (WHITE/BLACK) 7. BRAKE (PINK) 3. FRONT RIGHT SPEAKER (-) (GRAY/BLACK) 5. REAR LEFT SPEAKER (-) (GREEN/BLACK) 7 N.C. 2. MEMORY +12V (YELLOW) 5. REAR RIGHT SPEAKER (+) (VIOLET) 2. N.C. 7. +12V (TO IGNITION KEY) (RED) 8. REAR VIEW (BROWN) 4. GROUND (BLACK) Connector B 1. FRONT RIGHT SPEAKER (+) (GRAY) 4. REAR LEFT SPEAKER (+) (GREEN) 8.
WIRING CONNECTION Connector A 1. REAR RIGHT SPEAKER (-) (VIOLET/BLACK) 3. FRONT LEFT SPEAKER (+) (WHITE) 6. AUTO ANTENNA OUTPUT (BLUE) 6. FRONT LEFT SPEAKER (-) (WHITE/BLACK) 7. BRAKE (PINK) 3. FRONT RIGHT SPEAKER (-) (GRAY/BLACK) 5. REAR LEFT SPEAKER (-) (GREEN/BLACK) 7 N.C. 2. MEMORY +12V (YELLOW) 5. REAR RIGHT SPEAKER (+) (VIOLET) 2. N.C. 7. +12V (TO IGNITION KEY) (RED) 8. REAR VIEW (BROWN) 4. GROUND (BLACK) Connector B 1. FRONT RIGHT SPEAKER (+) (GRAY) 4. REAR LEFT SPEAKER (+) (GREEN) 8.
User Manual in English
Page 10
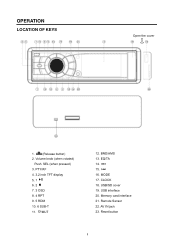
Volume knob (when rotated) Push SEL (when pressed) 3. BND/AMS 13. USB/SD cover 19. Memory card interface 21. CLOCK 18. MODE 17. USB interface 20. AV IN jack 23. OPERATION LOCATION OF KEYS Open the cover 1. (Release button) 2. PTY/AF 4. 3.2 inch TFT display 5. 1 6. 2 7. 3 OSD 8. 4 RPT 9. 5 RDM 10. 6 SUB-T 11. /MUT 12. EQ/TA 14. 15. 16. Remote Sensor 22. Reset button 8
Volume knob (when rotated) Push SEL (when pressed) 3. BND/AMS 13. USB/SD cover 19. Memory card interface 21. CLOCK 18. MODE 17. USB interface 20. AV IN jack 23. OPERATION LOCATION OF KEYS Open the cover 1. (Release button) 2. PTY/AF 4. 3.2 inch TFT display 5. 1 6. 2 7. 3 OSD 8. 4 RPT 9. 5 RDM 10. 6 SUB-T 11. /MUT 12. EQ/TA 14. 15. 16. Remote Sensor 22. Reset button 8
User Manual in English
Page 12
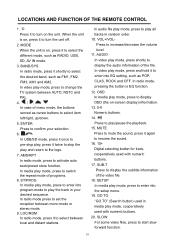
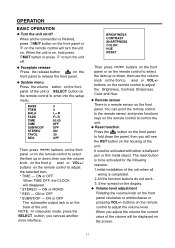
.... 5. AMS/RPT In radio mode, press to play mode, press to turn the unit off. 2. Press it to turn on , press it to switch the repeat mode of menu mode, the buttons served as POP, CLAS, ROCK and OFF. LOCATIONS AND FUNCTION OF THE REMOTE CONTROL 1. In radio mode press to increase/decrease the volume level. 11. Press to set the reception between mono mode or stereo mode. 9. In media play /pause the playback...
.... 5. AMS/RPT In radio mode, press to play mode, press to turn the unit off. 2. Press it to turn on , press it to switch the repeat mode of menu mode, the buttons served as POP, CLAS, ROCK and OFF. LOCATIONS AND FUNCTION OF THE REMOTE CONTROL 1. In radio mode press to increase/decrease the volume level. 11. Press to set the reception between mono mode or stereo mode. 9. In media play /pause the playback...
User Manual in English
Page 13
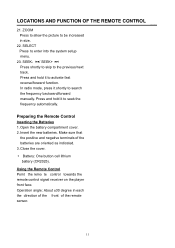
... to activate fast reverse/forward function. Open the battery compartment cover. 2. ZOOM Press to allow the picture to the previous/next track. Using the Remote Control Point the remo te control towards the remote control signal receiver on the player front face. Press and hold it shortly to enter into the system setup menu. 23. Make sure that the positive and negative terminals of the remote sensor. 11 Operation angle...
... to activate fast reverse/forward function. Open the battery compartment cover. 2. ZOOM Press to allow the picture to the previous/next track. Using the Remote Control Point the remo te control towards the remote control signal receiver on the player front face. Press and hold it shortly to enter into the system setup menu. 23. Make sure that the positive and negative terminals of the remote sensor. 11 Operation angle...
User Manual in English
Page 14
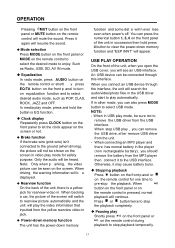
... panel or on the remote control will turn the unit off When all wiring is completed. 2.All the function buttons do not work. 3. It must be displayed on the housing of the unit. The reset button is to enter into the setup menu. Error symbol on the display. ◆ Volume level adjustment Rotating the volume knob on the back of the unit. NOTE: In video play mode, press the SELECT button, you will see...
... panel or on the remote control will turn the unit off When all wiring is completed. 2.All the function buttons do not work. 3. It must be displayed on the housing of the unit. The reset button is to enter into the setup menu. Error symbol on the display. ◆ Volume level adjustment Rotating the volume knob on the back of the unit. NOTE: In video play mode, press the SELECT button, you will see...
User Manual in English
Page 15
..., the unit will appear. When backing a car, the picture of the unit in the USB driver and start to play , you connect an USB device through this interface. Otherwise, it again will b e displayed. ◆ Rearview function On the back of the unit, when you open the USB cover, you should remove the battery from the USB interface. OPERATION Pressing MUT button on the front panel or MUTE button on the remote control will play mode for safety...
..., the unit will appear. When backing a car, the picture of the unit in the USB driver and start to play , you connect an USB device through this interface. Otherwise, it again will b e displayed. ◆ Rearview function On the back of the unit, when you open the USB cover, you should remove the battery from the USB interface. OPERATION Pressing MUT button on the front panel or MUTE button on the remote control will play mode for safety...
User Manual in English
Page 16
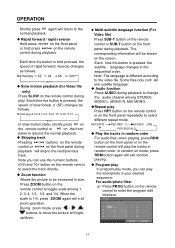
... function (For Video file) Press SUB-T button on the remote control or SUB-T button on the remote control to select the track directly. ◆ Zoom function Allows the picture to select different repeat mode. Some files only cont ain one subtitle language. ◆ Audio function Press AUDIO during playback. Each time the button is pressed, the speed of rapid forwar d /reverse changes as follows. Each time the button is hold press / on the remote control during play...
... function (For Video file) Press SUB-T button on the remote control or SUB-T button on the remote control to select the track directly. ◆ Zoom function Allows the picture to select different repeat mode. Some files only cont ain one subtitle language. ◆ Audio function Press AUDIO during playback. Each time the button is pressed, the speed of rapid forwar d /reverse changes as follows. Each time the button is hold press / on the remote control during play...

User Manual in English
Page 17
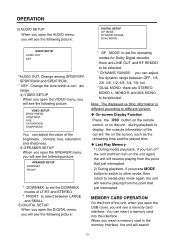
... program you just set. ◆ Setup Menu In media play the tracks you can change your country or region. 15 The language options are dif ferent depending on the remote control, then use / buttons to move between the different pages, such as SYSTEM SETUP, LANGUAGE SETUP, AUDIO SETUP, VIDEO SETUP, SPEAKER SETUP and DIGITAL SETUP. OPERATION b) Press / , / cursor buttons on the remote control to enter setup menu. And the unit will bec ome highlight. c) Press button to display...
... program you just set. ◆ Setup Menu In media play the tracks you can change your country or region. 15 The language options are dif ferent depending on the remote control, then use / buttons to move between the different pages, such as SYSTEM SETUP, LANGUAGE SETUP, AUDIO SETUP, VIDEO SETUP, SPEAKER SETUP and DIGITAL SETUP. OPERATION b) Press / , / cursor buttons on the remote control to enter setup menu. And the unit will bec ome highlight. c) Press button to display...
User Manual in English
Page 18
... the remote control or on the unit during playback to display the console information of the current file on the screen, such as the remaining time and the played time. ◆ Last Play Memory 1) During media play back, if you turn of f the unit and then turn on the unit again, the unit will resume playing from the point that just interrupted. 2) During playback, if you press MODE button to switch...
... the remote control or on the unit during playback to display the console information of the current file on the screen, such as the remaining time and the played time. ◆ Last Play Memory 1) During media play back, if you turn of f the unit and then turn on the unit again, the unit will resume playing from the point that just interrupted. 2) During playback, if you press MODE button to switch...
User Manual in English
Page 19
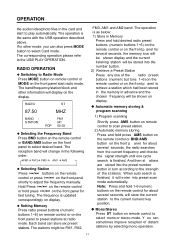
RADIO OPERATION ◆ Switching to Radio Mode Press MODE button on remote control or MODE on the front panel to play automatically. Hold Press / on the remote control or hold desired radio preset buttons (numeric buttons 1~6) on the remote control or on the front p anel for several seconds, the memory icon will be shown display and the current listening station will be stored into the number button. 2) Retrieve a Preset Station Press any one cycle search is updated correspondingly...
RADIO OPERATION ◆ Switching to Radio Mode Press MODE button on remote control or MODE on the front panel to play automatically. Hold Press / on the remote control or hold desired radio preset buttons (numeric buttons 1~6) on the remote control or on the front p anel for several seconds, the memory icon will be shown display and the current listening station will be stored into the number button. 2) Retrieve a Preset Station Press any one cycle search is updated correspondingly...
User Manual in English
Page 20
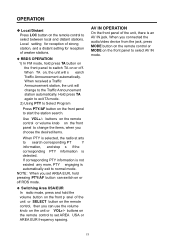
... of weaker stations. ◆ RBDS OPERATION 1) In FM mode, hold the volume button on the front p anel of the unit or SELECT button on the remote control, then you set AREA USA or AREA EUR frequency spacing. When TA on, the unit will change the items, when you connected the audio/video device from the jack, press MODE button on the remote control or MODE on the front panel to switch TA...
... of weaker stations. ◆ RBDS OPERATION 1) In FM mode, hold the volume button on the front p anel of the unit or SELECT button on the remote control, then you set AREA USA or AREA EUR frequency spacing. When TA on, the unit will change the items, when you connected the audio/video device from the jack, press MODE button on the remote control or MODE on the front panel to switch TA...
User Manual in English
Page 21
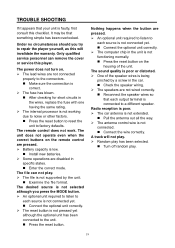
... batteries. ¾ Some operations are not wired correctly. „ Reconnect the speaker wires so that something simple has been overlooked. The sound quality is poor or distorted. ¾ One of the unit. TROUBLE SHOOTING If it appears that your unit is not functioning normally. „ Press the reset button on the housing of the speaker wires is being pinched by the unit. „ Examine the file format. The remote control...
... batteries. ¾ Some operations are not wired correctly. „ Reconnect the speaker wires so that something simple has been overlooked. The sound quality is poor or distorted. ¾ One of the unit. TROUBLE SHOOTING If it appears that your unit is not functioning normally. „ Press the reset button on the housing of the speaker wires is being pinched by the unit. „ Examine the file format. The remote control...
User Manual in English
Page 22
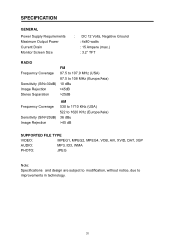
SPECIFICATION GENERAL Power Supply Requirements Maximum Output Power Current Drain Monitor Screen Size : DC 12 Volts, Negative Ground : 4x80 watts : 15 Ampere (max.) : 3.2" TFT RADIO Frequency Coverage Sensitivity (S/N=30dB) Image Rejection Stereo Separation FM 87.5 to 107.9 MHz (USA) 87.5 to 108 MHz (Europe/Asia) 10 dBu >45dB >25dB Frequency Coverage Sensitivity (S/N=20dB) Image Rejection AM 530 to 1710 KHz (USA) 522...
SPECIFICATION GENERAL Power Supply Requirements Maximum Output Power Current Drain Monitor Screen Size : DC 12 Volts, Negative Ground : 4x80 watts : 15 Ampere (max.) : 3.2" TFT RADIO Frequency Coverage Sensitivity (S/N=30dB) Image Rejection Stereo Separation FM 87.5 to 107.9 MHz (USA) 87.5 to 108 MHz (Europe/Asia) 10 dBu >45dB >25dB Frequency Coverage Sensitivity (S/N=20dB) Image Rejection AM 530 to 1710 KHz (USA) 522...


