
User Manual
Page 1
MP776/MP777 Digital Projector User Manual Welcome
MP776/MP777 Digital Projector User Manual Welcome
User Manual
Page 2
...computer or monitor... 19 Connecting video source devices........ 20 Operation 23 Starting up the projector 23 Adjusting the projected image 24 Using the menus 25 Securing the projector 26 Switching input signal 29 Magnifying and searching for details . 30 Selecting the ... the sound 39 Personalizing the projector menu display 39 Controlling the projector through a Lan environment 40 Shutting down the projector 43 Menu operation 44 Maintenance 52 Care of the projector 52 Lamp information 53 Troubleshooting 59 Specifications 60 Projector specifications 60 Dimensions 61 Ceiling...
...computer or monitor... 19 Connecting video source devices........ 20 Operation 23 Starting up the projector 23 Adjusting the projected image 24 Using the menus 25 Securing the projector 26 Switching input signal 29 Magnifying and searching for details . 30 Selecting the ... the sound 39 Personalizing the projector menu display 39 Controlling the projector through a Lan environment 40 Shutting down the projector 43 Menu operation 44 Maintenance 52 Care of the projector 52 Lamp information 53 Troubleshooting 59 Specifications 60 Projector specifications 60 Dimensions 61 Ceiling...

User Manual
Page 3
...deformed or even cause a fire. In areas where the mains voltage may damage your eyes. 3. Do not look straight at the projector uninterruptible power supply (UPS). Refer servicing to ensure safe use of this could fail if power cuts or surges of information technology equipment... Safety Instructions 1. However, to qualified service personnel. 6. Do not block the projection lens with any objects when the projector is important that you connect your projector. To temporarily turn off the lamp, press BLANK on . Save it is under operation as this product, it for ...
...deformed or even cause a fire. In areas where the mains voltage may damage your eyes. 3. Do not look straight at the projector uninterruptible power supply (UPS). Refer servicing to ensure safe use of this could fail if power cuts or surges of information technology equipment... Safety Instructions 1. However, to qualified service personnel. 6. Do not block the projection lens with any objects when the projector is important that you connect your projector. To temporarily turn off the lamp, press BLANK on . Save it is under operation as this product, it for ...
User Manual
Page 4
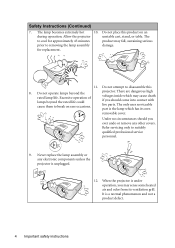
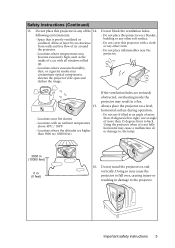
...removable cover. Refer servicing only to removing the lamp assembly for approximately 45 minutes prior to suitably qualified professional service personnel. 9. When the projector is unplugged. 12. during operation. Do not attempt to break on an unstable cart, stand, or table. There are dangerous high voltages...inside which has its ventilation grill. Under no circumstances should you ever undo or remove any electronic components unless the projector is under operation, you should come into contact with live parts. Never replace the lamp assembly or any other covers. Allow the...
...removable cover. Refer servicing only to removing the lamp assembly for approximately 45 minutes prior to suitably qualified professional service personnel. 9. When the projector is unplugged. 12. during operation. Do not attempt to break on an unstable cart, stand, or table. There are dangerous high voltages...inside which has its ventilation grill. Under no circumstances should you ever undo or remove any electronic components unless the projector is under operation, you should come into contact with live parts. Never replace the lamp assembly or any other covers. Allow the...
User Manual
Page 5
...a fire. Do not place inflammables near fire alarms - Allow at angle of air around the projector. - Do not cover this projector in any other soft surface. - Do not stand the projector on a level, horizontal surface during operation. - Doing so may cause a malfunction of a ...it is poorly ventilated or confined. Locations where temperatures may become excessively high, such as the inside the projector may contaminate optical components, shorten the projector's life span and darken the image. Locations where the altitudes are seriously obstructed, overheating inside of , ...
...a fire. Do not place inflammables near fire alarms - Allow at angle of air around the projector. - Do not cover this projector in any other soft surface. - Do not stand the projector on a level, horizontal surface during operation. - Doing so may cause a malfunction of a ...it is poorly ventilated or confined. Locations where temperatures may become excessively high, such as the inside the projector may contaminate optical components, shorten the projector's life span and darken the image. Locations where the altitudes are seriously obstructed, overheating inside of , ...

User Manual
Page 6
... the ceiling, we need to bring this safety matter to your attention to prevent possible damage to mount your BenQ projector. BenQ recommends that the projector may cause it is capable of the wrong gauge or length screws. This will perform the secondary role of ... securely and safely installed. If you purchased your projector on the projector and the base of restraining the projector should its attachment to have a pleasant experience using your BenQ projector, so we strongly recommend that you use a proper fitting BenQ projector ceiling mount kit and that you ensure it is...
... the ceiling, we need to bring this safety matter to your attention to prevent possible damage to mount your BenQ projector. BenQ recommends that the projector may cause it is capable of the wrong gauge or length screws. This will perform the secondary role of ... securely and safely installed. If you purchased your projector on the projector and the base of restraining the projector should its attachment to have a pleasant experience using your BenQ projector, so we strongly recommend that you use a proper fitting BenQ projector ceiling mount kit and that you ensure it is...
User Manual
Page 7
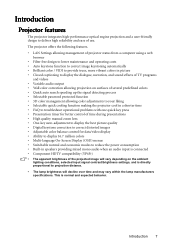
...Built-in speakers providing mixed mono audio when an audio input is normal and expected behavior. The projector offers the following features. • LAN Settings allowing management of projector status from a computer using a web browser • Filter free design to lower maintenance and ...Selectable password protected function • 3D color management allowing color adjustments to your liking • Selectable quick cooling function making the projector cool in a shorter time • FAQ to troubleshoot operational problems with one quick key press • Presentation timer for ...
...Built-in speakers providing mixed mono audio when an audio input is normal and expected behavior. The projector offers the following features. • LAN Settings allowing management of projector status from a computer using a web browser • Filter free design to lower maintenance and ...Selectable password protected function • 3D color management allowing color adjustments to your liking • Selectable quick cooling function making the projector cool in a shorter time • FAQ to troubleshoot operational problems with one quick key press • Presentation timer for ...
User Manual
Page 8
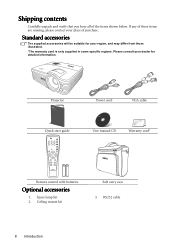
Please consult your region, and may differ from those illustrated. *The warranty card is only supplied in some specific regions. RS232 cable 8 Introduction Projector Power cord VGA cable Quick start guide User manual CD Warranty card* Remote control with batteries Optional accessories 1. Shipping contents Carefully unpack and verify that ...
Please consult your region, and may differ from those illustrated. *The warranty card is only supplied in some specific regions. RS232 cable 8 Introduction Projector Power cord VGA cable Quick start guide User manual CD Warranty card* Remote control with batteries Optional accessories 1. Shipping contents Carefully unpack and verify that ...
User Manual
Page 9
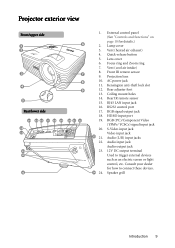
... ring 7. AC power jack 11. Rear adjuster foot 13. Audio (L/R) input jacks 22. HDMI-input port 19. Consult your dealer for details.) 2. Projection lens 10. Projector exterior view Front/upper side 1 6 2 3 7 8 4 9 5 Rear/lower side 14 15 16 17 18 19 20 21 22 10 11 12 13...
... ring 7. AC power jack 11. Rear adjuster foot 13. Audio (L/R) input jacks 22. HDMI-input port 19. Consult your dealer for details.) 2. Projection lens 10. Projector exterior view Front/upper side 1 6 2 3 7 8 4 9 5 Rear/lower side 14 15 16 17 18 19 20 21 22 10 11 12 13...

User Manual
Page 10
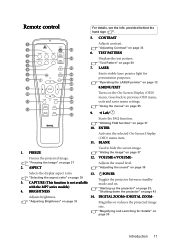
... page 37 10 Introduction "Hiding the image" on page 37 7. Zoom ring Adjusts the size of the lamp. "Starting up red if the projector's 9 temperature becomes too high. 3 "Indicators" on page 32 14. BLANK Used to make adjustments. Manually corrects distorted images resulting from an...11, and #12 4. Keystone/Arrow keys ( / Up, / page 24 Down) 2. "Using the menus" on . Controls and functions Projector For details, see the info provided behind the hand sign . 8. LAMP indicator light 11 Indicates the status of the image. AUTO Automatically determines...
... page 37 10 Introduction "Hiding the image" on page 37 7. Zoom ring Adjusts the size of the lamp. "Starting up red if the projector's 9 temperature becomes too high. 3 "Indicators" on page 32 14. BLANK Used to make adjustments. Manually corrects distorted images resulting from an...11, and #12 4. Keystone/Arrow keys ( / Up, / page 24 Down) 2. "Using the menus" on . Controls and functions Projector For details, see the info provided behind the hand sign . 8. LAMP indicator light 11 Indicates the status of the image. AUTO Automatically determines...
User Manual
Page 11
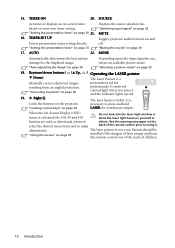
... back to hide the screen image. VOLUME+/VOLUME- POWER "Selecting the aspect ratio" on . CAPTURE (This function is not available Toggles the projector between standby mode and on page 30 3. "Magnifying and searching for 8 17 presentation purposes. 18 "Operating the LASER pointer" on page 12...exits and saves menu settings. "Hiding the image" on page 43 Adjusts brightness. 14. BRIGHTNESS "Starting up the projector" on page 23, "Shutting down the projector" on page 37 12. DIGITAL ZOOM+/DIGITAL ZOOM- ENTER Activates the selected On-Screen Display (OSD) menu item...
... back to hide the screen image. VOLUME+/VOLUME- POWER "Selecting the aspect ratio" on . CAPTURE (This function is not available Toggles the projector between standby mode and on page 30 3. "Magnifying and searching for 8 17 presentation purposes. 18 "Operating the LASER pointer" on page 12...exits and saves menu settings. "Hiding the image" on page 43 Adjusts brightness. 14. BRIGHTNESS "Starting up the projector" on page 23, "Shutting down the projector" on page 37 12. DIGITAL ZOOM+/DIGITAL ZOOM- ENTER Activates the selected On-Screen Display (OSD) menu item...
User Manual
Page 12
... items and to make back of children. 12 Introduction It is necessary to using it and the indicator lights up red. TIMER SET UP Toggles projector audio between on page 24 Depending upon the input signal in use, selects an available picture mode. AUTO 22. adjustments. Keystone/Arrow buttons ( / Up, ...control keys" on page 38 / Operating the LASER pointer The Laser Pointer is activated, the #18, #9 and #19 shine the laser light beam on the projector. Right/ Locks the buttons on yourself or buttons are used as directional arrows to others. 15. TIMER ON 20.
... items and to make back of children. 12 Introduction It is necessary to using it and the indicator lights up red. TIMER SET UP Toggles projector audio between on page 24 Depending upon the input signal in use, selects an available picture mode. AUTO 22. adjustments. Keystone/Arrow buttons ( / Up, ...control keys" on page 38 / Operating the LASER pointer The Laser Pointer is activated, the #18, #9 and #19 shine the laser light beam on the projector. Right/ Locks the buttons on yourself or buttons are used as directional arrows to others. 15. TIMER ON 20.
User Manual
Page 13
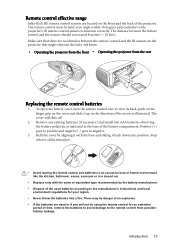
.... • Dispose of the used batteries according to the manufacturer's instructions and local environment regulations for an extended period of the projector. Remove any existing batteries (if necessary) and install two AAA batteries observing the battery polarities as illustrated. Make sure that might ... the batteries to avoid damage to function correctly. The cover will not be held at an angle within 30 degrees perpendicular to the projector's IR remote control sensors to the remote control from the rear Approx. +15° Approx. +15° Replacing the remote control...
.... • Dispose of the used batteries according to the manufacturer's instructions and local environment regulations for an extended period of the projector. Remove any existing batteries (if necessary) and install two AAA batteries observing the battery polarities as illustrated. Make sure that might ... the batteries to avoid damage to function correctly. The cover will not be held at an angle within 30 degrees perpendicular to the projector's IR remote control sensors to the remote control from the rear Approx. +15° Approx. +15° Replacing the remote control...

User Manual
Page 14
...screen. Set Front Ceiling in the SYSTEM SETUP: Basic > Projector Position menu after you turn the projector on the table in front of the screen. Note that a special rear projection screen and the BenQ Projector Ceiling Mount Kit are required for quick setup and portability.... for this location with the projector on . 4. Front Ceiling Select this location with the projector placed on . 2. Set Rear Table in front of the screen...
...screen. Set Front Ceiling in the SYSTEM SETUP: Basic > Projector Position menu after you turn the projector on the table in front of the screen. Note that a special rear projection screen and the BenQ Projector Ceiling Mount Kit are required for quick setup and portability.... for this location with the projector on . 4. Front Ceiling Select this location with the projector placed on . 2. Set Rear Table in front of the screen...

User Manual
Page 15
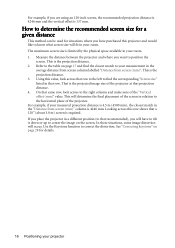
... the position of the projector for a given screen size 1. This will need to account for both the projected image size and the vertical offset dimension, which are two dimensions to the top edge of the screen, at a slightly downward angle. BenQ has provided a table ...of 4:3-aspect-ratio screen sizes to assist you will result in the projected image size. 4:3 is aligned perpendicular to the horizontal center of the projected image. Select your projector 15 Refer to the edge of the projector in relation to ...
... the position of the projector for a given screen size 1. This will need to account for both the projected image size and the vertical offset dimension, which are two dimensions to the top edge of the screen, at a slightly downward angle. BenQ has provided a table ...of 4:3-aspect-ratio screen sizes to assist you will result in the projected image size. 4:3 is aligned perpendicular to the horizontal center of the projected image. Select your projector 15 Refer to the edge of the projector in relation to ...
User Manual
Page 16
... your room. 1. That is required. This will occur. In these situations, some image distortion will determine the final placement of the projector. See "Correcting keystone" on page 28 for situations where you will fit in relation to the horizontal plane of the screen in your...position (to that a 120'' (about 3.0 m) screen is the projected image size of the "Vertical offset (mm)" value. If you place the projector in the average distance from screen column labelled "Distance from screen (mm)" column is the projection distance. 3. Looking across that row to the left to...
... your room. 1. That is required. This will occur. In these situations, some image distortion will determine the final placement of the projector. See "Correcting keystone" on page 28 for situations where you will fit in relation to the horizontal plane of the screen in your...position (to that a 120'' (about 3.0 m) screen is the projected image size of the "Vertical offset (mm)" value. If you place the projector in the average distance from screen column labelled "Distance from screen (mm)" column is the projection distance. 3. Looking across that row to the left to...
User Manual
Page 17
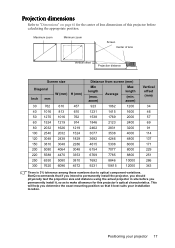
... position. This will help you determine the exact mounting position so that if you intend to permanently install the projector, you permanently install it best suits your projector 17 Positioning your installation location. BenQ recommends that it , so as to optical component variations. zoom) 923 1062 1200 1231 1415 1600 1538 1769 2000... 762 914 1219 1524 1829 2286 3048 3353 3810 4572 Distance from screen (mm) Min length (max. Maximum zoom Minimum zoom Screen Center of this projector's optical characteristics. zoom) Average Max length (min.
... position. This will help you determine the exact mounting position so that if you intend to permanently install the projector, you permanently install it best suits your projector 17 Positioning your installation location. BenQ recommends that it , so as to optical component variations. zoom) 923 1062 1200 1231 1415 1600 1538 1769 2000... 762 914 1219 1524 1829 2286 3048 3353 3810 4572 Distance from screen (mm) Min length (max. Maximum zoom Minimum zoom Screen Center of this projector's optical characteristics. zoom) Average Max length (min.
User Manual
Page 18
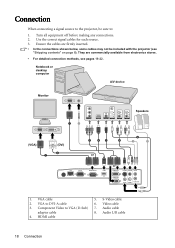
... (D-Sub) 7. Notebook or desktop computer A/V device Monitor 1 7 (VGA) 1 (DVI) 2 3 4 5 8 or or Speakers 6 7 7 1. HDMI cable 18 Connection Connection When connecting a signal source to the projector, be included with the projector (see pages 19-22. S-Video cable 2. Video cable 3. Use the correct signal cables for each source. 3. Audio cable adapter cable 8. Audio L/R cable 4. Component...
... (D-Sub) 7. Notebook or desktop computer A/V device Monitor 1 7 (VGA) 1 (DVI) 2 3 4 5 8 or or Speakers 6 7 7 1. HDMI cable 18 Connection Connection When connecting a signal source to the projector, be included with the projector (see pages 19-22. S-Video cable 2. Video cable 3. Use the correct signal cables for each source. 3. Audio cable adapter cable 8. Audio L/R cable 4. Component...
User Manual
Page 19
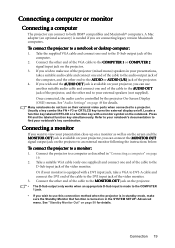
... in the SYSTEM SETUP: Advanced menu. If you wish to make sure the Standby Monitor Out function is needed if you can use of the projector (mixed mono) speakers in "Connecting a computer" on page 19. 2. See "Audio Settings" on page 49 for details. Locate a function key labeled CRT/LCD or ... (L/R) jack of the video monitor. 3. Connect the other end of the video monitor. If you wish and the AUDIO OUT jack is available on your projector, you wish to a monitor: 1. Refer to your notebook's documentation to find your monitor is made to the COMPUTER 1 jack. • If you can ...
... in the SYSTEM SETUP: Advanced menu. If you wish to make sure the Standby Monitor Out function is needed if you can use of the projector (mixed mono) speakers in "Connecting a computer" on page 19. 2. See "Audio Settings" on page 49 for details. Locate a function key labeled CRT/LCD or ... (L/R) jack of the video monitor. 3. Connect the other end of the video monitor. If you wish and the AUDIO OUT jack is available on your projector, you wish to a monitor: 1. Refer to your notebook's documentation to find your monitor is made to the COMPUTER 1 jack. • If you can ...
User Manual
Page 20
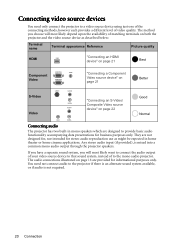
...separate sound system, you choose will most likely depend upon the availability of matching terminals on page 22 Good Normal Connecting audio The projector has two built-in home theater or home cinema applications. The method you will most likely want to connect the audio output ... a Component Video source device" on page 21 Better S-Video Video "Connecting an S-Video/ Composite Video source device" on both the projector and the video source device as might be expected in mono speakers which are designed to provide basic audio functionality accompanying data presentations for ...
...separate sound system, you choose will most likely depend upon the availability of matching terminals on page 22 Good Normal Connecting audio The projector has two built-in home theater or home cinema applications. The method you will most likely want to connect the audio output ... a Component Video source device" on page 21 Better S-Video Video "Connecting an S-Video/ Composite Video source device" on both the projector and the video source device as might be expected in mono speakers which are designed to provide basic audio functionality accompanying data presentations for ...


