
User Manual
Page 2
...translated into this product yourself, as dropping or mishandling occurs, contact qualified service personnel for ventilation. Your monitor should never be reproduced, transmitted, transcribed, stored in installation unless proper ventilation is provided. • Never push objects or..., optical, chemical, manual or otherwise, without obligation of BENQ Corporation to notify any warranties, merchantability or fitness for pluggable equipment. The socket outlet should be blocked or covered. Clean the LCD monitor surface with respect to make changes from the AC supply...
...translated into this product yourself, as dropping or mishandling occurs, contact qualified service personnel for ventilation. Your monitor should never be reproduced, transmitted, transcribed, stored in installation unless proper ventilation is provided. • Never push objects or..., optical, chemical, manual or otherwise, without obligation of BENQ Corporation to notify any warranties, merchantability or fitness for pluggable equipment. The socket outlet should be blocked or covered. Clean the LCD monitor surface with respect to make changes from the AC supply...
User Manual
Page 5
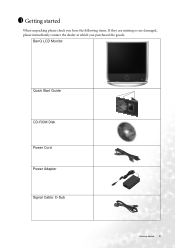
BenQ LCD Monitor Quick Start Guide CD-ROM Disk Power Cord Power Adapter Signal Cable: D-Sub Getting started When unpacking please check you have the following items. If they are missing or are damaged, please immediately contact the dealer at which you purchased the goods. 1 Getting started 5
BenQ LCD Monitor Quick Start Guide CD-ROM Disk Power Cord Power Adapter Signal Cable: D-Sub Getting started When unpacking please check you have the following items. If they are missing or are damaged, please immediately contact the dealer at which you purchased the goods. 1 Getting started 5
User Manual
Page 9
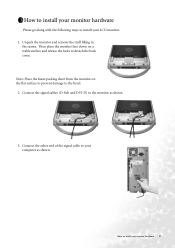
Unpack the monitor and remove the stuff filling in the seams. Then place the monitor face down on the flat surface to prevent damage to the bezel. 2. Note: Place the foam packing sheet from the monitor on a stable surface and release the locks to detach the back cover. Connect the signal cables (D-Sub and DVI-D) to the monitor as shown. Connect the other end of the signal cable to your LCD monitor. 1. 3 How to install your monitor hardware Please go along with the following steps to install your computer as shown. 3. How to install your monitor hardware 9
Unpack the monitor and remove the stuff filling in the seams. Then place the monitor face down on the flat surface to prevent damage to the bezel. 2. Note: Place the foam packing sheet from the monitor on a stable surface and release the locks to detach the back cover. Connect the signal cables (D-Sub and DVI-D) to the monitor as shown. Connect the other end of the signal cable to your LCD monitor. 1. 3 How to install your monitor hardware Please go along with the following steps to install your computer as shown. 3. How to install your monitor hardware 9

User Manual
Page 11
... wish to support the weight of the monitor. Note: This funtion is stable to mount your monitor hardware 11 Using the Monitor Mounting Kit (Optional) Your FP785 allows "Location Free" installation. Click on the provided CD. 2. To cancel this action, choose "Rotate 0 degree" , . 4. How to install your LCD monitor to complete the installation. Press the Power...
... wish to support the weight of the monitor. Note: This funtion is stable to mount your monitor hardware 11 Using the Monitor Mounting Kit (Optional) Your FP785 allows "Location Free" installation. Click on the provided CD. 2. To cancel this action, choose "Rotate 0 degree" , . 4. How to install your LCD monitor to complete the installation. Press the Power...

User Manual
Page 12
Now you may turn the monitor power on. 2 3 1 4 Adjusting the viewing angle Your LCD monitor is designed with a tilt feature that allows you to achieve your optimal viewing angle. 12 How to the wall. 4. Insert the supplied screws into the holes and then attach the monitor mounting kit to install your monitor hardware Mount the LCD panel to the wall. 2. Adhere the mounting position reference chart to the fixed monitor mounting kit. Installing the monitor mounting kit 1. Use a suitable drill and bit to drill two holes inon the wall according to the reference chart. 3.
Now you may turn the monitor power on. 2 3 1 4 Adjusting the viewing angle Your LCD monitor is designed with a tilt feature that allows you to achieve your optimal viewing angle. 12 How to the wall. 4. Insert the supplied screws into the holes and then attach the monitor mounting kit to install your monitor hardware Mount the LCD panel to the wall. 2. Adhere the mounting position reference chart to the fixed monitor mounting kit. Installing the monitor mounting kit 1. Use a suitable drill and bit to drill two holes inon the wall according to the reference chart. 3.
User Manual
Page 19
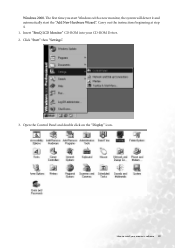
The first time you start Windows with a new monitor, the system will detect it and automatically start the "Add New Hardware Wizard". Carry out the instructions beginning at step 4. 1. Click "Start" then "Settings". 3. Open the Control Panel and double click on the "Display" icon. Insert "BenQ LCD Monitor" CD-ROM into your monitor's software 19 How to install your CD-ROM Driver. 2. Windows 2000.
The first time you start Windows with a new monitor, the system will detect it and automatically start the "Add New Hardware Wizard". Carry out the instructions beginning at step 4. 1. Click "Start" then "Settings". 3. Open the Control Panel and double click on the "Display" icon. Insert "BenQ LCD Monitor" CD-ROM into your monitor's software 19 How to install your CD-ROM Driver. 2. Windows 2000.
User Manual
Page 25
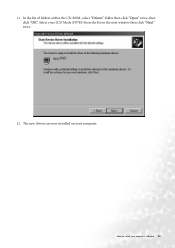
The new drivers are now installed on your monitor's software 25 How to install your computer. Select your LCD Mode (FP785) from the list in the next window then click "Next" twice. 12. In the list of folders within the CD-ROM, select "Drivers" folder then click "Open" twice, then click "OK". 11.
The new drivers are now installed on your monitor's software 25 How to install your computer. Select your LCD Mode (FP785) from the list in the next window then click "Next" twice. 12. In the list of folders within the CD-ROM, select "Drivers" folder then click "Open" twice, then click "OK". 11.
User Manual
Page 29
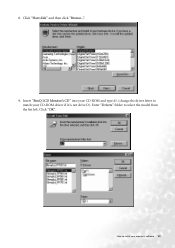
8. Insert "BenQ LCD Monitor's CD" into your CD-ROM and type d:\ (change the driver letter to install your CD-ROM driver if it is not drive D). Click "Have disk" and then click "Browse...". 9. Click "OK". How to match your monitor's software 29 Enter "Drivers" folder to select the model from the list left.
8. Insert "BenQ LCD Monitor's CD" into your CD-ROM and type d:\ (change the driver letter to install your CD-ROM driver if it is not drive D). Click "Have disk" and then click "Browse...". 9. Click "OK". How to match your monitor's software 29 Enter "Drivers" folder to select the model from the list left.


