
User Manual
Page 2
... ventilation. Avoid using any of power available, consult your monitor Power Safety • The AC plug isolates this product. If any liquid, aerosol or glass cleaners. • Slots and openings on the marked label. No part of this publication and to make changes from the AC supply. • The power supply cord serves as opening or removing covers may be operated from the wall outlet before cleaning. The...
... ventilation. Avoid using any of power available, consult your monitor Power Safety • The AC plug isolates this product. If any liquid, aerosol or glass cleaners. • Slots and openings on the marked label. No part of this publication and to make changes from the AC supply. • The power supply cord serves as opening or removing covers may be operated from the wall outlet before cleaning. The...
User Manual
Page 3
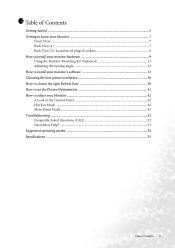
... to install your monitor hardware 9 Using the Monitor Mounting Kit (Optional 11 Adjusting the viewing angle 12 How to install your monitor's software 13 Choosing the best picture resolution 36 How to choose the right Refresh Rate 38 How to set the Picture Optimization 41 How to adjust your Monitor 42 A Look at the Control Panel 42 Hot Key Mode ...42 Main Menu Mode ...43 Troubleshooting ...52 Frequently Asked Questions (FAQ 52 Need More Help? ...53 Supported operating modes 54 Specifications...
... to install your monitor hardware 9 Using the Monitor Mounting Kit (Optional 11 Adjusting the viewing angle 12 How to install your monitor's software 13 Choosing the best picture resolution 36 How to choose the right Refresh Rate 38 How to set the Picture Optimization 41 How to adjust your Monitor 42 A Look at the Control Panel 42 Hot Key Mode ...42 Main Menu Mode ...43 Troubleshooting ...52 Frequently Asked Questions (FAQ 52 Need More Help? ...53 Supported operating modes 54 Specifications...
User Manual
Page 11
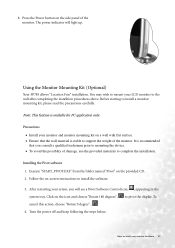
... monitor hardware 11 Before starting to install the software. 3. Press the Power button on the icon and choose "Rotate 180 degrees", , to pivot the display. Using the Monitor Mounting Kit (Optional) Your FP785 allows "Location Free" installation. Precautions • Install your LCD monitor to complete the installation. Turn the power off and keep following the steps below.. Note: This funtion is recommended that the wall material is stable to mount your monitor and monitor mounting...
... monitor hardware 11 Before starting to install the software. 3. Press the Power button on the icon and choose "Rotate 180 degrees", , to pivot the display. Using the Monitor Mounting Kit (Optional) Your FP785 allows "Location Free" installation. Precautions • Install your LCD monitor to complete the installation. Turn the power off and keep following the steps below.. Note: This funtion is recommended that the wall material is stable to mount your monitor and monitor mounting...

User Manual
Page 12
Adhere the mounting position reference chart to the reference chart. 3. Use a suitable drill and bit to drill two holes inon the wall according to the wall. 2. Now you may turn the monitor power on. 2 3 1 4 Adjusting the viewing angle Your LCD monitor is designed with a tilt feature that allows you to achieve your monitor hardware Insert the supplied screws into the holes and then attach the monitor mounting kit to install your optimal viewing angle. 12 How to the wall. 4. Mount the LCD panel to the fixed monitor mounting kit. Installing the monitor mounting kit 1.
Adhere the mounting position reference chart to the reference chart. 3. Use a suitable drill and bit to drill two holes inon the wall according to the wall. 2. Now you may turn the monitor power on. 2 3 1 4 Adjusting the viewing angle Your LCD monitor is designed with a tilt feature that allows you to achieve your monitor hardware Insert the supplied screws into the holes and then attach the monitor mounting kit to install your optimal viewing angle. 12 How to the wall. 4. Mount the LCD panel to the fixed monitor mounting kit. Installing the monitor mounting kit 1.
User Manual
Page 13
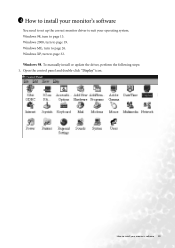
Windows 2000, turn to suit your operating system. To manually install or update the driver, perform the following steps: 1. How to page 19. 4 How to install your monitor's software You need to set up the correct monitor driver to page 26. Windows ME, turn to install your monitor's software 13 Windows 98. Windows XP, turn to page 32. Open the control panel and double-click "Display" icon. Windows 98, turn to page 13.
Windows 2000, turn to suit your operating system. To manually install or update the driver, perform the following steps: 1. How to page 19. 4 How to install your monitor's software You need to set up the correct monitor driver to page 26. Windows ME, turn to install your monitor's software 13 Windows 98. Windows XP, turn to page 32. Open the control panel and double-click "Display" icon. Windows 98, turn to page 13.
User Manual
Page 14
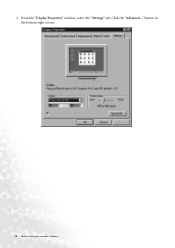
button in the bottom right corner. 14 How to install your monitor's software Click the "Advanced..." 2. From the "Display Properties" window, select the "Settings" tab.
button in the bottom right corner. 14 How to install your monitor's software Click the "Advanced..." 2. From the "Display Properties" window, select the "Settings" tab.
User Manual
Page 19
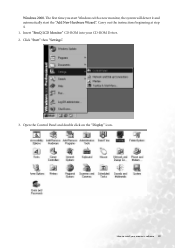
The first time you start Windows with a new monitor, the system will detect it and automatically start the "Add New Hardware Wizard". How to install your CD-ROM Driver. 2. Insert "BenQ LCD Monitor" CD-ROM into your monitor's software 19 Click "Start" then "Settings". 3. Open the Control Panel and double click on the "Display" icon. Carry out the instructions beginning at step 4. 1. Windows 2000.
The first time you start Windows with a new monitor, the system will detect it and automatically start the "Add New Hardware Wizard". How to install your CD-ROM Driver. 2. Insert "BenQ LCD Monitor" CD-ROM into your monitor's software 19 Click "Start" then "Settings". 3. Open the Control Panel and double click on the "Display" icon. Carry out the instructions beginning at step 4. 1. Windows 2000.
User Manual
Page 20
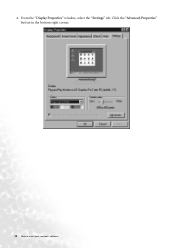
From the "Display Properties" window, select the "Settings" tab. Click the "Advanced Properties" button in the bottom right corner. 20 How to install your monitor's software 4.
From the "Display Properties" window, select the "Settings" tab. Click the "Advanced Properties" button in the bottom right corner. 20 How to install your monitor's software 4.
User Manual
Page 26
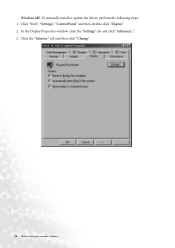
Click "Start", "Settings", "Control Panel" and then double-click "Display". 2. Click the "Monitor" tab and then click "Change". 26 How to install your monitor's software In the Display Properties window, click the "Settings" tab and click "Advanced...". 3. To manually install or update the driver, perform the following steps: 1. Windows ME.
Click "Start", "Settings", "Control Panel" and then double-click "Display". 2. Click the "Monitor" tab and then click "Change". 26 How to install your monitor's software In the Display Properties window, click the "Settings" tab and click "Advanced...". 3. To manually install or update the driver, perform the following steps: 1. Windows ME.
User Manual
Page 29
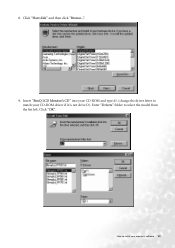
8. Click "OK". How to match your monitor's software 29 Insert "BenQ LCD Monitor's CD" into your CD-ROM and type d:\ (change the driver letter to install your CD-ROM driver if it is not drive D). Click "Have disk" and then click "Browse...". 9. Enter "Drivers" folder to select the model from the list left.
8. Click "OK". How to match your monitor's software 29 Insert "BenQ LCD Monitor's CD" into your CD-ROM and type d:\ (change the driver letter to install your CD-ROM driver if it is not drive D). Click "Have disk" and then click "Browse...". 9. Enter "Drivers" folder to select the model from the list left.
User Manual
Page 32
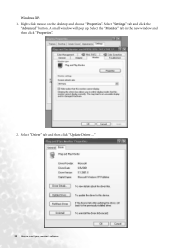
Select "Driver" tab and then click "Update Driver..." 32 How to install your monitor's software Right click mouse on the desktop and choose "Properties". Select "Settings" tab and click the "Advanced" button. A small window will pop up. Select the "Monitor" tab in the new window and then click "Properties". 2. Windows XP. 1.
Select "Driver" tab and then click "Update Driver..." 32 How to install your monitor's software Right click mouse on the desktop and choose "Properties". Select "Settings" tab and click the "Advanced" button. A small window will pop up. Select the "Monitor" tab in the new window and then click "Properties". 2. Windows XP. 1.
User Manual
Page 36
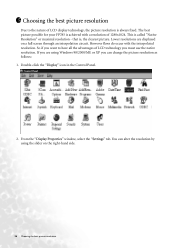
... XP you can change the picture resolution as follows: 1. that is achieved with the interpolated resolution. So if you want to the nature of LCD display technology, the picture resolution is called "Native Resolution" or maximal resolution - This is always fixed. If you are displayed on the right-hand side. 36 Choosing the best picture resolution From the "Display Properties" window, select the "Settings" tab. 5 Choosing the best picture resolution Due to...
... XP you can change the picture resolution as follows: 1. that is achieved with the interpolated resolution. So if you want to the nature of LCD display technology, the picture resolution is called "Native Resolution" or maximal resolution - This is always fixed. If you are displayed on the right-hand side. 36 Choosing the best picture resolution From the "Display Properties" window, select the "Settings" tab. 5 Choosing the best picture resolution Due to...

User Manual
Page 38
6 How to choose the right Refresh Rate You don't have to choose the highest possible refresh rate on an LCD display, because it is a table with the factory modes in this user's guide. Youc an choose 60 Hertz, (but not 72Hz) for an LCD display to choose the right Refresh Rate The best results are obtained by using the factory modes already set in the Control Panel. 38 How to flicker. In Windows 98/2000/ME/XP you can change the refresh rate as follows: 1. Double click the "Display" icon in your computer. There is not technically possible for the native resolution of 1280x1024.
6 How to choose the right Refresh Rate You don't have to choose the highest possible refresh rate on an LCD display, because it is a table with the factory modes in this user's guide. Youc an choose 60 Hertz, (but not 72Hz) for an LCD display to choose the right Refresh Rate The best results are obtained by using the factory modes already set in the Control Panel. 38 How to flicker. In Windows 98/2000/ME/XP you can change the refresh rate as follows: 1. Double click the "Display" icon in your computer. There is not technically possible for the native resolution of 1280x1024.
User Manual
Page 41
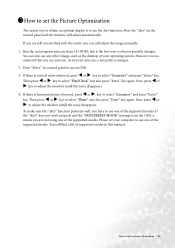
... adjust the monitor untill the noise disappears. Please set the Picture Optimization 41 You will adjust automatically. this manual. If there is horizontal noise observed, press W or X key to use one of the supported modes. Run the test program auto.exe from CD-ROM; You can still adjust the image manually. 1. How to use any other image, such as the desktop of supported modes in this is on the OSD...
... adjust the monitor untill the noise disappears. Please set the Picture Optimization 41 You will adjust automatically. this manual. If there is horizontal noise observed, press W or X key to use one of the supported modes. Run the test program auto.exe from CD-ROM; You can still adjust the image manually. 1. How to use any other image, such as the desktop of supported modes in this is on the OSD...

User Manual
Page 42
... menu or exit OSD. "Mode" key: Switch between different modes, including Standard, Movie 1, Movie 2, and Photo. 2. "Exit" key: Back to adjust your Monitor The specified mode will optimise the image properties to adjust your desired mode from these keys & switch. 1. Movie 1, enhancing color and contrast level, is also the hot key for vewing videos, while the Movie 2 mode best suits landscape-specific videos; The following descriptions are 6 keys for user's control...
... menu or exit OSD. "Mode" key: Switch between different modes, including Standard, Movie 1, Movie 2, and Photo. 2. "Exit" key: Back to adjust your Monitor The specified mode will optimise the image properties to adjust your desired mode from these keys & switch. 1. Movie 1, enhancing color and contrast level, is also the hot key for vewing videos, while the Movie 2 mode best suits landscape-specific videos; The following descriptions are 6 keys for user's control...
User Manual
Page 52
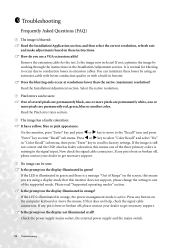
... external power supply and the mains switch. 52 Troubleshooting 9 Troubleshooting Frequently Asked Questions (FAQ) The image is blurred: Read the Installation/Application section, and then select the correct resolution, refresh rate and make adjustments based on these losses by working through the instructions in the Installation/Adjustment section. Is the image now in extension cables. Please read "Supported operating modes" section. Now check the signal cable connectors. Pixel errors can be seen: One of the supported mode. If any button...
... external power supply and the mains switch. 52 Troubleshooting 9 Troubleshooting Frequently Asked Questions (FAQ) The image is blurred: Read the Installation/Application section, and then select the correct resolution, refresh rate and make adjustments based on these losses by working through the instructions in the Installation/Adjustment section. Is the image now in extension cables. Please read "Supported operating modes" section. Now check the signal cable connectors. Pixel errors can be seen: One of the supported mode. If any button...

User Manual
Page 53
Need More Help? If your problems remain after checking this manual, please contact your place of purchase or e-mail us at: Support@BenQ.com Troubleshooting 53 The image is distorted, flashes or flickers: Read the Installation//section and then select the correct resolution, refresh rate and make adjustments based on these instructions. The image is displaced in one direction: Read the Installation//section and then select the correct resolution, refresh rate and make adjustments based on these instructions.
Need More Help? If your problems remain after checking this manual, please contact your place of purchase or e-mail us at: Support@BenQ.com Troubleshooting 53 The image is distorted, flashes or flickers: Read the Installation//section and then select the correct resolution, refresh rate and make adjustments based on these instructions. The image is displaced in one direction: Read the Installation//section and then select the correct resolution, refresh rate and make adjustments based on these instructions.
User Manual
Page 54
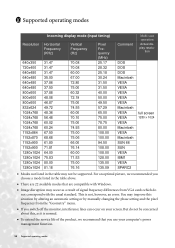
... correspond with Windows. • Image disruption may not be concerned about this situation by altering an automatic setting or by manually changing the phase setting and the pixel frequency from VGA cards which do not be supported. For an optimal picture, we recommend that you choose a mode listed in the table may occur as it is not, however, an error. 10 Supported operating modes Incoming display mode (Input timing) Resolution Horizontal Frequency (KHz...
... correspond with Windows. • Image disruption may not be concerned about this situation by altering an automatic setting or by manually changing the phase setting and the pixel frequency from VGA cards which do not be supported. For an optimal picture, we recommend that you choose a mode listed in the table may occur as it is not, however, an error. 10 Supported operating modes Incoming display mode (Input timing) Resolution Horizontal Frequency (KHz...
User Manual
Page 55
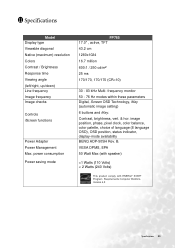
...) resolution Colors Contrast / Brightness Response time Viewing angle (left/right, up/down) Line frequency Image frequency Image checks Controls iScreen functions Power Adapter Power Management Max. Contrast, brightness, vert. & hor. image position, phase, pixel clock, color balance, color palette, choice of language (8 language OSD), OSD position, status indicator, display-mode availability BENQ ADP-50SH Rev. frequency monitor 50 - 76 Hz modes within these parameters Digital, Screen OSD Technology, iKey (automatic image setting) 6 buttons and iKey. B. power consumption Power saving mode...
...) resolution Colors Contrast / Brightness Response time Viewing angle (left/right, up/down) Line frequency Image frequency Image checks Controls iScreen functions Power Adapter Power Management Max. Contrast, brightness, vert. & hor. image position, phase, pixel clock, color balance, color palette, choice of language (8 language OSD), OSD position, status indicator, display-mode availability BENQ ADP-50SH Rev. frequency monitor 50 - 76 Hz modes within these parameters Digital, Screen OSD Technology, iKey (automatic image setting) 6 buttons and iKey. B. power consumption Power saving mode...
User Manual
Page 56
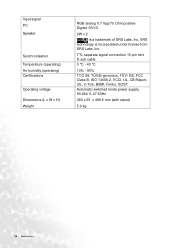
...;V/ GS, FCC Class B, ISO 13406-2, VCCI, UL, CB Report, CE, C-Tick, BSMI, Fimko, GOST Automatic switched mode power supply, 90-264 V, 47-63Hz 380 x 55 x 496.5 mm (with stand) 5.0 kg 56 Specifications Input signal PC Speaker Synchronisation Temperature (operating) Air humidity (operating) Certifications Operating voltage Dimensions (L x W x H) Weight RGB analog 0.7 Vpp/75 Ohm positive Digital: DVI-D 2W x 2 is incorporated under license from SRS Labs, Inc.
...;V/ GS, FCC Class B, ISO 13406-2, VCCI, UL, CB Report, CE, C-Tick, BSMI, Fimko, GOST Automatic switched mode power supply, 90-264 V, 47-63Hz 380 x 55 x 496.5 mm (with stand) 5.0 kg 56 Specifications Input signal PC Speaker Synchronisation Temperature (operating) Air humidity (operating) Certifications Operating voltage Dimensions (L x W x H) Weight RGB analog 0.7 Vpp/75 Ohm positive Digital: DVI-D 2W x 2 is incorporated under license from SRS Labs, Inc.


