
User Manual
Page 2
...sure of the type of this publication may expose you are for any of BENQ Corporation. No part of power available, consult your dealer or local power company. All rights reserved. Clean the LCD monitor surface with respect to service this product. They must not be operated... from time to time in any form or by BENQ Corporation. Your monitor should be blocked or covered. Servicing • Do...
...sure of the type of this publication may expose you are for any of BENQ Corporation. No part of power available, consult your dealer or local power company. All rights reserved. Clean the LCD monitor surface with respect to service this product. They must not be operated... from time to time in any form or by BENQ Corporation. Your monitor should be blocked or covered. Servicing • Do...
User Manual
Page 5
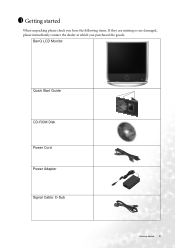
BenQ LCD Monitor Quick Start Guide CD-ROM Disk Power Cord Power Adapter Signal Cable: D-Sub Getting started When unpacking please check you have the following items. If they are missing or are damaged, please immediately contact the dealer at which you purchased the goods. 1 Getting started 5
BenQ LCD Monitor Quick Start Guide CD-ROM Disk Power Cord Power Adapter Signal Cable: D-Sub Getting started When unpacking please check you have the following items. If they are missing or are damaged, please immediately contact the dealer at which you purchased the goods. 1 Getting started 5
User Manual
Page 9
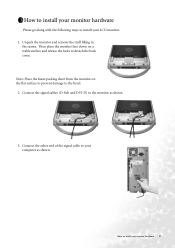
Note: Place the foam packing sheet from the monitor on a stable surface and release the locks to your computer as shown. 3. Connect the other end of the signal cable to detach the back cover. How to install your LCD monitor. 1. Connect the signal cables (D-Sub and DVI-D) to the bezel. 2. 3 How to install your monitor hardware Please go along with the following steps to install your monitor hardware 9 Unpack the monitor and remove the stuff filling in the seams. Then place the monitor face down on the flat surface to prevent damage to the monitor as shown.
Note: Place the foam packing sheet from the monitor on a stable surface and release the locks to your computer as shown. 3. Connect the other end of the signal cable to detach the back cover. How to install your LCD monitor. 1. Connect the signal cables (D-Sub and DVI-D) to the bezel. 2. 3 How to install your monitor hardware Please go along with the following steps to install your monitor hardware 9 Unpack the monitor and remove the stuff filling in the seams. Then place the monitor face down on the flat surface to prevent damage to the monitor as shown.
User Manual
Page 11
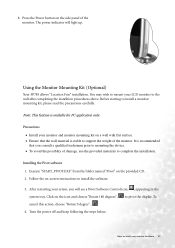
... surface. • Ensure that you consult a qualified tradesman prior to install your sytem, you will light up. Precautions • Install your LCD monitor to support the weight of the monitor. Execute "START_PIVOT.EXE" from the folder named "Pivot" on the side panel of damage, use...is available for PC application only. Turn the power off and keep following the steps below.. Using the Monitor Mounting Kit (Optional) Your FP785 allows "Location Free" installation. Note: This funtion is recommended that the wall material is stable to the wall after completing the installtion ...
... surface. • Ensure that you consult a qualified tradesman prior to install your sytem, you will light up. Precautions • Install your LCD monitor to support the weight of the monitor. Execute "START_PIVOT.EXE" from the folder named "Pivot" on the side panel of damage, use...is available for PC application only. Turn the power off and keep following the steps below.. Using the Monitor Mounting Kit (Optional) Your FP785 allows "Location Free" installation. Note: This funtion is recommended that the wall material is stable to the wall after completing the installtion ...

User Manual
Page 12
Adhere the mounting position reference chart to the fixed monitor mounting kit. Mount the LCD panel to the wall. 2. Use a suitable drill and bit to drill two holes inon the wall according to install your optimal viewing angle. 12 How to the reference chart. 3. Now you may turn the monitor power on. 2 3 1 4 Adjusting the viewing angle Your LCD monitor is designed with a tilt feature that allows you to achieve your monitor hardware Installing the monitor mounting kit 1. Insert the supplied screws into the holes and then attach the monitor mounting kit to the wall. 4.
Adhere the mounting position reference chart to the fixed monitor mounting kit. Mount the LCD panel to the wall. 2. Use a suitable drill and bit to drill two holes inon the wall according to install your optimal viewing angle. 12 How to the reference chart. 3. Now you may turn the monitor power on. 2 3 1 4 Adjusting the viewing angle Your LCD monitor is designed with a tilt feature that allows you to achieve your monitor hardware Installing the monitor mounting kit 1. Insert the supplied screws into the holes and then attach the monitor mounting kit to the wall. 4.
User Manual
Page 19
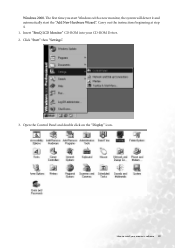
Insert "BenQ LCD Monitor" CD-ROM into your monitor's software 19 How to install your CD-ROM Driver. 2. Click "Start" then "Settings". 3. The first time you start Windows with a new monitor, the system will detect it and automatically start the "Add New Hardware Wizard". Open the Control Panel and double click on the "Display" icon. Windows 2000. Carry out the instructions beginning at step 4. 1.
Insert "BenQ LCD Monitor" CD-ROM into your monitor's software 19 How to install your CD-ROM Driver. 2. Click "Start" then "Settings". 3. The first time you start Windows with a new monitor, the system will detect it and automatically start the "Add New Hardware Wizard". Open the Control Panel and double click on the "Display" icon. Windows 2000. Carry out the instructions beginning at step 4. 1.
User Manual
Page 25
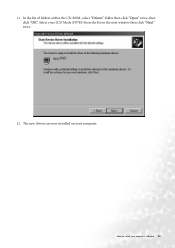
How to install your LCD Mode (FP785) from the list in the next window then click "Next" twice. 12. In the list of folders within the CD-ROM, select "Drivers" folder then click "Open" twice, then click "OK". Select your monitor's software 25 11. The new drivers are now installed on your computer.
How to install your LCD Mode (FP785) from the list in the next window then click "Next" twice. 12. In the list of folders within the CD-ROM, select "Drivers" folder then click "Open" twice, then click "OK". Select your monitor's software 25 11. The new drivers are now installed on your computer.
User Manual
Page 29
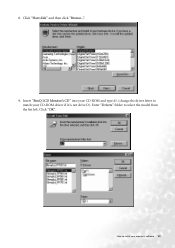
8. Click "Have disk" and then click "Browse...". 9. How to install your CD-ROM driver if it is not drive D). Enter "Drivers" folder to match your monitor's software 29 Click "OK". Insert "BenQ LCD Monitor's CD" into your CD-ROM and type d:\ (change the driver letter to select the model from the list left.
8. Click "Have disk" and then click "Browse...". 9. How to install your CD-ROM driver if it is not drive D). Enter "Drivers" folder to match your monitor's software 29 Click "OK". Insert "BenQ LCD Monitor's CD" into your CD-ROM and type d:\ (change the driver letter to select the model from the list left.
User Manual
Page 36
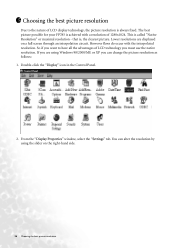
...the picture resolution is always fixed. that is called "Native Resolution" or maximal resolution - So if you want to the nature of LCD technology you must use the native resolution. If you can alter the resolution by using Windows 98/2000/ME or XP you are ...36 Choosing the best picture resolution Lower resolutions are using the slider on a full screen through an interpolation circuit. The best picture possible for your FP785 is achieved with the interpolated resolution. Double-click the "Display" icon in the Control Panel. 2. This is , the clearest picture. You can...
...the picture resolution is always fixed. that is called "Native Resolution" or maximal resolution - So if you want to the nature of LCD technology you must use the native resolution. If you can alter the resolution by using Windows 98/2000/ME or XP you are ...36 Choosing the best picture resolution Lower resolutions are using the slider on a full screen through an interpolation circuit. The best picture possible for your FP785 is achieved with the interpolated resolution. Double-click the "Display" icon in the Control Panel. 2. This is , the clearest picture. You can...

User Manual
Page 38
In Windows 98/2000/ME/XP you can change the refresh rate as follows: 1. Double click the "Display" icon in the Control Panel. 38 How to flicker. There is not technically possible for the native resolution of 1280x1024. 6 How to choose the right Refresh Rate You don't have to choose the highest possible refresh rate on an LCD display, because it is a table with the factory modes in this user's guide. Youc an choose 60 Hertz, (but not 72Hz) for an LCD display to choose the right Refresh Rate The best results are obtained by using the factory modes already set in your computer.
In Windows 98/2000/ME/XP you can change the refresh rate as follows: 1. Double click the "Display" icon in the Control Panel. 38 How to flicker. There is not technically possible for the native resolution of 1280x1024. 6 How to choose the right Refresh Rate You don't have to choose the highest possible refresh rate on an LCD display, because it is a table with the factory modes in this user's guide. Youc an choose 60 Hertz, (but not 72Hz) for an LCD display to choose the right Refresh Rate The best results are obtained by using the factory modes already set in your computer.


