User Manual
Page 8
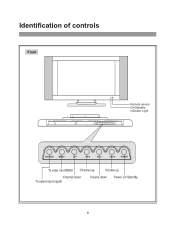
Identification of controls Front Remote sensor On/Standby Indicator Light SOURCE MENU CH CH VOL VOL POWER To enter into MENU Channel up Volume up Channel down To select input signal Volume down Power on/ Standby 8
Identification of controls Front Remote sensor On/Standby Indicator Light SOURCE MENU CH CH VOL VOL POWER To enter into MENU Channel up Volume up Channel down To select input signal Volume down Power on/ Standby 8
User Manual
Page 10
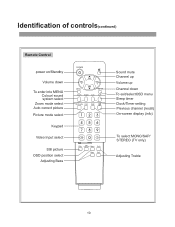
Identification of controls(continued) Remote Control power on/Standby Volume down To enter into MENU Colour/ sound system select Zoom mode select Auto correct picture Picture mode select Keypad Video Input select Still picture OSD position select Adjusting Bass Sound mute Channel up Volume up Channel down To exit/selectOSD menu Sleep timer Clock/Timer setting Previous channel (recall) On-screen display (info) To select MONO/SAP/ STEREO (TV only) Adjusting Treble 10
Identification of controls(continued) Remote Control power on/Standby Volume down To enter into MENU Colour/ sound system select Zoom mode select Auto correct picture Picture mode select Keypad Video Input select Still picture OSD position select Adjusting Bass Sound mute Channel up Volume up Channel down To exit/selectOSD menu Sleep timer Clock/Timer setting Previous channel (recall) On-screen display (info) To select MONO/SAP/ STEREO (TV only) Adjusting Treble 10
User Manual
Page 11
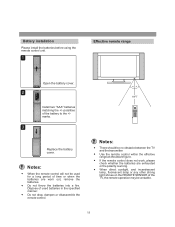
.... 30 30 16FT Notes: There should be unstable. 11 polarities of the TV, the remote operation may be no obstacle between the TV and the transmitter. If the remote control does not work, please check whether the batteries are worn out, remove the batteries. ...Battery installation Please install the batteries before using the remote control unit. 1 Effective remote range Open the battery cover. 2 Install two "AAA" batteries matching the +/- When direct sunlight, and incandescent lamp, fluorescent ...
.... 30 30 16FT Notes: There should be unstable. 11 polarities of the TV, the remote operation may be no obstacle between the TV and the transmitter. If the remote control does not work, please check whether the batteries are worn out, remove the batteries. ...Battery installation Please install the batteries before using the remote control unit. 1 Effective remote range Open the battery cover. 2 Install two "AAA" batteries matching the +/- When direct sunlight, and incandescent lamp, fluorescent ...
User Manual
Page 21
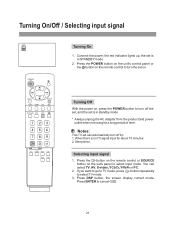
... mode. Connect the power, the red indicator lights up, the set can select TV, AV, S-video, YCbCr, YPbPr or PC. 2. Press the button on the remote control or SOURCE button on the set is no TV signal input for a long period of time. Press ENTER to select TV mode. 3. Turning Off... With the power on . Press the POWER button on the unit's control panel or the button on the remote control to turn off by: 1. Selecting input signal 1. Sleep timer. When there is in STANDBY mode. 2. Press DSP button, the screen display current mode. Turning...
... mode. Connect the power, the red indicator lights up, the set can select TV, AV, S-video, YCbCr, YPbPr or PC. 2. Press the button on the remote control or SOURCE button on the set is no TV signal input for a long period of time. Press ENTER to select TV mode. 3. Turning Off... With the power on . Press the POWER button on the unit's control panel or the button on the remote control to turn off by: 1. Selecting input signal 1. Sleep timer. When there is in STANDBY mode. 2. Press DSP button, the screen display current mode. Turning...
User Manual
Page 24
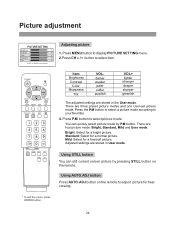
... a normal picture. Using STILL button You can quickly select picture mode by pressing STILL button on the remote to adjust picture for a bright picture. Using AUTO.ADJ button Press AUTO.ADJ button on the remote. Standard: Select for a fine/soft picture. Adjusted settings are stored in User mode. Press the P.M button to...
... a normal picture. Using STILL button You can quickly select picture mode by pressing STILL button on the remote to adjust picture for a bright picture. Using AUTO.ADJ button Press AUTO.ADJ button on the remote. Standard: Select for a fine/soft picture. Adjusted settings are stored in User mode. Press the P.M button to...
User Manual
Page 25
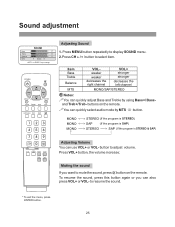
To resume the sound, press this button again or you want to mute the sound, press button on the remote. !You can also press VOL+ or VOL- Sound adjustment SOUND Bass 25 Treble 25 Balance 25 MTS MONO or key to resume the sound. * To ...exit the menu, press ENTER button. 25 buttons on the remote. to change Adjusting Sound 1. Press VOL+ button, the volume increase; MONO MONO MONO STEREO (If the program is STEREO) SAP (If the program is SAP...
To resume the sound, press this button again or you want to mute the sound, press button on the remote. !You can also press VOL+ or VOL- Sound adjustment SOUND Bass 25 Treble 25 Balance 25 MTS MONO or key to resume the sound. * To ...exit the menu, press ENTER button. 25 buttons on the remote. to change Adjusting Sound 1. Press VOL+ button, the volume increase; MONO MONO MONO STEREO (If the program is STEREO) SAP (If the program is SAP...

User Manual
Page 27
... From the SETUP menu, press CH5/6to select OSD position item. Anamorphic, 4:3 and Panorama can quickly select screen ratio by using ZOOM button on the Remote Control * To exit the menu, press ENTER button. 27 System setup(continued) SETUP Color sys Language OSD position OSD background AUTO Eng Upper Left Opaque... allows you to adjust screen aspect ratio in your preference. Notes: You can quickly select OSD menu position by using OSD POSITION button on the remote to select a proper screen aspect ratio. or VOL+ button to select Opaque or Translucent. Press ZOOM button on the...
... From the SETUP menu, press CH5/6to select OSD position item. Anamorphic, 4:3 and Panorama can quickly select screen ratio by using ZOOM button on the Remote Control * To exit the menu, press ENTER button. 27 System setup(continued) SETUP Color sys Language OSD position OSD background AUTO Eng Upper Left Opaque... allows you to adjust screen aspect ratio in your preference. Notes: You can quickly select OSD menu position by using OSD POSITION button on the remote to select a proper screen aspect ratio. or VOL+ button to select Opaque or Translucent. Press ZOOM button on the...

User Manual
Page 32
... is signal input. Use CH5/6to select item and VOL+/- Adjustment in YPbPr mode YPbPr To enter into YPbPr mode Repeatedly press button on the remote control or SOURCE button on the set's panel until the screen display YPbPr, which indicates that the set and the picture may not be in...
... is signal input. Use CH5/6to select item and VOL+/- Adjustment in YPbPr mode YPbPr To enter into YPbPr mode Repeatedly press button on the remote control or SOURCE button on the set's panel until the screen display YPbPr, which indicates that the set and the picture may not be in...
User Manual
Page 33
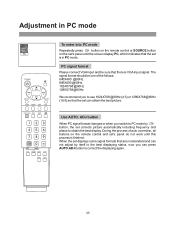
Adjustment in PC mode To enter into PC mode Repeatedly press button on the remote control or SOURCE button PC on the remote control and set's panel do not work until the screen display PC, which indicates that are nonstandard and can obtain the best picture. ADJ button ...
Adjustment in PC mode To enter into PC mode Repeatedly press button on the remote control or SOURCE button PC on the remote control and set's panel do not work until the screen display PC, which indicates that are nonstandard and can obtain the best picture. ADJ button ...


