

User Manual
Page 2
Table of Contents Important Information ...1 Important Safety Precautions ...2 Preparations ...5 Using the Remote Control...5 Batteries for the Remote Control...5 Power Connection...5 Antenna Connection ...6 Identification of Controls...7 Main Unit ...7 Remote Control ...9 Connections...11 Cautions Before Connecting ...11 Connect a VCR...11 Connect a Camcorder...12 Connect a DVD player ...13 Connect a DTV receiver ...14 Connect a PC ...15 Connect a ...
Table of Contents Important Information ...1 Important Safety Precautions ...2 Preparations ...5 Using the Remote Control...5 Batteries for the Remote Control...5 Power Connection...5 Antenna Connection ...6 Identification of Controls...7 Main Unit ...7 Remote Control ...9 Connections...11 Cautions Before Connecting ...11 Connect a VCR...11 Connect a Camcorder...12 Connect a DVD player ...13 Connect a DTV receiver ...14 Connect a PC ...15 Connect a ...
User Manual
Page 8
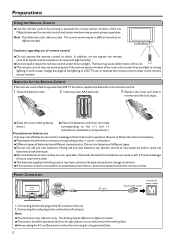
Preparations Using the Remote Control
Preparations Using the Remote Control
User Manual
Page 10
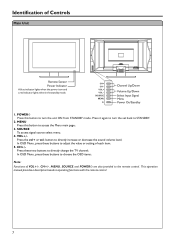
... Menu, press these buttons to choose the OSD items. Note: Functions of Controls Main Unit AC INPUT Remote Sensor Power Indicator A blue indicator lights when the power is on operating functions with the remote control. 7 This operation manual provides a description based on and a red indicator lights when in the ... back to STANDBY. 2. button to access the Menu main page. 3. Identification of VOL+/-, CH+/-, MENU, SOURCE and POWER are also provided to the remote control. VOL+ VOL- Press it again to turn the unit ON from STANDBY mode. SOURCE To access signal source select menu. 4.
... Menu, press these buttons to choose the OSD items. Note: Functions of Controls Main Unit AC INPUT Remote Sensor Power Indicator A blue indicator lights when the power is on operating functions with the remote control. 7 This operation manual provides a description based on and a red indicator lights when in the ... back to STANDBY. 2. button to access the Menu main page. 3. Identification of VOL+/-, CH+/-, MENU, SOURCE and POWER are also provided to the remote control. VOL+ VOL- Press it again to turn the unit ON from STANDBY mode. SOURCE To access signal source select menu. 4.

User Manual
Page 12
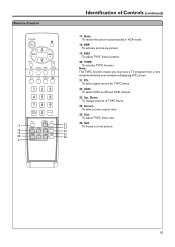
... menu item; Display To display channel status or signal information 16. --To select three-digit channel number * The SRS symbol are trademark of Controls (continued) Remote Control 1. Source To access source select menu 9 16 10. Sleep To set Sleep timer 13. CH5/6: Use to switch channels; 1 10 In Menu operation, use...
... menu item; Display To display channel status or signal information 16. --To select three-digit channel number * The SRS symbol are trademark of Controls (continued) Remote Control 1. Source To access source select menu 9 16 10. Sleep To set Sleep timer 13. CH5/6: Use to switch channels; 1 10 In Menu operation, use...
User Manual
Page 13
... activate TVPC function Note: The TVPC function means you may view a TV program from a mini window while the main window is displaying a PC screen. 21. Remote Control 17 18 19 20 21 Identification of TVPC frame 24. Screen To select screen aspect ratio 25. PBP To activate picture-by-picture 19...
... activate TVPC function Note: The TVPC function means you may view a TV program from a mini window while the main window is displaying a PC screen. 21. Remote Control 17 18 19 20 21 Identification of TVPC frame 24. Screen To select screen aspect ratio 25. PBP To activate picture-by-picture 19...
User Manual
Page 14
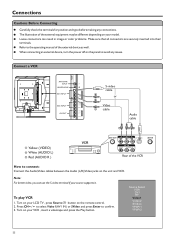
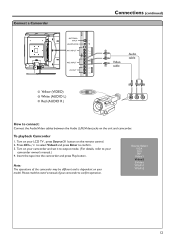
... the Play button. Source Select VGA DVI RF Video1 Video2 SVideo YPbPr1 YPbPr2 11 When connecting an external device, turn the power off on the remote control. 2. Refer to the operating manual of the VCR How to confirm. 3. Connect a VCR ANTENNA INPUT HEADPHONE S-VIDEO AVI INPUT R AUDIO L/MONO VIDEO AV2 INPUT...
... the Play button. Source Select VGA DVI RF Video1 Video2 SVideo YPbPr1 YPbPr2 11 When connecting an external device, turn the power off on the remote control. 2. Refer to the operating manual of the VCR How to confirm. 3. Connect a VCR ANTENNA INPUT HEADPHONE S-VIDEO AVI INPUT R AUDIO L/MONO VIDEO AV2 INPUT...
User Manual
Page 15
... Y WR Connections (continued) Video cable Audio cable Y WR VIDEO R AUDIO L How to connect: Connect the Audio/Video cables between the Audio (L/R)/Video jacks on the remote control. 2.
... Y WR Connections (continued) Video cable Audio cable Y WR VIDEO R AUDIO L How to connect: Connect the Audio/Video cables between the Audio (L/R)/Video jacks on the remote control. 2.
User Manual
Page 16
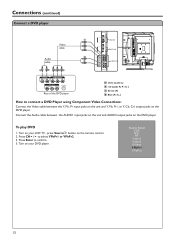
... or YPbPr2. 3. Connect the Audio cable between the Y, Pb, Pr input jacks on the unit and Y, Pb, Pr ( or Y, Cb, Cr) output jacks on the remote control. 2. To play DVD 1.
... or YPbPr2. 3. Connect the Audio cable between the Y, Pb, Pr input jacks on the unit and Y, Pb, Pr ( or Y, Cb, Cr) output jacks on the remote control. 2. To play DVD 1.
User Manual
Page 17
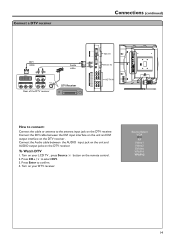
... IN AU DI O DVI-D DVI-D IN AU DI O HDTV IN How to connect: Connect the cable or antenna to the antenna input jack on the remote control. Connect the DVI cable between the AUDIO input jack on the unit and AUDIO output jacks on the DTV receiver .
... IN AU DI O DVI-D DVI-D IN AU DI O HDTV IN How to connect: Connect the cable or antenna to the antenna input jack on the remote control. Connect the DVI cable between the AUDIO input jack on the unit and AUDIO output jacks on the DTV receiver .

User Manual
Page 18
... TV , press Source button on the unit. Connect an Audio cable between the VGA jack on the PC and the VGA input jack on the remote control. 2. Adjust the screen resolution and settings on the unit. Connections (continued) Connect a PC Audio cable VGA cable DVI-D IN VGA IN AU DI O DVI...
... TV , press Source button on the unit. Connect an Audio cable between the VGA jack on the PC and the VGA input jack on the remote control. 2. Adjust the screen resolution and settings on the unit. Connections (continued) Connect a PC Audio cable VGA cable DVI-D IN VGA IN AU DI O DVI...
User Manual
Page 20
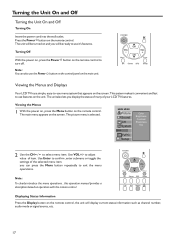
... to select menu item. Note: To clearly introduce the menu operations , this operation manual provides a description based on the remote control. Displaying Status Information Press the Display button on the remote control, the unit will be ready to -use features on the unit. The unit also lets you can also use... it convenient and fast to adjust value of item. The main menu appears on the remote control. Use Enter to turn off. Press the Power button on the screen. The unit will be turned on the main unit. Viewing the ...
... to select menu item. Note: To clearly introduce the menu operations , this operation manual provides a description based on the remote control. Displaying Status Information Press the Display button on the remote control, the unit will be ready to -use features on the unit. The unit also lets you can also use... it convenient and fast to adjust value of item. The main menu appears on the remote control. Use Enter to turn off. Press the Power button on the screen. The unit will be turned on the main unit. Viewing the ...
User Manual
Page 26
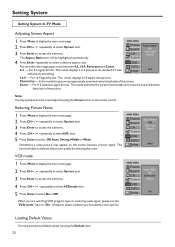
... can select the image aspect ratio between 4:3, 16:9, Panorama and Zoom. For 4:3 signal format. For 16:9 signal format. Sometimes a noisy picture may appear on the remote control. This function helps to select a desired aspect ratio. This mode stretches the picture horizontally and crops the top and bottom black bars of the...
... can select the image aspect ratio between 4:3, 16:9, Panorama and Zoom. For 4:3 signal format. For 16:9 signal format. Sometimes a noisy picture may appear on the remote control. This function helps to select a desired aspect ratio. This mode stretches the picture horizontally and crops the top and bottom black bars of the...
User Manual
Page 28
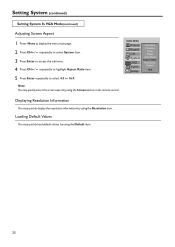
... quickly display the resolution information by using the Resolution item. Note: You may quickly select the screen aspect by using the Screen button on the remote control.
... quickly display the resolution information by using the Resolution item. Note: You may quickly select the screen aspect by using the Screen button on the remote control.
User Manual
Page 29
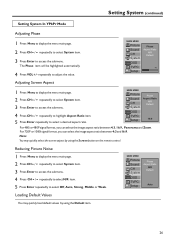
... Sound CH System Phase Aspect Ratio N/R Default OSD TVPC Setup Auto You may quickly select the screen aspect by using the Screen button on the remote control. Setting System (continued) Setting System In YPbPr Mode Adjusting Phase 1 Press Menu to display the menu main page. 2 Press CH5/6 repeatedly to select System...
... Sound CH System Phase Aspect Ratio N/R Default OSD TVPC Setup Auto You may quickly select the screen aspect by using the Screen button on the remote control. Setting System (continued) Setting System In YPbPr Mode Adjusting Phase 1 Press Menu to display the menu main page. 2 Press CH5/6 repeatedly to select System...
User Manual
Page 30
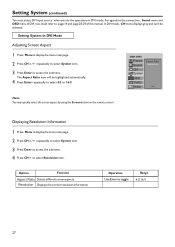
... Aspect Ratio Sound Resolution CH System OSD TVPC Setup 16:9 Note: You may quickly select the screen aspect by using the Screen button on the remote control. Option Function Aspect Ratio Selects different screen aspects Resolution Displays the current resolution information Operation Use Enter to select Resolution item. Setting System (continued...
... Aspect Ratio Sound Resolution CH System OSD TVPC Setup 16:9 Note: You may quickly select the screen aspect by using the Screen button on the remote control. Option Function Aspect Ratio Selects different screen aspects Resolution Displays the current resolution information Operation Use Enter to select Resolution item. Setting System (continued...
User Manual
Page 41
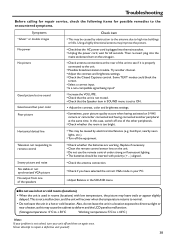
...Adjust the contrast and brightness settings. ! Television not responding to the encountered symptoms. Symptoms "Ghost" or double images Check item ! Clean the remote control sensor lens on the unit again. ! Also, do not leave the unit in a location exposed to normal. • Do not...neon lights, etc.). ! Check the Closed Captions control. Check whether the batteries are working. Unplug the power cord, wait for possible remedies to remote control ! Is a non-compatible signal being input? ! Check whether the room is not a malfunction, and the unit will recover when the ...
...Adjust the contrast and brightness settings. ! Television not responding to the encountered symptoms. Symptoms "Ghost" or double images Check item ! Clean the remote control sensor lens on the unit again. ! Also, do not leave the unit in a location exposed to normal. • Do not...neon lights, etc.). ! Check the Closed Captions control. Check whether the batteries are working. Unplug the power cord, wait for possible remedies to remote control ! Is a non-compatible signal being input? ! Check whether the room is not a malfunction, and the unit will recover when the ...
User Manual
Page 43
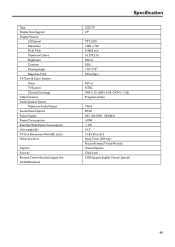
... Output Stereo Sound System Power Supply Power Consumption Stand by Mode Power Consumption Unit weight (lb) TV Unit Dimension (WxHxD) (inch) Other functions Caption Security Remote Control function support for full OSD features Specification LCD TV 27" TFT-LCD 1280 x 720 0.4665 mm 16,777,216 500 nit 500:1 170O/170O...
... Output Stereo Sound System Power Supply Power Consumption Stand by Mode Power Consumption Unit weight (lb) TV Unit Dimension (WxHxD) (inch) Other functions Caption Security Remote Control function support for full OSD features Specification LCD TV 27" TFT-LCD 1280 x 720 0.4665 mm 16,777,216 500 nit 500:1 170O/170O...


