

User Manual
Page 2
... Connect a DVD player ...13 Connect a DTV receiver ...14 Connect a PC ...15 Connect a VCR for Recording ...16 Turning the Unit On and Off...17 Turning the Unit On and Off ...17 Viewing the Menus and Displays ...17 Memorizing the Channels ...18 Selecting the Signal Source ...18 Storing Channels in Memory Automatically 18 Adding and Erasing Channels...19 Basic Operations...20 Changing Channels ...20 Adjusting the Volume ...20 Selecting Input Source Signal ...21 Selecting a Menu Language...21 Setting Picture...
... Connect a DVD player ...13 Connect a DTV receiver ...14 Connect a PC ...15 Connect a VCR for Recording ...16 Turning the Unit On and Off...17 Turning the Unit On and Off ...17 Viewing the Menus and Displays ...17 Memorizing the Channels ...18 Selecting the Signal Source ...18 Storing Channels in Memory Automatically 18 Adding and Erasing Channels...19 Basic Operations...20 Changing Channels ...20 Adjusting the Volume ...20 Selecting Input Source Signal ...21 Selecting a Menu Language...21 Setting Picture...

User Manual
Page 3
... OSD Menu ...29 Setting OSD Off Time ...29 Loading default values...29 TVPC Operations ...30 Viewing the TVPC ...30 Selecting the Signal Source for the TVPC Frame 30 Changing Channels for the TVPC Frame 30 Changing the Position of the TVPC Frame 31 Adjusting the Size of TVPC Frame ...31 Viewing Picture-by-Picture...31 Using Hotkeys...32 Setting Sleep Timer ...32 Setting Audio Mode...32 Adjusting Back Light of the Panel ...32 Freezing Picture...32 Viewing Closed Captions...33 Turning Closed Caption...
... OSD Menu ...29 Setting OSD Off Time ...29 Loading default values...29 TVPC Operations ...30 Viewing the TVPC ...30 Selecting the Signal Source for the TVPC Frame 30 Changing Channels for the TVPC Frame 30 Changing the Position of the TVPC Frame 31 Adjusting the Size of TVPC Frame ...31 Viewing Picture-by-Picture...31 Using Hotkeys...32 Setting Sleep Timer ...32 Setting Audio Mode...32 Adjusting Back Light of the Panel ...32 Freezing Picture...32 Viewing Closed Captions...33 Turning Closed Caption...
User Manual
Page 4
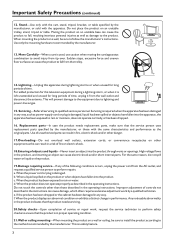
... when the equipment is operated in accordance with the instruction manual, may cause harmful interference to counter interference. 1 This equipment generates, uses, and can radiate radio frequency energy and, if not installed and used in a commercial environment. In a domestic environment this product may be connected to the grounding system of the building, as close to the point of...
... when the equipment is operated in accordance with the instruction manual, may cause harmful interference to counter interference. 1 This equipment generates, uses, and can radiate radio frequency energy and, if not installed and used in a commercial environment. In a domestic environment this product may be connected to the grounding system of the building, as close to the point of...
User Manual
Page 6
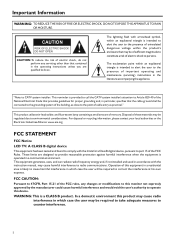
... operating instructions. Stand---Use only with the cart, stand, tripod, bracket, or table specified by the manufacturer. 13. b. When the product does not operate properly as power-supply cord or plug is used, use caution when moving the cart/apparatus combination to lightning and power-line surges. 15. Improper adjustment of the following conditions occurs, unplug the power cord from the wall outlet and disconnect the antenna. When the product displays...
... operating instructions. Stand---Use only with the cart, stand, tripod, bracket, or table specified by the manufacturer. 13. b. When the product does not operate properly as power-supply cord or plug is used, use caution when moving the cart/apparatus combination to lightning and power-line surges. 15. Improper adjustment of the following conditions occurs, unplug the power cord from the wall outlet and disconnect the antenna. When the product displays...
User Manual
Page 7
... periods of blue, green or red. Please note that this product during a lightning storm, or when it is a very high technology product, giving you should be supplied by a listed power supply indicated on the screen as a fixed point of time, unplug it can break when the product is intended to ensure safety and EMC. Use only the power cord designated by broken...
... periods of blue, green or red. Please note that this product during a lightning storm, or when it is a very high technology product, giving you should be supplied by a listed power supply indicated on the screen as a fixed point of time, unplug it can break when the product is intended to ensure safety and EMC. Use only the power cord designated by broken...
User Manual
Page 8
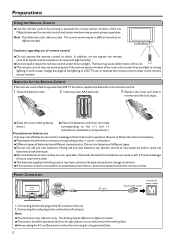
Preparations Using the Remote Control
Preparations Using the Remote Control
User Manual
Page 9
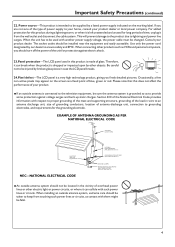
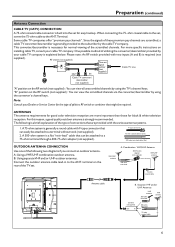
... RF switch provided with F-type connector that can view all unscrambled channels by using the TV's channel keys. Note: Consult your Dealer or Service Center for normal viewing of the TV set. The following two diagrams if you connect an outdoor antenna. B: Using separate VHF and/or UHF outdoor antennas. Preparation (continued) Antenna Connection CABLE TV (CATV) CONNECTION A 75-ohm coaxial cable connector is built into the set for black & white television reception...
... RF switch provided with F-type connector that can view all unscrambled channels by using the TV's channel keys. Note: Consult your Dealer or Service Center for normal viewing of the TV set. The following two diagrams if you connect an outdoor antenna. B: Using separate VHF and/or UHF outdoor antennas. Preparation (continued) Antenna Connection CABLE TV (CATV) CONNECTION A 75-ohm coaxial cable connector is built into the set for black & white television reception...
User Manual
Page 10
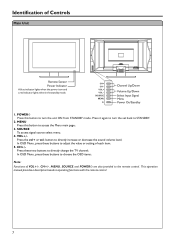
... button to access the Menu main page. 3. SOURCE To access signal source select menu. 4. This operation manual provides a description based on and a red indicator lights when in the standby mode. button to directly change the TV channel; In OSD Menu, press these buttons to the remote control. CH+/Press these buttons to choose the OSD items. Note: Functions of VOL+/-, CH+/-, MENU, SOURCE and POWER are also provided to adjust the value or setting of Controls Main Unit AC INPUT Remote Sensor Power...
... button to access the Menu main page. 3. SOURCE To access signal source select menu. 4. This operation manual provides a description based on and a red indicator lights when in the standby mode. button to directly change the TV channel; In OSD Menu, press these buttons to the remote control. CH+/Press these buttons to choose the OSD items. Note: Functions of VOL+/-, CH+/-, MENU, SOURCE and POWER are also provided to adjust the value or setting of Controls Main Unit AC INPUT Remote Sensor Power...
User Manual
Page 11
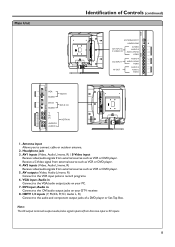
... connect cable or outdoor antenna. 2. AV1 inputs (Video, Audio L/mono, R) / S-Video input Receive video/audio signals from external sources such as VCR or DVD player. 5. Antenna input Allows you to record programs. 6. AV2 inputs (Video, Audio L/mono, R) Receive video/audio signals from external sources such as VCR or DVD player. 4. VGA input /Audio in Connect to the audio and component output jacks of Controls (continued) AV1 IN / S-VIDEO IN ANTENNA INPUT HEADPHONE S-VIDEO S-VIDEO AVI INPUT/ AUDIO R R S-VIDEO IN AUDIO L/MONO AUDIO L/MONO VIDEO VIDEO AV2 INPUT...
... connect cable or outdoor antenna. 2. AV1 inputs (Video, Audio L/mono, R) / S-Video input Receive video/audio signals from external sources such as VCR or DVD player. 5. Antenna input Allows you to record programs. 6. AV2 inputs (Video, Audio L/mono, R) Receive video/audio signals from external sources such as VCR or DVD player. 4. VGA input /Audio in Connect to the audio and component output jacks of Controls (continued) AV1 IN / S-VIDEO IN ANTENNA INPUT HEADPHONE S-VIDEO S-VIDEO AVI INPUT/ AUDIO R R S-VIDEO IN AUDIO L/MONO AUDIO L/MONO VIDEO VIDEO AV2 INPUT...

User Manual
Page 12
... SRS Labs,Inc. S.M 7 15 Sound mode select 7 P.M 8 Picture mode select 8. 0~9 number buttons Direct channel select 9. Display To display channel status or signal information 16. --To select three-digit channel number * The SRS symbol are trademark of the selected menu; 12. CH5/6: Use to switch channels; 1 10 In Menu operation, use VOL+/-to adjust volume; Menu To access the Menu main page or exit menu operation 3 11 4. POWER Turn the unit on or off 2. Source To access source select menu 9 16 10. Flip the cover...
... SRS Labs,Inc. S.M 7 15 Sound mode select 7 P.M 8 Picture mode select 8. 0~9 number buttons Direct channel select 9. Display To display channel status or signal information 16. --To select three-digit channel number * The SRS symbol are trademark of the selected menu; 12. CH5/6: Use to switch channels; 1 10 In Menu operation, use VOL+/-to adjust volume; Menu To access the Menu main page or exit menu operation 3 11 4. POWER Turn the unit on or off 2. Source To access source select menu 9 16 10. Flip the cover...
User Manual
Page 14
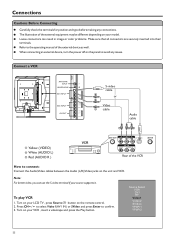
... and press the Play button. Turn on the panel to avoid any connections. When connecting an external device, turn the power off on your model. To play VCR 1. Source Select VGA DVI RF Video1 Video2 SVideo YPbPr1 YPbPr2 11 Turn on the remote control. 2. Refer to the operating manual of the VCR How to confirm. 3. Note: For better video, you can result in image or color problems. Make sure that...
... and press the Play button. Turn on the panel to avoid any connections. When connecting an external device, turn the power off on your model. To play VCR 1. Source Select VGA DVI RF Video1 Video2 SVideo YPbPr1 YPbPr2 11 Turn on the remote control. 2. Refer to the operating manual of the VCR How to confirm. 3. Note: For better video, you can result in image or color problems. Make sure that...
User Manual
Page 15
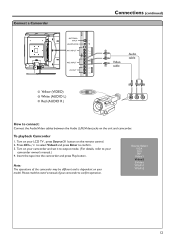
Connect a Camcorder ANTENNA INPUT HEADPHONE S-VIDEO AVI INPUT R AUDIO L/MONO VIDEO AV2 INPUT AV OUT AV1 IN / S-VIDEO IN Y Yellow (VIDEO) W White (AUDIO L) R Red (AUDIO R ) OUT IN Y WR Connections (continued) Video cable Audio cable Y WR VIDEO R AUDIO L How to connect: Connect the Audio/Video cables between the Audio (L/R)/Video jacks on the remote control. 2. Turn on your camcorder and set it to output mode. (For details, refer to your model. Insert the tape into the camcorder and press Play button. To playback Camcorder 1. Note: The operations of your LCD TV...
Connect a Camcorder ANTENNA INPUT HEADPHONE S-VIDEO AVI INPUT R AUDIO L/MONO VIDEO AV2 INPUT AV OUT AV1 IN / S-VIDEO IN Y Yellow (VIDEO) W White (AUDIO L) R Red (AUDIO R ) OUT IN Y WR Connections (continued) Video cable Audio cable Y WR VIDEO R AUDIO L How to connect: Connect the Audio/Video cables between the Audio (L/R)/Video jacks on the remote control. 2. Turn on your camcorder and set it to output mode. (For details, refer to your model. Insert the tape into the camcorder and press Play button. To playback Camcorder 1. Note: The operations of your LCD TV...
User Manual
Page 20
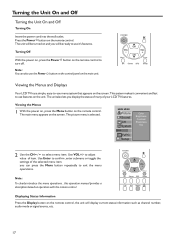
... status information such as channel number, audio mode or signal source, etc. 17 The main menu appears on the remote control. Use VOL+/- Press the Power button on the screen. This system makes it 's features. The picture menu is selected. Note: To clearly introduce the menu operations , this operation manual provides a description based on the remote control. Displaying Status Information Press the Display button on the remote control, the unit will be turned on the screen. The unit also...
... status information such as channel number, audio mode or signal source, etc. 17 The main menu appears on the remote control. Use VOL+/- Press the Power button on the screen. This system makes it 's features. The picture menu is selected. Note: To clearly introduce the menu operations , this operation manual provides a description based on the remote control. Displaying Status Information Press the Display button on the remote control, the unit will be turned on the screen. The unit also...

User Manual
Page 23
... Accessing Channels Press the number buttons to go directly to the selected channel. button to display "1--", then press the 0-9 number buttons to input the remain two digits of the channel number, then the unit goes to a channel. Note: When you use the number buttons, you can temporarily cut off the sound using the Mute button. 1 Press the button and the sound cuts off. 2 To turn mute off, press the button again. 20 Adjusting the Volume Using the volume buttons...
... Accessing Channels Press the number buttons to go directly to the selected channel. button to display "1--", then press the 0-9 number buttons to input the remain two digits of the channel number, then the unit goes to a channel. Note: When you use the number buttons, you can temporarily cut off the sound using the Mute button. 1 Press the button and the sound cuts off. 2 To turn mute off, press the button again. 20 Adjusting the Volume Using the volume buttons...
User Manual
Page 25
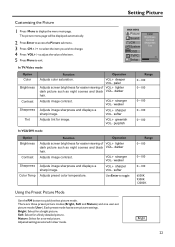
... Setting Picture Customizing the Picture 1 Press Menu to quickly select picture mode. softer Adjusts preset color temperature. purplish Range 0~100 0~100 0~100 0~100 0~100 In VGA/DVI mode Option Brightness Contrast Sharpness Color Temp Function Operation Adjusts screen brightness for easier viewing of the item. 5 Press Menu to change. 4 Press VOL+/- weaker Adjusts image sharpness and displays a sharp image. darker hair. The picture menu page will be displayed automatically. 2 Press Enter to access...
... Setting Picture Customizing the Picture 1 Press Menu to quickly select picture mode. softer Adjusts preset color temperature. purplish Range 0~100 0~100 0~100 0~100 0~100 In VGA/DVI mode Option Brightness Contrast Sharpness Color Temp Function Operation Adjusts screen brightness for easier viewing of the item. 5 Press Menu to change. 4 Press VOL+/- weaker Adjusts image sharpness and displays a sharp image. darker hair. The picture menu page will be displayed automatically. 2 Press Enter to access...
User Manual
Page 26
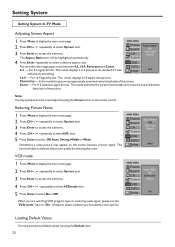
... the remote control. MAIN MENU Picture Sound CH System Aspect Ratio N/R VCR mode Default OSD TVPC Setup Auto VCR mode 1 Press Menu to display the menu main page. 2 Press CH5/6 repeatedly to select System item. 3 Press Enter to access the submenu. 4 Press CH5/6 repeatedly to select VCR mode item. 5 Press Enter to access the submenu. For 4:3 letterbox signal format. Setting System Setting System In TV Mode Adjusting Screen Aspect 1 Press Menu to display the menu main...
... the remote control. MAIN MENU Picture Sound CH System Aspect Ratio N/R VCR mode Default OSD TVPC Setup Auto VCR mode 1 Press Menu to display the menu main page. 2 Press CH5/6 repeatedly to select System item. 3 Press Enter to access the submenu. 4 Press CH5/6 repeatedly to select VCR mode item. 5 Press Enter to access the submenu. For 4:3 letterbox signal format. Setting System Setting System In TV Mode Adjusting Screen Aspect 1 Press Menu to display the menu main...
User Manual
Page 27
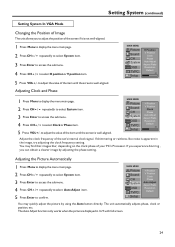
... set's internal clock signal. The Auto Adjust function only works when the picture is apparent in 16:9 with full screen. 24 MAIN MENU Picture Sound CH System OSD TVPC Setup H Position V Position Clock Phase Auto Adjust Aspect Ratio Resolution Default 40 Adjust the clock frequency of your PC's Processor. If shimmering or rainbow-like noise is displayed in the image, try adjusting the clock frequency setting. You may quickly adjust the picture...
... set's internal clock signal. The Auto Adjust function only works when the picture is apparent in 16:9 with full screen. 24 MAIN MENU Picture Sound CH System OSD TVPC Setup H Position V Position Clock Phase Auto Adjust Aspect Ratio Resolution Default 40 Adjust the clock frequency of your PC's Processor. If shimmering or rainbow-like noise is displayed in the image, try adjusting the clock frequency setting. You may quickly adjust the picture...
User Manual
Page 36
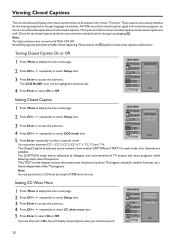
... closed caption signal from television programs, so home-recorded video tapes also provide closed caption symbol in two modes: CAPTION and TEXT. Not all the programs and videos will offer closed captioning. MAIN MENU Picture Sound CH CCD On/Off CCD Mode CC when mute Child Lock System OSD TVPC On Setup Setting Closed Caption 1 Press Menu to display the menu main page. 2 Press CH5/6 repeatedly to select a desired mode. You may quickly select CCD mode by using the CCD button...
... closed caption signal from television programs, so home-recorded video tapes also provide closed caption symbol in two modes: CAPTION and TEXT. Not all the programs and videos will offer closed captioning. MAIN MENU Picture Sound CH CCD On/Off CCD Mode CC when mute Child Lock System OSD TVPC On Setup Setting Closed Caption 1 Press Menu to display the menu main page. 2 Press CH5/6 repeatedly to select a desired mode. You may quickly select CCD mode by using the CCD button...
User Manual
Page 41
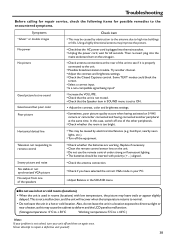
... picture. Turn off and then on again once. Check the antenna connection. ! Also, do not leave the unit in a location exposed to direct sunlight or near a heater, as this case, switch off one of the speakers ! Check that the unit is properly connected to ON. • Adjust the contrast, color and brightness settings. ! Check the Closed Captions control. Select a correct input. ! Replace if necessary. ! Clean the remote control sensor...
... picture. Turn off and then on again once. Check the antenna connection. ! Also, do not leave the unit in a location exposed to direct sunlight or near a heater, as this case, switch off one of the speakers ! Check that the unit is properly connected to ON. • Adjust the contrast, color and brightness settings. ! Check the Closed Captions control. Select a correct input. ! Replace if necessary. ! Clean the remote control sensor...
User Manual
Page 43
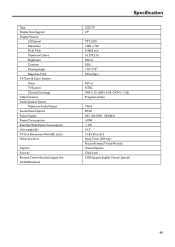
Type Display Size diagonal Display Feature LCD panel Resolution Pixel Pitch Maximum Colors Brightness Contrast Viewing Angle Response Time TV Tuner & Color System Tuner TV System Channel Coverage Video Features Audio Speaker System Maximum Audio Output Stereo Sound System Power Supply Power Consumption Stand by Mode Power Consumption Unit weight (lb) TV Unit Dimension (WxHxD) (inch) Other functions Caption Security Remote Control function support for full OSD features Specification LCD TV 27" TFT-LCD 1280 x 720 0.4665 mm 16,777,216 500 nit 500:1 170O/170O 25ms...
Type Display Size diagonal Display Feature LCD panel Resolution Pixel Pitch Maximum Colors Brightness Contrast Viewing Angle Response Time TV Tuner & Color System Tuner TV System Channel Coverage Video Features Audio Speaker System Maximum Audio Output Stereo Sound System Power Supply Power Consumption Stand by Mode Power Consumption Unit weight (lb) TV Unit Dimension (WxHxD) (inch) Other functions Caption Security Remote Control function support for full OSD features Specification LCD TV 27" TFT-LCD 1280 x 720 0.4665 mm 16,777,216 500 nit 500:1 170O/170O 25ms...


