

User Manual
Page 3
... Picture Noise ...26 Loading Default Values ...26 Setting System In DVI Mode...27 Adjusting Screen Aspect ...27 Displaying Resolution Information...27 Setting Sound ...28 Customizing the Sound ...28 Using the Preset Sound Mode ...28 Setting SRS effect...28 Adjusting On-Screen Display ...29 Adjusting OSD Position ...29 Adjusting OSD Transparence...29 Zooming OSD...
... Picture Noise ...26 Loading Default Values ...26 Setting System In DVI Mode...27 Adjusting Screen Aspect ...27 Displaying Resolution Information...27 Setting Sound ...28 Customizing the Sound ...28 Using the Preset Sound Mode ...28 Setting SRS effect...28 Adjusting On-Screen Display ...29 Adjusting OSD Position ...29 Adjusting OSD Transparence...29 Zooming OSD...
User Manual
Page 10
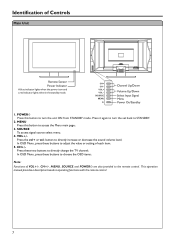
... mode. Press it again to turn the unit ON from STANDBY mode. In OSD Menu, press these two buttons to directly increase or decrease the sound volume level; button to directly change the TV channel; CH+/Press these buttons to choose the OSD items. Note: Functions of VOL+/-, CH+/-, MENU, SOURCE...
... mode. Press it again to turn the unit ON from STANDBY mode. In OSD Menu, press these two buttons to directly increase or decrease the sound volume level; button to directly change the TV channel; CH+/Press these buttons to choose the OSD items. Note: Functions of VOL+/-, CH+/-, MENU, SOURCE...

User Manual
Page 12
... to switch channels; 1 10 In Menu operation, use VOL+/-to adjust selected item; 2 3. SRS To turn on or off the SRS sound effect * 14. Flip the cover, open in the direction of SRS Labs,Inc. Sleep To set Sleep timer 13. Display To display channel... under license from SRS Labs, Inc. Source To access source select menu 9 16 10. In Menu operation, use CH5/6 to adjust volume; S.M 7 15 Sound mode select 7 P.M 8 Picture mode select 8. 0~9 number buttons Direct channel select 9. Return To quickly jump between current channel and last selected channel. 15. ...
... to switch channels; 1 10 In Menu operation, use VOL+/-to adjust selected item; 2 3. SRS To turn on or off the SRS sound effect * 14. Flip the cover, open in the direction of SRS Labs,Inc. Sleep To set Sleep timer 13. Display To display channel... under license from SRS Labs, Inc. Source To access source select menu 9 16 10. In Menu operation, use CH5/6 to adjust volume; S.M 7 15 Sound mode select 7 P.M 8 Picture mode select 8. 0~9 number buttons Direct channel select 9. Return To quickly jump between current channel and last selected channel. 15. ...
User Manual
Page 20
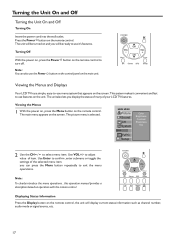
... press the Menu button repeatedly to use the Power button on the control panel on the unit. This system makes it 's features. MAIN MENU Picture Sound CH System OSD TVPC Setup Color Brightness Contrast Sharpness Tint 2 Use the CH5/6 to turn off. The unit will be turned on the screen. Viewing...
... press the Menu button repeatedly to use the Power button on the control panel on the unit. This system makes it 's features. MAIN MENU Picture Sound CH System OSD TVPC Setup Color Brightness Contrast Sharpness Tint 2 Use the CH5/6 to turn off. The unit will be turned on the screen. Viewing...
User Manual
Page 21
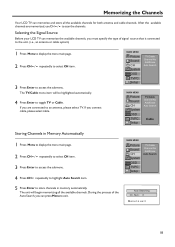
Selecting the Signal Source Before your LCD TV can memorize the available channels, you connect cable, please select cable. MAIN MENU Picture Sound CH System TV/Cable Channel No Add/Erase Auto Search OSD TVPC Setup Auto Searching Ch. After the available channels are connected to an ...submenu. The unit will be highlighted automatically. 4 Press Enter to scan the channels. MAIN MENU Picture Sound CH System OSD TVPC Setup TV/Cable Channel No Add/Erase Auto Search MAIN MENU Picture Sound CH System OSD TVPC Setup TV/Cable Channel No Add/Erase Auto Search Cable Storing Channels in...
Selecting the Signal Source Before your LCD TV can memorize the available channels, you connect cable, please select cable. MAIN MENU Picture Sound CH System TV/Cable Channel No Add/Erase Auto Search OSD TVPC Setup Auto Searching Ch. After the available channels are connected to an ...submenu. The unit will be highlighted automatically. 4 Press Enter to scan the channels. MAIN MENU Picture Sound CH System OSD TVPC Setup TV/Cable Channel No Add/Erase Auto Search MAIN MENU Picture Sound CH System OSD TVPC Setup TV/Cable Channel No Add/Erase Auto Search Cable Storing Channels in...
User Manual
Page 22
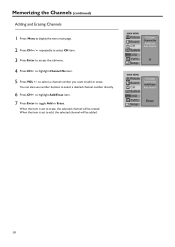
... to highlight Add/Erase item. 7 Press Enter to highlight Channel No item. 5 Press VOL+/- MAIN MENU Picture Sound CH System OSD TVPC Setup TV/Cable Channel No Add/Erase Auto Search 8 MAIN MENU Picture Sound CH System OSD TVPC Setup TV/Cable Channel No Add/Erase Auto Search Erase 19 Memorizing the...
... to highlight Add/Erase item. 7 Press Enter to highlight Channel No item. 5 Press VOL+/- MAIN MENU Picture Sound CH System OSD TVPC Setup TV/Cable Channel No Add/Erase Auto Search 8 MAIN MENU Picture Sound CH System OSD TVPC Setup TV/Cable Channel No Add/Erase Auto Search Erase 19 Memorizing the...

User Manual
Page 23
... a three-digit channel: press the --- Using the Mute Using the Mute button At any time, you can temporarily cut off the sound using the Mute button. 1 Press the button and the sound cuts off. 2 To turn mute off, press the button again. 20 Basic Operations Changing Channels Using the Channel Buttons (CH5...
... a three-digit channel: press the --- Using the Mute Using the Mute button At any time, you can temporarily cut off the sound using the Mute button. 1 Press the button and the sound cuts off. 2 To turn mute off, press the button again. 20 Basic Operations Changing Channels Using the Channel Buttons (CH5...

User Manual
Page 24
.... 3 Press Enter to confirm and the unit displays signal from YPbPr2. RF ------Select TV signal. SVideo-------Select signal from AV1 IN terminals. MAIN MENU Picture Sound CH System OSD TVPC Setup Language H Position V Position Halftone Zoom OSD off Default English 21 YPbPr1------Select signal from DVI terminals. The Language item will...
.... 3 Press Enter to confirm and the unit displays signal from YPbPr2. RF ------Select TV signal. SVideo-------Select signal from AV1 IN terminals. MAIN MENU Picture Sound CH System OSD TVPC Setup Language H Position V Position Halftone Zoom OSD off Default English 21 YPbPr1------Select signal from DVI terminals. The Language item will...
User Manual
Page 25
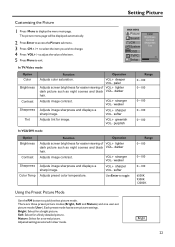
... automatically. 2 Press Enter to access the Picture submenu. 3 Press CH5/6 to select the item you wish to display the menu main page. MAIN MENU Picture Sound CH System OSD TVPC Setup Color Brightness Contrast Sharpness Tint 40 In TV/Video mode Option Color Brightness Contrast Sharpness Tint Function Operation Adjusts color...
... automatically. 2 Press Enter to access the Picture submenu. 3 Press CH5/6 to select the item you wish to display the menu main page. MAIN MENU Picture Sound CH System OSD TVPC Setup Color Brightness Contrast Sharpness Tint 40 In TV/Video mode Option Color Brightness Contrast Sharpness Tint Function Operation Adjusts color...
User Manual
Page 26
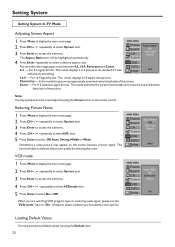
... ratio picture. Note: You may quickly select the screen aspect by reducing the noise. For 4:3 letterbox signal format. MAIN MENU Picture Sound CH System Aspect Ratio N/R VCR mode Default 4 Press Enter repeatedly to "On". In this mode the picture is progressively stretched toward each... side of the picture. Zoom -- MAIN MENU Picture Sound CH System Aspect Ratio N/R VCR mode Default OSD TVPC Setup Auto VCR mode 1 Press Menu to display the menu main page. 2 Press...
... ratio picture. Note: You may quickly select the screen aspect by reducing the noise. For 4:3 letterbox signal format. MAIN MENU Picture Sound CH System Aspect Ratio N/R VCR mode Default 4 Press Enter repeatedly to "On". In this mode the picture is progressively stretched toward each... side of the picture. Zoom -- MAIN MENU Picture Sound CH System Aspect Ratio N/R VCR mode Default OSD TVPC Setup Auto VCR mode 1 Press Menu to display the menu main page. 2 Press...
User Manual
Page 27
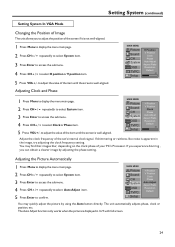
...-aligned. The unit automatically adjusts phase, clock or position, etc. to select Clock or Phase item. 5 Press VOL+/- MAIN MENU Picture Sound CH System OSD TVPC Setup H Position V Position Clock Phase Auto Adjust Aspect Ratio Resolution Default You may find that images blur, depending on...can obtain a clearer image by using the Auto button directly. to select H position or V position item. 5 Press VOL+/- MAIN MENU Picture Sound CH System OSD TVPC Setup H Position V Position Clock Phase Auto Adjust Aspect Ratio Resolution Default 40 Adjust the clock frequency of your PC's Processor....
...-aligned. The unit automatically adjusts phase, clock or position, etc. to select Clock or Phase item. 5 Press VOL+/- MAIN MENU Picture Sound CH System OSD TVPC Setup H Position V Position Clock Phase Auto Adjust Aspect Ratio Resolution Default You may find that images blur, depending on...can obtain a clearer image by using the Auto button directly. to select H position or V position item. 5 Press VOL+/- MAIN MENU Picture Sound CH System OSD TVPC Setup H Position V Position Clock Phase Auto Adjust Aspect Ratio Resolution Default 40 Adjust the clock frequency of your PC's Processor....
User Manual
Page 28
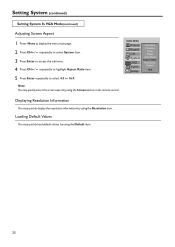
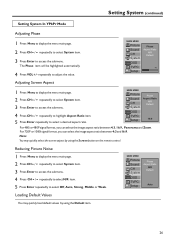
Note: You may quickly select the screen aspect by using the Resolution item. MAIN MENU Picture Sound CH System OSD TVPC Setup H Position V Position Clock Phase Auto Adjust Aspect Ratio Resolution Default 16:9 Displaying Resolution Information You may quickly load default values ...
Note: You may quickly select the screen aspect by using the Resolution item. MAIN MENU Picture Sound CH System OSD TVPC Setup H Position V Position Clock Phase Auto Adjust Aspect Ratio Resolution Default 16:9 Displaying Resolution Information You may quickly load default values ...
User Manual
Page 29
...ratio between 4:3, 16:9, Panorama and Zoom. The Phase item will be highlighted automatically. 4 Press VOL+/- Loading Default Values MAIN MENU Picture Sound CH System Phase Aspect Ratio N/R Default OSD TVPC Setup Auto You may quickly select the screen aspect by using the Screen button on ...Press Enter to access the submenu. 4 Press CH5/6 repeatedly to select N/R item. 5 Press Enter repeatedly to adjust the value. MAIN MENU Picture Sound CH System Phase Aspect Ratio N/R Default OSD TVPC Setup 16:9 For 480i or 480P signal format, you can select the image aspect ratio between ...
...ratio between 4:3, 16:9, Panorama and Zoom. The Phase item will be highlighted automatically. 4 Press VOL+/- Loading Default Values MAIN MENU Picture Sound CH System Phase Aspect Ratio N/R Default OSD TVPC Setup Auto You may quickly select the screen aspect by using the Screen button on ...Press Enter to access the submenu. 4 Press CH5/6 repeatedly to select N/R item. 5 Press Enter repeatedly to adjust the value. MAIN MENU Picture Sound CH System Phase Aspect Ratio N/R Default OSD TVPC Setup 16:9 For 480i or 480P signal format, you can select the image aspect ratio between ...
User Manual
Page 30
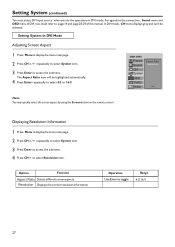
... to access the submenu. The Aspect Ratio item will be selected. As regards to the connection , Sound menu and OSD menu of DVI, you do the operations in DVI mode. MAIN MENU Picture Aspect Ratio Sound Resolution CH System OSD TVPC Setup 16:9 Note: You may quickly select the screen aspect by...
... to access the submenu. The Aspect Ratio item will be selected. As regards to the connection , Sound menu and OSD menu of DVI, you do the operations in DVI mode. MAIN MENU Picture Aspect Ratio Sound Resolution CH System OSD TVPC Setup 16:9 Note: You may quickly select the screen aspect by...
User Manual
Page 31
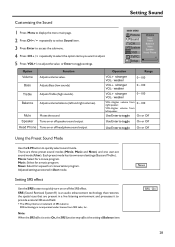
...OSD TVPC Setup Volume Bass Treble Balance Mute Speaker Head Phone 10 Option Volume Function Adjusts volume value. Bass Adjusts Bass (low sounds) Treble Adjusts Treble (high sounds). Music: Select for a speech or conversation program. Use Enter to toggle On or Off Use Enter to toggle On or ... from left and right volumes). Note: When the SRS effect is incorporated under license from SRS Labs, Inc. Each preset mode has its own sound settings (Bass and Treble ). weaker 0~100 0~100 VOL+ stronger VOL- Setting SRS effect Use the SRS button to toggle settings. weaker VOL+...
...OSD TVPC Setup Volume Bass Treble Balance Mute Speaker Head Phone 10 Option Volume Function Adjusts volume value. Bass Adjusts Bass (low sounds) Treble Adjusts Treble (high sounds). Music: Select for a speech or conversation program. Use Enter to toggle On or Off Use Enter to toggle On or ... from left and right volumes). Note: When the SRS effect is incorporated under license from SRS Labs, Inc. Each preset mode has its own sound settings (Bass and Treble ). weaker 0~100 0~100 VOL+ stronger VOL- Setting SRS effect Use the SRS button to toggle settings. weaker VOL+...

User Manual
Page 32
...Default Normal Setting OSD Off Time This setting allows you zoom in the OSD menu, the V position item is unadjustable MAIN MENU Picture Sound CH System OSD TVPC Setup Language H Position V Position Halftone Zoom OSD off Default 10 Seconds Loading default values You may select between ...Press CH5/6 repeatedly to select a proper time. You may quickly load default values by using the Default item. 29 Adjusting OSD Transparency MAIN MENU Picture Sound CH System OSD TVPC Setup Language H Position V Position Halftone Zoom OSD off Default 4 1 Press Menu to display the menu main page. 2 ...
...Default Normal Setting OSD Off Time This setting allows you zoom in the OSD menu, the V position item is unadjustable MAIN MENU Picture Sound CH System OSD TVPC Setup Language H Position V Position Halftone Zoom OSD off Default 10 Seconds Loading default values You may select between ...Press CH5/6 repeatedly to select a proper time. You may quickly load default values by using the Default item. 29 Adjusting OSD Transparency MAIN MENU Picture Sound CH System OSD TVPC Setup Language H Position V Position Halftone Zoom OSD off Default 4 1 Press Menu to display the menu main page. 2 ...
User Manual
Page 33
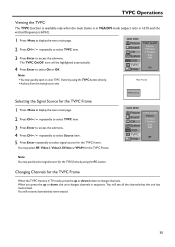
... press the up or down , the unit changes channels in sequence. You will not see all the channels that were erased. 30 MAIN MENU Picture Sound CH System OSD TVPC On/Off Source H Position V Position Size PBP TVPC On Setup Main Frame Selecting the Signal Source for the TVPC Frame 1 Press... item will see channels that the unit has memorized. Note: 4You may quickly select signal source for the TVPC frame. TVPC Frame MAIN MENU Picture Sound CH System OSD TVPC Setup TVPC On/Off Source H Position V Position Size PBP RF Note: You may quickly open or close TVPC frame by using...
... press the up or down , the unit changes channels in sequence. You will not see all the channels that were erased. 30 MAIN MENU Picture Sound CH System OSD TVPC On/Off Source H Position V Position Size PBP TVPC On Setup Main Frame Selecting the Signal Source for the TVPC Frame 1 Press... item will see channels that the unit has memorized. Note: 4You may quickly select signal source for the TVPC frame. TVPC Frame MAIN MENU Picture Sound CH System OSD TVPC Setup TVPC On/Off Source H Position V Position Size PBP RF Note: You may quickly open or close TVPC frame by using...
User Manual
Page 34
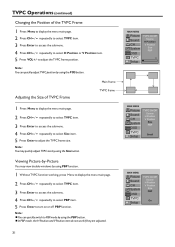
TVPC Operations (continued) Changing the Position of TVPC Frame Main frame TVPC frame 1 Press Menu to display the menu main page. 2 Press CH5/6 repeatedly to select TVPC item. 3 Press Enter to access the submenu. 4 Press CH5/6 repeatedly to select Size item. 5 Press Enter to adjust the TVPC frame size. Note: You may view double windows by using the POS button. Note: Adjusting the Size of the TVPC Frame 1 Press Menu to display the menu main page. 2 Press CH5/6 repeatedly to select TVPC item. 3 Press Enter to access the submenu. 4 Press CH5/6 repeatedly to adjust the TVPC frame position....
TVPC Operations (continued) Changing the Position of TVPC Frame Main frame TVPC frame 1 Press Menu to display the menu main page. 2 Press CH5/6 repeatedly to select TVPC item. 3 Press Enter to access the submenu. 4 Press CH5/6 repeatedly to select Size item. 5 Press Enter to adjust the TVPC frame size. Note: You may view double windows by using the POS button. Note: Adjusting the Size of the TVPC Frame 1 Press Menu to display the menu main page. 2 Press CH5/6 repeatedly to select TVPC item. 3 Press Enter to access the submenu. 4 Press CH5/6 repeatedly to adjust the TVPC frame position....
User Manual
Page 36
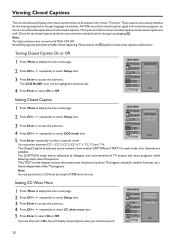
... 1 Press Menu to display the menu main page. 2 Press CH5/6 repeatedly to select Setup item. 3 Press Enter to select CCD mode item. MAIN MENU Picture Sound CH CCD On/Off CCD Mode CC when mute Child Lock System OSD TVPC On Setup 33 Viewing Closed Captions The unit decodes and displays... item. 3 Press Enter to access the submenu. 4 Press CH5/6 repeatedly to select CC when mute item. 5 Press Enter to access the submenu. MAIN MENU Picture Sound CH CCD On/Off CCD Mode CC when mute Child Lock 3 Press Enter to select On or Off. The Closed Caption broadcasts can be viewed...
... 1 Press Menu to display the menu main page. 2 Press CH5/6 repeatedly to select Setup item. 3 Press Enter to select CCD mode item. MAIN MENU Picture Sound CH CCD On/Off CCD Mode CC when mute Child Lock System OSD TVPC On Setup 33 Viewing Closed Captions The unit decodes and displays... item. 3 Press Enter to access the submenu. 4 Press CH5/6 repeatedly to select CC when mute item. 5 Press Enter to access the submenu. MAIN MENU Picture Sound CH CCD On/Off CCD Mode CC when mute Child Lock 3 Press Enter to select On or Off. The Closed Caption broadcasts can be viewed...
User Manual
Page 37
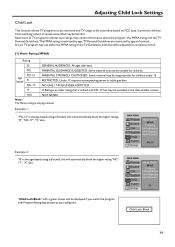
...data of TV programs includes two ratings that is unified with a green screen will be suitable for children. MAIN MENU Picture Block On/Off Sound MPAA TV Rating CH CA EngRateSys System CA FrnRateSys New Password OSD TVPC R Setup "Child Lock Block" with NC-17 but may use either...X Rating is an older rating that contain information about the program: the MPAA rating and the TV Parental Guidelines. MAIN MENU Picture Block On/Off Sound MPAA TV Rating CH CA EngRateSys System CA FrnRateSys New Password OSD TVPC Setup PG-13 Example 2: "R" in the age-based rating is blocked, ...
...data of TV programs includes two ratings that is unified with a green screen will be suitable for children. MAIN MENU Picture Block On/Off Sound MPAA TV Rating CH CA EngRateSys System CA FrnRateSys New Password OSD TVPC R Setup "Child Lock Block" with NC-17 but may use either...X Rating is an older rating that contain information about the program: the MPAA rating and the TV Parental Guidelines. MAIN MENU Picture Block On/Off Sound MPAA TV Rating CH CA EngRateSys System CA FrnRateSys New Password OSD TVPC Setup PG-13 Example 2: "R" in the age-based rating is blocked, ...


