

User Manual
Page 2
Table of Contents Important Information ...1 Important Safety Precautions ...2 Preparations ...5 Using the Remote Control...5 Batteries for the Remote Control...5 Power Connection...5 Antenna Connection ...6 Identification of Controls...7 Main Unit ...7 Remote Control ...9 Connections...11 Cautions Before Connecting ...11 Connect a VCR...11 Connect a Camcorder...12 Connect a DVD player ...13 Connect a DTV receiver ...14 Connect a PC ...15 Connect a VCR ...
Table of Contents Important Information ...1 Important Safety Precautions ...2 Preparations ...5 Using the Remote Control...5 Batteries for the Remote Control...5 Power Connection...5 Antenna Connection ...6 Identification of Controls...7 Main Unit ...7 Remote Control ...9 Connections...11 Cautions Before Connecting ...11 Connect a VCR...11 Connect a Camcorder...12 Connect a DVD player ...13 Connect a DTV receiver ...14 Connect a PC ...15 Connect a VCR ...
User Manual
Page 8
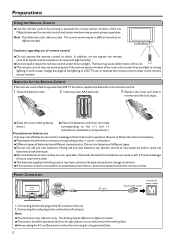
Preparations Using the Remote Control
Preparations Using the Remote Control
User Manual
Page 10
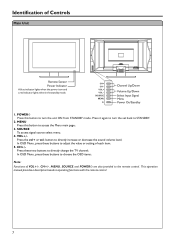
Identification of VOL+/-, CH+/-, MENU, SOURCE and POWER are also provided to the remote control. POWER Press this button to access the Menu main page. 3. Press it again to STANDBY. 2. MENU Press this button to turn the set back to ... channel; In OSD Menu, press these two buttons to choose the OSD items. Note: Functions of Controls Main Unit AC INPUT Remote Sensor Power Indicator A blue indicator lights when the power is on operating functions with the remote control. 7 This operation manual provides a description based on and a red indicator lights when in the standby...
Identification of VOL+/-, CH+/-, MENU, SOURCE and POWER are also provided to the remote control. POWER Press this button to access the Menu main page. 3. Press it again to STANDBY. 2. MENU Press this button to turn the set back to ... channel; In OSD Menu, press these two buttons to choose the OSD items. Note: Functions of Controls Main Unit AC INPUT Remote Sensor Power Indicator A blue indicator lights when the power is on operating functions with the remote control. 7 This operation manual provides a description based on and a red indicator lights when in the standby...

User Manual
Page 12
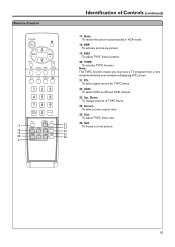
Display To display channel status or signal information 16. --To select three-digit channel number * The SRS symbol are trademark of Controls (continued) Remote Control 1. Identification of SRS Labs,Inc. POWER Turn the unit on or off 2. Stereo 5 13 To select STEREO, SAP or MONO 6 14 6. S.M 7 15 Sound mode select 7 P.M 8 ...
Display To display channel status or signal information 16. --To select three-digit channel number * The SRS symbol are trademark of Controls (continued) Remote Control 1. Identification of SRS Labs,Inc. POWER Turn the unit on or off 2. Stereo 5 13 To select STEREO, SAP or MONO 6 14 6. S.M 7 15 Sound mode select 7 P.M 8 ...
User Manual
Page 13
... while the main window is displaying a PC screen. 21. Size To adjust TVPC frame size 22 26. Remote Control 17 18 19 20 21 Identification of TVPC frame 24. Up, Down To change channel of Controls (continued) 17. Auto To rectify the picture automatically in VGA mode 18. P.S. Still 23 To freeze current...
... while the main window is displaying a PC screen. 21. Size To adjust TVPC frame size 22 26. Remote Control 17 18 19 20 21 Identification of TVPC frame 24. Up, Down To change channel of Controls (continued) 17. Auto To rectify the picture automatically in VGA mode 18. P.S. Still 23 To freeze current...
User Manual
Page 14
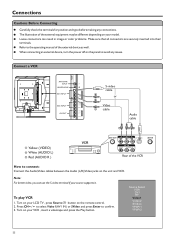
When connecting an external device, turn the power off on the panel to the operating manual of the external device as well. Turn on the remote control. 2. Source Select VGA DVI RF Video1 Video2 SVideo YPbPr1 YPbPr2 11 To play VCR 1. Refer to avoid any connections. Turn on your LCD TV , press ...
When connecting an external device, turn the power off on the panel to the operating manual of the external device as well. Turn on the remote control. 2. Source Select VGA DVI RF Video1 Video2 SVideo YPbPr1 YPbPr2 11 To play VCR 1. Refer to avoid any connections. Turn on your LCD TV , press ...
User Manual
Page 15
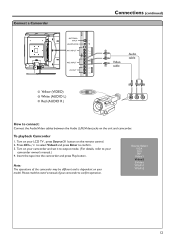
... Enter to confirm. 3. Note: The operations of your model. Please read the owner's manual of the camcorder may be different and is dependent on the remote control. 2. Source Select VGA DVI RF Video1 Video2 SVideo YPbPr1 YPbPr2 12 Turn on your camcorder and set it to output mode. (For details, refer to...
... Enter to confirm. 3. Note: The operations of your model. Please read the owner's manual of the camcorder may be different and is dependent on the remote control. 2. Source Select VGA DVI RF Video1 Video2 SVideo YPbPr1 YPbPr2 12 Turn on your camcorder and set it to output mode. (For details, refer to...
User Manual
Page 16
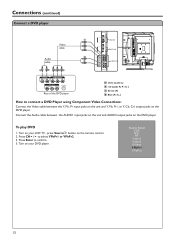
... YPbPr2 13 Connect the Audio cable between the Y, Pb, Pr input jacks on the unit and Y, Pb, Pr ( or Y, Cb, Cr) output jacks on the remote control. 2.
... YPbPr2 13 Connect the Audio cable between the Y, Pb, Pr input jacks on the unit and Y, Pb, Pr ( or Y, Cb, Cr) output jacks on the remote control. 2.
User Manual
Page 17
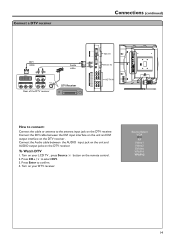
... IN AU DI O DVI-D DVI-D IN AU DI O HDTV IN How to connect: Connect the cable or antenna to the antenna input jack on the remote control. Turn on your DTV receiver. Connect the DVI cable between the AUDIO input jack on the unit and AUDIO output jacks on the DTV receiver...
... IN AU DI O DVI-D DVI-D IN AU DI O HDTV IN How to connect: Connect the cable or antenna to the antenna input jack on the remote control. Turn on your DTV receiver. Connect the DVI cable between the AUDIO input jack on the unit and AUDIO output jacks on the DTV receiver...

User Manual
Page 18
... YPbPr1 YPbPr2 15 Connect an Audio cable between the VGA jack on the PC and the VGA input jack on the unit. Turn on the remote control. 2. Connections (continued) Connect a PC Audio cable VGA cable DVI-D IN VGA IN AU DI O DVI-D DVI-D IN AU DI O HDTV IN YPbPr/CbCr IN How...
... YPbPr1 YPbPr2 15 Connect an Audio cable between the VGA jack on the PC and the VGA input jack on the unit. Turn on the remote control. 2. Connections (continued) Connect a PC Audio cable VGA cable DVI-D IN VGA IN AU DI O DVI-D DVI-D IN AU DI O HDTV IN YPbPr/CbCr IN How...
User Manual
Page 20
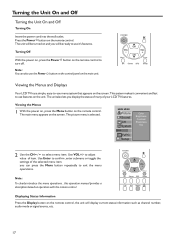
... can press the Menu button repeatedly to -use it convenient and fast to use the Power button on the control panel on the remote control, the unit will be turned on the remote control to select menu item. you display the status of many of item. Press the Power button on the... remote control. Viewing the Menus 1 With the power on, press the Menu button on the remote control. Note: To clearly introduce the menu operations , this operation manual provides a description based on the screen....
... can press the Menu button repeatedly to -use it convenient and fast to use the Power button on the control panel on the remote control, the unit will be turned on the remote control to select menu item. you display the status of many of item. Press the Power button on the... remote control. Viewing the Menus 1 With the power on, press the Menu button on the remote control. Note: To clearly introduce the menu operations , this operation manual provides a description based on the screen....
User Manual
Page 26
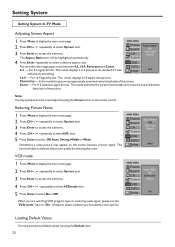
... access the submenu. This mode displays a 4:3 picture at its standard 4:3 size Setup 16:9 without any stretching. 16:9 -- Panorama -- Sometimes a noisy picture may appear on the remote control. OSD You can select the image aspect ratio between 4:3, 16:9, Panorama and Zoom. TVPC 4:3 -- In this mode the picture is progressively stretched toward each side...
... access the submenu. This mode displays a 4:3 picture at its standard 4:3 size Setup 16:9 without any stretching. 16:9 -- Panorama -- Sometimes a noisy picture may appear on the remote control. OSD You can select the image aspect ratio between 4:3, 16:9, Panorama and Zoom. TVPC 4:3 -- In this mode the picture is progressively stretched toward each side...
User Manual
Page 28
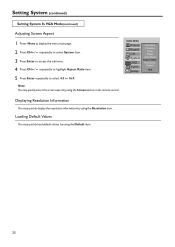
... Phase Auto Adjust Aspect Ratio Resolution Default 16:9 Displaying Resolution Information You may quickly select the screen aspect by using the Screen button on the remote control. Loading Default Values You may quickly load default values by using the Default item. 25 Setting System (continued) Setting System In VGA Mode(continued) Adjusting...
... Phase Auto Adjust Aspect Ratio Resolution Default 16:9 Displaying Resolution Information You may quickly select the screen aspect by using the Screen button on the remote control. Loading Default Values You may quickly load default values by using the Default item. 25 Setting System (continued) Setting System In VGA Mode(continued) Adjusting...
User Manual
Page 29
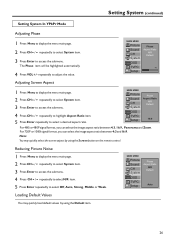
... Sound CH System Phase Aspect Ratio N/R Default OSD TVPC Setup Auto You may quickly select the screen aspect by using the Screen button on the remote control.
... Sound CH System Phase Aspect Ratio N/R Default OSD TVPC Setup Auto You may quickly select the screen aspect by using the Screen button on the remote control.
User Manual
Page 30
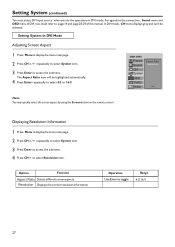
... Aspect Ratio Sound Resolution CH System OSD TVPC Setup 16:9 Note: You may quickly select the screen aspect by using the Screen button on the remote control.
... Aspect Ratio Sound Resolution CH System OSD TVPC Setup 16:9 Note: You may quickly select the screen aspect by using the Screen button on the remote control.
User Manual
Page 41
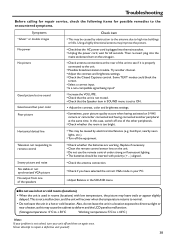
...line ! Turn off and then on again once. Check whether the batteries are working. Clean the remote control sensor lens on the unit again. ! This is set to remote control ! No power No picture Good picture but no sound Good sound but poor color Poor picture !...insert plug into the mains socket. ! Replace if necessary. ! Check the antenna connection. ! Adjust Balance in the SOUND menu. + Do not use the remote control under strong or fluorescent lighting. ! Also, do not leave the unit in rooms (locations) with polarity (+, -) aligned. hairdryer, nearby neon lights, etc...
...line ! Turn off and then on again once. Check whether the batteries are working. Clean the remote control sensor lens on the unit again. ! This is set to remote control ! No power No picture Good picture but no sound Good sound but poor color Poor picture !...insert plug into the mains socket. ! Replace if necessary. ! Check the antenna connection. ! Adjust Balance in the SOUND menu. + Do not use the remote control under strong or fluorescent lighting. ! Also, do not leave the unit in rooms (locations) with polarity (+, -) aligned. hairdryer, nearby neon lights, etc...
User Manual
Page 43
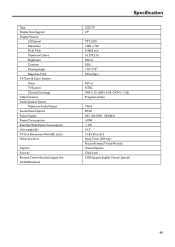
... Output Stereo Sound System Power Supply Power Consumption Stand by Mode Power Consumption Unit weight (lb) TV Unit Dimension (WxHxD) (inch) Other functions Caption Security Remote Control function support for full OSD features Specification LCD TV 27" TFT-LCD 1280 x 720 0.4665 mm 16,777,216 500 nit 500:1 170O/170O 25ms...
... Output Stereo Sound System Power Supply Power Consumption Stand by Mode Power Consumption Unit weight (lb) TV Unit Dimension (WxHxD) (inch) Other functions Caption Security Remote Control function support for full OSD features Specification LCD TV 27" TFT-LCD 1280 x 720 0.4665 mm 16,777,216 500 nit 500:1 170O/170O 25ms...


