T2-AH1 English user manual E2065
Page 10
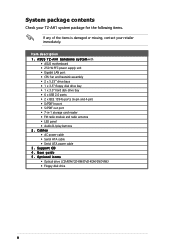
A H 1 b a r e b o n e s y s t e m with • ASUS motherboard • 250 W PFC power supply unit • Gigabit LAN port • CPU fan and heatsink assembly • 2 x 5.25" drive bays • 1 x 3.5" floppy disk drive bay • 1 x 3.5" hard disk drive bay • 6 x USB 2.0 ports • ... 5 . A S U S T 2 - Item description 1 . Cables • AC power cable • Serial ATA cable • Serial ATA power cable 3 . System package contents Check your T2-AH1 system package for the following items. If any of the items is damaged or missing, contact your retailer immediately...
A H 1 b a r e b o n e s y s t e m with • ASUS motherboard • 250 W PFC power supply unit • Gigabit LAN port • CPU fan and heatsink assembly • 2 x 5.25" drive bays • 1 x 3.5" floppy disk drive bay • 1 x 3.5" hard disk drive bay • 6 x USB 2.0 ports • ... 5 . A S U S T 2 - Item description 1 . Cables • AC power cable • Serial ATA cable • Serial ATA power cable 3 . System package contents Check your T2-AH1 system package for the following items. If any of the items is damaged or missing, contact your retailer immediately...
T2-AH1 English user manual E2065
Page 24
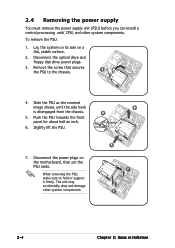
... power supply You must remove the power supply unit (PSU) before you can install a central processing unit( CPU) and other system components. 6 4 5 7 7 2-4 Chapter 2: Basic installation Remove the screw that secures 3 the PSU to hold or support it firmly. Disconnect the power plugs on a flat, stable surface. 2. To remove the PSU: 1. Disconnect the...
... power supply You must remove the power supply unit (PSU) before you can install a central processing unit( CPU) and other system components. 6 4 5 7 7 2-4 Chapter 2: Basic installation Remove the screw that secures 3 the PSU to hold or support it firmly. Disconnect the power plugs on a flat, stable surface. 2. To remove the PSU: 1. Disconnect the...
T2-AH1 English user manual E2065
Page 61
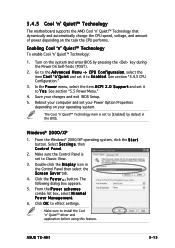
... s p l a y icon in the BIOS. The following dialog box appears. 5. ASUS T2-AH1 3-15 Reboot your operating system. Select S e t t i n g s, then Control Panel. 2. See section "5.4.5 CPU Configuration." 3. Save your Power Option Properties depending on the system and enter BIOS by default.... button. 3.4.5 Cool 'n' Quiet!™ Technology The motherboard supports the AMD Cool 'n' Quiet!™ Technology that dynamically and automatically change the CPU speed, voltage, and amount of power depending on the task the CPU performs. Enabling Cool 'n' Quiet!™ Technology To enable Cool...
... s p l a y icon in the BIOS. The following dialog box appears. 5. ASUS T2-AH1 3-15 Reboot your operating system. Select S e t t i n g s, then Control Panel. 2. See section "5.4.5 CPU Configuration." 3. Save your Power Option Properties depending on the system and enter BIOS by default.... button. 3.4.5 Cool 'n' Quiet!™ Technology The motherboard supports the AMD Cool 'n' Quiet!™ Technology that dynamically and automatically change the CPU speed, voltage, and amount of power depending on the task the CPU performs. Enabling Cool 'n' Quiet!™ Technology To enable Cool...

T2-AH1 English user manual E2065
Page 62
...ASUS -> Cool & Quiet -> Cool & Quiet. 3. The Cool 'n' Quiet!™ technology screen appears and displays the current CPU Frequency and CPU Voltage. 3-16 Chapter 3: Starting up If you are using Windows® XP, click the S t a r t button. Refer to install the Cool 'n' Quiet!™ software from the motherboard support.... Make sure to section "3.3.3 Utilities menu" for details. Select Programs-> ASUS -> Cool & Quiet -> Cool & Quiet. 2. Launching the Cool 'n' Quiet!™ software The motherboard support CD includes the Cool 'n' Quiet!™ software that enables you to view...
...ASUS -> Cool & Quiet -> Cool & Quiet. 3. The Cool 'n' Quiet!™ technology screen appears and displays the current CPU Frequency and CPU Voltage. 3-16 Chapter 3: Starting up If you are using Windows® XP, click the S t a r t button. Refer to install the Cool 'n' Quiet!™ software from the motherboard support.... Make sure to section "3.3.3 Utilities menu" for details. Select Programs-> ASUS -> Cool & Quiet -> Cool & Quiet. 2. Launching the Cool 'n' Quiet!™ software The motherboard support CD includes the Cool 'n' Quiet!™ software that enables you to view...
T2-AH1 English user manual E2065
Page 63
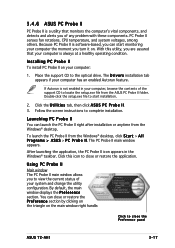
... you are assured that monitors the computer's vital components, and detects and alerts you of your computer, browse the contents of the support CD to close the Preference panel ASUS T2-AH1 3-17 Click the U t i l i t i e s tab, then click A S U S P C P r o b e I I . Launching PC Probe II You can close or restore the P r e ... By default, the main window displays the P r e f e r e n c e section. PC Probe II senses fan rotations, CPU temperature, and system voltages, among others. Click this utility, you to view the current status of any problem with these components. If Autorun ...
... you are assured that monitors the computer's vital components, and detects and alerts you of your computer, browse the contents of the support CD to close the Preference panel ASUS T2-AH1 3-17 Click the U t i l i t i e s tab, then click A S U S P C P r o b e I I . Launching PC Probe II You can close or restore the P r e ... By default, the main window displays the P r e f e r e n c e section. PC Probe II senses fan rotations, CPU temperature, and system voltages, among others. Click this utility, you to view the current status of any problem with these components. If Autorun ...
T2-AH1 English user manual E2065
Page 77
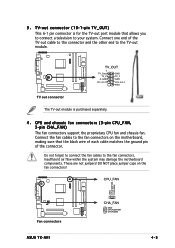
... that allows you to connect a television to the fan connectors on the fan connectors! These are not jumpers! CPU_FAN GND CPUFANPWR SYSFANIN ® Fan connectors ASUS T2-AH1 CHA_FAN GND CPUFANPWR CPUFANIN 4-5 CPU and chassis fan connectors (3-pin CPU_FAN, 3-pin CHA_FAN) The fan connectors support the proprietary CPU fan and chassis fan. 3 .
... that allows you to connect a television to the fan connectors on the fan connectors! These are not jumpers! CPU_FAN GND CPUFANPWR SYSFANIN ® Fan connectors ASUS T2-AH1 CHA_FAN GND CPUFANPWR CPUFANIN 4-5 CPU and chassis fan connectors (3-pin CPU_FAN, 3-pin CHA_FAN) The fan connectors support the proprietary CPU fan and chassis fan. 3 .
T2-AH1 English user manual E2065
Page 101
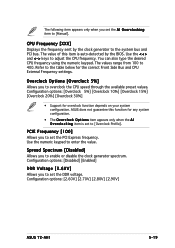
...] Allows you to enter the value. Configuration options: [2.60V] [2.70V] [2.80V] [2.90V] ASUS T2-AH1 5-19 Use the numeric keypad to set to 400. Spread Spectrum [Disabled] Allows you to adjust the CPU frequency. Use the < + > and < - > keys to enable or disable the clock generator...15%] [Overclock 20%] [Overclock 30%] • Support for the correct Front Side Bus and CPU External Frequency settings. CPU Frequency [XXX] Displays the frequency sent by the BIOS. The values range from 100 to [Overclock Profile]. ASUS does not guarantee this item is set the PCI ...
...] Allows you to enter the value. Configuration options: [2.60V] [2.70V] [2.80V] [2.90V] ASUS T2-AH1 5-19 Use the numeric keypad to set to 400. Spread Spectrum [Disabled] Allows you to adjust the CPU frequency. Use the < + > and < - > keys to enable or disable the clock generator...15%] [Overclock 20%] [Overclock 30%] • Support for the correct Front Side Bus and CPU External Frequency settings. CPU Frequency [XXX] Displays the frequency sent by the BIOS. The values range from 100 to [Overclock Profile]. ASUS does not guarantee this item is set the PCI ...

