Asus T2-PH1 - Terminator - 0 MB RAM Support and Manuals
Get Help and Manuals for this Asus item
Popular Asus T2-PH1 Manual Pages
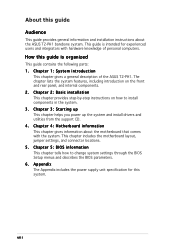
User Guide - Page 8
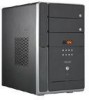
... T2-PH1 barebone system. viii About this guide
Audience
This guide provides general information and installation instructions about the motherboard that comes with hardware knowledge of the ASUS T2-PH1. Chapter 3: Starting up This chapter helps you power up the system and install drivers and utilities from the support CD. 4 . This chapter includes the motherboard layout, jumper settings...
User Guide - Page 17
...
15
5
6
7
16
8
9
10
17
11
18
12
13
19
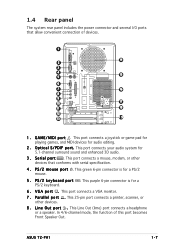
1 . This port connects your audio system for audio editing.
2 . V G A p o r t . ASUS T2-PH1
1-7 O p t i c a l S / P D I p o r t . P a r a l l e l p o r t . L i n e O u t p o r t . This port connects a mouse, modem, or other devices.
8 .... the power connector and several I/O ports that conforms with serial specification.
4 .
User Guide - Page 19
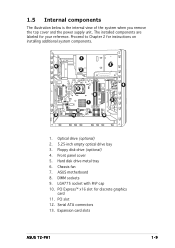
Proceed to Chapter 2 for discrete graphics
card 11. Hard disk drive metal tray 6. PCI Express™ x16 slot for instructions on installing additional system components.
1
6
3
2
9 8
7
4 5
10
13
11
12
1. Front panel cover 5. LGA775 socket with PnP cap 10. PCI slot 12. Expansion card slots
ASUS T2-PH1
1-9 ASUS motherboard 8. Serial ATA connectors 13. Floppy disk drive (...
User Guide - Page 21
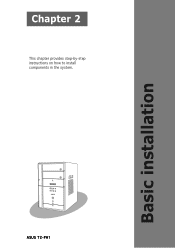
Basic installation
Chapter 2
This chapter provides step-by-step instructions on how to install components in the system. MODE
ASUS T2-PH1
User Guide - Page 23
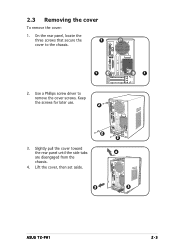
Use a Phillips screw driver to the chassis.
1
1
2. Lift the cover, then set aside.
2 2
4
3
3
ASUS T2-PH1
2-3 Keep the screws for later use.
2
3. 2.3 Removing the cover
To remove the cover:
1. Slightly pull the cover toward the rear panel until the side tabs ...
User Guide - Page 27
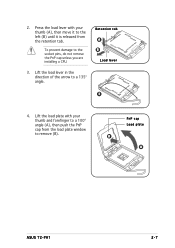
... plate
B A
ASUS T2-PH1
2-7
Lift the load lever in the direction of the arrow to the socket pins, do not remove the PnP cap unless you are installing a CPU.
3. Retention tab A B Load lever
3
4.
Press the load lever with your thumb (A), then move it to the left (B) until it is released from the load plate window to...
User Guide - Page 33
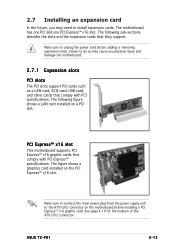
...™ x16 graphic cards that comply with PCI specifications. Failure to do so may cause you may need to install expansion cards. The following sub-sections describe the slots and the expansion cards that they support. Make sure to connect the 4-pin power plug from the power supply unit to unplug the power cord before installing a PCI Express™ x16 graphic card.
ASUS T2-PH1
2-13...
User Guide - Page 53
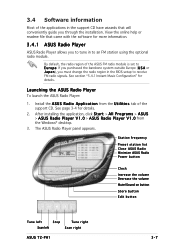
...i e s tab of the support CD.
Install the A S U S R a d i o A p p l i c a t i o n from the Windows® desktop.
3. Station frequency
Preset station list Close ASUS Radio Minimize ASUS Radio Power button
Clock
Increase the volume Decrease the volume Mute/Sound on button
Store button Edit button
Tune left
Stop
Scan left
Tune right Scan right
ASUS T2-PH1
3-7 View the online help or readme...
User Guide - Page 75
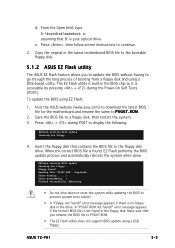
... floppy disk and using EZ Flash:
1. ASUS T2-PH1
5-3
EZFlash starting BIOS update Checking for floppy...
4.
EZFlash starting BIOS update Checking for floppy...
Make sure that contains the BIOS file to P 5 G 6 T .
A "P5G6T.ROM not found !" Visit the ASUS website (www.asus.com) to download the latest BIOS file for the motherboard and rename the same to the floppy...
User Guide - Page 79
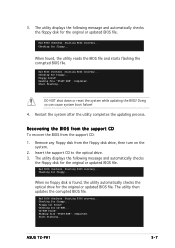
... utility completes the updating process.
Bad BIOS checksum. Starting BIOS recovery... The utility then updates the corrupted BIOS file. Bad BIOS checksum. Reading file "P5G6T.ROM". ASUS T2-PH1
5-7 The utility ... the support CD to the optical drive. 3. Bad BIOS checksum.
Remove any floppy disk from the support CD:
1. Checking for floppy... Recovering the BIOS from the support CD
To...
User Guide - Page 81
ASUS T2-PH1
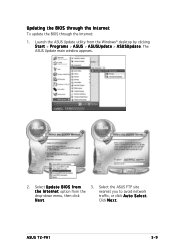
5-9 Updating the BIOS through the Internet
To update the BIOS through the Internet:
1. The ASUS Update main window appears.
2. N e x t.
Select the ASUS FTP site
t h e I O S f r o m
3. Click N e x t. Select U p d a t e B I n t e r n e t option from the Windows® desktop by clicking S t a r t > P r o g r a m s > A S U S > A S U S U p d a t e > A S U S U p d a ...
User Guide - Page 85
... solid triangle before each item on the screen.
Scroll bar
ASUS T2-PH1
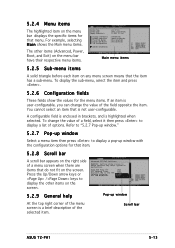
5-13 5.2.4 Menu items
The highlighted item on the menu bar displays the specific items for that the item has a sub-menu. You ... pop-up window
At the top right corner of the menu screen is user-configurable, you can change the value of a field, select it then press to display the other items (Advanced, Power, Boot,...
User Guide - Page 87
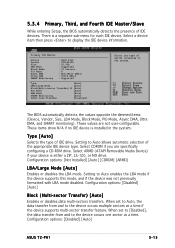
... enables the LBA mode if the device supports this mode, and if the device was not previously formatted with LBA mode disabled. Setting to Auto allows automatic selection of device connected to display the IDE device information. Configuration options: [Disabled] [Auto]
ASUS T2-PH1
5-15 These values are specifically configuring a CD-ROM drive. Configuration options: [Disabled...
User Guide - Page 101
...: [No] [Yes]
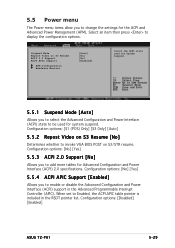
5.5.3 ACPI 2.0 Support [No]
Allows you to select the Advanced Configuration and Power Interface (ACPI) state to add more tables for the ACPI and Advanced Power Management (APM). Configuration options: [Disabled] [Enabled]
ASUS T2-PH1
5-29 Configuration options: [S1 (POS) Only] [S3 Only] [Auto]
5.5.2 Repost Video on S3/STR resume. When set to invoke VGA BIOS...
User Guide - Page 111
Appendix
The Appendix includes the power supply unit specification for this system.
MODE
ASUS T2-PH1
Appendix
Asus T2-PH1 Reviews
We have not received any reviews for Asus yet.