T2-AH1 English user manual E2065
Page 4
... II 3-17 3.4.7 AC`97 audio feature 3-23 Chapter 4: Motherboard Info 4.1 Introduction 4-2 4.2 Motherboard layout 4-2 4.3 Jumper 4-3 4.4 Connectors 4-4 Chapter 5: BIOS Information 5.1 Managing and updating your BIOS 5-2 5.1.1 Creating a bootable floppy disk 5-2 5.1.2 ASUS EZ Flash utility 5-3 5.1.3 AFUDOS utility 5-4 5.1.4 ASUS CrashFree BIOS 2 utility 5-6 5.1.5 ASUS Update utility 5-8 5.2 BIOS setup program 5-11 5.2.1 BIOS menu screen 5-12 5.2.2 Menu bar 5-12 5.2.3 Navigation keys 5-12 5.2.4 Menu items 5-13 iv
... II 3-17 3.4.7 AC`97 audio feature 3-23 Chapter 4: Motherboard Info 4.1 Introduction 4-2 4.2 Motherboard layout 4-2 4.3 Jumper 4-3 4.4 Connectors 4-4 Chapter 5: BIOS Information 5.1 Managing and updating your BIOS 5-2 5.1.1 Creating a bootable floppy disk 5-2 5.1.2 ASUS EZ Flash utility 5-3 5.1.3 AFUDOS utility 5-4 5.1.4 ASUS CrashFree BIOS 2 utility 5-6 5.1.5 ASUS Update utility 5-8 5.2 BIOS setup program 5-11 5.2.1 BIOS menu screen 5-12 5.2.2 Menu bar 5-12 5.2.3 Navigation keys 5-12 5.2.4 Menu items 5-13 iv

T2-AH1 English user manual E2065
Page 8
... about the motherboard that comes with hardware knowledge of the ASUS T2-AH1. Chapter 3: Starting up This chapter helps you power up the system and install drivers and utilities from the support CD. 4 . About this guide is intended for this system. viii Chapter 5: BIOS information This chapter tells how to install components in the... and integrators with the system. This chapter includes the motherboard layout, jumper settings, and connector locations. 5. Chapter 4: Motherboard information This chapter gives information about the ASUS T2-AH1 barebone system.
... about the motherboard that comes with hardware knowledge of the ASUS T2-AH1. Chapter 3: Starting up This chapter helps you power up the system and install drivers and utilities from the support CD. 4 . About this guide is intended for this system. viii Chapter 5: BIOS information This chapter tells how to install components in the... and integrators with the system. This chapter includes the motherboard layout, jumper settings, and connector locations. 5. Chapter 4: Motherboard information This chapter gives information about the ASUS T2-AH1 barebone system.
T2-AH1 English user manual E2065
Page 20
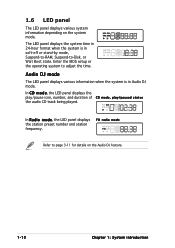
... information depending on the Audio DJ feature. 1-10 Chapter 1: System introduction In R a d i o m o d e, the LED panel displays the station preset number and station frequency. Enter the BIOS setup or the operating system to -Disk, or Wait Boot state. FM radio mode Refer to page 3-11 for details on the system mode.
... information depending on the Audio DJ feature. 1-10 Chapter 1: System introduction In R a d i o m o d e, the LED panel displays the station preset number and station frequency. Enter the BIOS setup or the operating system to -Disk, or Wait Boot state. FM radio mode Refer to page 3-11 for details on the system mode.
T2-AH1 English user manual E2065
Page 51
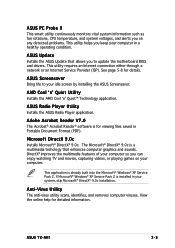
...Technology application. The Microsoft® DirectX® 9.0c is already built into the Microsoft® Windows® XP Service Pack 2. ASUS T2-AH1 3-5 ASUS Screensaver Bring life to your computer so you can enjoy watching TV and movies, capturing videos, or playing games on any detected ...problems. This utility helps you to update the motherboard BIOS and drivers. ASUS Radio Player Utility Installs the ASUS Radio Player application. Adobe Acrobat Reader V7.0 The Acrobat® Acrobat Reader® software is installed in...
...Technology application. The Microsoft® DirectX® 9.0c is already built into the Microsoft® Windows® XP Service Pack 2. ASUS T2-AH1 3-5 ASUS Screensaver Bring life to your computer so you can enjoy watching TV and movies, capturing videos, or playing games on any detected ...problems. This utility helps you to update the motherboard BIOS and drivers. ASUS Radio Player Utility Installs the ASUS Radio Player application. Adobe Acrobat Reader V7.0 The Acrobat® Acrobat Reader® software is installed in...

T2-AH1 English user manual E2065
Page 54
...radio module. See section "5.4.1 Instant Music Configuration" for details. 2. Launching the ASUS Radio Player To launch the ASUS Radio Player: 1. Station frequency Preset station list Close ASUS Radio Minimize ASUS Radio Power button Clock Increase the volume Decrease the volume Mute/Sound on button Store...information Most of the applications in the support CD have wizards that came with the software for more information. 3.4.1 ASUS Radio Player ASUS Radio Player allows you to tune in the BIOS setup to E u r o p e. View the online help or readme file that will conveniently guide you ...
...radio module. See section "5.4.1 Instant Music Configuration" for details. 2. Launching the ASUS Radio Player To launch the ASUS Radio Player: 1. Station frequency Preset station list Close ASUS Radio Minimize ASUS Radio Power button Clock Increase the volume Decrease the volume Mute/Sound on button Store...information Most of the applications in the support CD have wizards that came with the software for more information. 3.4.1 ASUS Radio Player ASUS Radio Player allows you to tune in the BIOS setup to E u r o p e. View the online help or readme file that will conveniently guide you ...
T2-AH1 English user manual E2065
Page 56
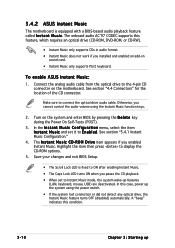
... Music only supports PS/2 keyboard. Turn on the motherboard. The I n s t a n t M u s i c. Highlight the item then press to the 4-pin CD connector on the system and enter BIOS by pressing the D e l e t e key during the Power On Self-Tests (POST). 3. In the I n s t a n t M u s i c C o n f i g u r a t i o n menu, select the item...LED is equipped with a BIOS-based audio playback feature called I n s t a n t M u s i c C D - A "beep" indicates this condition. 3-10 Chapter 3: Starting up See section "5.4.1 Instant Music Configuration." 4. 3.4.2 ASUS Instant Music The motherboard is...
... Music only supports PS/2 keyboard. Turn on the motherboard. The I n s t a n t M u s i c. Highlight the item then press to the 4-pin CD connector on the system and enter BIOS by pressing the D e l e t e key during the Power On Self-Tests (POST). 3. In the I n s t a n t M u s i c C o n f i g u r a t i o n menu, select the item...LED is equipped with a BIOS-based audio playback feature called I n s t a n t M u s i c C D - A "beep" indicates this condition. 3-10 Chapter 3: Starting up See section "5.4.1 Instant Music Configuration." 4. 3.4.2 ASUS Instant Music The motherboard is...
T2-AH1 English user manual E2065
Page 57
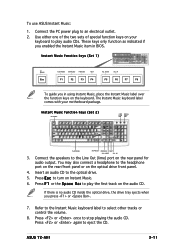
... audio CD inside the optical drive, the drive tray ejects when you in BIOS. You may also connect a headphone to turn on the optical drive front panel. 4. Refer to the Instant Music keyboard label to an electrical outlet. 2. ASUS T2-AH1 3-11 UP 3. Use either one of the two sets of special function keys...
... audio CD inside the optical drive, the drive tray ejects when you in BIOS. You may also connect a headphone to turn on the optical drive front panel. 4. Refer to the Instant Music keyboard label to an electrical outlet. 2. ASUS T2-AH1 3-11 UP 3. Use either one of the two sets of special function keys...
T2-AH1 English user manual E2065
Page 60
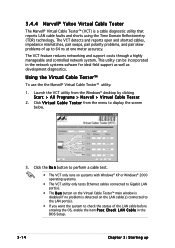
This utility can be incorporated in the BIOS Setup. 3-14 Chapter 3: Starting up to display the screen below. 3. Launch the VCT utility from the menu to 64 ns at one meter accuracy. Using ...
This utility can be incorporated in the BIOS Setup. 3-14 Chapter 3: Starting up to display the screen below. 3. Launch the VCT utility from the menu to 64 ns at one meter accuracy. Using ...
T2-AH1 English user manual E2065
Page 61
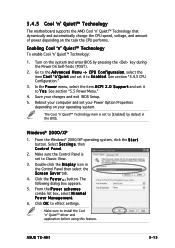
... automatically change the CPU speed, voltage, and amount of power depending on the system and enter BIOS by default in the Control Panel then select the S c r e e n S a v e r tab. 4. Double-click the D i s p l a y icon in the BIOS. ASUS T2-AH1 3-15 The Cool 'n' Quiet!™ Technology item is set to [Enabled] by pressing the ... Technology: 1. Click the P o w e r . . . From the Windows® 2000/XP operating system, click the S t a r t button. See section "5.4.5 CPU Configuration." 3. Reboot your changes and exit BIOS Setup. 5. The following dialog box appears. 5.
... automatically change the CPU speed, voltage, and amount of power depending on the system and enter BIOS by default in the Control Panel then select the S c r e e n S a v e r tab. 4. Double-click the D i s p l a y icon in the BIOS. ASUS T2-AH1 3-15 The Cool 'n' Quiet!™ Technology item is set to [Enabled] by pressing the ... Technology: 1. Click the P o w e r . . . From the Windows® 2000/XP operating system, click the S t a r t button. See section "5.4.5 CPU Configuration." 3. Reboot your changes and exit BIOS Setup. 5. The following dialog box appears. 5.
T2-AH1 English user manual E2065
Page 74
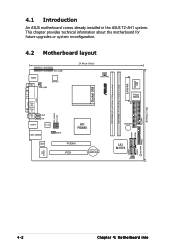
... comes already installed in the ASUS T2-AH1 system. This chapter provides technical information about the motherboard for future upgrades or system reconfiguration. 4.2 Motherboard layout DVI_COM1 KBMS VGA CHA_FAN ATX12V 24.89cm (9.8in) ... CD ALC655 LAN_USB34 SPDIF ATI RS480 DDR DIMM_B1 (64/128-bit, 184-pin module) DDR DIMM_A1 (64/128-bit, 184-pin module) EATXPWR Super I/O Flash BIOS BUZZER SATA2 SATA4 SATA1 VIA VT6307 Marvell 88E8053 PCIEX16 PCI1 CR2032 3V Lithium Cell CMOS Power ULI M1573 CLRTC SATA3 SB_PWR PANEL IDE FLOPPY 20...
... comes already installed in the ASUS T2-AH1 system. This chapter provides technical information about the motherboard for future upgrades or system reconfiguration. 4.2 Motherboard layout DVI_COM1 KBMS VGA CHA_FAN ATX12V 24.89cm (9.8in) ... CD ALC655 LAN_USB34 SPDIF ATI RS480 DDR DIMM_B1 (64/128-bit, 184-pin module) DDR DIMM_A1 (64/128-bit, 184-pin module) EATXPWR Super I/O Flash BIOS BUZZER SATA2 SATA4 SATA1 VIA VT6307 Marvell 88E8053 PCIEX16 PCI1 CR2032 3V Lithium Cell CMOS Power ULI M1573 CLRTC SATA3 SB_PWR PANEL IDE FLOPPY 20...
T2-AH1 English user manual E2065
Page 75
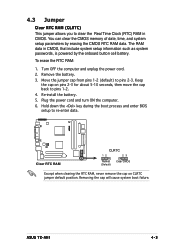
... during the boot process and enter BIOS setup to re-enter data. ® Clear RTC RAM CLRTC 12 23 Normal (Default) Clear CMOS Except when clearing the RTC RAM, never remove the cap on pins 2-3 for about 5-10 seconds, then move the cap back to pins 1-2. 4. ASUS T2-AH1 4-3 4.3 Jumper Clear RTC RAM (CLRTC...
... during the boot process and enter BIOS setup to re-enter data. ® Clear RTC RAM CLRTC 12 23 Normal (Default) Clear CMOS Except when clearing the RTC RAM, never remove the cap on pins 2-3 for about 5-10 seconds, then move the cap back to pins 1-2. 4. ASUS T2-AH1 4-3 4.3 Jumper Clear RTC RAM (CLRTC...
T2-AH1 English user manual E2065
Page 81
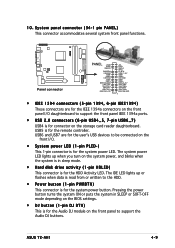
... the HDD. • Power button (1-pin PWRBTN) This connector is for the system power LED. 10. USB5 is for the IEEE 1394a connectors on the BIOS settings. • DJ button (1-pin DJ BTN) This is for the HDD Activity LED. System panel connector (34-1 pin PANEL) This connector accommodates several system... the front panel to support the front panel IEEE 1394a ports. • USB 2.0 connectors (6-pin USB4_5, 7-pin USB6_7) USB4 is for the system power button. ASUS T2-AH1 4-9
... the HDD. • Power button (1-pin PWRBTN) This connector is for the system power LED. 10. USB5 is for the IEEE 1394a connectors on the BIOS settings. • DJ button (1-pin DJ BTN) This is for the HDD Activity LED. System panel connector (34-1 pin PANEL) This connector accommodates several system... the front panel to support the front panel IEEE 1394a ports. • USB 2.0 connectors (6-pin USB4_5, 7-pin USB6_7) USB4 is for the system power button. ASUS T2-AH1 4-9
T2-AH1 English user manual E2065
Page 83
BIOS setup MODE ASUS T2-AH1 1 Chapter 5 This chapter tells how to change system settings through the BIOS Setup menus and describes the BIOS parameters.
BIOS setup MODE ASUS T2-AH1 1 Chapter 5 This chapter tells how to change system settings through the BIOS Setup menus and describes the BIOS parameters.
T2-AH1 English user manual E2065
Page 84
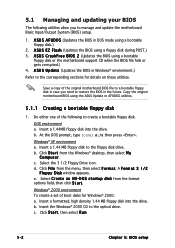
... create a set of the original motherboard BIOS file to a bootable floppy disk in DOS mode using the ASUS Update or AFUDOS utilities. 5.1.1 Creating a bootable floppy disk 1. Click S t a r t, then select R u n. 5-2 Chapter 5: BIOS setup A S U S U p d a t e (Updates the BIOS in Windows® environment.) Refer to restore the BIOS in the future. b. Select C r e a t e a n M S - A S U S E Z F l a s h (Updates the BIOS using a bootable floppy disk or...
... create a set of the original motherboard BIOS file to a bootable floppy disk in DOS mode using the ASUS Update or AFUDOS utilities. 5.1.1 Creating a bootable floppy disk 1. Click S t a r t, then select R u n. 5-2 Chapter 5: BIOS setup A S U S U p d a t e (Updates the BIOS in Windows® environment.) Refer to restore the BIOS in the future. b. Select C r e a t e a n M S - A S U S E Z F l a s h (Updates the BIOS using a bootable floppy disk or...
T2-AH1 English user manual E2065
Page 85
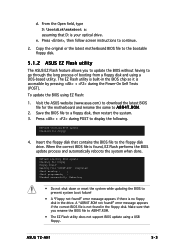
..........| Start programming...| Flashed successfully. A "A8R4T.ROM not found ! When the correct BIOS file is your optical drive. Floppy found !" Save the BIOS file to the floppy disk drive. EZFlash starting BIOS update Checking for floppy... 4. ASUS T2-AH1 5-3 error message appears if the correct BIOS file is not found !" e. error message appears if there is accessible by...
..........| Start programming...| Flashed successfully. A "A8R4T.ROM not found ! When the correct BIOS file is your optical drive. Floppy found !" Save the BIOS file to the floppy disk drive. EZFlash starting BIOS update Checking for floppy... 4. ASUS T2-AH1 5-3 error message appears if the correct BIOS file is not found !" e. error message appears if there is accessible by...
T2-AH1 English user manual E2065
Page 86
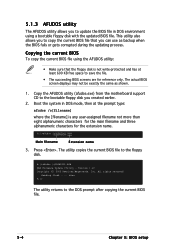
...afudos.exe) from the motherboard support CD to the bootable floppy disk you to update the BIOS file in DOS mode, then at least 600 KB free space to copy the current BIOS file that the floppy disk is not write-protected and has at the prompt type: .... A:\>afudos /oOLDBIOS1.ROM Main filename Extension name 3. Copying the current BIOS To copy the current BIOS file using a bootable floppy disk with the updated BIOS file. This utility also allows you to save the file. • The succeeding BIOS screens are for the extension name. Reading flash ..... Version 1.10 Copyright...
...afudos.exe) from the motherboard support CD to the bootable floppy disk you to update the BIOS file in DOS mode, then at least 600 KB free space to copy the current BIOS file that the floppy disk is not write-protected and has at the prompt type: .... A:\>afudos /oOLDBIOS1.ROM Main filename Extension name 3. Copying the current BIOS To copy the current BIOS file using a bootable floppy disk with the updated BIOS file. This utility also allows you to save the file. • The succeeding BIOS screens are for the extension name. Reading flash ..... Version 1.10 Copyright...

T2-AH1 English user manual E2065
Page 87
...: 1. Boot the system in DOS mode, then at the DOS prompt. 2. Version 1.19(ASUS V2.07(03.11.24BB)) Copyright (C) 2003 American Megatrends, Inc. done Reading flash .... Write the BIOS filename on the bootable floppy disk. All rights reserved. ASUS T2-AH1 5-5 Copy the AFUDOS utility (afudos.exe) from the motherboard support CD to prevent...
...: 1. Boot the system in DOS mode, then at the DOS prompt. 2. Version 1.19(ASUS V2.07(03.11.24BB)) Copyright (C) 2003 American Megatrends, Inc. done Reading flash .... Write the BIOS filename on the bootable floppy disk. All rights reserved. ASUS T2-AH1 5-5 Copy the AFUDOS utility (afudos.exe) from the motherboard support CD to prevent...
T2-AH1 English user manual E2065
Page 88
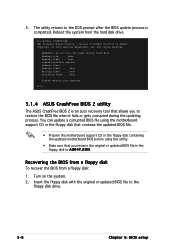
... turn off power during the updating process. done Reading flash .... done Writing flash ..... done Verifying flash ... done Please restart your computer A:\> 5.1.4 ASUS CrashFree BIOS 2 utility The ASUS CrashFree BIOS 2 is completed. Version 1.19(ASUS V2.07(03.11.24BB)) Copyright (C) 2003 American Megatrends, Inc. done Search bootblock version Advance Check......... A:\>afudos /iA8R4T.ROM AMI Firmware...
... turn off power during the updating process. done Reading flash .... done Writing flash ..... done Verifying flash ... done Please restart your computer A:\> 5.1.4 ASUS CrashFree BIOS 2 utility The ASUS CrashFree BIOS 2 is completed. Version 1.19(ASUS V2.07(03.11.24BB)) Copyright (C) 2003 American Megatrends, Inc. done Search bootblock version Advance Check......... A:\>afudos /iA8R4T.ROM AMI Firmware...
T2-AH1 English user manual E2065
Page 89
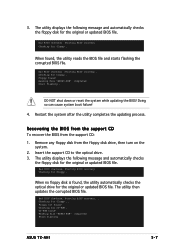
... CD to the optical drive. 3. Bad BIOS checksum. 3. Starting BIOS recovery... Checking for the original or updated BIOS file. Completed. Recovering the BIOS from the support CD To recover the BIOS from the floppy disk drive, then turn ...BIOS file. Completed. Doing so can cause system boot failure! 4. Bad BIOS checksum. The utility displays the following message and automatically checks the floppy disk for floppy... Checking for the original or updated BIOS file. The utility displays the following message and automatically checks the floppy disk for floppy... ASUS T2-AH1...
... CD to the optical drive. 3. Bad BIOS checksum. 3. Starting BIOS recovery... Checking for the original or updated BIOS file. Completed. Recovering the BIOS from the support CD To recover the BIOS from the floppy disk drive, then turn ...BIOS file. Completed. Doing so can cause system boot failure! 4. Bad BIOS checksum. The utility displays the following message and automatically checks the floppy disk for floppy... Checking for the original or updated BIOS file. The utility displays the following message and automatically checks the floppy disk for floppy... ASUS T2-AH1...
T2-AH1 English user manual E2065
Page 90
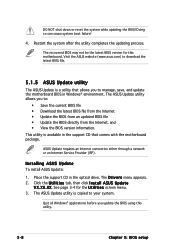
...: 1. Place the support CD in the support CD that allows you update the BIOS using this motherboard. X X . X X. See page 3-4 for this utility. 5-8 Chapter 5: BIOS setup Quit all Windows® applications before you to download the latest BIOS file. 5.1.5 ASUS Update utility The ASUS Update is a utility that comes with the motherboard package. Doing so can...
...: 1. Place the support CD in the support CD that allows you update the BIOS using this motherboard. X X . X X. See page 3-4 for this utility. 5-8 Chapter 5: BIOS setup Quit all Windows® applications before you to download the latest BIOS file. 5.1.5 ASUS Update utility The ASUS Update is a utility that comes with the motherboard package. Doing so can...