
T2-AH1 English user manual E2065
Page 8
... you power up the system and install drivers and utilities from the support CD. 4 . About this system. Chapter 2: Basic installation This chapter provides step-by-step instructions on the front and rear panel, and internal components. 2. Chapter 4: Motherboard information This chapter gives information about the ASUS T2-AH1 barebone system. How this guide is intended for this guide Audience This guide provides general information and installation instructions...
... you power up the system and install drivers and utilities from the support CD. 4 . About this system. Chapter 2: Basic installation This chapter provides step-by-step instructions on the front and rear panel, and internal components. 2. Chapter 4: Motherboard information This chapter gives information about the ASUS T2-AH1 barebone system. How this guide is intended for this guide Audience This guide provides general information and installation instructions...
T2-AH1 English user manual E2065
Page 10
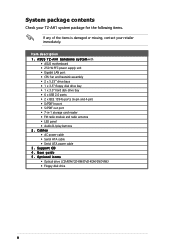
A H 1 b a r e b o n e s y s t e m with • ASUS motherboard • 250 W PFC power supply unit • Gigabit LAN port • CPU fan and heatsink assembly • 2 x 5.25" drive bays • 1 x 3.5" floppy disk drive bay • 1 x 3.5" hard disk drive bay • 6 x USB 2.0 ports • 2 x IEEE 1394a ports (6-pin and 4-pin) • S/PDIF In port • S/PDIF out port • 7-in-1 storage card reader • FM radio module and radio antenna • LED panel • Audio...
A H 1 b a r e b o n e s y s t e m with • ASUS motherboard • 250 W PFC power supply unit • Gigabit LAN port • CPU fan and heatsink assembly • 2 x 5.25" drive bays • 1 x 3.5" floppy disk drive bay • 1 x 3.5" hard disk drive bay • 6 x USB 2.0 ports • 2 x IEEE 1394a ports (6-pin and 4-pin) • S/PDIF In port • S/PDIF out port • 7-in-1 storage card reader • FM radio module and radio antenna • LED panel • Audio...
T2-AH1 English user manual E2065
Page 12
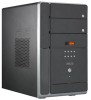
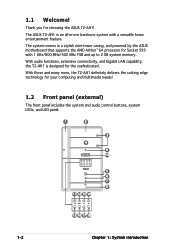
... LEDs, and LED panel. 1 2 3 4 9 10 MODE 5 6 7 8 11 12 13 14 MODE 15 16 17 18 1-2 Chapter 1: System introduction With these and many more, the T2-AH1 definitely delivers the cutting edge technology for choosing the ASUS T2-AH1! With audio functions, extensive connectivity, and Gigabit LAN capability, the T2-AH1 is an all-in a stylish mini-tower casing, and powered by the ASUS motherboard that supports...
... LEDs, and LED panel. 1 2 3 4 9 10 MODE 5 6 7 8 11 12 13 14 MODE 15 16 17 18 1-2 Chapter 1: System introduction With these and many more, the T2-AH1 definitely delivers the cutting edge technology for choosing the ASUS T2-AH1! With audio functions, extensive connectivity, and Gigabit LAN capability, the T2-AH1 is an all-in a stylish mini-tower casing, and powered by the ASUS motherboard that supports...

T2-AH1 English user manual E2065
Page 13
... turn the system on the OS setting. 1 2 . This door covers a second optical drive bay. 5 . P o w e r L E D . F r o n t p a n e l I / O d o o r . In Windows® mode, pressing this button to eject the optical drive loading tray. 4 . P L A Y / P A U S E b u t t o n ( / ) . In C D m o d e, plays or pauses an audio CD track. Press this button shuts down, restarts, or puts the system in -1 storage card reader. 1 0 . H D D L E D . This LED lights up to an FM radio...
... turn the system on the OS setting. 1 2 . This door covers a second optical drive bay. 5 . P o w e r L E D . F r o n t p a n e l I / O d o o r . In Windows® mode, pressing this button to eject the optical drive loading tray. 4 . P L A Y / P A U S E b u t t o n ( / ) . In C D m o d e, plays or pauses an audio CD track. Press this button shuts down, restarts, or puts the system in -1 storage card reader. 1 0 . H D D L E D . This LED lights up to an FM radio...
T2-AH1 English user manual E2065
Page 17
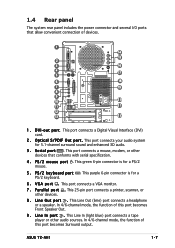
..., scanner, or other audio sources. L i n e O u t p o r t . ASUS T2-AH1 1-7 This green 6-pin connector is for 5.1-channel surround sound and enhanced 3D audio. 3 . In 4/6-channel mode, the function of this port becomes Surround output. 1.4 Rear panel The system rear panel includes the power connector and several I - This port connects a Digital Visual Interface (DVI) card. 2 . In 4/6-channel mode, the function...
..., scanner, or other audio sources. L i n e O u t p o r t . ASUS T2-AH1 1-7 This green 6-pin connector is for 5.1-channel surround sound and enhanced 3D audio. 3 . In 4/6-channel mode, the function of this port becomes Surround output. 1.4 Rear panel The system rear panel includes the power connector and several I - This port connects a Digital Visual Interface (DVI) card. 2 . In 4/6-channel mode, the function...
T2-AH1 English user manual E2065
Page 19
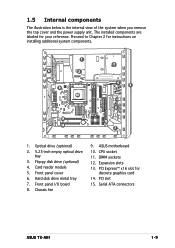
... when you remove the top cover and the power supply unit. PCI Express™ x16 slot for your reference. Floppy disk drive (optional) 4. Card reader module 5. Hard disk drive metal tray 7. CPU socket 11. Serial ATA connectors ASUS T2-AH1 1-9 The installed components are labeled for discrete graphics card 14. Chassis fan 9. Optical drive (optional) 2. 5.25-inch empty optical drive bay 3. Front panel cover 6. Proceed to Chapter 2 for instructions on installing additional system...
... when you remove the top cover and the power supply unit. PCI Express™ x16 slot for your reference. Floppy disk drive (optional) 4. Card reader module 5. Hard disk drive metal tray 7. CPU socket 11. Serial ATA connectors ASUS T2-AH1 1-9 The installed components are labeled for discrete graphics card 14. Chassis fan 9. Optical drive (optional) 2. 5.25-inch empty optical drive bay 3. Front panel cover 6. Proceed to Chapter 2 for instructions on installing additional system...

T2-AH1 English user manual E2065
Page 22
... components you plan to install in the bag that came with an onboard standby power LED. DDR Dual Inline Memory Module (DIMM) 3. 2.1 Preparation Before you proceed, make sure that the standby power LED is ON, in sleep mode or in soft-off mode, and not powered OFF. The motherboard comes with the component. Hard disk drive 5. This LED lights up to indicate that...
... components you plan to install in the bag that came with an onboard standby power LED. DDR Dual Inline Memory Module (DIMM) 3. 2.1 Preparation Before you proceed, make sure that the standby power LED is ON, in sleep mode or in soft-off mode, and not powered OFF. The motherboard comes with the component. Hard disk drive 5. This LED lights up to indicate that...
T2-AH1 English user manual E2065
Page 35
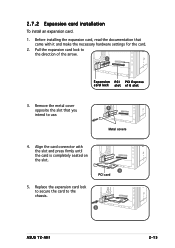
... chassis. 5 ASUS T2-AH1 2-15 Remove the metal cover opposite the slot that came with the slot and press firmly until the card is completely seated on the slot. 4 PCI card 5. Before installing the expansion card, read the documentation that you intend to use. 3 Metal covers 4. Replace the expansion card lock to secure the card to the direction of the arrow. 2 Expansion PCI PCI Express card...
... chassis. 5 ASUS T2-AH1 2-15 Remove the metal cover opposite the slot that came with the slot and press firmly until the card is completely seated on the slot. 4 PCI card 5. Before installing the expansion card, read the documentation that you intend to use. 3 Metal covers 4. Replace the expansion card lock to secure the card to the direction of the arrow. 2 Expansion PCI PCI Express card...
T2-AH1 English user manual E2065
Page 37
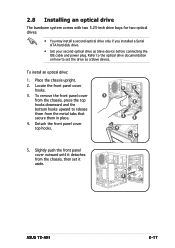
... from the chassis, then set the drive as Slave device before connecting the IDE cable and power plug. Slightly push the front panel cover outward until it aside. 5 ASUS T2-AH1 2-17 2.8 Installing an optical drive The barebone system comes with two 5.25-inch drive bays for two optical drives. • You may install a second optical drive only if you installed a Serial ATA hard disk drive. • Set your second...
... from the chassis, then set the drive as Slave device before connecting the IDE cable and power plug. Slightly push the front panel cover outward until it aside. 5 ASUS T2-AH1 2-17 2.8 Installing an optical drive The barebone system comes with two 5.25-inch drive bays for two optical drives. • You may install a second optical drive only if you installed a Serial ATA hard disk drive. • Set your second...
T2-AH1 English user manual E2065
Page 41
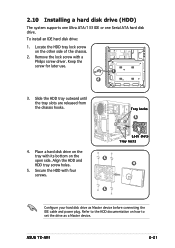
... the IDE cable and power plug. To install an IDE hard disk drive: 1. Align the HDD and HDD tray screw holes. 5. Locate the HDD tray lock screw on how to the HDD documentation on the other side of the chassis. 2. Remove the lock screw with its bottom on the tray with a Philips screw driver. ASUS T2-AH1 2-21 Keep the...
... the IDE cable and power plug. To install an IDE hard disk drive: 1. Align the HDD and HDD tray screw holes. 5. Locate the HDD tray lock screw on how to the HDD documentation on the other side of the chassis. 2. Remove the lock screw with its bottom on the tray with a Philips screw driver. ASUS T2-AH1 2-21 Keep the...

T2-AH1 English user manual E2065
Page 44
... the PSU over the chassis. 4. See page 4-6 for the location of the rear panel until it fits in place. 5 6. Connect the 24-pin ATX power plug to the ATX12V connector on the motherboard. Secure the PSU with the screw you removed earlier. 2.11 Reinstalling the power supply unit Reinstall the power supply unit (PSU) after installing the system components and...
... the PSU over the chassis. 4. See page 4-6 for the location of the rear panel until it fits in place. 5 6. Connect the 24-pin ATX power plug to the ATX12V connector on the motherboard. Secure the PSU with the screw you removed earlier. 2.11 Reinstalling the power supply unit Reinstall the power supply unit (PSU) after installing the system components and...
T2-AH1 English user manual E2065
Page 48
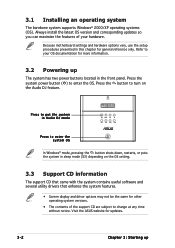
Visit the ASUS website for updates. 3-2 Chapter 3: Starting up The system has two power buttons located in the front panel. Because motherboard settings and hardware options vary, use the setup procedures presented in sleep mode (S3) depending on the Audio DJ feature. Press the system power button ( ) to turn on the OS setting. 3.3 Support CD information The support CD that came with...
Visit the ASUS website for updates. 3-2 Chapter 3: Starting up The system has two power buttons located in the front panel. Because motherboard settings and hardware options vary, use the setup procedures presented in sleep mode (S3) depending on the Audio DJ feature. Press the system power button ( ) to turn on the OS setting. 3.3 Support CD information The support CD that came with...
T2-AH1 English user manual E2065
Page 49
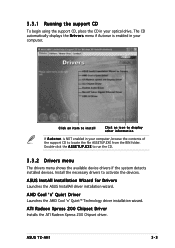
... in your optical drive. E X E to activate the devices. ASUS InstAll Installation Wizard for Drivers Launches the ASUS InstallAll driver installation wizard. ATI Radeon Xpress 200 Chipset Driver Installs the ATI Radeon Xpress 200 Chipset driver. 3.3.1 Running the support CD To begin using the support CD, place the CD in your computer. ASUS T2-AH1 3-3 AMD Cool 'n' Quiet Driver Launches the AMD Cool 'n' Quiet™ Technology driver installation wizard. Double...
... in your optical drive. E X E to activate the devices. ASUS InstAll Installation Wizard for Drivers Launches the ASUS InstallAll driver installation wizard. ATI Radeon Xpress 200 Chipset Driver Installs the ATI Radeon Xpress 200 Chipset driver. 3.3.1 Running the support CD To begin using the support CD, place the CD in your computer. ASUS T2-AH1 3-3 AMD Cool 'n' Quiet Driver Launches the AMD Cool 'n' Quiet™ Technology driver installation wizard. Double...
T2-AH1 English user manual E2065
Page 50
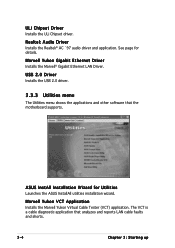
... audio driver and application. See page for Utilities Launches the ASUS InstallAll utilities installation wizard. ULi Chipset Driver Installs the ULi Chipset driver. USB 2.0 Driver Installs the USB 2.0 driver. 3.3.3 Utilities menu The Utilities menu shows the applications and other software that analyzes and reports LAN cable faults and shorts. 3-4 Chapter 3: Starting up The VCT is a cable diagnostic application that the motherboard supports. ASUS InstAll Installation Wizard...
... audio driver and application. See page for Utilities Launches the ASUS InstallAll utilities installation wizard. ULi Chipset Driver Installs the ULi Chipset driver. USB 2.0 Driver Installs the USB 2.0 driver. 3.3.3 Utilities menu The Utilities menu shows the applications and other software that analyzes and reports LAN cable faults and shorts. 3-4 Chapter 3: Starting up The VCT is a cable diagnostic application that the motherboard supports. ASUS InstAll Installation Wizard...
T2-AH1 English user manual E2065
Page 51
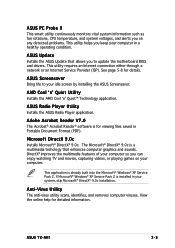
... you on any detected problems. This utility helps you can enjoy watching TV and movies, capturing videos, or playing games on your computer. ASUS Screensaver Bring life to update the motherboard BIOS and drivers. Microsoft DirectX 9.0c Installs Microsoft® DirectX® 9.0c. Anti-Virus Utility The anti-virus utility scans, identifies, and removes computer viruses. ASUS T2-AH1 3-5 DirectX® improves...
... you on any detected problems. This utility helps you can enjoy watching TV and movies, capturing videos, or playing games on your computer. ASUS Screensaver Bring life to update the motherboard BIOS and drivers. Microsoft DirectX 9.0c Installs Microsoft® DirectX® 9.0c. Anti-Virus Utility The anti-virus utility scans, identifies, and removes computer viruses. ASUS T2-AH1 3-5 DirectX® improves...

T2-AH1 English user manual E2065
Page 54
... details. See section "5.4.1 Instant Music Configuration" for more information. 3.4.1 ASUS Radio Player ASUS Radio Player allows you to tune in the BIOS setup to E u r o p e. Install the A S U S R a d i o A p p l i c a t i o n from the Windows® desktop. 3. By default, the radio region of the support CD. The ASUS Radio Player panel appears. Station frequency Preset station list Close ASUS Radio Minimize ASUS Radio Power button Clock Increase the volume...
... details. See section "5.4.1 Instant Music Configuration" for more information. 3.4.1 ASUS Radio Player ASUS Radio Player allows you to tune in the BIOS setup to E u r o p e. Install the A S U S R a d i o A p p l i c a t i o n from the Windows® desktop. 3. By default, the radio region of the support CD. The ASUS Radio Player panel appears. Station frequency Preset station list Close ASUS Radio Minimize ASUS Radio Power button Clock Increase the volume...
T2-AH1 English user manual E2065
Page 90
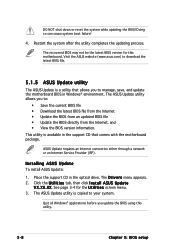
... the ASUS website (www.asus.com) to download the latest BIOS file. 5.1.5 ASUS Update utility The ASUS Update is copied to your system. The D r i v e r s menu appears. 2. See page 3-4 for this utility. 5-8 Chapter 5: BIOS setup The ASUS Update utility is a utility that comes with the motherboard package. This utility is available in the optical drive. The ASUS Update utility allows you update the BIOS using this motherboard. Place the support CD...
... the ASUS website (www.asus.com) to download the latest BIOS file. 5.1.5 ASUS Update utility The ASUS Update is copied to your system. The D r i v e r s menu appears. 2. See page 3-4 for this utility. 5-8 Chapter 5: BIOS setup The ASUS Update utility is a utility that comes with the motherboard package. This utility is available in the optical drive. The ASUS Update utility allows you update the BIOS using this motherboard. Place the support CD...

T2-AH1 English user manual E2065
Page 117
... system security settings. ASUS T2-AH1 5-35 Select the Change Supervisor Password item and press . 2. The message "Password Uninstalled" appears. The message "Password Installed" appears after you to change the supervisor password, follow the same steps as in setting a user password. To clear the supervisor password, select the Change Supervisor Password then press . To set your password. again to display the configuration options. Change Supervisor Password Select this...
... system security settings. ASUS T2-AH1 5-35 Select the Change Supervisor Password item and press . 2. The message "Password Uninstalled" appears. The message "Password Installed" appears after you to change the supervisor password, follow the same steps as in setting a user password. To clear the supervisor password, select the Change Supervisor Password then press . To set your password. again to display the configuration options. Change Supervisor Password Select this...
T2-AH1 English user manual E2065
Page 118
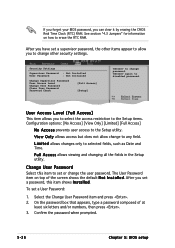
... set a password, this item to erase the RTC RAM. Security Settings Supervisor Password : Not Installed User Password : Not Installed Change Supervisor Password User Access Level Change User Password Clear User Password Password Check [Full Access] [Setup] to selected fields, such as Date and Time. Confirm the password when prompted. 5-36 Chapter 5: BIOS setup User Access Level (Full Access] This item allows you to select the access restriction to the Setup items. Configuration...
... set a password, this item to erase the RTC RAM. Security Settings Supervisor Password : Not Installed User Password : Not Installed Change Supervisor Password User Access Level Change User Password Clear User Password Password Check [Full Access] [Setup] to selected fields, such as Date and Time. Confirm the password when prompted. 5-36 Chapter 5: BIOS setup User Access Level (Full Access] This item allows you to select the access restriction to the Setup items. Configuration...
T2-AH1 English user manual E2065
Page 119
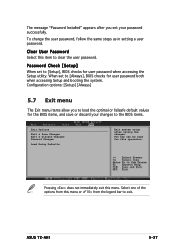
To change the user password, follow the same steps as in setting a user password. Configuration options: [Setup] [Always] 5.7 Exit menu The Exit menu items allow you set your changes to [Always], BIOS checks for this menu. ASUS T2-AH1 5-37 F10 key can be used for user password both when accessing Setup and booting the system. Pressing does not immediately exit this operation. Select one of the...
To change the user password, follow the same steps as in setting a user password. Configuration options: [Setup] [Always] 5.7 Exit menu The Exit menu items allow you set your changes to [Always], BIOS checks for this menu. ASUS T2-AH1 5-37 F10 key can be used for user password both when accessing Setup and booting the system. Pressing does not immediately exit this operation. Select one of the...


