T2-AH1 English user manual E2065
Page 4
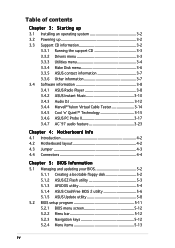
Table of contents Chapter 3: Starting up 3.1 Installing an operating system 3-2 3.2 Powering up 3-2 3.3 Support CD information 3-2 3.3.1 Running the support CD 3-3 3.3.2 Drivers menu 3-3 3.3.3 Utilities menu 3-4 3.3.4 Make Disk menu 3-6 3.3.5 ASUS contact information 3-7 3.3.6 Other information 3-7 3.4 Software information 3-8 3.4.1 ASUS Radio Player 3-8 3.4.2 ASUS Instant Music 3-10 3.4.3 Audio DJ 3-12 3.4.4 Marvell® Yukon Virtual Cable Tester 3-14 3.4.5 Cool 'n' Quiet!™ Technology 3-15...
Table of contents Chapter 3: Starting up 3.1 Installing an operating system 3-2 3.2 Powering up 3-2 3.3 Support CD information 3-2 3.3.1 Running the support CD 3-3 3.3.2 Drivers menu 3-3 3.3.3 Utilities menu 3-4 3.3.4 Make Disk menu 3-6 3.3.5 ASUS contact information 3-7 3.3.6 Other information 3-7 3.4 Software information 3-8 3.4.1 ASUS Radio Player 3-8 3.4.2 ASUS Instant Music 3-10 3.4.3 Audio DJ 3-12 3.4.4 Marvell® Yukon Virtual Cable Tester 3-14 3.4.5 Cool 'n' Quiet!™ Technology 3-15...

T2-AH1 English user manual E2065
Page 8
Chapter 3: Starting up This chapter helps you power up the system and install drivers and utilities from the support CD. 4 . This chapter includes the motherboard layout, jumper settings, and connector locations. 5. Appendix The ...the BIOS parameters. 6. viii This guide is organized This guide contains the following parts: 1. Chapter 4: Motherboard information This chapter gives information about the ASUS T2-AH1 barebone system. Chapter 5: BIOS information This chapter tells how to install components in the system. 3. Chapter 1: System introduction This chapter gives a general...
Chapter 3: Starting up This chapter helps you power up the system and install drivers and utilities from the support CD. 4 . This chapter includes the motherboard layout, jumper settings, and connector locations. 5. Appendix The ...the BIOS parameters. 6. viii This guide is organized This guide contains the following parts: 1. Chapter 4: Motherboard information This chapter gives information about the ASUS T2-AH1 barebone system. Chapter 5: BIOS information This chapter tells how to install components in the system. 3. Chapter 1: System introduction This chapter gives a general...

T2-AH1 English user manual E2065
Page 22
Floppy disk drive Tool Phillips (cross) screw driver 2.2 Before you proceed Take note of the following precautions before you install components into the system. • Use a grounded wrist strap or touch a safely grounded ...
Floppy disk drive Tool Phillips (cross) screw driver 2.2 Before you proceed Take note of the following precautions before you install components into the system. • Use a grounded wrist strap or touch a safely grounded ...
T2-AH1 English user manual E2065
Page 23
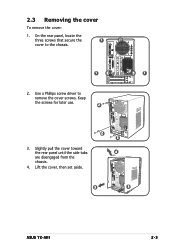
Keep the screws for later use. 2 3. Use a Phillips screw driver to the chassis. Slightly pull the cover toward the rear panel until the side tabs are disengaged from the chassis. 4. Lift the cover, then set aside. 2 2 4 3 3 ASUS T2-AH1 2-3 On the rear panel, locate the three screws that secure the 1 cover to remove the cover screws. RADIO ANY 1 1 2. 2.3 Removing the cover To remove the cover: 1.
Keep the screws for later use. 2 3. Use a Phillips screw driver to the chassis. Slightly pull the cover toward the rear panel until the side tabs are disengaged from the chassis. 4. Lift the cover, then set aside. 2 2 4 3 3 ASUS T2-AH1 2-3 On the rear panel, locate the three screws that secure the 1 cover to remove the cover screws. RADIO ANY 1 1 2. 2.3 Removing the cover To remove the cover: 1.
T2-AH1 English user manual E2065
Page 36
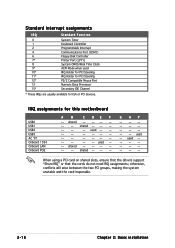
shared -- -- -- -- -- -- used -- -- -- -- -- -- -- -- -- -- -- -- -- -- -- -- -- -- shared -- -- -- used -- -- G H P used When using a PCI card on shared slots, ensure that the drivers support "Share IRQ" or that the cards do not need IRQ assignments; used -- Standard interrupt assignments IRQ Standard Function 0 System Timer 1 Keyboard Controller 2 Programmable Interrupt 4 ...
shared -- -- -- -- -- -- used -- -- -- -- -- -- -- -- -- -- -- -- -- -- -- -- -- -- shared -- -- -- used -- -- G H P used When using a PCI card on shared slots, ensure that the drivers support "Share IRQ" or that the cards do not need IRQ assignments; used -- Standard interrupt assignments IRQ Standard Function 0 System Timer 1 Keyboard Controller 2 Programmable Interrupt 4 ...
T2-AH1 English user manual E2065
Page 41
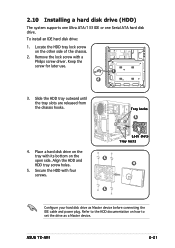
... HDD tray screw holes. 5. Refer to the HDD documentation on the tray with four screws. Locate the HDD tray lock screw on the open side. ASUS T2-AH1 2-21 Place a hard disk drive on how to set the drive as Master device before connecting the IDE cable and power plug. Lock slots Tray... Ultra ATA/133 IDE or one Serial ATA hard disk drive. To install an IDE hard disk drive: 1. Remove the lock screw with a Philips screw driver. Tray locks 3 4.
... HDD tray screw holes. 5. Refer to the HDD documentation on the tray with four screws. Locate the HDD tray lock screw on the open side. ASUS T2-AH1 2-21 Place a hard disk drive on how to set the drive as Master device before connecting the IDE cable and power plug. Lock slots Tray... Ultra ATA/133 IDE or one Serial ATA hard disk drive. To install an IDE hard disk drive: 1. Remove the lock screw with a Philips screw driver. Tray locks 3 4.
T2-AH1 English user manual E2065
Page 47
Chapter 3 This chapter helps you power up MODE ASUS T2-AH1 Starting up the system and install drivers and utilities from the support CD.
Chapter 3 This chapter helps you power up MODE ASUS T2-AH1 Starting up the system and install drivers and utilities from the support CD.
T2-AH1 English user manual E2065
Page 48
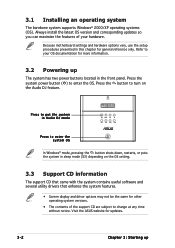
... mode, pressing the button shuts down, restarts, or puts the system in sleep mode (S3) depending on the Audio DJ feature. Visit the ASUS website for updates. 3-2 Chapter 3: Starting up The system has two power buttons located in this chapter for more information. 3.2 Powering up 3.1 Installing...setting. 3.3 Support CD information The support CD that came with the system contains useful software and several utility drivers that enhance the system features. • Screen display and driver options may not be the same for other operating system versions. • The contents of your OS ...
... mode, pressing the button shuts down, restarts, or puts the system in sleep mode (S3) depending on the Audio DJ feature. Visit the ASUS website for updates. 3-2 Chapter 3: Starting up The system has two power buttons located in this chapter for more information. 3.2 Powering up 3.1 Installing...setting. 3.3 Support CD information The support CD that came with the system contains useful software and several utility drivers that enhance the system features. • Screen display and driver options may not be the same for other operating system versions. • The contents of your OS ...
T2-AH1 English user manual E2065
Page 49
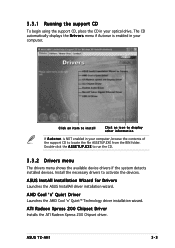
...CD to locate the file ASSETUP.EXE from the BIN folder. ASUS InstAll Installation Wizard for Drivers Launches the ASUS InstallAll driver installation wizard. Click an item to install Click an icon to ...drivers if the system detects installed devices. Double-click the A S S E T U P . AMD Cool 'n' Quiet Driver Launches the AMD Cool 'n' Quiet™ Technology driver installation wizard. ATI Radeon Xpress 200 Chipset Driver Installs the ATI Radeon Xpress 200 Chipset driver. The CD automatically displays the D r i v e r s menu if Autorun is NOT enabled in your computer. ASUS T2-AH1...
...CD to locate the file ASSETUP.EXE from the BIN folder. ASUS InstAll Installation Wizard for Drivers Launches the ASUS InstallAll driver installation wizard. Click an item to install Click an icon to ...drivers if the system detects installed devices. Double-click the A S S E T U P . AMD Cool 'n' Quiet Driver Launches the AMD Cool 'n' Quiet™ Technology driver installation wizard. ATI Radeon Xpress 200 Chipset Driver Installs the ATI Radeon Xpress 200 Chipset driver. The CD automatically displays the D r i v e r s menu if Autorun is NOT enabled in your computer. ASUS T2-AH1...
T2-AH1 English user manual E2065
Page 50
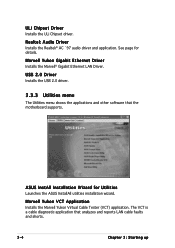
ULi Chipset Driver Installs the ULi Chipset driver. ASUS InstAll Installation Wizard for details. Realtek Audio Driver Installs the Realtek® AC `97 audio driver and application. Marvell Yukon Gigabit Ethernet Driver Installs the Marvell® Gigabit Ethernet LAN Driver. Marvell Yukon VCT Application ... Cable Tester (VCT) application. The VCT is a cable diagnostic application that the motherboard supports. USB 2.0 Driver Installs the USB 2.0 driver. 3.3.3 Utilities menu The Utilities menu shows the applications and other software that analyzes and reports LAN cable faults...
ULi Chipset Driver Installs the ULi Chipset driver. ASUS InstAll Installation Wizard for details. Realtek Audio Driver Installs the Realtek® AC `97 audio driver and application. Marvell Yukon Gigabit Ethernet Driver Installs the Marvell® Gigabit Ethernet LAN Driver. Marvell Yukon VCT Application ... Cable Tester (VCT) application. The VCT is a cable diagnostic application that the motherboard supports. USB 2.0 Driver Installs the USB 2.0 driver. 3.3.3 Utilities menu The Utilities menu shows the applications and other software that analyzes and reports LAN cable faults...
T2-AH1 English user manual E2065
Page 51
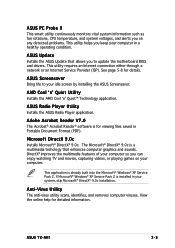
... Microsoft® Windows® XP Service Pack 2. ASUS T2-AH1 3-5 ASUS Radio Player Utility Installs the ASUS Radio Player application. Anti-Virus Utility The anti-virus utility scans, identifies, and removes computer viruses. See page 5-8 for detailed information. ASUS Screensaver Bring life to update the motherboard BIOS and drivers. This utility requires an Internet connection either through...
... Microsoft® Windows® XP Service Pack 2. ASUS T2-AH1 3-5 ASUS Radio Player Utility Installs the ASUS Radio Player application. Anti-Virus Utility The anti-virus utility scans, identifies, and removes computer viruses. See page 5-8 for detailed information. ASUS Screensaver Bring life to update the motherboard BIOS and drivers. This utility requires an Internet connection either through...
T2-AH1 English user manual E2065
Page 61
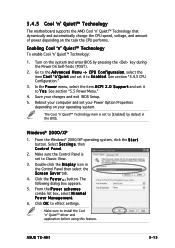
...; driver and application before using this feature. See section "5.5 Power Menu." 4. Select S e t t i n g s, then Control Panel. 2. Make sure the Control Panel is set it to Classic View. 3. Reboot your computer and set to E n a b l e d. The following dialog box appears. 5. Click O K to [Enabled] by pressing the key during the Power On Self-Tests (POST). 2. ASUS T2-AH1...
...; driver and application before using this feature. See section "5.5 Power Menu." 4. Select S e t t i n g s, then Control Panel. 2. Make sure the Control Panel is set it to Classic View. 3. Reboot your computer and set to E n a b l e d. The following dialog box appears. 5. Click O K to [Enabled] by pressing the key during the Power On Self-Tests (POST). 2. ASUS T2-AH1...
T2-AH1 English user manual E2065
Page 69
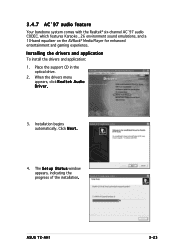
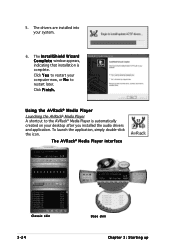
Place the support CD in the optical drive. 2. Installation begins automatically. When the drivers menu appears, click R e a l t e k A u d i o Driver. 3. The S e t u p S t a t u s window appears, indicating the progress of the installation. 3.4.7 AC`97 audio feature Your barebone system comes with the Realtek® six-..., 26 environment sound emulations, and a 10-band equalizer on the AVRack® Media Player for enhanced entertainment and gaming experience. Click N e x t . 4. Installing the drivers and application To install the drivers and application: 1. ASUS T2-AH1 3-23
Place the support CD in the optical drive. 2. Installation begins automatically. When the drivers menu appears, click R e a l t e k A u d i o Driver. 3. The S e t u p S t a t u s window appears, indicating the progress of the installation. 3.4.7 AC`97 audio feature Your barebone system comes with the Realtek® six-..., 26 environment sound emulations, and a 10-band equalizer on the AVRack® Media Player for enhanced entertainment and gaming experience. Click N e x t . 4. Installing the drivers and application To install the drivers and application: 1. ASUS T2-AH1 3-23
T2-AH1 English user manual E2065
Page 70
... up The I n s t a l l S h i e l d W i z a r d C o m p l e t e window appears, indicating that installation is automatically created on your desktop after you installed the audio drivers and application. Click Y e s to restart your system. 6. To launch the application, simply double-click the icon. The drivers are installed into your computer now, or N o to the AVRack® Media Player is complete. 5.
... up The I n s t a l l S h i e l d W i z a r d C o m p l e t e window appears, indicating that installation is automatically created on your desktop after you installed the audio drivers and application. Click Y e s to restart your system. 6. To launch the application, simply double-click the icon. The drivers are installed into your computer now, or N o to the AVRack® Media Player is complete. 5.
T2-AH1 English user manual E2065
Page 104
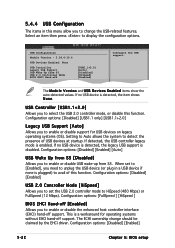
Configuration options: [Disabled] [USB1.1 only] [USB1.1+2.0] Legacy USB Support [Auto] Allows you to change should be claimed by the EHCI driver. If no USB device is detected, the item shows N o n e. Configuration options: [Disabled] [Enabled] 5-22 Chapter 5: BIOS setup 5.4.4 USB Configuration The items in a USB device if ...
Configuration options: [Disabled] [USB1.1 only] [USB1.1+2.0] Legacy USB Support [Auto] Allows you to change should be claimed by the EHCI driver. If no USB device is detected, the item shows N o n e. Configuration options: [Disabled] [Enabled] 5-22 Chapter 5: BIOS setup 5.4.4 USB Configuration The items in a USB device if ...

T2-AH1 English user manual E2065
Page 105
...purposes. GART Error Reporting [Disabled] Set this menu show the CPU-related information that the BIOS automatically detects. The driver developer may enable it is slower than or equal to enable or disable the enhanced virus protection feature. 5.4.5 CPU ... hole below the 4 GB boundary undescribed. [Continuous] explicitly descibes the PCI hole as non-cacheable. Configuration options: [Disabled] [Enabled] ASUS T2-AH1 5-23 Configuration options: [Disabled] [Enabled] MTRR Mapping [Continuous] This option determines the method used for the normal operation. CPU Configuration...
...purposes. GART Error Reporting [Disabled] Set this menu show the CPU-related information that the BIOS automatically detects. The driver developer may enable it is slower than or equal to enable or disable the enhanced virus protection feature. 5.4.5 CPU ... hole below the 4 GB boundary undescribed. [Continuous] explicitly descibes the PCI hole as non-cacheable. Configuration options: [Disabled] [Enabled] ASUS T2-AH1 5-23 Configuration options: [Disabled] [Enabled] MTRR Mapping [Continuous] This option determines the method used for the normal operation. CPU Configuration...