User Guide
Page 12
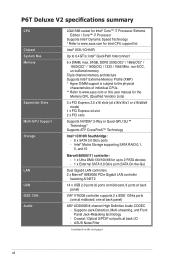
... to www.asus.com or this user manual for up to 6.4GT/s; Intel® Matrix Storage supporting SATA RAID 0,1, 5, and 10 Marvell 88SE6111 controller: - 1 x Ultra DMA 133/100/66 for the Memory QVL (Qualified Vendors Lists) 3 x PCI Express 2.0 x16 slots (at back panel) ADI® AD2000B 8-channel High Definition Audio CODEC - P6T Deluxe V2 specifications...
... to www.asus.com or this user manual for up to 6.4GT/s; Intel® Matrix Storage supporting SATA RAID 0,1, 5, and 10 Marvell 88SE6111 controller: - 1 x Ultra DMA 133/100/66 for the Memory QVL (Qualified Vendors Lists) 3 x PCI Express 2.0 x16 slots (at back panel) ADI® AD2000B 8-channel High Definition Audio CODEC - P6T Deluxe V2 specifications...
User Guide
Page 49
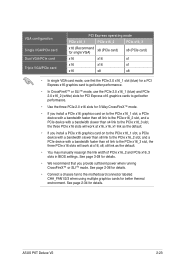
ASUS P6T Deluxe V2 2-23 See page 3-28 for details. • We recommend that you install a PCIe x16 graphics card on to the PCIe x16_1 slot, a PCIe device with a bandwidth slower than x8 link to the PCIe x16_2 slot, and a PCIe device with a bandwidth faster than x4 link to the motherboard ...connector labeled CHA_FAN1/2/3 when using multiple graphics cards for better thermal environment. See page 2-36 for details. • Connect a chassis fan to the PCIe x16_3 slot, the three PCIe x16 slots will work at x16, x16, x1 link as the default. • You may manually ...
ASUS P6T Deluxe V2 2-23 See page 3-28 for details. • We recommend that you install a PCIe x16 graphics card on to the PCIe x16_1 slot, a PCIe device with a bandwidth slower than x8 link to the PCIe x16_2 slot, and a PCIe device with a bandwidth faster than x4 link to the motherboard ...connector labeled CHA_FAN1/2/3 when using multiple graphics cards for better thermal environment. See page 2-36 for details. • Connect a chassis fan to the PCIe x16_3 slot, the three PCIe x16 slots will work at x16, x16, x1 link as the default. • You may manually ...

User Guide
Page 57
... section 4.4.3 Intel RAID configurations or the manual bundled in the motherboard support DVD. • You must install the Windows® XP Service Pack 1 before using hot-plug and NCQ, set the Configure SATA as item in the BIOS to create a Serial ATA RAID set using these connectors. ASUS P6T Deluxe V2 2-31 See section 3.3.6 Storage Configuration...
... section 4.4.3 Intel RAID configurations or the manual bundled in the motherboard support DVD. • You must install the Windows® XP Service Pack 1 before using hot-plug and NCQ, set the Configure SATA as item in the BIOS to create a Serial ATA RAID set using these connectors. ASUS P6T Deluxe V2 2-31 See section 3.3.6 Storage Configuration...
User Guide
Page 87
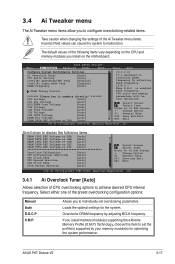
...eXtreme Memory Profile (X.M.P.) Technology, choose this item to display the following items vary depending on the CPU and memory modules you install on the motherboard. Loads the optimal settings for optimizing the system performance. 3.4 Ai Tweaker menu The Ai Tweaker menu items allow you to configure overclocking-related ... [Auto] DRAM CTRL REF Voltage on CHA [Auto] [D.O.C.P] It's designed to Sub Screen +- The default values of the preset overclocking configuration options: Manual Auto D.O.C.P X.M.P. ASUS P6T Deluxe V2 3-17 Allows you to malfunction.
...eXtreme Memory Profile (X.M.P.) Technology, choose this item to display the following items vary depending on the CPU and memory modules you install on the motherboard. Loads the optimal settings for optimizing the system performance. 3.4 Ai Tweaker menu The Ai Tweaker menu items allow you to configure overclocking-related ... [Auto] DRAM CTRL REF Voltage on CHA [Auto] [D.O.C.P] It's designed to Sub Screen +- The default values of the preset overclocking configuration options: Manual Auto D.O.C.P X.M.P. ASUS P6T Deluxe V2 3-17 Allows you to malfunction.
User Guide
Page 143
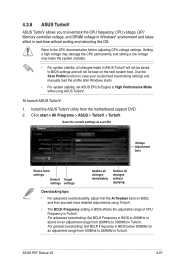
... voltage settings. Install the ASUS TurboV utility from 100MHz to 250MHz in TurboV. ASUS P6T Deluxe V2 4-27 Use the Save Profile function to save your customized overclocking settings and manually load the profile after Windows starts. • For system stability, set ASUS EPU 6-Engine to High... range of CPU Frequency in TurboV. To launch ASUS TurboV 1. Click start > All Programs > ASUS > TurboV > TurboV. For advanced overclocking: Set BCLK Frequency in BIOS to 200MHz or above for an adjustment range from the motherboard support DVD. 2. Setting a high voltage may damage...
... voltage settings. Install the ASUS TurboV utility from 100MHz to 250MHz in TurboV. ASUS P6T Deluxe V2 4-27 Use the Save Profile function to save your customized overclocking settings and manually load the profile after Windows starts. • For system stability, set ASUS EPU 6-Engine to High... range of CPU Frequency in TurboV. To launch ASUS TurboV 1. Click start > All Programs > ASUS > TurboV > TurboV. For advanced overclocking: Set BCLK Frequency in BIOS to 200MHz or above for an adjustment range from the motherboard support DVD. 2. Setting a high voltage may damage...
User Guide
Page 175
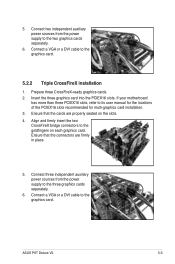
If your motherboard has more than three PCIEX16 slots, refer to the three graphics cards separately. 6. ASUS P6T Deluxe V2 5-3 Connect three independent auxiliary power sources from the power supply to the graphics card. Prepare three CrossFireX-ready graphics cards. 2....6. Insert the three graphics card into the PCIEX16 slots. 5. Connect two independent auxiliary power sources from the power supply to its user manual for the locations of the PCIEX16 slots recommended for multi-graphics card installation. 3. Align and firmly insert the two CrossFireX bridge connectors to...
If your motherboard has more than three PCIEX16 slots, refer to the three graphics cards separately. 6. ASUS P6T Deluxe V2 5-3 Connect three independent auxiliary power sources from the power supply to the graphics card. Prepare three CrossFireX-ready graphics cards. 2....6. Insert the three graphics card into the PCIEX16 slots. 5. Connect two independent auxiliary power sources from the power supply to its user manual for the locations of the PCIEX16 slots recommended for multi-graphics card installation. 3. Align and firmly insert the two CrossFireX bridge connectors to...


