
N4L-VM DH User's Manual English Edition
Page 1
N4L-VM DH Motherboard
N4L-VM DH Motherboard
N4L-VM DH User's Manual English Edition
Page 3
Contents Notices vii Safety information viii About this guide ix N4L-VM DH specifications summary xi Chapter 1: Product introduction 1.1 Welcome 1-1 1.2 Package contents 1-1 1.3 Special features 1-2 1.3.1 Product highlights 1-2 1.3.2 ASUS Special features 1-5 Chapter 2: Hardware information 2.1 Before you proceed 2-1 2.2 Motherboard overview 2-2 2.2.1 Placement direction 2-2 2.2.2 Screw holes 2-2 2.2.3 Motherboard layout 2-3 2.2.4 Layout contents 2-4 2.3 Central Processing Unit (CPU 2-6 2.3.1 Installing the CPU 2-6 2.3.2 Installing the CPU heatsink and...
Contents Notices vii Safety information viii About this guide ix N4L-VM DH specifications summary xi Chapter 1: Product introduction 1.1 Welcome 1-1 1.2 Package contents 1-1 1.3 Special features 1-2 1.3.1 Product highlights 1-2 1.3.2 ASUS Special features 1-5 Chapter 2: Hardware information 2.1 Before you proceed 2-1 2.2 Motherboard overview 2-2 2.2.1 Placement direction 2-2 2.2.2 Screw holes 2-2 2.2.3 Motherboard layout 2-3 2.2.4 Layout contents 2-4 2.3 Central Processing Unit (CPU 2-6 2.3.1 Installing the CPU 2-6 2.3.2 Installing the CPU heatsink and...

N4L-VM DH User's Manual English Edition
Page 8
... to fix it , carefully read all cables are correctly connected and the power cables are not damaged. Operation safety • Before installing the motherboard and adding devices on a stable surface. • If you detect any damage, contact your dealer immediately. • To avoid short circuits,...are not sure about the voltage of the electrical outlet you add a device. • Before connecting or removing signal cables from the motherboard, ensure that all power cables are unplugged. • Seek professional assistance before using the product, make sure all the manuals that came...
... to fix it , carefully read all cables are correctly connected and the power cables are not damaged. Operation safety • Before installing the motherboard and adding devices on a stable surface. • If you detect any damage, contact your dealer immediately. • To avoid short circuits,...are not sure about the voltage of the electrical outlet you add a device. • Before connecting or removing signal cables from the motherboard, ensure that all power cables are unplugged. • Seek professional assistance before using the product, make sure all the manuals that came...
N4L-VM DH User's Manual English Edition
Page 9
...guide is organized This guide contains the following sources for additional information and for product and software updates. 1. ASUS websites The ASUS website provides updated information on the motherboard. • Chapter 3: Powering up This chapter describes the power up sequence and ways of the standard ... chapter describes the features of the support CD that may include optional documentation, such as warranty flyers, that comes with the motherboard package. ix How this guide This user guide contains the information you have been added by your dealer. Detailed descriptions of ...
...guide is organized This guide contains the following sources for additional information and for product and software updates. 1. ASUS websites The ASUS website provides updated information on the motherboard. • Chapter 3: Powering up This chapter describes the power up sequence and ways of the standard ... chapter describes the features of the support CD that may include optional documentation, such as warranty flyers, that comes with the motherboard package. ix How this guide This user guide contains the information you have been added by your dealer. Detailed descriptions of ...

N4L-VM DH User's Manual English Edition
Page 13
This chapter describes the motherboard features and the new technologies it supports. 1Product introduction
This chapter describes the motherboard features and the new technologies it supports. 1Product introduction
N4L-VM DH User's Manual English Edition
Page 15
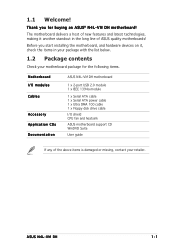
V M D H motherboard! ASUS N4L-VM DH 1-1 Thank you start installing the motherboard, and hardware devices on it another standout in your package with the list below. 1.2 Package contents Check your retailer. The motherboard delivers a host of new features and latest ...the long line of the above items is damaged or missing, contact your motherboard package for buying an ASUS® N 4 L - Before you for the following items. Motherboard I/O modules Cables Accessory Application CDs Documentation ASUS N4L-VM DH motherboard 1 x 2-port USB 2.0 module 1 x IEEE 1394a module 1 ...
V M D H motherboard! ASUS N4L-VM DH 1-1 Thank you start installing the motherboard, and hardware devices on it another standout in your package with the list below. 1.2 Package contents Check your retailer. The motherboard delivers a host of new features and latest ...the long line of the above items is damaged or missing, contact your motherboard package for buying an ASUS® N 4 L - Before you for the following items. Motherboard I/O modules Cables Accessory Application CDs Documentation ASUS N4L-VM DH motherboard 1 x 2-port USB 2.0 module 1 x IEEE 1394a module 1 ...
N4L-VM DH User's Manual English Edition
Page 16
...digital multi-media content like never before. Intel® 945GM/Intel® ICH7-M (DH) chipset The Intel® 945GM Memory Controller Hub (MCH) and the Intel® ICH7-M (DH) I/O controller hub provide the vital interfaces for the Intel® Core™ Duo ..., Serial ATA, and USB 2.0. 1.3 Special features 1.3.1 Product highlights Latest processor technology The motherboard comes with a 479-pin, surface-mount, Zero Insertion Force (ZIF) mPGA479M socket designed for the motherboard. See page 2-6 for a thinner, lighter design without compromising performance. The Intel® Core...
...digital multi-media content like never before. Intel® 945GM/Intel® ICH7-M (DH) chipset The Intel® 945GM Memory Controller Hub (MCH) and the Intel® ICH7-M (DH) I/O controller hub provide the vital interfaces for the Intel® Core™ Duo ..., Serial ATA, and USB 2.0. 1.3 Special features 1.3.1 Product highlights Latest processor technology The motherboard comes with a 479-pin, surface-mount, Zero Insertion Force (ZIF) mPGA479M socket designed for the motherboard. See page 2-6 for a thinner, lighter design without compromising performance. The Intel® Core...
N4L-VM DH User's Manual English Edition
Page 17
...provide the total solution for details. The Intel® ICH7-M (DH) Southbridge allows RAID 0, RAID 1, and Intel® Matrix Storage configuration with existing PCI specifications. Gigabit LAN solution The motherboard comes with dual-RAID functionality that speeds up to 10.7 GB/s. ...motherboard supports the S/PDIF technology through the S/PDIF interfaces on the rear panel and at midboard. PCI Express features point-to-point serial interconnections between devices and allows higher clockspeeds by carrying data in packets. See pages 2-28 and 5-36 for details. ASUS N4L-VM DH ...
...provide the total solution for details. The Intel® ICH7-M (DH) Southbridge allows RAID 0, RAID 1, and Intel® Matrix Storage configuration with existing PCI specifications. Gigabit LAN solution The motherboard comes with dual-RAID functionality that speeds up to 10.7 GB/s. ...motherboard supports the S/PDIF technology through the S/PDIF interfaces on the rear panel and at midboard. PCI Express features point-to-point serial interconnections between devices and allows higher clockspeeds by carrying data in packets. See pages 2-28 and 5-36 for details. ASUS N4L-VM DH ...
N4L-VM DH User's Manual English Edition
Page 18
...1394a support The IEEE 1394a interface provides high-speed and flexible PC connectivity to a wide range of DVD. USB 2.0 technology The motherboard implements the Universal Serial Bus (USB) 2.0 specification, dramatically increasing the connection speed from the 12 Mbps bandwidth on USB 2.0. ...Speaker, and Dolby Digital Live. See page 5-16 for details. Theater-level audio (designed for Dolby® Master Studio) This motherboard offers theater-level 7.1 surround sound and audio specifications higher than that features jack detection to monitor the plugging status of transforming your ...
...1394a support The IEEE 1394a interface provides high-speed and flexible PC connectivity to a wide range of DVD. USB 2.0 technology The motherboard implements the Universal Serial Bus (USB) 2.0 specification, dramatically increasing the connection speed from the 12 Mbps bandwidth on USB 2.0. ...Speaker, and Dolby Digital Live. See page 5-16 for details. Theater-level audio (designed for Dolby® Master Studio) This motherboard offers theater-level 7.1 surround sound and audio specifications higher than that features jack detection to monitor the plugging status of transforming your ...
N4L-VM DH User's Manual English Edition
Page 19
ASUS N4L-VM DH 1-5 This external port on the rear panel I/O provides smart setup, hot-plug and support for details. ASUS Q-Fan technology The ASUS Q-Fan technology smartly adjusts the CPU fan speeds according to the system loading to open the system chassis and clear the RTC ... shut down and reboot the system, and the BIOS automatically restores the CPU default setting for each parameter. 1.3.2 ASUS Special features Serial ATA II and SATA-On-The-Go The motherboard supports the Serial ATA II 3 Gb/s technology through the JMicron Serial ATA interfaces. eliminates the need to ensure...
ASUS N4L-VM DH 1-5 This external port on the rear panel I/O provides smart setup, hot-plug and support for details. ASUS Q-Fan technology The ASUS Q-Fan technology smartly adjusts the CPU fan speeds according to the system loading to open the system chassis and clear the RTC ... shut down and reboot the system, and the BIOS automatically restores the CPU default setting for each parameter. 1.3.2 ASUS Special features Serial ATA II and SATA-On-The-Go The motherboard supports the Serial ATA II 3 Gb/s technology through the JMicron Serial ATA interfaces. eliminates the need to ensure...

N4L-VM DH User's Manual English Edition
Page 21
It includes description of the jumpers and connectors on the motherboard. 2 Hardware information This chapter lists the hardware setup procedures that you have to perform when installing system components.
It includes description of the jumpers and connectors on the motherboard. 2 Hardware information This chapter lists the hardware setup procedures that you have to perform when installing system components.

N4L-VM DH User's Manual English Edition
Page 22
Chapter summary 2 2.1 Before you proceed 2-1 2.2 Motherboard overview 2-2 2.3 Central Processing Unit (CPU 2-6 2.4 System memory 2-10 2.5 Expansion slots 2-16 2.6 Jumpers 2-21 2.7 Connectors 2-24 ASUS N4L-VM DH
Chapter summary 2 2.1 Before you proceed 2-1 2.2 Motherboard overview 2-2 2.3 Central Processing Unit (CPU 2-6 2.4 System memory 2-10 2.5 Expansion slots 2-16 2.6 Jumpers 2-21 2.7 Connectors 2-24 ASUS N4L-VM DH
N4L-VM DH User's Manual English Edition
Page 23
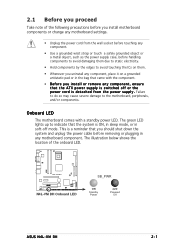
... pad or in soft-off or the p o w e r c o r d i s d e t a c h e d f r o m t h e p o w e r s u p p l y . N4L-VM DH ® N4L-VM DH Onboard LED SB_PWR ON Standby Power OFF Powered Off ASUS N4L-VM DH 2-1 2.1 Before you proceed Take note of the onboard LED. The illustration below shows the location of the following precautions before you install motherboard components or change any motherboard settings. • Unplug the power cord from...
... pad or in soft-off or the p o w e r c o r d i s d e t a c h e d f r o m t h e p o w e r s u p p l y . N4L-VM DH ® N4L-VM DH Onboard LED SB_PWR ON Standby Power OFF Powered Off ASUS N4L-VM DH 2-1 2.1 Before you proceed Take note of the onboard LED. The illustration below shows the location of the following precautions before you install motherboard components or change any motherboard settings. • Unplug the power cord from...

N4L-VM DH User's Manual English Edition
Page 24
... 2.2.2 Screw holes Place eight (8) screws into the holes indicated by circles to secure the motherboard to unplug the power cord before installing or removing the motherboard. The edge with external ports goes to the rear part of the chassis as indicated in...overtighten the screws! Doing so can cause you physical injury and damage motherboard components. 2.2.1 Placement direction When installing the motherboard, make sure that you install the motherboard, study the configuration of the chassis N4L-VM DH ® 2-2 Chapter 2: Hardware information Place this side towards the rear...
... 2.2.2 Screw holes Place eight (8) screws into the holes indicated by circles to secure the motherboard to unplug the power cord before installing or removing the motherboard. The edge with external ports goes to the rear part of the chassis as indicated in...overtighten the screws! Doing so can cause you physical injury and damage motherboard components. 2.2.1 Placement direction When installing the motherboard, make sure that you install the motherboard, study the configuration of the chassis N4L-VM DH ® 2-2 Chapter 2: Hardware information Place this side towards the rear...
N4L-VM DH User's Manual English Edition
Page 25
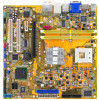
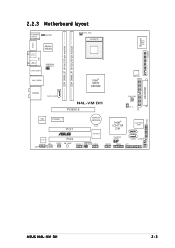
Super I/O FLOPPY 2.2.3 Motherboard layout PS/2KBMS T: Mouse B: Keyboard KBPWR ESATA Coaxial S/PDIF-out JMicron JMB363 CPU_FAN mPGA479 DDR DIMM_B1 (64 bit,240-pin module) DDR DIMM_A1 (64 bit,240-pin module) VGA Optical S/PDIF-out 1394_USB12 USBPW34 USBPW12 LAN_USB34 AUDIO SATA_RAID1 Intel® MCH 945GM N4L-VM DH PCIEX16 ATX12V CHA_FAN TV_C IDE Intel 82573L...
Super I/O FLOPPY 2.2.3 Motherboard layout PS/2KBMS T: Mouse B: Keyboard KBPWR ESATA Coaxial S/PDIF-out JMicron JMB363 CPU_FAN mPGA479 DDR DIMM_B1 (64 bit,240-pin module) DDR DIMM_A1 (64 bit,240-pin module) VGA Optical S/PDIF-out 1394_USB12 USBPW34 USBPW12 LAN_USB34 AUDIO SATA_RAID1 Intel® MCH 945GM N4L-VM DH PCIEX16 ATX12V CHA_FAN TV_C IDE Intel 82573L...
N4L-VM DH User's Manual English Edition
Page 28
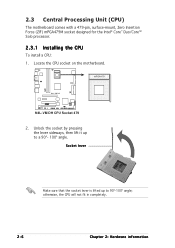
... it up to a 90º- 100º angle. otherwise, the CPU will not fit in completely. 2-6 Chapter 2: Hardware information mPGA479 N4L-VM DH ® N4L-VM DH CPU Socket 479 2. 2.3 Central Processing Unit (CPU) The motherboard comes with a 479-pin, surface-mount, Zero Insertion Force (ZIF) mPGA479M socket designed for the Intel® Core™ Duo/Core...
... it up to a 90º- 100º angle. otherwise, the CPU will not fit in completely. 2-6 Chapter 2: Hardware information mPGA479 N4L-VM DH ® N4L-VM DH CPU Socket 479 2. 2.3 Central Processing Unit (CPU) The motherboard comes with a 479-pin, surface-mount, Zero Insertion Force (ZIF) mPGA479M socket designed for the Intel® Core™ Duo/Core...
N4L-VM DH User's Manual English Edition
Page 29
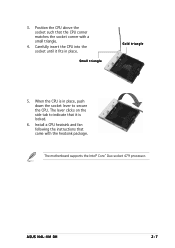
When the CPU is locked. 6. ASUS N4L-VM DH 2-7 The lever clicks on the side tab to secure the CPU. Install a CPU heatsink and fan following the instructions that the CPU corner matches the socket corner with the heatsink package. The motherboard supports the Intel® Core™ Duo socket 479 processor. Small triangle Gold triangle 5. 3. Position the CPU above the socket such that came with a small triangle. 4. Carefully insert the CPU into the socket until it is in place, push down the socket lever to indicate that it fits in place.
When the CPU is locked. 6. ASUS N4L-VM DH 2-7 The lever clicks on the side tab to secure the CPU. Install a CPU heatsink and fan following the instructions that the CPU corner matches the socket corner with the heatsink package. The motherboard supports the Intel® Core™ Duo socket 479 processor. Small triangle Gold triangle 5. 3. Position the CPU above the socket such that came with a small triangle. 4. Carefully insert the CPU into the socket until it is in place, push down the socket lever to indicate that it fits in place.

N4L-VM DH User's Manual English Edition
Page 31
CPU_FAN N4L-VM DH ® N4L-VM DH CPU fan connector Do not forget to the connector on the motherboard labeled CPU_FAN. ASUS N4L-VM DH 2-9 Connect the CPU fan cable to connect the CPU fan connector! Hardware monitoring errors can occur if you fail to the motherboard. GND +12V Rotation 4. Push down the handle until the other end of the retention bracket is hooked into the hole to secure the heatsink and fan to plug this connector. 3.
CPU_FAN N4L-VM DH ® N4L-VM DH CPU fan connector Do not forget to the connector on the motherboard labeled CPU_FAN. ASUS N4L-VM DH 2-9 Connect the CPU fan cable to connect the CPU fan connector! Hardware monitoring errors can occur if you fail to the motherboard. GND +12V Rotation 4. Push down the handle until the other end of the retention bracket is hooked into the hole to secure the heatsink and fan to plug this connector. 3.

N4L-VM DH User's Manual English Edition
Page 32
...of 2048 Mb chips or double sided x16 memory modules. 2-10 Chapter 2: Hardware information DIMM_B1 DIMM_A1 2.4 System memory 2.4.1 Overview The motherboard comes with the same CAS latency. For optimum compatibility, we recommend that you obtain memory modules from the same vendor. A DDR2 module...DDR2 DIMMs are notched differently to prevent installation on the next page for details. • This motherboard does not support memory modules made up of the DDR2 DIMM sockets: N4L-VM DH ® N4L-VM DH 240-pin DDR2 DIMM sockets 2.4.2 Memory configurations You may install 256 MB, 512 MB, and ...
...of 2048 Mb chips or double sided x16 memory modules. 2-10 Chapter 2: Hardware information DIMM_B1 DIMM_A1 2.4 System memory 2.4.1 Overview The motherboard comes with the same CAS latency. For optimum compatibility, we recommend that you obtain memory modules from the same vendor. A DDR2 module...DDR2 DIMMs are notched differently to prevent installation on the next page for details. • This motherboard does not support memory modules made up of the DDR2 DIMM sockets: N4L-VM DH ® N4L-VM DH 240-pin DDR2 DIMM sockets 2.4.2 Memory configurations You may install 256 MB, 512 MB, and ...
N4L-VM DH User's Manual English Edition
Page 37
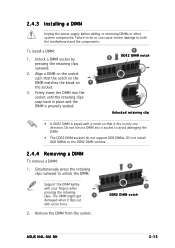
Unlock a DIMM socket by pressing the retaining clips outward. 2. Remove the DIMM from the socket. 2 1 DDR2 DIMM notch ASUS N4L-VM DH 2-15 To install a DIMM: 1. Do not force a DIMM into the socket until the retaining clips snap back in only one direction. The DIMM ...on the socket such that it flips out with your fingers when pressing the retaining clips. Simultaneously press the retaining clips outward to both the motherboard and the components. Support the DIMM lightly with extra force. 2. Failure to do not support DDR DIMMs. DO not install DDR DIMMs ...
Unlock a DIMM socket by pressing the retaining clips outward. 2. Remove the DIMM from the socket. 2 1 DDR2 DIMM notch ASUS N4L-VM DH 2-15 To install a DIMM: 1. Do not force a DIMM into the socket until the retaining clips snap back in only one direction. The DIMM ...on the socket such that it flips out with your fingers when pressing the retaining clips. Simultaneously press the retaining clips outward to both the motherboard and the components. Support the DIMM lightly with extra force. 2. Failure to do not support DDR DIMMs. DO not install DDR DIMMs ...


