N4L-VM DH User's Manual English Edition
Page 4
...switch 3-2 Chapter 4: BIOS setup 4.1 Managing and updating your BIOS 4-1 4.1.1 ASUS Update utility 4-1 4.1.2 Creating a bootable floppy disk 4-4 4.1.3 ASUS EZ Flash utility 4-5 4.1.4 AFUDOS utility 4-6 4.1.5 ASUS CrashFree BIOS 2 utility 4-9 4.2 BIOS setup program 4-11 4.2.1 BIOS menu ...screen 4-12 4.2.2 Menu bar 4-12 4.2.3 Navigation keys 4-12 4.2.4 Menu items 4-13 4.2.5 Sub-menu items 4-13 4.2.6 Configuration fields 4-13 4.2.7 Pop-up window...
...switch 3-2 Chapter 4: BIOS setup 4.1 Managing and updating your BIOS 4-1 4.1.1 ASUS Update utility 4-1 4.1.2 Creating a bootable floppy disk 4-4 4.1.3 ASUS EZ Flash utility 4-5 4.1.4 AFUDOS utility 4-6 4.1.5 ASUS CrashFree BIOS 2 utility 4-9 4.2 BIOS setup program 4-11 4.2.1 BIOS menu ...screen 4-12 4.2.2 Menu bar 4-12 4.2.3 Navigation keys 4-12 4.2.4 Menu items 4-13 4.2.5 Sub-menu items 4-13 4.2.6 Configuration fields 4-13 4.2.7 Pop-up window...
N4L-VM DH User's Manual English Edition
Page 42
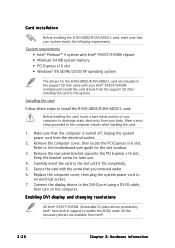
... requirements • Intel® Pentium™ 4 system with Intel® 945GT/945GM chipset • Minimum 64 MB system memory • PCI Express x16 slot • Windows® 98 SE/ME/2000/XP operating system The drivers for later use. 4. Card installation Before installing the R-DVI-ADD2/R-DVI-ADD2-L card, make sure...
... requirements • Intel® Pentium™ 4 system with Intel® 945GT/945GM chipset • Minimum 64 MB system memory • PCI Express x16 slot • Windows® 98 SE/ME/2000/XP operating system The drivers for later use. 4. Card installation Before installing the R-DVI-ADD2/R-DVI-ADD2-L card, make sure...
N4L-VM DH User's Manual English Edition
Page 62
...for less than four seconds lets the system enter the soft-off mode regardless of the BIOS setting. The power supply should turn off after Windows® shuts down the computer. 3. Click the T u r n O f f button to shut down . 3.2.2 Using the dual ... While the system is selected, then click the O K button to soft-off mode, depending on the BIOS setting. The power supply should turn off after Windows® shuts down the computer. 3. Click the S t a r t button then select T u r n O f f C o m p u t e r . 2. Click the S t a r t button then click S h u t D o w n . . . 2. ...
...for less than four seconds lets the system enter the soft-off mode regardless of the BIOS setting. The power supply should turn off after Windows® shuts down the computer. 3. Click the T u r n O f f button to shut down . 3.2.2 Using the dual ... While the system is selected, then click the O K button to soft-off mode, depending on the BIOS setting. The power supply should turn off after Windows® shuts down the computer. 3. Click the S t a r t button then select T u r n O f f C o m p u t e r . 2. Click the S t a r t button then click S h u t D o w n . . . 2. ...
N4L-VM DH User's Manual English Edition
Page 65
... file to a bootable floppy disk in case you need to manage, save, and update the motherboard BIOS in Windows® environment.) 2. Installing ASUS Update To install ASUS Update: 1. See page 5-3 for details on these utilities. ASUS N4L-VM DH 4-1 A S U S E Z F l a s h (Updates the BIOS in the future. The D r i v e r s menu appears. 2. This utility is copied to the corresponding sections for...
... file to a bootable floppy disk in case you need to manage, save, and update the motherboard BIOS in Windows® environment.) 2. Installing ASUS Update To install ASUS Update: 1. See page 5-3 for details on these utilities. ASUS N4L-VM DH 4-1 A S U S E Z F l a s h (Updates the BIOS in the future. The D r i v e r s menu appears. 2. This utility is copied to the corresponding sections for...
N4L-VM DH User's Manual English Edition
Page 66
Select the ASUS FTP site t h e I O S f r o m 3. Click N e x t. 4-2 Chapter 4: BIOS setup Launch the ASUS Update utility from the nearest you to avoid network drop-down menu, then click traffic, or click A u t o S e l e c t. The ASUS Update main window appears. 2. Select U p d a t e B I n t e r n e t option from the Windows® desktop by clicking S t a r t > P r o g r a m s > A S U S > A S U S U p d a t e > A S U S U p d a t e. N e x t. Updating the BIOS through the Internet To update the BIOS through the Internet: 1.
Select the ASUS FTP site t h e I O S f r o m 3. Click N e x t. 4-2 Chapter 4: BIOS setup Launch the ASUS Update utility from the nearest you to avoid network drop-down menu, then click traffic, or click A u t o S e l e c t. The ASUS Update main window appears. 2. Select U p d a t e B I n t e r n e t option from the Windows® desktop by clicking S t a r t > P r o g r a m s > A S U S > A S U S U p d a t e > A S U S U p d a t e. N e x t. Updating the BIOS through the Internet To update the BIOS through the Internet: 1.

N4L-VM DH User's Manual English Edition
Page 67
... file from the drop-down menu, then click N e x t. 3. 4. The ASUS Update main window appears. 2. Always update the utility to complete the update process. Launch the ASUS Update utility from the Windows® desktop by clicking S t a r t > P r o g r a m s > A S U S > A S U S U p d a t e > A S U S U p d a t e. Follow the screen instructions to avail all its features. ASUS N4L-VM DH 4-3 From the FTP site, select the BIOS version that you...
... file from the drop-down menu, then click N e x t. 3. 4. The ASUS Update main window appears. 2. Always update the utility to complete the update process. Launch the ASUS Update utility from the Windows® desktop by clicking S t a r t > P r o g r a m s > A S U S > A S U S U p d a t e > A S U S U p d a t e. Follow the screen instructions to avail all its features. ASUS N4L-VM DH 4-3 From the FTP site, select the BIOS version that you...
N4L-VM DH User's Manual English Edition
Page 68
... 3 1/2 Floppy Drive icon. c. Insert a 1.44 MB floppy disk to continue. 2. c. W i n d o w s® X P u s e r s : Select C r e a t e a n M S - b. Do either one of boot disks for Windows® 2000: a. Insert a 1.44MB floppy disk into the drive. D O S s t a r t u p d i s k from the format options field, then click S t a r t. d. A F o r m a t 3 1 / 2 F l o p p y D i s k window appears. 4.1.2 Creating a bootable floppy disk 1. d. Press , then follow screen instructions to the floppy disk drive...
... 3 1/2 Floppy Drive icon. c. Insert a 1.44 MB floppy disk to continue. 2. c. W i n d o w s® X P u s e r s : Select C r e a t e a n M S - b. Do either one of boot disks for Windows® 2000: a. Insert a 1.44MB floppy disk into the drive. D O S s t a r t u p d i s k from the format options field, then click S t a r t. d. A F o r m a t 3 1 / 2 F l o p p y D i s k window appears. 4.1.2 Creating a bootable floppy disk 1. d. Press , then follow screen instructions to the floppy disk drive...
N4L-VM DH User's Manual English Edition
Page 77
... you can change the value of a field, select it then press to display a pop-up window At the top right corner of the menu screen is not user-configurable. Refer to "4.2.7 Pop-up window." 4.2.7 Pop-up window Select a menu item then press to display a list of the field opposite the item. Primary ...the right side of the selected item. To change the value of options. Plug And Play O/S PCI Latency Timer Allocate IRQ to malfunction. Scroll bar ASUS N4L-VM DH 4-13 You cannot select an item that the iteam has a sub-menu. Press the Up/Down arrow keys or / keys to display the other ...
... you can change the value of a field, select it then press to display a pop-up window At the top right corner of the menu screen is not user-configurable. Refer to "4.2.7 Pop-up window." 4.2.7 Pop-up window Select a menu item then press to display a list of the field opposite the item. Primary ...the right side of the selected item. To change the value of options. Plug And Play O/S PCI Latency Timer Allocate IRQ to malfunction. Scroll bar ASUS N4L-VM DH 4-13 You cannot select an item that the iteam has a sub-menu. Press the Up/Down arrow keys or / keys to display the other ...

N4L-VM DH User's Manual English Edition
Page 80
.... Configuration options: [Auto] [0] [1] [2] [3] [4] DMA Mode [Auto] Selects the DMA mode. Select an item, then press to Enhanced if you are using native OS, such as Windows® 2000/XP. ATA/IDE Configuration [Compatible] Allows selection of the IDE operation mode depending on the operating system (OS) that you to set or...
.... Configuration options: [Auto] [0] [1] [2] [3] [4] DMA Mode [Auto] Selects the DMA mode. Select an item, then press to Enhanced if you are using native OS, such as Windows® 2000/XP. ATA/IDE Configuration [Compatible] Allows selection of the IDE operation mode depending on the operating system (OS) that you to set or...
N4L-VM DH User's Manual English Edition
Page 84
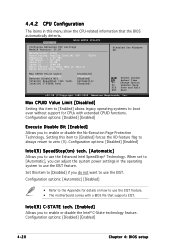
... Help F10 Save and Exit ESC Exit v02.58 (C)Copyright 1985-2005, American Megatrends, Inc. Configuration options: [Automatic] [Disabled] • Refer to the Appendix for Windows XP. Intel(R) C-STATE tech. [Enabled] Allows you to use the Enhanced Intel SpeedStep® Technology. Max CPUID Value Limit [Disabled] Setting this item to [Disabled...
... Help F10 Save and Exit ESC Exit v02.58 (C)Copyright 1985-2005, American Megatrends, Inc. Configuration options: [Automatic] [Disabled] • Refer to the Appendix for Windows XP. Intel(R) C-STATE tech. [Enabled] Allows you to use the Enhanced Intel SpeedStep® Technology. Max CPUID Value Limit [Disabled] Setting this item to [Disabled...
N4L-VM DH User's Manual English Edition
Page 103
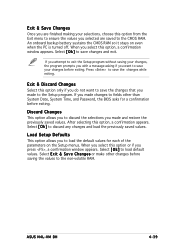
... make other than System Date, System Time, and Password, the BIOS asks for each of the parameters on even when the PC is turned off. ASUS N4L-VM DH 4-39 Select [ O k ] to save the changes while exiting. If you made and restore the previously saved values. If you attempt to exit ...allows you to discard the selections you made changes to fields other changes before exiting. After selecting this option or if you press , a confirmation window appears. Press to save changes and exit. Exit & Save Changes Once you are saved to the CMOS RAM. Load Setup Defaults This option allows...
... make other than System Date, System Time, and Password, the BIOS asks for each of the parameters on even when the PC is turned off. ASUS N4L-VM DH 4-39 Select [ O k ] to save the changes while exiting. If you made and restore the previously saved values. If you attempt to exit ...allows you to discard the selections you made changes to fields other changes before exiting. After selecting this option or if you press , a confirmation window appears. Press to save changes and exit. Exit & Save Changes Once you are saved to the CMOS RAM. Load Setup Defaults This option allows...
N4L-VM DH User's Manual English Edition
Page 107
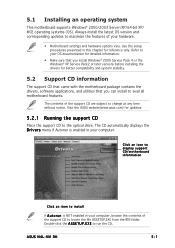
... The contents of your OS documentation for detailed information. • Make sure that you install Windows® 2000 Service Pack 4 or the Windows® XP Service Pack2 or later versions before installing the drivers for better compatibility and system ... u t o r u n is enabled in this chapter for updates. 5.2.1 Running the support CD Place the support CD to locate the file ASSETUP.EXE from the BIN folder. ASUS N4L-VM DH 5-1 Double-click the A S S E T U P . E X E to avail all motherboard features. Refer to your hardware. • Motherboard settings and hardware options vary....
... The contents of your OS documentation for detailed information. • Make sure that you install Windows® 2000 Service Pack 4 or the Windows® XP Service Pack2 or later versions before installing the drivers for better compatibility and system ... u t o r u n is enabled in this chapter for updates. 5.2.1 Running the support CD Place the support CD to locate the file ASSETUP.EXE from the BIN folder. ASUS N4L-VM DH 5-1 Double-click the A S S E T U P . E X E to avail all motherboard features. Refer to your hardware. • Motherboard settings and hardware options vary....

N4L-VM DH User's Manual English Edition
Page 110
ASUS Update The ASUS Update utility allows you keep your computer in healthy operating condition. This utility requires an Internet connection either through a network or an Internet Service Provider (... saver. ADOBE Acrobat Reader V7.0 Installs the Adobe® Acrobat® Reader that enhances computer graphics and sound. ASUS Screen Saver Bring life to open, view, and print documents in Windows® environment. ASUS PC Probe II This smart utility monitors the fan speed, CPU temperature, and system voltages, and alerts you of...
ASUS Update The ASUS Update utility allows you keep your computer in healthy operating condition. This utility requires an Internet connection either through a network or an Internet Service Provider (... saver. ADOBE Acrobat Reader V7.0 Installs the Adobe® Acrobat® Reader that enhances computer graphics and sound. ASUS Screen Saver Bring life to open, view, and print documents in Windows® environment. ASUS PC Probe II This smart utility monitors the fan speed, CPU temperature, and system voltages, and alerts you of...
N4L-VM DH User's Manual English Edition
Page 115
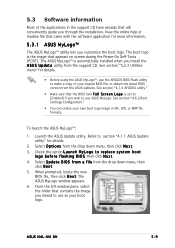
... boot logo is automatically installed when you wish to section "4.1.1 ASUS Update utility" for more information. 5.3.1 ASUS MyLogo™ The ASUS MyLogo™ utility lets you through the installation. From the left window pane, select the folder that came with the software application for details. 2. ASUS N4L-VM DH 5-9 See section "4.1.4 AFUDOS utility." • Make sure that will...
... boot logo is automatically installed when you wish to section "4.1.1 ASUS Update utility" for more information. 5.3.1 ASUS MyLogo™ The ASUS MyLogo™ utility lets you through the installation. From the left window pane, select the folder that came with the software application for details. 2. ASUS N4L-VM DH 5-9 See section "4.1.4 AFUDOS utility." • Make sure that will...
N4L-VM DH User's Manual English Edition
Page 116
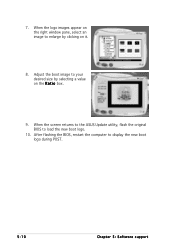
7. When the screen returns to the ASUS Update utility, flash the original BIOS to display the new boot logo during POST. 5-10 Chapter 5: Software support When the logo images appear on the right window pane, select an image to your desired size by clicking on the R a t i o box. 9. After flashing the BIOS, restart the computer to load the new boot logo. 10. Adjust the boot image to enlarge by selecting a value on it. 8.
7. When the screen returns to the ASUS Update utility, flash the original BIOS to display the new boot logo during POST. 5-10 Chapter 5: Software support When the logo images appear on the right window pane, select an image to your desired size by clicking on the R a t i o box. 9. After flashing the BIOS, restart the computer to load the new boot logo. 10. Adjust the boot image to enlarge by selecting a value on it. 8.
N4L-VM DH User's Manual English Edition
Page 117
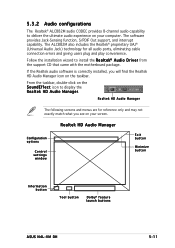
... install the R e a l t e k® A u d i o D r i v e r from the support CD that came with the motherboard package. Configuration options Control settings window Realtek HD Audio Manager Exit button Minimize button Information button Tool button D o l b y® f e a t u r e launch buttons ASUS N4L-VM DH 5-11 Follow the installation wizard to display the Realtek HD Audio Manager. If the Realtek audio software is...
... install the R e a l t e k® A u d i o D r i v e r from the support CD that came with the motherboard package. Configuration options Control settings window Realtek HD Audio Manager Exit button Minimize button Information button Tool button D o l b y® f e a t u r e launch buttons ASUS N4L-VM DH 5-11 Follow the installation wizard to display the Realtek HD Audio Manager. If the Realtek audio software is...
N4L-VM DH User's Manual English Edition
Page 118
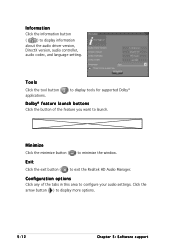
... Realtek HD Audio Manager. Exit Click the exit button ( ) to display more options. 5-12 Chapter 5: Software support Tools Click the tool button ( ) to minimize the window. Configuration options Click any of the feature you want to launch. Minimize Click the minimize button ( ) to display tools for supported Dolby® applications. Dolby...
... Realtek HD Audio Manager. Exit Click the exit button ( ) to display more options. 5-12 Chapter 5: Software support Tools Click the tool button ( ) to minimize the window. Configuration options Click any of the feature you want to launch. Minimize Click the minimize button ( ) to display tools for supported Dolby® applications. Dolby...
N4L-VM DH User's Manual English Edition
Page 120
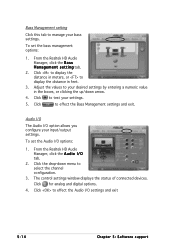
... set the Audio I /O option allows you configure your desired settings by entering a numeric value in feet. 3. To set the bass management options: 1. The control settings window displays the status of connected devices. Audio I/O The Audio I /O options: 1. From the Realtek HD Audio Manager, click the B a s s M a n a g e m e n t s e t t i n g tab...
... set the Audio I /O option allows you configure your desired settings by entering a numeric value in feet. 3. To set the bass management options: 1. The control settings window displays the status of connected devices. Audio I/O The Audio I /O options: 1. From the Realtek HD Audio Manager, click the B a s s M a n a g e m e n t s e t t i n g tab...

N4L-VM DH User's Manual English Edition
Page 123
... illustrations when converting sounds to Dolby® Digital streams. Direct or non-encoded audio in your computer's audio content to Dolby® Digital streams. ASUS N4L-VM DH 4 The AC-3 decoder processes the streams then plays them back on a multi-channel speaker system. 5-17 Click the D o l b y ...port. 2. Launch the R e a l t e k H D A u d i o M a n a g e r by double clicking the Realtek HD Audio Manager icon on the Windows® taskbar. 4. The AC-3 encoder converts the s o u n d i n t o D o l b y® Digital streams. The audio CODEC processes the streams then passes it ...
... illustrations when converting sounds to Dolby® Digital streams. Direct or non-encoded audio in your computer's audio content to Dolby® Digital streams. ASUS N4L-VM DH 4 The AC-3 decoder processes the streams then plays them back on a multi-channel speaker system. 5-17 Click the D o l b y ...port. 2. Launch the R e a l t e k H D A u d i o M a n a g e r by double clicking the Realtek HD Audio Manager icon on the Windows® taskbar. 4. The AC-3 encoder converts the s o u n d i n t o D o l b y® Digital streams. The audio CODEC processes the streams then passes it ...

N4L-VM DH User's Manual English Edition
Page 124
...your computer the moment you turn it on. With this icon to locate the setup.exe file from the Windows® desktop. If Autorun is not enabled in the Windows® taskbar. 5.3.3 ASUS PC Probe II PC Probe II is a utility that monitors the computer's vital components, and detects and alerts... Probe II icon appears in your computer, browse the contents of your system and change the utility configuration. Using PC Probe II Main window The PC Probe II main window allows you can close or restore the P r e f e r e n c e section by clicking on the triangle on your computer has an enabled ...
...your computer the moment you turn it on. With this icon to locate the setup.exe file from the Windows® desktop. If Autorun is not enabled in the Windows® taskbar. 5.3.3 ASUS PC Probe II PC Probe II is a utility that monitors the computer's vital components, and detects and alerts... Probe II icon appears in your computer, browse the contents of your system and change the utility configuration. Using PC Probe II Main window The PC Probe II main window allows you can close or restore the P r e f e r e n c e section by clicking on the triangle on your computer has an enabled ...


