
User Manual
Page 1
M4A78L-M Motherboard
M4A78L-M Motherboard
User Manual
Page 3
Contents Notices...vi Safety information vii About this guide viii M4A78L-M specifications summary x Chapter 1: Product introduction 1.1 Welcome 1-1 1.2 Package contents 1-1 1.3 Special features 1-1 1.3.1 Product highlights 1-1 1.3.2 Innovative ASUS features 1-3 1.4 Before you proceed 1-5 1.5 Motherboard overview 1-6 1.5.1 Placement direction 1-6 1.5.2 Screw holes 1-6 1.5.3 Motherboard layout 1-7 1.5.4 Layout contents 1-7 1.6 Central Processing Unit (CPU 1-8 1.6.1 Installing the CPU 1-8 1.6.2 Installing the heatsink and fan 1-10 1.7 System memory 1-11...
Contents Notices...vi Safety information vii About this guide viii M4A78L-M specifications summary x Chapter 1: Product introduction 1.1 Welcome 1-1 1.2 Package contents 1-1 1.3 Special features 1-1 1.3.1 Product highlights 1-1 1.3.2 Innovative ASUS features 1-3 1.4 Before you proceed 1-5 1.5 Motherboard overview 1-6 1.5.1 Placement direction 1-6 1.5.2 Screw holes 1-6 1.5.3 Motherboard layout 1-7 1.5.4 Layout contents 1-7 1.6 Central Processing Unit (CPU 1-8 1.6.1 Installing the CPU 1-8 1.6.2 Installing the heatsink and fan 1-10 1.7 System memory 1-11...
User Manual
Page 6
... parts and recycling. These limits are designed to provide reasonable protection against harmful interference in municipal waste. DO NOT throw the motherboard in municipal waste. This symbol of Chemicals) regulatory framework, we published the chemical substances in a particular installation. This class ...; This device must accept any interference received including interference that interference will not occur in our products at ASUS REACH website at http://green.asus.com/english/REACH.htm. vi The use of shielded cables for disposal of the following two conditions: &#...
... parts and recycling. These limits are designed to provide reasonable protection against harmful interference in municipal waste. DO NOT throw the motherboard in municipal waste. This symbol of Chemicals) regulatory framework, we published the chemical substances in a particular installation. This class ...; This device must accept any interference received including interference that interference will not occur in our products at ASUS REACH website at http://green.asus.com/english/REACH.htm. vi The use of shielded cables for disposal of the following two conditions: &#...
User Manual
Page 7
.... If you are not sure about the voltage of the electrical outlet you add a device. • Before connecting or removing signal cables from the motherboard, ensure that all power cables from the system, ensure that the power cables for the devices are unplugged before using , contact your... motherboard) and is broken, do not try to fix it to a hazardous material collection point. • Never replace the battery with your area. Contact a qualified ...
.... If you are not sure about the voltage of the electrical outlet you add a device. • Before connecting or removing signal cables from the motherboard, ensure that all power cables from the system, ensure that the power cables for the devices are unplugged before using , contact your... motherboard) and is broken, do not try to fix it to a hazardous material collection point. • Never replace the battery with your area. Contact a qualified ...

User Manual
Page 8
...clips, screws, and staples away from connectors, slots, sockets and circuitry. • Avoid dust, humidity, and temperature extremes. This motherboard should only be used in any damage, contact your retailer. About this guide is organized This guide contains the following parts: •... describes the features of the BIOS parameters are not damaged. Detailed descriptions of the motherboard and the new technology it may become wet. Operation safety • Before installing the motherboard and adding devices on a stable surface. • If you encounter technical problems ...
...clips, screws, and staples away from connectors, slots, sockets and circuitry. • Avoid dust, humidity, and temperature extremes. This motherboard should only be used in any damage, contact your retailer. About this guide is organized This guide contains the following parts: •... describes the features of the BIOS parameters are not damaged. Detailed descriptions of the motherboard and the new technology it may become wet. Operation safety • Before installing the motherboard and adding devices on a stable surface. • If you encounter technical problems ...
User Manual
Page 13
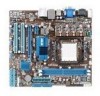
Before you for the following items. Motherboard Cables Accessories Application DVD Documentation ASUS M4A78L-M motherboard 2 x Serial ATA cables 1 x Ultra DMA 133/100 cable 1 x I/O shield ASUS motherboard Support DVD User Manual If any of the above items is damaged or missing, contact your motherboard package for buying an ASUS® M4A78L-M motherboard! Thank you start installing the motherboard, and hardware devices on it...
Before you for the following items. Motherboard Cables Accessories Application DVD Documentation ASUS M4A78L-M motherboard 2 x Serial ATA cables 1 x Ultra DMA 133/100 cable 1 x I/O shield ASUS motherboard Support DVD User Manual If any of the above items is damaged or missing, contact your motherboard package for buying an ASUS® M4A78L-M motherboard! Thank you start installing the motherboard, and hardware devices on it...
User Manual
Page 14
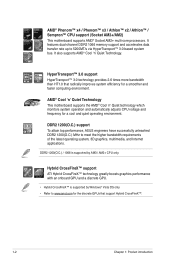
...x2 / Athlon™ / Sempron™ CPU support (Socket AM2+/AM2) This motherboard supports AMD® Socket AM2+ multi-core processors. AMD® Cool 'n' Quiet Technology This motherboard supports the AMD® Cool 'n' Quiet technology which monitors system operation and automatically ...adjusts CPU voltage and frequency for a smoother and faster computing environment. DDR2 1200(O.C.) support To attain top performance, ASUS engineers have successfully ...
...x2 / Athlon™ / Sempron™ CPU support (Socket AM2+/AM2) This motherboard supports AMD® Socket AM2+ multi-core processors. AMD® Cool 'n' Quiet Technology This motherboard supports the AMD® Cool 'n' Quiet technology which monitors system operation and automatically ...adjusts CPU voltage and frequency for a smoother and faster computing environment. DDR2 1200(O.C.) support To attain top performance, ASUS engineers have successfully ...
User Manual
Page 15
... that gives you to provide efficient power management for advanced operating systems. Serial ATA 3Gb/s technology and RAID support This motherboard supports hard drives based on the Serial ATA (SATA) 3Gb/s storage specification, delivering enhanced scalability and doubling the bus ... supports RAID 0, RAID 1, and RAID 0+1 configurations for Express Gate source codes. ASUS M4A78L-M 1-3 Gigabit LAN solution The onboard LAN controller is an instant-on the system configuration. • ASUS Express Gate supports file uploading from switching power supply. It supports file downloading to ...
... that gives you to provide efficient power management for advanced operating systems. Serial ATA 3Gb/s technology and RAID support This motherboard supports hard drives based on the Serial ATA (SATA) 3Gb/s storage specification, delivering enhanced scalability and doubling the bus ... supports RAID 0, RAID 1, and RAID 0+1 configurations for Express Gate source codes. ASUS M4A78L-M 1-3 Gigabit LAN solution The onboard LAN controller is an instant-on the system configuration. • ASUS Express Gate supports file uploading from switching power supply. It supports file downloading to ...

User Manual
Page 16
... NET2 remotely detects the cable connection immediately after you to 100 meters at 1 meter accuracy. ASUS EPU ASUS EPU is in real time. Green ASUS This motherboard and its packaging comply with the ASUS vision of Hazardous Substances (RoHS). eliminates the need to their default settings. Simply shut down and reboot the system, and the...
... NET2 remotely detects the cable connection immediately after you to 100 meters at 1 meter accuracy. ASUS EPU ASUS EPU is in real time. Green ASUS This motherboard and its packaging comply with the ASUS vision of Hazardous Substances (RoHS). eliminates the need to their default settings. Simply shut down and reboot the system, and the...

User Manual
Page 17
... the wall socket before removing or plugging in any motherboard component. Failure to do so may cause severe damage to static electricity. SB_PWR M4A78L-M ON OFF Standby Power Powered Off M4A78L-M Onboard power LED ASUS M4A78L-M 1-5 This is ON, in sleep mode, or in soft-off the ATX power supply and detach its power cord. P5KPL...
... the wall socket before removing or plugging in any motherboard component. Failure to do so may cause severe damage to static electricity. SB_PWR M4A78L-M ON OFF Standby Power Powered Off M4A78L-M Onboard power LED ASUS M4A78L-M 1-5 This is ON, in sleep mode, or in soft-off the ATX power supply and detach its power cord. P5KPL...
User Manual
Page 18
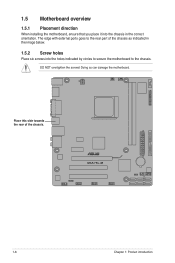
Doing so can damage the motherboard. DO NOT overtighten the screws! The edge with external ports goes to the rear part of the chassis. Place this side towards the rear of the chassis as indicated in the correct orientation. M4A78L-M 1-6 Chapter 1: Product introduction 1.5 Motherboard overview 1.5.1 Placement direction When installing the motherboard, ensure that you place it into the chassis in the image below. 1.5.2 Screw holes Place six screws into the holes indicated by circles to secure the motherboard to the chassis.
Doing so can damage the motherboard. DO NOT overtighten the screws! The edge with external ports goes to the rear part of the chassis. Place this side towards the rear of the chassis as indicated in the correct orientation. M4A78L-M 1-6 Chapter 1: Product introduction 1.5 Motherboard overview 1.5.1 Placement direction When installing the motherboard, ensure that you place it into the chassis in the image below. 1.5.2 Screw holes Place six screws into the holes indicated by circles to secure the motherboard to the chassis.
User Manual
Page 19
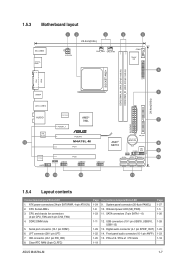
...Motherboard layout 1 24 3 4 5 22.4cm(8.8in) KB_USB56 SPDIFO_ HDMI ATX12V CHA_FAN CPU_FAN COM1 Super I/O 6 LPT SOCKET AM2+ DDR2 DIMM_A1 (64bit, 240-pin module) DDR2 DIMM_B1 (64bit, 240-pin module) DVI VGA USB34 15 LAN1_USB12 AUDIO RTL 8112L VT1708S AAFP ICS9LPRS485 PCIEX1_1 AMD® 780L EATXPWR PCIEX16 M4A78L...x16 / PCIe x1 / PCI slots 1-19 Page 1-27 1-5 1-26 1-28 1-29 1-23 1-18 ASUS M4A78L-M 1-7 USB connectors (10-1 pin USB78, USB910, USB1112) 1-29 13. Digital audio connector (4-1 pin SPDIF_OUT... 5. ATX power connectors (24-pin EATXPWR, 4-pin ATX12V) 2.
...Motherboard layout 1 24 3 4 5 22.4cm(8.8in) KB_USB56 SPDIFO_ HDMI ATX12V CHA_FAN CPU_FAN COM1 Super I/O 6 LPT SOCKET AM2+ DDR2 DIMM_A1 (64bit, 240-pin module) DDR2 DIMM_B1 (64bit, 240-pin module) DVI VGA USB34 15 LAN1_USB12 AUDIO RTL 8112L VT1708S AAFP ICS9LPRS485 PCIEX1_1 AMD® 780L EATXPWR PCIEX16 M4A78L...x16 / PCIe x1 / PCI slots 1-19 Page 1-27 1-5 1-26 1-28 1-29 1-23 1-18 ASUS M4A78L-M 1-7 USB connectors (10-1 pin USB78, USB910, USB1112) 1-29 13. Digital audio connector (4-1 pin SPDIF_OUT... 5. ATX power connectors (24-pin EATXPWR, 4-pin ATX12V) 2.
User Manual
Page 20
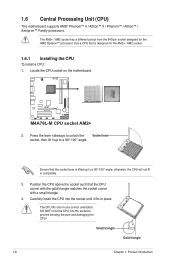
M4A78L-M M4A78L-M CPU socket AM2+ 2. otherwise, the CPU will not fit in one correct orientation. DO NOT force the CPU into the socket until it up to prevent bending the pins and damaging the CPU! 1.6 Central Processing Unit (CPU) This motherboard supports AMD® Phenom™ II / Athlon™... II / Phenom™ / Athlon™ / Sempron™ Family processors. Locate the CPU socket on the motherboard. The AM2+ / AM2 socket has a different pinout from the 940-pin socket designed for the AM2+ / AM2 socket. 1.6.1 Installing the CPU To ...
M4A78L-M M4A78L-M CPU socket AM2+ 2. otherwise, the CPU will not fit in one correct orientation. DO NOT force the CPU into the socket until it up to prevent bending the pins and damaging the CPU! 1.6 Central Processing Unit (CPU) This motherboard supports AMD® Phenom™ II / Athlon™... II / Phenom™ / Athlon™ / Sempron™ Family processors. Locate the CPU socket on the motherboard. The AM2+ / AM2 socket has a different pinout from the 940-pin socket designed for the AM2+ / AM2 socket. 1.6.1 Installing the CPU To ...
User Manual
Page 21
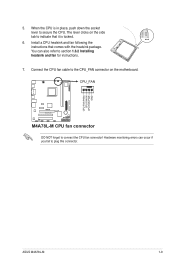
...fail to section 1.6.2 Installing heatsink and fan for instructions. 7. Hardware monitoring errors can also refer to plug this connector. The lever clicks on the motherboard. 5. When the CPU is locked. 6. Connect the CPU fan cable to connect the CPU fan connector! Install a CPU heatsink and fan following the... instructions that it is in place, push down the socket lever to indicate that comes with the heatsink package. CPU_FAN M4A78L-M M4A78L-M CPU fan connector DO NOT forget to the CPU_FAN connector on the side tab to secure the CPU. CPU FAN PWM CPU FAN ...
...fail to section 1.6.2 Installing heatsink and fan for instructions. 7. Hardware monitoring errors can also refer to plug this connector. The lever clicks on the motherboard. 5. When the CPU is locked. 6. Connect the CPU fan cable to connect the CPU fan connector! Install a CPU heatsink and fan following the... instructions that it is in place, push down the socket lever to indicate that comes with the heatsink package. CPU_FAN M4A78L-M M4A78L-M CPU fan connector DO NOT forget to the CPU_FAN connector on the side tab to secure the CPU. CPU FAN PWM CPU FAN ...
User Manual
Page 22
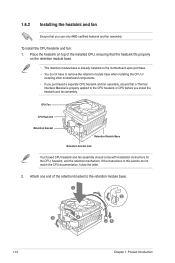
If the instructions in this section do not have to remove the retention module base when installing the CPU or installing other motherboard components. • If you purchased a separate CPU heatsink and fan assembly, ensure that you install the heatsink and fan assembly. Attach one end ...use only AMD-certified heatsink and fan assembly. 1.6.2 Installing the heatsink and fan Ensure that a Thermal Interface Material is already installed on the motherboard upon purchase. • You do not match the CPU documentation, follow the latter. 2. To install the CPU heatsink and fan: 1.
If the instructions in this section do not have to remove the retention module base when installing the CPU or installing other motherboard components. • If you purchased a separate CPU heatsink and fan assembly, ensure that you install the heatsink and fan assembly. Attach one end ...use only AMD-certified heatsink and fan assembly. 1.6.2 Installing the heatsink and fan Ensure that a Thermal Interface Material is already installed on the motherboard upon purchase. • You do not match the CPU documentation, follow the latter. 2. To install the CPU heatsink and fan: 1.
User Manual
Page 23
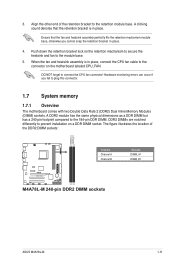
...assembly perfectly fits the retention mechanism module base, otherwise you fail to plug this connector. 1.7 System memory 1.7.1 Overview The motherboard comes with two Double Data Rate 2 (DDR2) Dual Inline Memory Modules (DIMM) sockets. DO NOT forget to the 184...motherboard labeled CPU_FAN. Push down the retention bracket lock on the retention mechanism to secure the heatsink and fan to the retention module base. Align the other end of the DDR2 DIMM sockets: DIMM_A1 DIMM_B1 Channel Channel A Channel B M4A78L-M M4A78L-M 240-pin DDR2 DIMM sockets Sockets DIMM_A1 DIMM_B1 ASUS M4A78L...
...assembly perfectly fits the retention mechanism module base, otherwise you fail to plug this connector. 1.7 System memory 1.7.1 Overview The motherboard comes with two Double Data Rate 2 (DDR2) Dual Inline Memory Modules (DIMM) sockets. DO NOT forget to the 184...motherboard labeled CPU_FAN. Push down the retention bracket lock on the retention mechanism to secure the heatsink and fan to the retention module base. Align the other end of the DDR2 DIMM sockets: DIMM_A1 DIMM_B1 Channel Channel A Channel B M4A78L-M M4A78L-M 240-pin DDR2 DIMM sockets Sockets DIMM_A1 DIMM_B1 ASUS M4A78L...
User Manual
Page 24
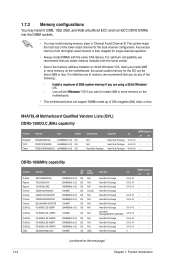
... • • • • • • • • • • • • • • • (continued on the motherboard. • This motherboard does not support DIMMs made up of the lower-sized channel for single-channel operation. • Always install DIMMs with the same CAS latency...can be about 3GB or less. The system maps the total size of 256 megabits (Mb) chips or less. M4A78L-M Motherboard Qualified Vendors Lists (QVL) DDR2-1200(O.C.)MHz capability Vendor Part No. For optimum compatibility, we recommend that you install...
... • • • • • • • • • • • • • • • (continued on the motherboard. • This motherboard does not support DIMMs made up of the lower-sized channel for single-channel operation. • Always install DIMMs with the same CAS latency...can be about 3GB or less. The system maps the total size of 256 megabits (Mb) chips or less. M4A78L-M Motherboard Qualified Vendors Lists (QVL) DDR2-1200(O.C.)MHz capability Vendor Part No. For optimum compatibility, we recommend that you install...
User Manual
Page 29
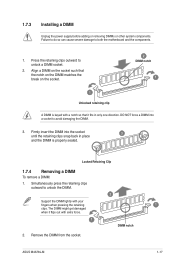
... so that it flips out with extra force. 1 2 DIMM notch 2. Remove the DIMM from the socket. Firmly insert the DIMM into a socket to both the motherboard and the components. 1. The DIMM might get damaged when it fits in place 3 and the DIMM is keyed with your fingers when pressing the retaining... or other system components. Failure to do so can cause severe damage to avoid damaging the DIMM. 3. Locked Retaining Clip 1.7.4 Removing a DIMM To remove a DIMM: 1. ASUS M4A78L-M 1 1-17
... so that it flips out with extra force. 1 2 DIMM notch 2. Remove the DIMM from the socket. Firmly insert the DIMM into a socket to both the motherboard and the components. 1. The DIMM might get damaged when it fits in place 3 and the DIMM is keyed with your fingers when pressing the retaining... or other system components. Failure to do so can cause severe damage to avoid damaging the DIMM. 3. Locked Retaining Clip 1.7.4 Removing a DIMM To remove a DIMM: 1. ASUS M4A78L-M 1 1-17
User Manual
Page 30
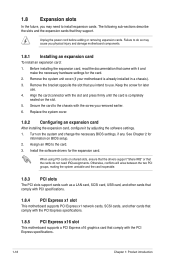
... cards such as a LAN card, SCSI card, USB card, and other cards that comply with PCI specifications. 1.8.4 PCI Express x1 slot This motherboard supports PCI Express x1 network cards, SCSI cards, and other cards that comply with the PCI Express specifications. 1.8.5 PCI Express x16 slot This...Installing an expansion card To install an expansion card: 1. Failure to do not need to the card. 3. Remove the system unit cover (if your motherboard is completely seated on BIOS setup. 2. Secure the card to the chassis with it by adjusting the software settings. 1. Assign an IRQ to install ...
... cards such as a LAN card, SCSI card, USB card, and other cards that comply with PCI specifications. 1.8.4 PCI Express x1 slot This motherboard supports PCI Express x1 network cards, SCSI cards, and other cards that comply with the PCI Express specifications. 1.8.5 PCI Express x16 slot This...Installing an expansion card To install an expansion card: 1. Failure to do not need to the card. 3. Remove the system unit cover (if your motherboard is completely seated on BIOS setup. 2. Secure the card to the chassis with it by adjusting the software settings. 1. Assign an IRQ to install ...
User Manual
Page 33
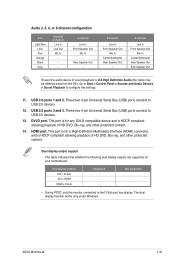
... your motherboard: Dual display outputs DVI + D-Sub DVI + HDMI HDMI + D-Sub Supported • • Not supported • • During POST, only the monitor connected to configure the settings. 11. The dual display function works only under Windows. These two 4-pin Universal Serial Bus (USB) ports connect to USB 2.0 devices. 13. ASUS M4A78L-M 1-21...
... your motherboard: Dual display outputs DVI + D-Sub DVI + HDMI HDMI + D-Sub Supported • • Not supported • • During POST, only the monitor connected to configure the settings. 11. The dual display function works only under Windows. These two 4-pin Universal Serial Bus (USB) ports connect to USB 2.0 devices. 13. ASUS M4A78L-M 1-21...


