A7V600 User Manual
Page 28
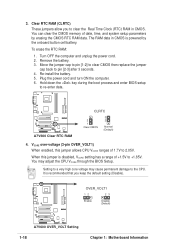
...[2-3] after 3 seconds. 4. You may cause permanent damage to 2.05V. Re-install the battery. 5. Clear RTC RAM (CLRTC) These jumpers allow you keep the default setting (Disable). A7V600 ® A7V600 Clear RTC RAM CLRTC 2 1 Clear CMOS 3 2 Normal (Default) 4. It is disabled, VCORE setting has a range of 1....the power cord and turn ON the computer. 6. Setting to clear the Real Time Clock (RTC) RAM in CMOS is powered by erasing the CMOS RTC RAM data. OVER_VOLT1 12 23 Enable Disable (Default) A7V600 ® A7V600 OVER_VOLT Setting 1-18 Chapter 1: Motherboard Information
...[2-3] after 3 seconds. 4. You may cause permanent damage to 2.05V. Re-install the battery. 5. Clear RTC RAM (CLRTC) These jumpers allow you keep the default setting (Disable). A7V600 ® A7V600 Clear RTC RAM CLRTC 2 1 Clear CMOS 3 2 Normal (Default) 4. It is disabled, VCORE setting has a range of 1....the power cord and turn ON the computer. 6. Setting to clear the Real Time Clock (RTC) RAM in CMOS is powered by erasing the CMOS RTC RAM data. OVER_VOLT1 12 23 Enable Disable (Default) A7V600 ® A7V600 OVER_VOLT Setting 1-18 Chapter 1: Motherboard Information

A7V600 User Manual
Page 45
... configuration. The Setup program is a menudriven program, which means you may want to change the configuration of your computer in the CMOS RAM of the screen has a menu bar with the following BIOS setup screens and descriptions are for reference purposes only, and may want to...desired item is constantly being updated, the following selections: MAIN Use this menu to make your system, or prompted to use as possible. ASUS A7V600 Motherboard 2-9 It is designed to make changes to the advanced features. BOOT Use this menu to configure the default system device used to...
... configuration. The Setup program is a menudriven program, which means you may want to change the configuration of your computer in the CMOS RAM of the screen has a menu bar with the following BIOS setup screens and descriptions are for reference purposes only, and may want to...desired item is constantly being updated, the following selections: MAIN Use this menu to make your system, or prompted to use as possible. ASUS A7V600 Motherboard 2-9 It is designed to make changes to the advanced features. BOOT Use this menu to configure the default system device used to...
A7V600 User Manual
Page 48
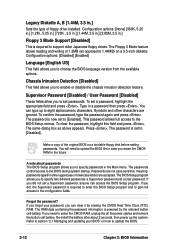
... in either uppercase or lowercase letters are ignored. The passwords control access to the BIOS Setup menus. If you need to [Enabled]. The RAM data containing the password information is required to the configuration fields. If you did , the Supervisor password is required to enter the BIOS Setup... .] Floppy 3 Mode Support [Disabled] This is powered by erasing the CMOS Real Time Clock (RTC) RAM. The same dialog box as opposed to erase the CMOS RAM, unplug the all the power cables and remove the button cell battery. You will need to 1.44MB) on a bootable floppy disk before...
... in either uppercase or lowercase letters are ignored. The passwords control access to the BIOS Setup menus. If you need to [Enabled]. The RAM data containing the password information is required to the configuration fields. If you did , the Supervisor password is required to enter the BIOS Setup... .] Floppy 3 Mode Support [Disabled] This is powered by erasing the CMOS Real Time Clock (RTC) RAM. The same dialog box as opposed to erase the CMOS RAM, unplug the all the power cables and remove the button cell battery. You will need to 1.44MB) on a bootable floppy disk before...
A7V600 User Manual
Page 60
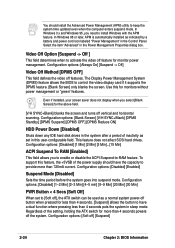
... the system. Configuration options: [Soft off features. Configuration options: [Disabled] [1 Min] [2 Min] [3 Min]...[15 Min] ACPI Suspend To RAM [Enabled] This field allows you need to provide more than 720mA current. Configuration options: [Always On] [Suspend -> Off] Video Off Method ... Chapter 2: BIOS Information Select the item "Advanced" in the Control Panel. Use this feature, the +5VSB of inactivity as set to -RAM feature. You should have a dual function where pressing less than 4 seconds puts the system in sleep mode. Configuration options: [Disabled] [...
... the system. Configuration options: [Soft off features. Configuration options: [Disabled] [1 Min] [2 Min] [3 Min]...[15 Min] ACPI Suspend To RAM [Enabled] This field allows you need to provide more than 720mA current. Configuration options: [Always On] [Suspend -> Off] Video Off Method ... Chapter 2: BIOS Information Select the item "Advanced" in the Control Panel. Use this feature, the +5VSB of inactivity as set to -RAM feature. You should have a dual function where pressing less than 4 seconds puts the system in sleep mode. Configuration options: [Disabled] [...

A7V600 User Manual
Page 65
Select Exit from the Exit menu to ensure the values you selected are saved to the CMOS RAM. The CMOS RAM is sustained by an onboard backup battery and stays on the Setup menus. If you attempt to exit the Setup program without saving your changes, ... changes before exiting. Load Setup Defaults This option allows you to load the default values for a confirmation before saving the values to the non-volatile RAM. ASUS A7V600 Motherboard 2-29 When you press , a confirmation window appears. Select [Yes] to load default values. Select one of the parameters on even when the PC is...
Select Exit from the Exit menu to ensure the values you selected are saved to the CMOS RAM. The CMOS RAM is sustained by an onboard backup battery and stays on the Setup menus. If you attempt to exit the Setup program without saving your changes, ... changes before exiting. Load Setup Defaults This option allows you to load the default values for a confirmation before saving the values to the non-volatile RAM. ASUS A7V600 Motherboard 2-29 When you press , a confirmation window appears. Select [Yes] to load default values. Select one of the parameters on even when the PC is...

A7V600 User Manual
Page 66
Discard Changes This option allows you to discard the selections you select this option, a confirmation appears. Save Changes This option saves your selections without exiting the Setup program. You can then return to the non-volatile RAM. 2-30 Chapter 2: BIOS Information After you made and restore the previously saved values. Select [Yes] to save any changes and load the previously saved values. After selecting this option, a confirmation window appears. Select [Yes] to discard any changes to other menus and make further changes.
Discard Changes This option allows you to discard the selections you select this option, a confirmation appears. Save Changes This option saves your selections without exiting the Setup program. You can then return to the non-volatile RAM. 2-30 Chapter 2: BIOS Information After you made and restore the previously saved values. Select [Yes] to save any changes and load the previously saved values. After selecting this option, a confirmation window appears. Select [Yes] to discard any changes to other menus and make further changes.


