Asus A7V600 SE Support and Manuals
Get Help and Manuals for this Asus item
View All Support Options Below
Free Asus A7V600 SE manuals!
Problems with Asus A7V600 SE?
Ask a Question
Free Asus A7V600 SE manuals!
Problems with Asus A7V600 SE?
Ask a Question
Popular Asus A7V600 SE Manual Pages
Motherboard DIY Troubleshooting Guide - Page 3
... this guide vii ASUS contact information viii A7V600 SE specifications summary ix
Chapter 1: Product introduction
1.1 Welcome 1-2 1.2 Package contents 1-2 1.3 Special Features 1-3
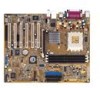
1.3.1 Product highlights 1-3 1.3.2 Value-added solutions 1-5 1.4 Motherboard components 1-6 Core specifications 1-7 1.5 Motherboard layout 1-9 1.6 Before you proceed 1-10 1.7 Motherboard installation 1-11...
Motherboard DIY Troubleshooting Guide - Page 10
...BIOS2.3, ASUS EZ Flash, ASUS CrashFree BIOS 2, ASUS C.P.R.
x PCI 2.2, USB 2.0
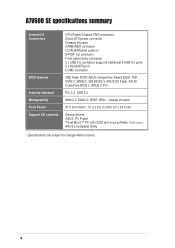
WfM 2.0. A7V600 SE specifications summary
Internal I/O Connectors
BIOS features Industry standard Manageability Form Factor Support CD contents
CPU/Power/Chassis FAN connectors 20 pin ATX power connector Chassis Intrusion GAME/MIDI connector CD/AUX/Modem audio in (30.5 cm x 24.5 cm)
Device drivers ASUS PC Probe...
Motherboard DIY Troubleshooting Guide - Page 14
...ports support
USB 2.0 is backward compatible with USB 1.1. USB 2.0 delivers fast transfer speeds up to Windows™. The higher bandwidth of USB 2.0 allows connection of the ASUS motherboard BIOS allows automatic resetting to the BIOS previous settings in case when the BIOS codes and data are corrupted.
CrashFree BIOS 2
The CrashFree BIOS 2 feature allows you can easily update...
Motherboard DIY Troubleshooting Guide - Page 25
Install the software drivers for the ...support.
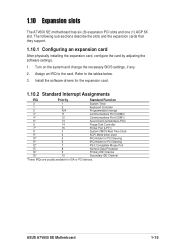
1.10.1 Configuring an expansion card
After physically installing the expansion card, configure the card by adjusting the software settings. 1. Refer to the card.
Assign an IRQ to the tables below. 3. ASUS A7V600 SE Motherboard
1-15 Turn on the system and change the necessary BIOS settings, if any. 2. 1.10 Expansion slots
The A7V600 SE...
Motherboard DIY Troubleshooting Guide - Page 29
... during the boot process and enter BIOS setup
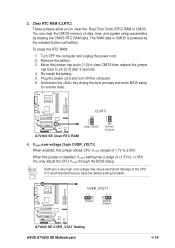
to pin [2-3] after 3 seconds. 4. Setting to +1.85V.
To erase the RTC RAM:
1. A7V600 SE
®
A7V600 SE Clear RTC RAM
CLRTC
2 1 Clear CMOS
3 2
Normal (Default)
4. Move the jumper cap to pin [1-2] to clear CMOS then replace the jumper
cap back to re-enter data. Re-install the battery. 5.
You can clear...
Motherboard DIY Troubleshooting Guide - Page 30
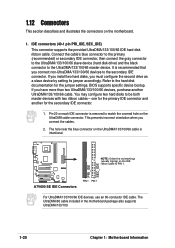
... you must configure the second drive as a slave device by setting its jumper accordingly. The hole near the blue connector on the...install two hard disks, you connect the cables.
2. If you connect non-UltraDMA/133/100/66 devices to the secondary IDE connector.
BIOS supports specific device bootup. You may configure two hard disks to the UltraDMA/133/100/66 master device. A7V600 SE...
Motherboard DIY Troubleshooting Guide - Page 43
....XXX, then press . ASUS A7V600 SE Motherboard
2-5 To cancel this operation, press .
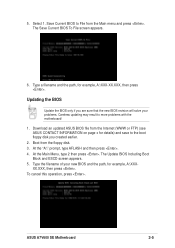
5.
Save Current BIOS to File from the floppy disk. 3. Type a filename and the path, for details) and save to more problems with the motherboard!
1.
At the "A:\" prompt, type AFLASH and then press . 4. At the Main Menu, type 2 then press . The Update BIOS Including Boot
Block...
Motherboard DIY Troubleshooting Guide - Page 45
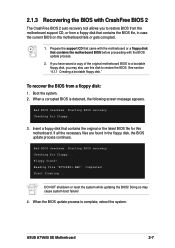
...a bootable floppy disk, you to restore the BIOS. Floppy found in case the current BIOS on the motherboard fails or gets corrupted.
1. Doing so may also use this motherboard. Start flashing... When a corrupted BIOS is complete, reboot the system. ASUS A7V600 SE Motherboard
2-7 2.1.3 Recovering the BIOS with the BIOS update process.
2. See section "4.1.1 Creating a bootable floppy...
Motherboard DIY Troubleshooting Guide - Page 47
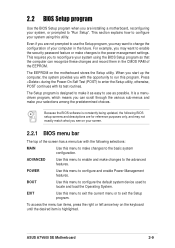
... the motherboard stores the Setup utility. 2.2 BIOS Setup program
Use the BIOS Setup program when you are not prompted to use the Setup program, you may want to enable the security password feature or make it as easy to use as possible. It is designed to make changes to the basic system configuration.
ASUS A7V600 SE Motherboard
2-9 Press during the...
Motherboard DIY Troubleshooting Guide - Page 55
... installed ...ASUS A7V600 SE Motherboard
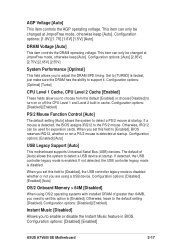
2-17 Configuration options: [Optimal] [Turbo]
CPU Level 1 Cache, CPU Level 2 Cache [Enabled]
These fields allow you set this field to turn on or off the CPU Level 1 and Level 2 built-in BIOS...support it. Configuration options: [Disabled] [Enabled] [Auto]
OS/2 Onboard Memory > 64M [Disabled]
When using a USB device. Set to [TURBO] is detected, the BIOS...
Motherboard DIY Troubleshooting Guide - Page 67
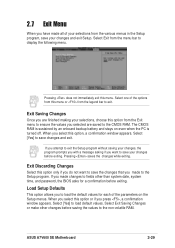
... the CMOS RAM. Select [Yes] to save the changes that you made to the Setup program.
ASUS A7V600 SE Motherboard
2-29
When you select this option only if you do not want to save... the various menus in the Setup program, save your changes and exit Setup.
Select Exit Saving Changes or make other than system date, system time, and password, the BIOS asks for each of the parameters...
Motherboard DIY Troubleshooting Guide - Page 70
...-Up
Because motherboard settings and hardware options vary, use the setup procedures presented in your OS documentation for general reference only. Always install the latest OS version and corresponding updates so you can maximize the features of the support CD to change at any time without notice. The CD automatically displays the Drivers menu if Autorun...
Motherboard DIY Troubleshooting Guide - Page 71
... up to specific operating system versions.
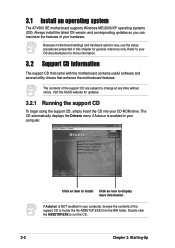
3.2.3 Utilities menu
The Utilities menu shows the applications and other software that can monitor Fan, Speed, Voltage, and CPU temperature.
VIA ATAPI vendor support driver -
VIA AGP VxD driver - SoundMAX Audio Driver
This item installs the ADI 1980 AC'97 compliant audio controller and application. ASUS A7V600 SE Motherboard
3-3 Some...
Motherboard DIY Troubleshooting Guide - Page 73
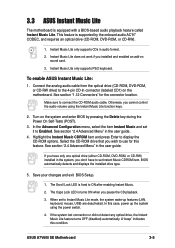
...-RW) installed in the user guide.
4.
The Caps Lock LED is fixed to ON after enabling Instant Music.
2. ASUS A7V600 SE Motherboard
3-5 Select the CD-ROM drive that you wish to Instant Music Lite mode, the system wake-up the system using the Instant Music Lite function keys.
2. Save your changes and exit BIOS Setup.
1. When set to...
Motherboard DIY Troubleshooting Guide - Page 77
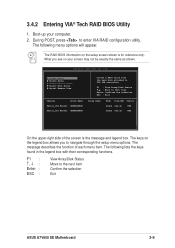
...:
View Array/Disk Status Move to navigate through the setup menu options. The RAID BIOS information on your computer. 2. What you to the next item Confirm the selection Exit
ASUS A7V600 SE Motherboard
3-9 RAID BIOS Ver 1.XX
Create Array Delete Array Create/Delete Spare Select... : Move to enter VIA RAID configuration utility. VIA Tech. 3.4.2 Entering VIA® Tech RAID BIOS Utility
1.
Asus A7V600 SE Reviews
We have not received any reviews for Asus yet.