Motherboard DIY Troubleshooting Guide
Page 4
Safeguards Contents 2.1.2 Using AFLASH to update the BIOS 2-4 2.1.3 Recovering the BIOS with CrashFree BIOS 2 ....... 2-7 2.2 BIOS Setup program 2-9 2.2.1 BIOS menu bar 2-9 2.2.2 Legend bar 2-10 2.3 Main Menu 2-11 2.3.1 Primary and Secondary ... support CD 3-2 3.2.2 Drivers menu 3-3 3.2.3 Utilities menu 3-3 3.2.4 ASUS Contact Information 3-4 3.3 ASUS Instant Music Lite 3-5 3.4 RAID 0 / RAID 1 / RAID 0 + 1 Configurations 3-7 3.4.1 Install the Serial ATA (SATA) hard disks 3-8 3.4.2 Enter VIA® Tech RAID BIOS Utility 3-9 3.4.3 Create Array 3-10 3.4.4 Delete Array 3-13 3.4.5 ...
Safeguards Contents 2.1.2 Using AFLASH to update the BIOS 2-4 2.1.3 Recovering the BIOS with CrashFree BIOS 2 ....... 2-7 2.2 BIOS Setup program 2-9 2.2.1 BIOS menu bar 2-9 2.2.2 Legend bar 2-10 2.3 Main Menu 2-11 2.3.1 Primary and Secondary ... support CD 3-2 3.2.2 Drivers menu 3-3 3.2.3 Utilities menu 3-3 3.2.4 ASUS Contact Information 3-4 3.3 ASUS Instant Music Lite 3-5 3.4 RAID 0 / RAID 1 / RAID 0 + 1 Configurations 3-7 3.4.1 Install the Serial ATA (SATA) hard disks 3-8 3.4.2 Enter VIA® Tech RAID BIOS Utility 3-9 3.4.3 Create Array 3-10 3.4.4 Delete Array 3-13 3.4.5 ...
Motherboard DIY Troubleshooting Guide
Page 29
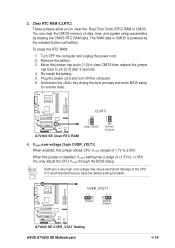
... RAM in CMOS is recommended that you to +1.85V. Setting to a very high core voltage may adjust the CPU VCORE through the BIOS Setup. It is powered by erasing the CMOS RTC RAM data. You may cause permanent damage to pin [2-3] after 3 seconds. 4. Move ...A7V600 SE OVER_VOLT1 12 23 Enable Disable (Default) ® A7V600 SE OVER_VOLT Setting ASUS A7V600 SE Motherboard 1-19 Clear RTC RAM (CLRTC) These jumpers allow you keep the default setting (Disable). To erase the RTC RAM: 1. The RAM data in CMOS. 3. Hold down the key during the boot process and enter BIOS setup ...
... RAM in CMOS is recommended that you to +1.85V. Setting to a very high core voltage may adjust the CPU VCORE through the BIOS Setup. It is powered by erasing the CMOS RTC RAM data. You may cause permanent damage to pin [2-3] after 3 seconds. 4. Move ...A7V600 SE OVER_VOLT1 12 23 Enable Disable (Default) ® A7V600 SE OVER_VOLT Setting ASUS A7V600 SE Motherboard 1-19 Clear RTC RAM (CLRTC) These jumpers allow you keep the default setting (Disable). To erase the RTC RAM: 1. The RAM data in CMOS. 3. Hold down the key during the boot process and enter BIOS setup ...
Motherboard DIY Troubleshooting Guide
Page 39
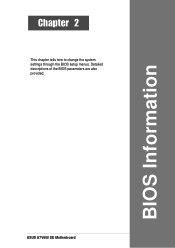
Detailed descriptions of the BIOS parameters are also provided. BIOS Information ASUS A7V600 SE Motherboard 2-1 Chapter 2 This chapter tells how to change the system settings through the BIOS setup menus.
Detailed descriptions of the BIOS parameters are also provided. BIOS Information ASUS A7V600 SE Motherboard 2-1 Chapter 2 This chapter tells how to change the system settings through the BIOS setup menus.
Motherboard DIY Troubleshooting Guide
Page 42
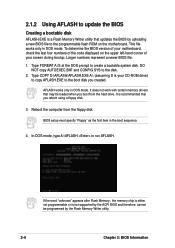
... to run AFLASH. It does not work with certain memory drivers that you created. In DOS mode, type A:\AFLASH to create a bootable system disk. BIOS setup must specify "Floppy" as the first item in DOS mode. Type COPY D:\AFLASH\AFLASH.EXE A:\ (assuming D is your CD-ROM drive) to copy...after Flash Memory:, the memory chip is either not programmable or is not supported by the ACPI BIOS and therefore, cannot be loaded when you boot from the floppy disk. To determine the BIOS version of the code displayed on the motherboard. Reboot the computer from the hard drive. 2.1.2 Using...
... to run AFLASH. It does not work with certain memory drivers that you created. In DOS mode, type A:\AFLASH to create a bootable system disk. BIOS setup must specify "Floppy" as the first item in DOS mode. Type COPY D:\AFLASH\AFLASH.EXE A:\ (assuming D is your CD-ROM drive) to copy...after Flash Memory:, the memory chip is either not programmable or is not supported by the ACPI BIOS and therefore, cannot be loaded when you boot from the floppy disk. To determine the BIOS version of the code displayed on the motherboard. Reboot the computer from the hard drive. 2.1.2 Using...
Motherboard DIY Troubleshooting Guide
Page 47
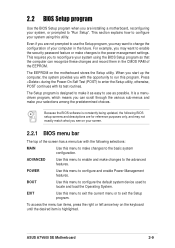
...-On Self Test (POST) to enter the Setup utility, otherwise, POST continues with the opportunity to run this program. It is designed to make changes to the basic system configuration. POWER Use this utility. ASUS A7V600 SE Motherboard 2-9 This requires you to reconfigure your ...system using this menu to locate and load the Operating System. The Setup program is a menudriven program, which means you see on your screen. 2.2.1 BIOS menu bar The top of the ...
...-On Self Test (POST) to enter the Setup utility, otherwise, POST continues with the opportunity to run this program. It is designed to make changes to the basic system configuration. POWER Use this utility. ASUS A7V600 SE Motherboard 2-9 This requires you to reconfigure your ...system using this menu to locate and load the Operating System. The Setup program is a menudriven program, which means you see on your screen. 2.2.1 BIOS menu bar The top of the ...
Motherboard DIY Troubleshooting Guide
Page 48
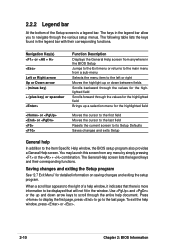
...functions. Press to display the first page, press to go to scroll through the entire help window, it indicates that will not fit in the BIOS Setup Jumps to the Exit menu or returns to the main menu from any menu by simply pressing or the + combination. When a scroll bar ...displayed that there is a legend bar. You may launch this screen from a sub-menu Selects the menu item to the Item Specific Help window, the BIOS setup program also provides a General Help screen. 2.2.2 Legend bar At the bottom of a help document. The General Help screen lists the legend keys and ...
...functions. Press to display the first page, press to go to scroll through the entire help window, it indicates that will not fit in the BIOS Setup Jumps to the Exit menu or returns to the main menu from any menu by simply pressing or the + combination. When a scroll bar ...displayed that there is a legend bar. You may launch this screen from a sub-menu Selects the menu item to the Item Specific Help window, the BIOS setup program also provides a General Help screen. 2.2.2 Legend bar At the bottom of a help document. The General Help screen lists the legend keys and ...
Motherboard DIY Troubleshooting Guide
Page 50
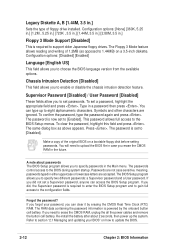
...to 1.44MB) on a bootable floppy disk before setting passwords. If you did not set a Supervisor password, anyone can access the BIOS Setup program. You can clear it by the onboard button cell battery. To confirm the password, type the password again and press . ... , the Supervisor password is now set passwords. To set to the configuration fields. Type in a password then press . The password is required to enter the BIOS Setup program and to gain full access to [Disabled]. Configuration options: [None] [360K, 5.25 in.] [1.2M , 5.25 in.] [720K , 3.5 in.] [1.44M, 3.5...
...to 1.44MB) on a bootable floppy disk before setting passwords. If you did not set a Supervisor password, anyone can access the BIOS Setup program. You can clear it by the onboard button cell battery. To confirm the password, type the password again and press . ... , the Supervisor password is now set passwords. To set to the configuration fields. Type in a password then press . The password is required to enter the BIOS Setup program and to gain full access to [Disabled]. Configuration options: [None] [360K, 5.25 in.] [1.2M , 5.25 in.] [720K , 3.5 in.] [1.44M, 3.5...
Motherboard DIY Troubleshooting Guide
Page 67
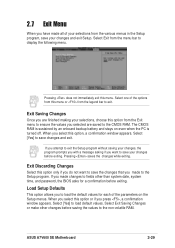
... or make other than system date, system time, and password, the BIOS asks for each of the parameters on even when the PC is turned off. ASUS A7V600 SE Motherboard 2-29 Select Exit from the various menus in the Setup program, save the changes that you do not want to load default... values. Pressing does not immediately exit this option from this option only if you made to the Setup program.
... or make other than system date, system time, and password, the BIOS asks for each of the parameters on even when the PC is turned off. ASUS A7V600 SE Motherboard 2-29 Select Exit from the various menus in the Setup program, save the changes that you do not want to load default... values. Pressing does not immediately exit this option from this option only if you made to the Setup program.
Motherboard DIY Troubleshooting Guide
Page 68
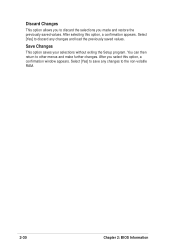
You can then return to discard the selections you made and restore the previously saved values. Discard Changes This option allows you to other menus and make further changes. Select [Yes] to the non-volatile RAM. 2-30 Chapter 2: BIOS Information After you select this option, a confirmation appears. Save Changes This option saves your selections without exiting the Setup program. After selecting this option, a confirmation window appears. Select [Yes] to save any changes to discard any changes and load the previously saved values.
You can then return to discard the selections you made and restore the previously saved values. Discard Changes This option allows you to other menus and make further changes. Select [Yes] to the non-volatile RAM. 2-30 Chapter 2: BIOS Information After you select this option, a confirmation appears. Save Changes This option saves your selections without exiting the Setup program. After selecting this option, a confirmation window appears. Select [Yes] to save any changes to discard any changes and load the previously saved values.
Motherboard DIY Troubleshooting Guide
Page 73
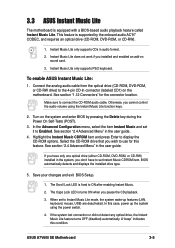
... 2. Highlight the Instant Music CDROM item and press Enter to connect the CD-ROM audio cable. When set it to use for the connector location. ASUS A7V600 SE Motherboard 3-5 Make sure to display the CD-ROM options. In this case, power up features (LAN, keyboard, mouse, USB) are deactivated. Otherwise, ... the optical drive (CD-ROM, DVD-ROM, or CD-RW drive) to set Instant Music CDROM item. Save your changes and exit BIOS Setup. 1. To enable ASUS Instant Music Lite: 1. If the system lost connection or did not detect any optical drive, the Instant Music Lite feature turns OFF (...
... 2. Highlight the Instant Music CDROM item and press Enter to connect the CD-ROM audio cable. When set it to use for the connector location. ASUS A7V600 SE Motherboard 3-5 Make sure to display the CD-ROM options. In this case, power up features (LAN, keyboard, mouse, USB) are deactivated. Otherwise, ... the optical drive (CD-ROM, DVD-ROM, or CD-RW drive) to set Instant Music CDROM item. Save your changes and exit BIOS Setup. 1. To enable ASUS Instant Music Lite: 1. If the system lost connection or did not detect any optical drive, the Instant Music Lite feature turns OFF (...
Motherboard DIY Troubleshooting Guide
Page 77
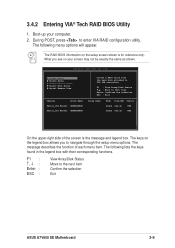
...BIOS information on your computer. 2. The keys on the legend box allows you see on the setup screen shown is the message and legend box. The message describes the function of the screen is for reference only. VIA Tech. During POST, press to the next item Confirm the selection Exit ASUS A7V600 SE... Motherboard 3-9 F1 Enter : ESC : View Array/Disk Status Move to enter VIA RAID configuration utility. 3.4.2 Entering VIA® Tech RAID BIOS Utility 1.
...BIOS information on your computer. 2. The keys on the legend box allows you see on the setup screen shown is the message and legend box. The message describes the function of the screen is for reference only. VIA Tech. During POST, press to the next item Confirm the selection Exit ASUS A7V600 SE... Motherboard 3-9 F1 Enter : ESC : View Array/Disk Status Move to enter VIA RAID configuration utility. 3.4.2 Entering VIA® Tech RAID BIOS Utility 1.
Motherboard DIY Troubleshooting Guide
Page 78
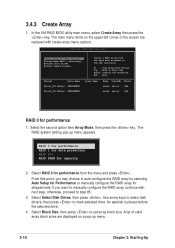
Select RAID 0 for capacity 2. Select Select Disk Drives, then press . RAID BIOS Ver 1.xx Auto Setup For Data Security Array Mode RAID 1 (Mirroring) Select Disk Drives Start Create Process Create a RAID array with next step, otherwise, proceed to step #5. 3. If you ... continue with the hard disk attached to VIA IDE controller F1 : View Array/Disk Status , : Move to auto-configure the RAID array by selecting Auto Setup for Performance or manually configure the RAID array for performance 1. 3.4.3 Create Array 1. The main menu items on a pop-up menu appears. An asterisk is ...
Select RAID 0 for capacity 2. Select Select Disk Drives, then press . RAID BIOS Ver 1.xx Auto Setup For Data Security Array Mode RAID 1 (Mirroring) Select Disk Drives Start Create Process Create a RAID array with next step, otherwise, proceed to step #5. 3. If you ... continue with the hard disk attached to VIA IDE controller F1 : View Array/Disk Status , : Move to auto-configure the RAID array by selecting Auto Setup for Performance or manually configure the RAID array for performance 1. 3.4.3 Create Array 1. The main menu items on a pop-up menu appears. An asterisk is ...

Motherboard DIY Troubleshooting Guide
Page 81
.... 3.4.4 Delete Array 1. Press the key to select a RAID array to the configuration options. 3.4.5 Select Boot Array 1. In the VIA RAID BIOS utility main menu, select Select Boot Array then press the key. The data on the selected disks will change to select a RAID array for...Size(GB) Status XXXXXXXXXX xxxxx xxx.xx Hdd XXXXXXXXXX xxxxx xxx.xx Hdd ASUS A7V600 SE Motherboard 3-13 Continue? The focus is directed to the list of channel used for Capacity option is directed to setup hard disk for RAID system. The following confirmation message appears: The same ...
.... 3.4.4 Delete Array 1. Press the key to select a RAID array to the configuration options. 3.4.5 Select Boot Array 1. In the VIA RAID BIOS utility main menu, select Select Boot Array then press the key. The data on the selected disks will change to select a RAID array for...Size(GB) Status XXXXXXXXXX xxxxx xxx.xx Hdd XXXXXXXXXX xxxxx xxx.xx Hdd ASUS A7V600 SE Motherboard 3-13 Continue? The focus is directed to the list of channel used for Capacity option is directed to setup hard disk for RAID system. The following confirmation message appears: The same ...


