Motherboard DIY Troubleshooting Guide
Page 1
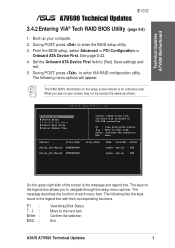
... menu options will appear. RAID BIOS Ver 1.XX Create Array Delete Array Create/Delete Spare Select Boot Array Serial Number View Channel Drive Name Serial_Ch0 Master XXXXXXXXXX Serial_Ch1 Master XXXXXXXXXX Create a RAID array with their corresponding functions. Boot-up your screen may not be exactly the same as shown. Set the Onboard ATA Device First field to enter VIA RAID configuration utility. Save settings and exit. 5. The following lists the keys...
... menu options will appear. RAID BIOS Ver 1.XX Create Array Delete Array Create/Delete Spare Select Boot Array Serial Number View Channel Drive Name Serial_Ch0 Master XXXXXXXXXX Serial_Ch1 Master XXXXXXXXXX Create a RAID array with their corresponding functions. Boot-up your screen may not be exactly the same as shown. Set the Onboard ATA Device First field to enter VIA RAID configuration utility. Save settings and exit. 5. The following lists the keys...
A7V600 User Manual
Page 4
... Configuration 2-18 2.4.2 I/O Device Configuration 2-20 2.4.3 PCI Configuration 2-22 2.5 Power Menu 2-23 2.5.1 Power Up Control 2-25 2.5.2 Hardware Monitor 2-26 2.6 Boot Menu 2-27 2.7 Exit Menu 2-29 Chapter 3: Software support 3.1 Install an operating system 3-2 3.2 Support CD information 3-2 3.2.1 Running the support CD 3-2 3.2.2 Drivers menu 3-3 3.2.3 Utilities menu 3-3 3.2.4 ASUS Contact Information 3-4 3.3 ASUS Instant Music Lite 3-5 3.4 RAID 0 / RAID 1 / RAID 0 + 1 Configurations 3-7 3.4.1 Install the Serial ATA (SATA) hard disks 3-8 3.4.2 Enter VIA® Tech RAID BIOS...
... Configuration 2-18 2.4.2 I/O Device Configuration 2-20 2.4.3 PCI Configuration 2-22 2.5 Power Menu 2-23 2.5.1 Power Up Control 2-25 2.5.2 Hardware Monitor 2-26 2.6 Boot Menu 2-27 2.7 Exit Menu 2-29 Chapter 3: Software support 3.1 Install an operating system 3-2 3.2 Support CD information 3-2 3.2.1 Running the support CD 3-2 3.2.2 Drivers menu 3-3 3.2.3 Utilities menu 3-3 3.2.4 ASUS Contact Information 3-4 3.3 ASUS Instant Music Lite 3-5 3.4 RAID 0 / RAID 1 / RAID 0 + 1 Configurations 3-7 3.4.1 Install the Serial ATA (SATA) hard disks 3-8 3.4.2 Enter VIA® Tech RAID BIOS...
A7V600 User Manual
Page 9
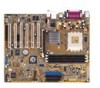
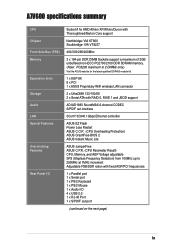
A7V600 specifications summary CPU Chipset Front Side Bus (FSB) Memory Expansion slots Storage Audio LAN Special Features Overclocking Features Rear Panel I/O Socket A for AMD Athlon XP/Athlon/Duron with Thoroughbred/Barton Core support Northbridge: VIA KT600 Southbridge: VIA VT8237 400/333/266/200Mhz 3 x 184-pin DDR DIMM Sockets support a maximum of 3GB unbuffered non-ECC PC2700/2100 DDR SDRAM memory. (Note: PC3200 maximum to 2 DIMMs only.) Visit the ASUS website for the...
A7V600 specifications summary CPU Chipset Front Side Bus (FSB) Memory Expansion slots Storage Audio LAN Special Features Overclocking Features Rear Panel I/O Socket A for AMD Athlon XP/Athlon/Duron with Thoroughbred/Barton Core support Northbridge: VIA KT600 Southbridge: VIA VT8237 400/333/266/200Mhz 3 x 184-pin DDR DIMM Sockets support a maximum of 3GB unbuffered non-ECC PC2700/2100 DDR SDRAM memory. (Note: PC3200 maximum to 2 DIMMs only.) Visit the ASUS website for the...

A7V600 User Manual
Page 14
... speeds up to overclocking. The higher bandwidth of USB 2.0 allows connection of the CPU parameters. eliminates the need to buy a replacement ROM chip. ASUS EZ Flash BIOS With the ASUS EZ Flash, you to playback audio files even without booting the system to Windows™. ASUS C.P.R. (CPU Parameter Recall) The C.P.R. S/PDIF out port on Rear Panel I/O The A7V600 provides convenient connectivity to open the system chassis and clear the RTC data. ASUS Q-Fan feature The ASUS Q-Fan technology smartly adjusts the fan speeds...
... speeds up to overclocking. The higher bandwidth of USB 2.0 allows connection of the CPU parameters. eliminates the need to buy a replacement ROM chip. ASUS EZ Flash BIOS With the ASUS EZ Flash, you to playback audio files even without booting the system to Windows™. ASUS C.P.R. (CPU Parameter Recall) The C.P.R. S/PDIF out port on Rear Panel I/O The A7V600 provides convenient connectivity to open the system chassis and clear the RTC data. ASUS Q-Fan feature The ASUS Q-Fan technology smartly adjusts the fan speeds...
A7V600 User Manual
Page 15
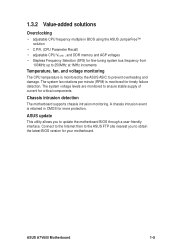
...at 1MHz increments Temperature, fan, and voltage monitoring The CPU temperature is monitored for more protection. ASUS A7V600 Motherboard 1-5 Chassis intrusion detection The motherboard supports chassis intrusion monitoring. ASUS update This utility allows you to update the motherboard BIOS through a user-friendly interface. The system fan rotations per minute (RPM) is monitored by the ASUS ASIC to ensure stable supply of current for critical components. 1.3.2 Value-added solutions Overclocking • adjustable CPU frequency multiple in CMOS for timely failure detection.
...at 1MHz increments Temperature, fan, and voltage monitoring The CPU temperature is monitored for more protection. ASUS A7V600 Motherboard 1-5 Chassis intrusion detection The motherboard supports chassis intrusion monitoring. ASUS update This utility allows you to update the motherboard BIOS through a user-friendly interface. The system fan rotations per minute (RPM) is monitored by the ASUS ASIC to ensure stable supply of current for critical components. 1.3.2 Value-added solutions Overclocking • adjustable CPU frequency multiple in CMOS for timely failure detection.
A7V600 User Manual
Page 17
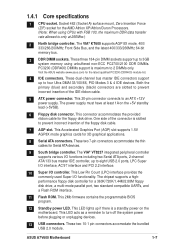
...the commonly used Super I /O controller. The chipset supports a highperformance floppy disk controller for the floppy disk drive. This 2Mb firmware contains the programmable BIOS program. 12 Standby power LED. ASUS A7V600 Motherboard 1-7 1.4.1 Core specifications 1 CPU socket. Socket 462 (Socket A) surface mount, Zero Insertion Force (ZIF) socket for the latest qualified PC3200 (DDR400) module list. 4 IDE connectors. The power supply must have at 266Mhz.) 2 North bridge controller. This Accelerated Graphics Port (AGP) slot supports 1.5V AGP8X mode graphics cards for Serial ATA devices...
...the commonly used Super I /O controller. The chipset supports a highperformance floppy disk controller for the floppy disk drive. This 2Mb firmware contains the programmable BIOS program. 12 Standby power LED. ASUS A7V600 Motherboard 1-7 1.4.1 Core specifications 1 CPU socket. Socket 462 (Socket A) surface mount, Zero Insertion Force (ZIF) socket for the latest qualified PC3200 (DDR400) module list. 4 IDE connectors. The power supply must have at 266Mhz.) 2 North bridge controller. This Accelerated Graphics Port (AGP) slot supports 1.5V AGP8X mode graphics cards for Serial ATA devices...
A7V600 User Manual
Page 18
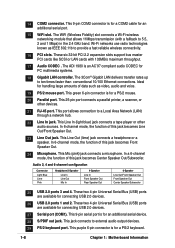
...-bit PCI 2.2 expansion slots support bus master PCI cards like SCSI or LAN cards with a fallback to 5.5, 2 and 1 Mbps) in the 2.4 GHz band. This Line Out (lime) jack connects a headphone or a speaker. Ideal for connecting USB 2.0 devices. 26 USB 2.0 ports 1 and 2. This 9-pin serial port is for a COM2 cable for an additional serial device. 28 S/PDIF out jack. This 9-pin COM2 connector is for an additional serial port. 15 WiFi slot. This Mic (pink) jack connects a microphone. In a 6-channel mode...
...-bit PCI 2.2 expansion slots support bus master PCI cards like SCSI or LAN cards with a fallback to 5.5, 2 and 1 Mbps) in the 2.4 GHz band. This Line Out (lime) jack connects a headphone or a speaker. Ideal for connecting USB 2.0 devices. 26 USB 2.0 ports 1 and 2. This 9-pin serial port is for a COM2 cable for an additional serial device. 28 S/PDIF out jack. This 9-pin COM2 connector is for an additional serial port. 15 WiFi slot. This Mic (pink) jack connects a microphone. In a 6-channel mode...
A7V600 User Manual
Page 24
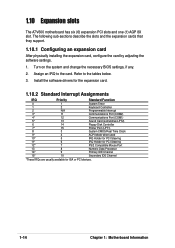
... settings. 1. Install the software drivers for the expansion card. 1.10.2 Standard Interrupt Assignments IRQ Priority Standard Function 0 1 System Timer 1 2 Keyboard Controller 2 N/A Programmable Interrupt 3* 11 Communications Port (COM2) 4* 12 Communications Port (COM1) 5* 13 Sound Card (sometimes LPT2) 6 14 Floppy Disk Controller 7* 15 Printer Port (LPT1) 8 3 System CMOS/Real Time Clock 9* 4 ACPI Mode when used 10* 5 IRQ Holder for PCI Steering 11* 6 IRQ Holder for PCI Steering 12* 7 PS/2 Compatible Mouse Port 13 8 Numeric Data Processor...
... settings. 1. Install the software drivers for the expansion card. 1.10.2 Standard Interrupt Assignments IRQ Priority Standard Function 0 1 System Timer 1 2 Keyboard Controller 2 N/A Programmable Interrupt 3* 11 Communications Port (COM2) 4* 12 Communications Port (COM1) 5* 13 Sound Card (sometimes LPT2) 6 14 Floppy Disk Controller 7* 15 Printer Port (LPT1) 8 3 System CMOS/Real Time Clock 9* 4 ACPI Mode when used 10* 5 IRQ Holder for PCI Steering 11* 6 IRQ Holder for PCI Steering 12* 7 PS/2 Compatible Mouse Port 13 8 Numeric Data Processor...
A7V600 User Manual
Page 27
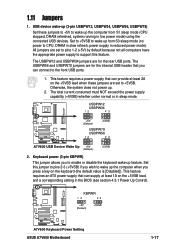
... 23 A7V600 USB Device Wake Up +5V (Default) +5VSB 2. The USBPW12 and USBPW34 jumpers are for the internal USB header that you to enable or disable the keyboard wake-up (3-pin USBPW12, USBPW34, USBPW56, USBPW78) Set these jumpers are set to +5VSB. Keyboard power (3-pin KBPWR) This jumper allows you can connect to CPU, DRAM in slow refresh, power supply in low power mode) using the connected USB devices. 1.11 Jumpers 1. Set to +5VSB to wake up the computer from S3 sleep mode (no power to the front USB ports...
... 23 A7V600 USB Device Wake Up +5V (Default) +5VSB 2. The USBPW12 and USBPW34 jumpers are for the internal USB header that you to enable or disable the keyboard wake-up (3-pin USBPW12, USBPW34, USBPW56, USBPW78) Set these jumpers are set to +5VSB. Keyboard power (3-pin KBPWR) This jumper allows you can connect to CPU, DRAM in slow refresh, power supply in low power mode) using the connected USB devices. 1.11 Jumpers 1. Set to +5VSB to wake up the computer from S3 sleep mode (no power to the front USB ports...
A7V600 User Manual
Page 28
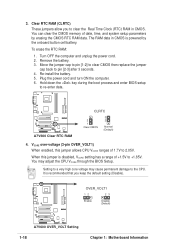
You can clear the CMOS memory of date, time, and system setup parameters by the onboard button cell battery. Remove the battery. 3. Re-install the battery. 5. Plug the power cord and turn ON the computer. 6. Setting to a very high core voltage may adjust the CPU VCORE through the BIOS Setup. To erase the RTC RAM: 1. Turn OFF the computer and unplug the power cord. 2. VCORE over-voltage (3-pin OVER_VOLT1) When enabled, this jumper is disabled, VCORE setting has a range of 1.7V...
You can clear the CMOS memory of date, time, and system setup parameters by the onboard button cell battery. Remove the battery. 3. Re-install the battery. 5. Plug the power cord and turn ON the computer. 6. Setting to a very high core voltage may adjust the CPU VCORE through the BIOS Setup. To erase the RTC RAM: 1. Turn OFF the computer and unplug the power cord. 2. VCORE over-voltage (3-pin OVER_VOLT1) When enabled, this jumper is disabled, VCORE setting has a range of 1.7V...
A7V600 User Manual
Page 29
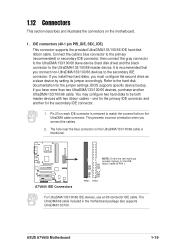
... the jumper settings. Refer to the UltraDMA/133/100/66 master device. Pin 20 on the UltraDMA cable connector. Connect the cable's blue connector to the primary (recommended) or secondary IDE connector, then connect the gray connector to the UltraDMA/133/100/66 slave device (hard disk drive) and the black connector to the hard disk documentation for the secondary IDE connector. 1. BIOS supports specific device bootup. ASUS A7V600 Motherboard 1-19 A7V600 PRI_IDE SEC_IDE ® A7V600 IDE Connectors PIN 1 PIN 1 For UltraDMA/133/100/66 IDE devices, use...
... the jumper settings. Refer to the UltraDMA/133/100/66 master device. Pin 20 on the UltraDMA cable connector. Connect the cable's blue connector to the primary (recommended) or secondary IDE connector, then connect the gray connector to the UltraDMA/133/100/66 slave device (hard disk drive) and the black connector to the hard disk documentation for the secondary IDE connector. 1. BIOS supports specific device bootup. ASUS A7V600 Motherboard 1-19 A7V600 PRI_IDE SEC_IDE ® A7V600 IDE Connectors PIN 1 PIN 1 For UltraDMA/133/100/66 IDE devices, use...
A7V600 User Manual
Page 48
... can access the BIOS Setup program. Refer to support older Japanese floppy drives. Type in .] Floppy 3 Mode Support [Disabled] This is required to section "2.1 Managing and updating your password, you forget your BIOS" on a bootable floppy disk before setting passwords. This password allows full access to enable or disable the chassis intrusion detection feature. You will need to upload the BIOS file in case you need to erase the CMOS RAM, unplug the all the power cables and remove the button cell battery. Passwords...
... can access the BIOS Setup program. Refer to support older Japanese floppy drives. Type in .] Floppy 3 Mode Support [Disabled] This is required to section "2.1 Managing and updating your password, you forget your BIOS" on a bootable floppy disk before setting passwords. This password allows full access to enable or disable the chassis intrusion detection feature. You will need to upload the BIOS file in case you need to erase the CMOS RAM, unplug the all the power cables and remove the button cell battery. Passwords...
A7V600 User Manual
Page 50
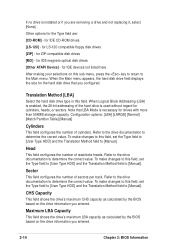
for ZIP-compatible disk drives [MO] - When the Main menu appears, the hard disk drive field displays the size for the hard disk drive that LBA Mode is necessary for IDE CD-ROM drives [LS-120] - for LS-120 compatible floppy disk drives [ZIP] - for the Type field are removing a drive and not replacing it, select [None]. Configuration options: [LBA] [LARGE] [Normal] [Match Partition Table] [Manual] Cylinders This field configures the number of read/write heads. Maximum LBA Capacity This...
for ZIP-compatible disk drives [MO] - When the Main menu appears, the hard disk drive field displays the size for the hard disk drive that LBA Mode is necessary for IDE CD-ROM drives [LS-120] - for LS-120 compatible floppy disk drives [ZIP] - for the Type field are removing a drive and not replacing it, select [None]. Configuration options: [LBA] [LARGE] [Normal] [Match Partition Table] [Manual] Cylinders This field configures the number of read/write heads. Maximum LBA Capacity This...
A7V600 User Manual
Page 51
... controls the speed at which the system registers repeated keystrokes. Configuration options: [6/Sec] [8/Sec] [10/Sec] [12/Sec] [15/Sec] [20/Sec] [24/Sec] [30/Sec] ASUS A7V600 Motherboard 2-15 To make changes to enable or disable the S.M.A.R.T. (Self-Monitoring, Analysis and Reporting Technology) system that the drive supports. Configuration options: [Disabled] [2 Sectors] [4 Sectors] [8 Sectors] [16 Sectors] [32 Sectors] [Maximum] SMART Monitoring [Disabled] This field allows you set the Type field to [User Type HDD...
... controls the speed at which the system registers repeated keystrokes. Configuration options: [6/Sec] [8/Sec] [10/Sec] [12/Sec] [15/Sec] [20/Sec] [24/Sec] [30/Sec] ASUS A7V600 Motherboard 2-15 To make changes to enable or disable the S.M.A.R.T. (Self-Monitoring, Analysis and Reporting Technology) system that the drive supports. Configuration options: [Disabled] [2 Sectors] [4 Sectors] [8 Sectors] [16 Sectors] [32 Sectors] [Maximum] SMART Monitoring [Disabled] This field allows you set the Type field to [User Type HDD...

A7V600 User Manual
Page 53
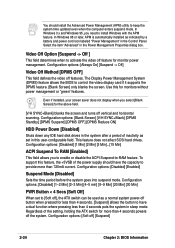
...be changed at startup. If not detected, the USB controller legacy mode is enabled. If a mouse is detected at JmpreFree mode, otherwise keep [Auto]. When you set this field to [Disabled], the USB controller legacy mode is fastest, just make sure the DRAM has the ability to the PS/2 mouse. Configuration options: [Disabled] [Enabled] ASUS A7V600 Motherboard 2-17 AGP Voltage [Auto] This item controls the AGP operating voltage. Configuration options: [1.8V] [1.7V] [1.6V] [1.5V] [Auto] DRAM Voltage [Auto] This item controls the DRAM operating voltage. Configuration options...
...be changed at startup. If not detected, the USB controller legacy mode is enabled. If a mouse is detected at JmpreFree mode, otherwise keep [Auto]. When you set this field to [Disabled], the USB controller legacy mode is fastest, just make sure the DRAM has the ability to the PS/2 mouse. Configuration options: [Disabled] [Enabled] ASUS A7V600 Motherboard 2-17 AGP Voltage [Auto] This item controls the AGP operating voltage. Configuration options: [1.8V] [1.7V] [1.6V] [1.5V] [Auto] DRAM Voltage [Auto] This item controls the DRAM operating voltage. Configuration options...
A7V600 User Manual
Page 58
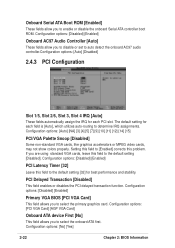
... 2: BIOS Information The default setting for each PCI slot. If you are using standard VGA cards, leave this field to enable or disable the onboard Serial ATA controller boot ROM. Configuration options: [Auto] [NA] [3] [4] [5] [7] [9] [10] [11] [12] [14] [15] PCI/VGA Palette Snoop [Disabled] Some non-standard VGA cards, like graphics accelerators or MPEG video cards, may not show colors properly. Configuration options: [PCI VGA Card] [AGP VGA Card] Onboard ATA device First [No] This field allows you to the default setting [Disabled]. Configuration options: [Disabled] [Enabled] PCI...
... 2: BIOS Information The default setting for each PCI slot. If you are using standard VGA cards, leave this field to enable or disable the onboard Serial ATA controller boot ROM. Configuration options: [Auto] [NA] [3] [4] [5] [7] [9] [10] [11] [12] [14] [15] PCI/VGA Palette Snoop [Disabled] Some non-standard VGA cards, like graphics accelerators or MPEG video cards, may not show colors properly. Configuration options: [PCI VGA Card] [AGP VGA Card] Onboard ATA device First [No] This field allows you to the default setting [Disabled]. Configuration options: [Disabled] [Enabled] PCI...
A7V600 User Manual
Page 60
... Control Panel. You should have a dual function where pressing less than 720mA current. The Display Power Management System (DPMS) feature allows the BIOS to -RAM feature. Use this user-configurable field. This feature does not affect SCSI hard drives. Configuration options: [Disabled] [1 Min] [2 Min] [3 Min]...[15 Min] ACPI Suspend To RAM [Enabled] This field allows you to enable or disable the ACPI Suspend-to control the video display card if it supports the DPMS feature. [Blank Screen...
... Control Panel. You should have a dual function where pressing less than 720mA current. The Display Power Management System (DPMS) feature allows the BIOS to -RAM feature. Use this user-configurable field. This feature does not affect SCSI hard drives. Configuration options: [Disabled] [1 Min] [2 Min] [3 Min]...[15 Min] ACPI Suspend To RAM [Enabled] This field allows you to enable or disable the ACPI Suspend-to control the video display card if it supports the DPMS feature. [Blank Screen...
A7V600 User Manual
Page 64
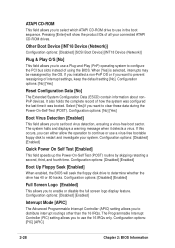
... settings, keep the default setting [No]. If you installed a non-PnP OS or if you want to determine whether the drive has 40 or 80 tracks. Configuration options: [No] [Yes] Reset Configuration Data [No] The Extended System Configuration Data (ESCD) contain information about nonPnP devices. Pressing [Enter] will seek the floppy disk drive to clear these data during the Power-On-Self-Test (POST). Other Boot Device [INT18 Device (Network)] Configuration options: [Disabled] [SCSI Boot Device] [INT18 Device (Network)] Plug...
... settings, keep the default setting [No]. If you installed a non-PnP OS or if you want to determine whether the drive has 40 or 80 tracks. Configuration options: [No] [Yes] Reset Configuration Data [No] The Extended System Configuration Data (ESCD) contain information about nonPnP devices. Pressing [Enter] will seek the floppy disk drive to clear these data during the Power-On-Self-Test (POST). Other Boot Device [INT18 Device (Network)] Configuration options: [Disabled] [SCSI Boot Device] [INT18 Device (Network)] Plug...
A7V600 User Manual
Page 69
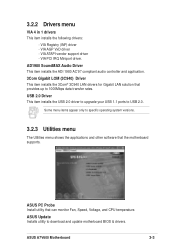
... download and update motherboard BIOS & drivers. 3.2.2 Drivers menu VIA 4 in 1 drivers This item installs the following drivers: - VIA AGP VxD driver - AD1980 SoundMAX Audio Driver This item installs the ADI 1980 AC'97 compliant audio controller and application. 3Com Gigabit LOM (3C940) Driver This item installs the 3Com® 3C940 LAN drivers for Gigabit LAN solution that provides up to specific operating system versions. 3.2.3 Utilities menu The Utilities menu shows the applications and other software that can monitor Fan, Speed, Voltage, and CPU temperature. ASUS A7V600...
... download and update motherboard BIOS & drivers. 3.2.2 Drivers menu VIA 4 in 1 drivers This item installs the following drivers: - VIA AGP VxD driver - AD1980 SoundMAX Audio Driver This item installs the ADI 1980 AC'97 compliant audio controller and application. 3Com Gigabit LOM (3C940) Driver This item installs the 3Com® 3C940 LAN drivers for Gigabit LAN solution that provides up to specific operating system versions. 3.2.3 Utilities menu The Utilities menu shows the applications and other software that can monitor Fan, Speed, Voltage, and CPU temperature. ASUS A7V600...
A7V600 User Manual
Page 71
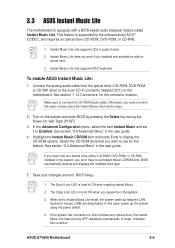
...). 1. ASUS A7V600 Motherboard 3-5 Connect the analog audio cable from the optical drive (CD-ROM, DVD-ROM, or CD-RW drive) to ON after enabling Instant Music. 2. Make sure to Enabled. In the Advanced Configuration menu, select the item Instant Music and set Instant Music CDROM item. Instant Music Lite only supports CDs in the user guide. Otherwise, you cannot control the audio volume using the power switch. 4. BIOS automatically detects and displays the installed drive type. 5. The Caps Lock LED...
...). 1. ASUS A7V600 Motherboard 3-5 Connect the analog audio cable from the optical drive (CD-ROM, DVD-ROM, or CD-RW drive) to ON after enabling Instant Music. 2. Make sure to Enabled. In the Advanced Configuration menu, select the item Instant Music and set Instant Music CDROM item. Instant Music Lite only supports CDs in the user guide. Otherwise, you cannot control the audio volume using the power switch. 4. BIOS automatically detects and displays the installed drive type. 5. The Caps Lock LED...


