A7V600 User Manual
Page 2
... reproduced, transmitted, transcribed, stored in a retrieval system, or translated into any means, except documentation kept by ASUS; ii SPECIFICATIONS AND INFORMATION CONTAINED IN THIS MANUAL ARE FURNISHED FOR INFORMATIONAL USE ONLY, AND ARE SUBJECT TO CHANGE AT ANY TIME WITHOUT NOTICE, AND SHOULD NOT...for backup purposes, without intent to the owners' benefit, without the express written permission of alteration is defaced or missing. ASUS PROVIDES THIS MANUAL "AS IS" WITHOUT WARRANTY OF ANY KIND, EITHER EXPRESS OR IMPLIED, INCLUDING BUT NOT LIMITED TO THE IMPLIED WARRANTIES OR ...
... reproduced, transmitted, transcribed, stored in a retrieval system, or translated into any means, except documentation kept by ASUS; ii SPECIFICATIONS AND INFORMATION CONTAINED IN THIS MANUAL ARE FURNISHED FOR INFORMATIONAL USE ONLY, AND ARE SUBJECT TO CHANGE AT ANY TIME WITHOUT NOTICE, AND SHOULD NOT...for backup purposes, without intent to the owners' benefit, without the express written permission of alteration is defaced or missing. ASUS PROVIDES THIS MANUAL "AS IS" WITHOUT WARRANTY OF ANY KIND, EITHER EXPRESS OR IMPLIED, INCLUDING BUT NOT LIMITED TO THE IMPLIED WARRANTIES OR ...
A7V600 User Manual
Page 6
If possible, disconnect all the manuals that the power cables for the devices are unplugged before the signal cables are using, contact your local power company. • If the power supply ...
If possible, disconnect all the manuals that the power cables for the devices are unplugged before the signal cables are using, contact your local power company. • If the power supply ...
A7V600 User Manual
Page 7
... the standard package. These documents are listed in this guide To make sure that you MUST follow to complete a task. ASUS Websites The ASUS websites worldwide provide updated information on page viii. 2. NOTE: Tips and additional information to complete a task. WARNING/DANGER: Information... Information on ASUS hardware and software products. Where to find more information Refer to complete a task. About this guide Conventions used throughout this manual. IMPORTANT: Information that may have been added by your dealer. The ASUS websites are not part of the following ...
... the standard package. These documents are listed in this guide To make sure that you MUST follow to complete a task. ASUS Websites The ASUS websites worldwide provide updated information on page viii. 2. NOTE: Tips and additional information to complete a task. WARNING/DANGER: Information... Information on ASUS hardware and software products. Where to find more information Refer to complete a task. About this guide Conventions used throughout this manual. IMPORTANT: Information that may have been added by your dealer. The ASUS websites are not part of the following ...
A7V600 User Manual
Page 36
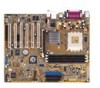
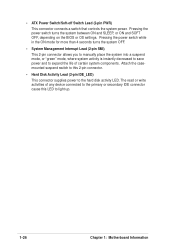
... in the ON mode for more than 4 seconds turns the system OFF. • System Management Interrupt Lead (2-pin SMI) This 2-pin connector allows you to manually place the system into a suspend mode, or "green" mode, where system activity is instantly decreased to save power and to light up. 1-26 Chapter 1: Motherboard...
... in the ON mode for more than 4 seconds turns the system OFF. • System Management Interrupt Lead (2-pin SMI) This 2-pin connector allows you to manually place the system into a suspend mode, or "green" mode, where system activity is instantly decreased to save power and to light up. 1-26 Chapter 1: Motherboard...
A7V600 User Manual
Page 49
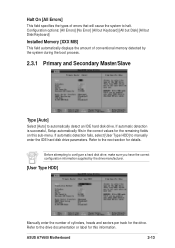
...heads and sectors per track for the drive. If automatic detection fails, select [User Type HDD] to the drive documentation or label for details. ASUS A7V600 Motherboard 2-13 Refer to the next section for this sub-menu. Before attempting to configure a hard disk drive, make sure you have the correct ... Disk/Keyboard] Installed Memory [XXX MB] This field automatically displays the amount of conventional memory detected by the drive manufacturer. [User Type HDD] Manually enter the number of errors that will cause the system to automatically detect an IDE hard disk drive. Refer to...
...heads and sectors per track for the drive. If automatic detection fails, select [User Type HDD] to the drive documentation or label for details. ASUS A7V600 Motherboard 2-13 Refer to the next section for this sub-menu. Before attempting to configure a hard disk drive, make sure you have the correct ... Disk/Keyboard] Installed Memory [XXX MB] This field automatically displays the amount of conventional memory detected by the drive manufacturer. [User Type HDD] Manually enter the number of errors that will cause the system to automatically detect an IDE hard disk drive. Refer to...
A7V600 User Manual
Page 50
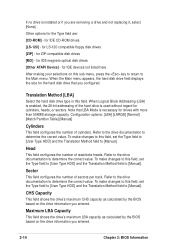
... drive documentation to determine the correct value. Refer to the drive documentation to determine the correct value. To make changes to [Manual]. Maximum LBA Capacity This field shows the drive's maximum LBA capacity as calculated by the BIOS based on the drive information you... configured. Configuration options: [LBA] [LARGE] [Normal] [Match Partition Table] [Manual] Cylinders This field configures the number of read/write heads. Translation Method [LBA] Select the hard disk drive type in this field, set...
... drive documentation to determine the correct value. Refer to the drive documentation to determine the correct value. To make changes to [Manual]. Maximum LBA Capacity This field shows the drive's maximum LBA capacity as calculated by the BIOS based on the drive information you... configured. Configuration options: [LBA] [LARGE] [Normal] [Match Partition Table] [Manual] Cylinders This field configures the number of read/write heads. Translation Method [LBA] Select the hard disk drive type in this field, set...
A7V600 User Manual
Page 51
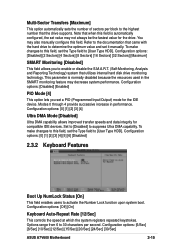
..., the set it manually. Configuration options: [0] [1] [2] [3] [4] [5] [6] [Disabled] 2.3.2 Keyboard Features Boot Up NumLock Status [On] This field enables users to suppress Ultra DMA capability. Configuration options: [6/Sec] [8/Sec] [10/Sec] [12/Sec] [15/Sec] [20/Sec] [24/Sec] [30/Sec] ASUS A7V600 Motherboard 2-15 Configuration options...Type HDD]. To make changes to this field, set the Type field to [User Type HDD]. You may also manually configure this field is normally disabled because the resources used in performance. Refer to determine the optimum value and set...
..., the set it manually. Configuration options: [0] [1] [2] [3] [4] [5] [6] [Disabled] 2.3.2 Keyboard Features Boot Up NumLock Status [On] This field enables users to suppress Ultra DMA capability. Configuration options: [6/Sec] [8/Sec] [10/Sec] [12/Sec] [15/Sec] [20/Sec] [24/Sec] [30/Sec] ASUS A7V600 Motherboard 2-15 Configuration options...Type HDD]. To make changes to this field, set the Type field to [User Type HDD]. You may also manually configure this field is normally disabled because the resources used in performance. Refer to determine the optimum value and set...

A7V600 User Manual
Page 52
... of the CPU installed. The bus frequency (external frequency) multiplied by the bus multiple equals the CPU speed. CPU VCore Setting [Auto] The [Manual] setting allows you to manually select the core voltage supplied to the system bus and PCI bus. This field is not accessible when the CPU VCore Setting is... set to [Manual], the CPU VCore item allows you keep the default setting [Auto] to allow the system to automatically determine the appropriate CPU core voltage. Keyboard Auto...
... of the CPU installed. The bus frequency (external frequency) multiplied by the bus multiple equals the CPU speed. CPU VCore Setting [Auto] The [Manual] setting allows you to manually select the core voltage supplied to the system bus and PCI bus. This field is not accessible when the CPU VCore Setting is... set to [Manual], the CPU VCore item allows you keep the default setting [Auto] to allow the system to automatically determine the appropriate CPU core voltage. Keyboard Auto...
A7V600 User Manual
Page 55
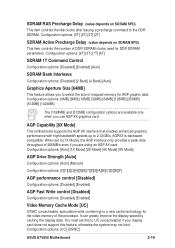
... speeds up to the DDR SDRAM. Configuration options: [Auto] [1X Mode] [2X Mode] [4X Mode] [8X Mode] AGP Drive Strength [Auto] Configuration options: [Auto] [Manual] Configuration options: [0][1][2][3][4][5][6][7][8][9][A][B][C][D][E][F] AGP performance control [Disabled] Configuration options: [Disabled] [Enabled] AGP Fast Write control [Disabled] Configuration options: [Disabled] [Enabled] Video Memory Cache Mode [UC... (value depends on SDRAM SPD) This item controls the number of DDR SDRAM clocks used for AGP graphic data. Configuration options: [UC] [USWC] ASUS A7V600 Motherboard 2-19
... speeds up to the DDR SDRAM. Configuration options: [Auto] [1X Mode] [2X Mode] [4X Mode] [8X Mode] AGP Drive Strength [Auto] Configuration options: [Auto] [Manual] Configuration options: [0][1][2][3][4][5][6][7][8][9][A][B][C][D][E][F] AGP performance control [Disabled] Configuration options: [Disabled] [Enabled] AGP Fast Write control [Disabled] Configuration options: [Disabled] [Enabled] Video Memory Cache Mode [UC... (value depends on SDRAM SPD) This item controls the number of DDR SDRAM clocks used for AGP graphic data. Configuration options: [UC] [USWC] ASUS A7V600 Motherboard 2-19
A7V600 User Manual
Page 76
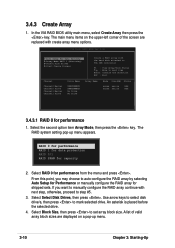
VIA Tech. From this point, you want to manually configure the RAID array continue with the hard disk attached to VIA IDE controller F1 : View Array/Disk Status , : Move to next item Enter: Confirm ... Drives Start Create Process Create a RAID array with next step, otherwise, proceed to auto-configure the RAID array by selecting Auto Setup for Performance or manually configure the RAID array for performance 1. The RAID system setting pop-up menu. 3-10 Chapter 3: Starting-Up The main menu items on a pop-up menu...
VIA Tech. From this point, you want to manually configure the RAID array continue with the hard disk attached to VIA IDE controller F1 : View Array/Disk Status , : Move to next item Enter: Confirm ... Drives Start Create Process Create a RAID array with next step, otherwise, proceed to auto-configure the RAID array by selecting Auto Setup for Performance or manually configure the RAID array for performance 1. The RAID system setting pop-up menu. 3-10 Chapter 3: Starting-Up The main menu items on a pop-up menu...
A7V600 User Manual
Page 77
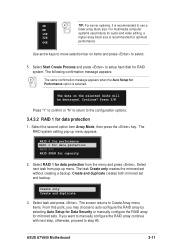
.... Select next task from the menu and press . The screen returns to Create Array menu items. From this point, you want to manually configure the RAID array continue with next step, otherwise, proceed to select. 5. Select Start Create Process and press to move selection bar... recommended to auto-configure the RAID array by selecting Auto Setup for Data Security or manually configure the RAID array for data protection 1. Create and duplicate creates both mirrored set without creating a backup. ASUS A7V600 Motherboard 3-11 If you may choose to use a 8K lower array block size....
.... Select next task from the menu and press . The screen returns to Create Array menu items. From this point, you want to manually configure the RAID array continue with next step, otherwise, proceed to select. 5. Select Start Create Process and press to move selection bar... recommended to auto-configure the RAID array by selecting Auto Setup for Data Security or manually configure the RAID array for data protection 1. Create and duplicate creates both mirrored set without creating a backup. ASUS A7V600 Motherboard 3-11 If you may choose to use a 8K lower array block size....
A7V600 User Manual
Page 78
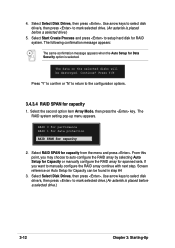
... . Select the second option item Array Mode, then press the key. The RAID system setting pop-up menu appears. If you may choose to manually configure the RAID array continue with next step. 4. From this point, you want to auto-configure the RAID array by selecting Auto Setup for Capacity... or manually configure the RAID array for RAID system. Use arrow keys to select disk drive/s, then press to mark selected drive.(An asterisk is placed before...
... . Select the second option item Array Mode, then press the key. The RAID system setting pop-up menu appears. If you may choose to manually configure the RAID array continue with next step. 4. From this point, you want to auto-configure the RAID array by selecting Auto Setup for Capacity... or manually configure the RAID array for RAID system. Use arrow keys to select disk drive/s, then press to mark selected drive.(An asterisk is placed before...


