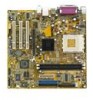
A7V400-MX SE user's manual for English version
Page 2
... permission of the product is defaced or missing. or (2) the serial number of ASUSTeK COMPUTER INC. ("ASUS"). All Rights Reserved. ii SPECIFICATIONS AND INFORMATION CONTAINED IN THIS MANUAL ARE FURNISHED FOR INFORMATIONAL USE ONLY, AND ARE SUBJECT TO CHANGE AT ANY TIME WITHOUT NOTICE, AND SHOULD...it, may not be extended if: (1) the product is authorized in any form or by any means, except documentation kept by ASUS; ASUS PROVIDES THIS MANUAL "AS IS" WITHOUT WARRANTY OF ANY KIND, EITHER EXPRESS OR IMPLIED, INCLUDING BUT NOT LIMITED TO THE IMPLIED WARRANTIES OR CONDITIONS ...
... permission of the product is defaced or missing. or (2) the serial number of ASUSTeK COMPUTER INC. ("ASUS"). All Rights Reserved. ii SPECIFICATIONS AND INFORMATION CONTAINED IN THIS MANUAL ARE FURNISHED FOR INFORMATIONAL USE ONLY, AND ARE SUBJECT TO CHANGE AT ANY TIME WITHOUT NOTICE, AND SHOULD...it, may not be extended if: (1) the product is authorized in any form or by any means, except documentation kept by ASUS; ASUS PROVIDES THIS MANUAL "AS IS" WITHOUT WARRANTY OF ANY KIND, EITHER EXPRESS OR IMPLIED, INCLUDING BUT NOT LIMITED TO THE IMPLIED WARRANTIES OR CONDITIONS ...
A7V400-MX SE user's manual for English version
Page 6
..., disconnect the power cable from the electrical outlet before relocating the system. • When adding or removing devices to fix it , carefully read all the manuals that came with the product, contact a qualified service technician or your retailer. Operation safety • Before installing the motherboard and adding devices on a stable surface...
..., disconnect the power cable from the electrical outlet before relocating the system. • When adding or removing devices to fix it , carefully read all the manuals that came with the product, contact a qualified service technician or your retailer. Operation safety • Before installing the motherboard and adding devices on a stable surface...
A7V400-MX SE user's manual for English version
Page 36
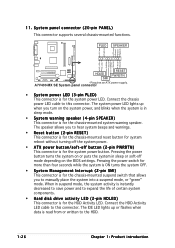
...manually place the system into a suspend mode, or "green" mode. Pressing the power switch for more than four seconds while the system is ON turns the system OFF. • System Management Interrupt (2-pin SMI) This connector is for the chassis-mounted suspend switch that allows you to this connector. A7V400-MX SE... for the system power button. PLED SPEAKER +5 V PLED +5V Ground Ground Speaker HD_LED+ HD_LEDExtSMI# Ground PWRBIN Ground Reset Ground A7V400-MX SE RESET HDLED PWRBTN SMI * Requires an ATX power supply. Pressing the power button turns the system on or puts the system in...
...manually place the system into a suspend mode, or "green" mode. Pressing the power switch for more than four seconds while the system is ON turns the system OFF. • System Management Interrupt (2-pin SMI) This connector is for the chassis-mounted suspend switch that allows you to this connector. A7V400-MX SE... for the system power button. PLED SPEAKER +5 V PLED +5V Ground Ground Speaker HD_LED+ HD_LEDExtSMI# Ground PWRBIN Ground Reset Ground A7V400-MX SE RESET HDLED PWRBTN SMI * Requires an ATX power supply. Pressing the power button turns the system on or puts the system in...
A7V400-MX SE user's manual for English version
Page 47
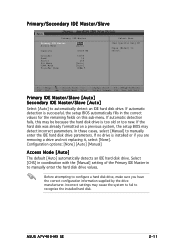
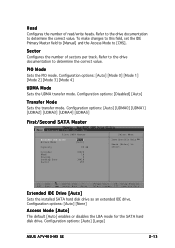
...automatic detection fails, this sub-menu. Configuration options: [None] [Auto] [Manual] Access Mode [Auto] The default [Auto] automatically detects an IDE hard disk drive. If no drive is too old or too new. ASUS A7V400-MX SE 2-11 If the hard disk was already formatted on this may cause the ...system to fail to configure a hard disk drive, make sure you are removing a drive and not replacing it, select [None]. Select [CHS] in coordination with the [Manual] setting of ...
...automatic detection fails, this sub-menu. Configuration options: [None] [Auto] [Manual] Access Mode [Auto] The default [Auto] automatically detects an IDE hard disk drive. If no drive is too old or too new. ASUS A7V400-MX SE 2-11 If the hard disk was already formatted on this may cause the ...system to fail to configure a hard disk drive, make sure you are removing a drive and not replacing it, select [None]. Select [CHS] in coordination with the [Manual] setting of ...

A7V400-MX SE user's manual for English version
Page 48
... : Help ↑↓ : Select Item -/+ : Change Value F5 : Setup Defaults ESC : Exit →← : Select Menu Enter : Select Sub-menu F10 : Save and Exit Manually enter the number of the Primary IDE hard disk drives to set the partition of cylinders, heads and sectors per track for the drive. Access...number of the hard drive is used without regard for drives with your selections on this sub-menu, press the key to return to make manual entries for this field. This is necessary for cylinders, heads, or sectors. Note that LBA Mode is necessary so that you can write ...
... : Help ↑↓ : Select Item -/+ : Change Value F5 : Setup Defaults ESC : Exit →← : Select Menu Enter : Select Sub-menu F10 : Save and Exit Manually enter the number of the Primary IDE hard disk drives to set the partition of cylinders, heads and sectors per track for the drive. Access...number of the hard drive is used without regard for drives with your selections on this sub-menu, press the key to return to make manual entries for this field. This is necessary for cylinders, heads, or sectors. Note that LBA Mode is necessary so that you can write ...
A7V400-MX SE user's manual for English version
Page 49
... as an extended IDE drive. Configuration options: [Auto] [Large] ASUS A7V400-MX SE 2-13 Sector Configures the number of read/write heads. Refer to the drive documentation to determine the correct value. To make changes to this field, set the IDE Primary Master field to [Manual] and the Access Mode to select. PIO Mode Sets...
... as an extended IDE drive. Configuration options: [Auto] [Large] ASUS A7V400-MX SE 2-13 Sector Configures the number of read/write heads. Refer to the drive documentation to determine the correct value. To make changes to this field, set the IDE Primary Master field to [Manual] and the Access Mode to select. PIO Mode Sets...
A7V400-MX SE user's manual for English version
Page 52
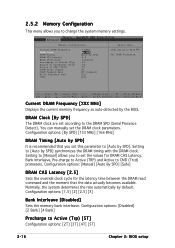
... that the data actually becomes available. Configuration options: [Disabled] [2 Bank] [4 Bank] Precharge to change the system memory settings. Setting to [Manual] allows you set the values for the latency time between the DRAM read command and the moment that you to set this parameter to [Auto... by default. Configuration options: [Manual] [Auto By SPD] [Safe] DRAM CAS Latency [2.5] Sets the override clock cycle for DRAM CAS Latency, Bank Interleave, Pre-charge to Active...
... that the data actually becomes available. Configuration options: [Disabled] [2 Bank] [4 Bank] Precharge to change the system memory settings. Setting to [Manual] allows you set the values for the latency time between the DRAM read command and the moment that you to set this parameter to [Auto... by default. Configuration options: [Manual] [Auto By SPD] [Safe] DRAM CAS Latency [2.5] Sets the override clock cycle for DRAM CAS Latency, Bank Interleave, Pre-charge to Active...
A7V400-MX SE user's manual for English version
Page 54
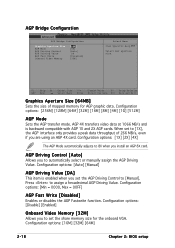
When set the AGP Driving Control to automatically select or manually assign the AGP Driving Value. Configuration options: [Auto] [Manual] AGP Driving Value [DA] This item is backward compatible with AGP 1X and 2X AGP cards. Configuration options: [16M] [32M] [64M...] 2-18 Chapter 2: BIOS setup Configuration options: [Disable] [Enabled] Onboard Video Memory [32M] Allows you to [Manual]. AGP Driving Control [Auto] Allows you to [1X], the AGP interface only provides a peak data throughput of mapped memory for the onboard VGA. AGP Bridge...
When set the AGP Driving Control to automatically select or manually assign the AGP Driving Value. Configuration options: [Auto] [Manual] AGP Driving Value [DA] This item is backward compatible with AGP 1X and 2X AGP cards. Configuration options: [16M] [32M] [64M...] 2-18 Chapter 2: BIOS setup Configuration options: [Disable] [Enabled] Onboard Video Memory [32M] Allows you to [Manual]. AGP Driving Control [Auto] Allows you to [1X], the AGP interface only provides a peak data throughput of mapped memory for the onboard VGA. AGP Bridge...
A7V400-MX SE user's manual for English version
Page 55
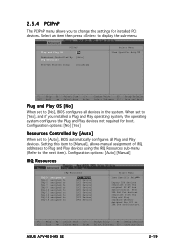
...and Exit Plug and Play OS [No] When set to change the settings for PCI or ISA bus architecture. Setting this item to [Manual], allows manual assignment of IRQ addresses to Plug and Play devices using the IRQ Resources sub-menu (Refer to display the sub-menu. 2.5.4 PCIPnP ... F10 : Save and Exit ASUS A7V400-MX SE 2-19 Configuration options: [No] [Yes] Resources Controlled by [Auto] When set to [Yes], and if you to [No], BIOS configures all Plug and Play devices. Select an item then press to the next item). Configuration options: [Auto] [Manual] IRQ Resources IRQ Resources IRQ...
...and Exit Plug and Play OS [No] When set to change the settings for PCI or ISA bus architecture. Setting this item to [Manual], allows manual assignment of IRQ addresses to Plug and Play devices using the IRQ Resources sub-menu (Refer to display the sub-menu. 2.5.4 PCIPnP ... F10 : Save and Exit ASUS A7V400-MX SE 2-19 Configuration options: [No] [Yes] Resources Controlled by [Auto] When set to [Yes], and if you to [No], BIOS configures all Plug and Play devices. Select an item then press to the next item). Configuration options: [Auto] [Manual] IRQ Resources IRQ Resources IRQ...
A7V400-MX SE user's manual for English version
Page 56
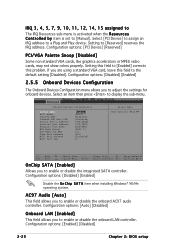
... are using a standard VGA card, leave this problem. Configuration options: [Disabled] [Enabled] Disable the O n C h i p S A T A item when installing Windows® 98/Me operating system. Setting to [Manual]. IRQ 3, 4, 5, 7, 9, 10, 11, 12, 14, 15 assigned to The IRQ Resources sub-menu is activated when the R e s o u r c e s C o n t r o l l e d b y item is set to [Reserved] reserves the IRQ...
... are using a standard VGA card, leave this problem. Configuration options: [Disabled] [Enabled] Disable the O n C h i p S A T A item when installing Windows® 98/Me operating system. Setting to [Manual]. IRQ 3, 4, 5, 7, 9, 10, 11, 12, 14, 15 assigned to The IRQ Resources sub-menu is activated when the R e s o u r c e s C o n t r o l l e d b y item is set to [Reserved] reserves the IRQ...

A7V400-MX SE user's manual for English version
Page 61
...button for less than 4 seconds. [Suspend] allows the button to have a dual function where pressing less than 4 seconds powers off feature for manual setup. Configuration options: [Disabled] [Enabled] Power On By RTC Alarm [Disabled] Allows you to set whether or not to power the system... to [Last State] puts the system back to activate the video off the system. Configuration options: [Last State] [Power On] [Power Off] ASUS A7V400-MX SE 2-25 PS2MS Wakeup from S3/S4 [Disabled] Configuration options: [Disabled] [Enabled] Power On By PCI Devices [Disabled] When set to [Enabled], this...
...button for less than 4 seconds. [Suspend] allows the button to have a dual function where pressing less than 4 seconds powers off feature for manual setup. Configuration options: [Disabled] [Enabled] Power On By RTC Alarm [Disabled] Allows you to set whether or not to power the system... to [Last State] puts the system back to activate the video off the system. Configuration options: [Last State] [Power On] [Power Off] ASUS A7V400-MX SE 2-25 PS2MS Wakeup from S3/S4 [Disabled] Configuration options: [Disabled] [Enabled] Power On By PCI Devices [Disabled] When set to [Enabled], this...


