Motherboard DIY Troubleshooting Guide
Page 5
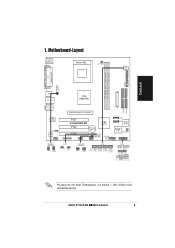
... werden. Motherboard-Layout PS/2KBMS T: Mouse B: Keyboard COM1 Socket 462 CPU_FAN DSW FLOPPY DDR DIMM1 (64 bit,184-pin module) DDR DIMM2 (64 bit,184-pin module) PARALLEL PORT USBPWR34 USBPWR12 VGA1 ATX Power Connector PRI_IDE SEC_IDE USB12 LAN_USB34 VIA KM400A Top:Line In Center:Line Out Below:Mic In Accelerated Graphics Port (AGP1) VIA VT6103 SPDIF AD1888 FP_AUDIO PCI1 A7V400-MX SE PCI2 CR2032 3V Lithium Cell CMOS Power VIA...
... werden. Motherboard-Layout PS/2KBMS T: Mouse B: Keyboard COM1 Socket 462 CPU_FAN DSW FLOPPY DDR DIMM1 (64 bit,184-pin module) DDR DIMM2 (64 bit,184-pin module) PARALLEL PORT USBPWR34 USBPWR12 VGA1 ATX Power Connector PRI_IDE SEC_IDE USB12 LAN_USB34 VIA KM400A Top:Line In Center:Line Out Below:Mic In Accelerated Graphics Port (AGP1) VIA VT6103 SPDIF AD1888 FP_AUDIO PCI1 A7V400-MX SE PCI2 CR2032 3V Lithium Cell CMOS Power VIA...
Motherboard DIY Troubleshooting Guide
Page 8
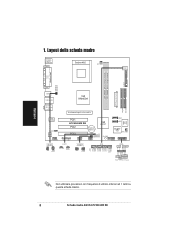
.... 8 Scheda madre ASUS A7V400-MX SE 1. Layout della scheda madre PS/2KBMS T: Mouse B: Keyboard COM1 Socket 462 CPU_FAN DSW FLOPPY DDR DIMM1 (64 bit,184-pin module) DDR DIMM2 (64 bit,184-pin module) PARALLEL PORT USBPWR34 USBPWR12 VGA1 ATX Power Connector PRI_IDE SEC_IDE USB12 LAN_USB34 VIA KM400A Top:Line In Center:Line Out Below:Mic In Accelerated Graphics Port (AGP1) VIA VT6103 SPDIF AD1888 FP_AUDIO PCI1 A7V400-MX SE PCI2 CR2032...
.... 8 Scheda madre ASUS A7V400-MX SE 1. Layout della scheda madre PS/2KBMS T: Mouse B: Keyboard COM1 Socket 462 CPU_FAN DSW FLOPPY DDR DIMM1 (64 bit,184-pin module) DDR DIMM2 (64 bit,184-pin module) PARALLEL PORT USBPWR34 USBPWR12 VGA1 ATX Power Connector PRI_IDE SEC_IDE USB12 LAN_USB34 VIA KM400A Top:Line In Center:Line Out Below:Mic In Accelerated Graphics Port (AGP1) VIA VT6103 SPDIF AD1888 FP_AUDIO PCI1 A7V400-MX SE PCI2 CR2032...
A7V400-MX SE user's manual for English version
Page 4
... 2.1.5 ASUS Update utility 2-5 2.2 BIOS beep codes 2-7 2.3 BIOS setup program 2-7 2.3.1 BIOS menu bar 2-8 2.3.2 Legend bar 2-8 2.4 Main menu 2-10 2.5 Advanced menu 2-15 2.5.1 CPU Configuration 2-15 2.5.2 Memory Configuration 2-16 2.5.3 Chipset 2-17 2.5.4 PCIPnP 2-19 2.5.5 Onboard Devices Configuration 2-20 2.5.6 USB Configuration 2-22 2.6 Power menu 2-23 2.6.1 APM Configuration 2-24 2.6.2 Hardware Monitor 2-26 2.7 Boot menu 2-27 2.7.1 Boot Device Priority 2-27 2.7.2 Removable Drives 2-28 2.7.3 Hard Disk Drives 2-28 2.7.4 CDROM Drives 2-29 2.7.5 Boot Settings Configuration...
... 2.1.5 ASUS Update utility 2-5 2.2 BIOS beep codes 2-7 2.3 BIOS setup program 2-7 2.3.1 BIOS menu bar 2-8 2.3.2 Legend bar 2-8 2.4 Main menu 2-10 2.5 Advanced menu 2-15 2.5.1 CPU Configuration 2-15 2.5.2 Memory Configuration 2-16 2.5.3 Chipset 2-17 2.5.4 PCIPnP 2-19 2.5.5 Onboard Devices Configuration 2-20 2.5.6 USB Configuration 2-22 2.6 Power menu 2-23 2.6.1 APM Configuration 2-24 2.6.2 Hardware Monitor 2-26 2.7 Boot menu 2-27 2.7.1 Boot Device Priority 2-27 2.7.2 Removable Drives 2-28 2.7.3 Hard Disk Drives 2-28 2.7.4 CDROM Drives 2-29 2.7.5 Boot Settings Configuration...
A7V400-MX SE user's manual for English version
Page 12
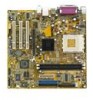
... 400 MHz front side bus frequency for the following items. Motherboard ASUS A7V400-MX SE motherboard Cables Serial ATA signal cable and Serial ATA power cable Ultra DMA 133/100/66 cable Floppy disk drive cable Accessories I/O shield A p p l i c a t i o n C D s ASUS motherboard support CD D o c u m e n t a t i o n User guide If any of ASUS quality motherboards! The Northridge chip features an integrated VIA Unichrome™ 2D/3D graphics core allowing efficient execution of up to 533 MB/s using the fast 8X V-Link connection. The motherboard delivers a host of...
... 400 MHz front side bus frequency for the following items. Motherboard ASUS A7V400-MX SE motherboard Cables Serial ATA signal cable and Serial ATA power cable Ultra DMA 133/100/66 cable Floppy disk drive cable Accessories I/O shield A p p l i c a t i o n C D s ASUS motherboard support CD D o c u m e n t a t i o n User guide If any of ASUS quality motherboards! The Northridge chip features an integrated VIA Unichrome™ 2D/3D graphics core allowing efficient execution of up to 533 MB/s using the fast 8X V-Link connection. The motherboard delivers a host of...

A7V400-MX SE user's manual for English version
Page 13
... backward compatible with USB 1.1. ASUS A7V400-MX SE 1-3 See page 1-22 for details. The S/PDIF technology turns your computer into a high-end entertainment system with lower pin count, reduced voltage requirement, and up to a local area network (LAN) and the Internet. See page 1-9 for details. Serial ATA technology The motherboard supports the Serial ATA technology through the S/PDIF connector at midboard. The SATA specification allows for thinner, more flexible cables with digital connectivity to...
... backward compatible with USB 1.1. ASUS A7V400-MX SE 1-3 See page 1-22 for details. The S/PDIF technology turns your computer into a high-end entertainment system with lower pin count, reduced voltage requirement, and up to a local area network (LAN) and the Internet. See page 1-9 for details. Serial ATA technology The motherboard supports the Serial ATA technology through the S/PDIF connector at midboard. The SATA specification allows for thinner, more flexible cables with digital connectivity to...
A7V400-MX SE user's manual for English version
Page 24
... change the necessary BIOS settings, if any. Align the card connector with the screw you intend to install expansion cards. Turn on the next page. 3. Install the software drivers for later use . The following sub-sections describe the slots and the expansion cards that came with it by adjusting the software settings. 1. Before installing the expansion card, read the documentation that they support. Replace the system cover. 1.8.2 Configuring an expansion card After installing...
... change the necessary BIOS settings, if any. Align the card connector with the screw you intend to install expansion cards. Turn on the next page. 3. Install the software drivers for later use . The following sub-sections describe the slots and the expansion cards that came with it by adjusting the software settings. 1. Before installing the expansion card, read the documentation that they support. Replace the system cover. 1.8.2 Configuring an expansion card After installing...

A7V400-MX SE user's manual for English version
Page 31
If you install two hard disk drives, you connect the IDE cable. • Use the 80-conductor IDE cable for Ultra DMA 133/100/66 IDE devices. This prevents incorrect insertion when you must configure the second drive as a slave device by setting its jumper accordingly. Pin 5 on the motherboard, a black connector for an Ultra DMA 133/100/66 IDE slave device (optical drive/hard disk drive), and a gray connector for an Ultra DMA 133 signal cable. The Ultra...
If you install two hard disk drives, you connect the IDE cable. • Use the 80-conductor IDE cable for Ultra DMA 133/100/66 IDE devices. This prevents incorrect insertion when you must configure the second drive as a slave device by setting its jumper accordingly. Pin 5 on the motherboard, a black connector for an Ultra DMA 133/100/66 IDE slave device (optical drive/hard disk drive), and a gray connector for an Ultra DMA 133 signal cable. The Ultra...
A7V400-MX SE user's manual for English version
Page 38
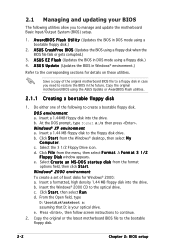
... motherboard BIOS file to a floppy disk in case you to manage and update the motherboard Basic Input/Output System (BIOS) setup. 1. Insert a 1.44MB floppy disk into the drive. At the DOS prompt, type format A:/S then press . c. b. Copy the original or the latest motherboard BIOS file to the floppy disk drive. ASUS EZ Flash (Updates the BIOS in Windows® environment.) Refer to the corresponding sections for Windows® 2000: a. A S U S U p d a t e (Updates the BIOS in DOS mode using a bootable floppy disk.) 2. Copy the original motherboard BIOS using a floppy disk...
... motherboard BIOS file to a floppy disk in case you to manage and update the motherboard Basic Input/Output System (BIOS) setup. 1. Insert a 1.44MB floppy disk into the drive. At the DOS prompt, type format A:/S then press . c. b. Copy the original or the latest motherboard BIOS file to the floppy disk drive. ASUS EZ Flash (Updates the BIOS in Windows® environment.) Refer to the corresponding sections for Windows® 2000: a. A S U S U p d a t e (Updates the BIOS in DOS mode using a bootable floppy disk.) 2. Copy the original motherboard BIOS using a floppy disk...
A7V400-MX SE user's manual for English version
Page 39
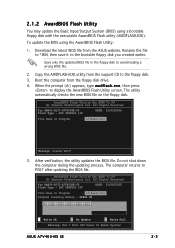
...-MX SE 2-3 Download the latest BIOS file from the floppy disk drive. 4. Boot the computer from the ASUS website. Save only the updated BIOS file in the floppy disk to display the AwardBIOS Flash Utility screen. The computer returns to Program : a7v4se02.bin Program Flashing Memory - 0FE00 OK 111122223333444455556666777788889999000011112222333344445555666677778888999900001111222233334444555566667777888899990000111122221111222233334444555566667777888899990000111122223333 111122223333 Write OK 111122223333 No Update 111122223333 Write Fail Warning: Don't Turn OFF Power Or Reset...
...-MX SE 2-3 Download the latest BIOS file from the floppy disk drive. 4. Boot the computer from the ASUS website. Save only the updated BIOS file in the floppy disk to display the AwardBIOS Flash Utility screen. The computer returns to Program : a7v4se02.bin Program Flashing Memory - 0FE00 OK 111122223333444455556666777788889999000011112222333344445555666677778888999900001111222233334444555566667777888899990000111122221111222233334444555566667777888899990000111122223333 111122223333 Write OK 111122223333 No Update 111122223333 Write Fail Warning: Don't Turn OFF Power Or Reset...
A7V400-MX SE user's manual for English version
Page 41
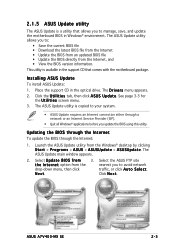
... menu, then click traffic, or click A u t o S e l e c t. Installing ASUS Update To install ASUS Update: 1. ASUS A7V400-MX SE 2-5 Select U p d a t e B I n t e r n e t option from the nearest you to manage, save, and update the motherboard BIOS in the optical drive. Click the U t i l i t i e s tab, then click A S U S U p d a t e. Updating the BIOS through the Internet To update the BIOS through a network or an Internet Service Provider (ISP). • Quit all Windows® applications before you update the BIOS using this utility. This utility is available in the support...
... menu, then click traffic, or click A u t o S e l e c t. Installing ASUS Update To install ASUS Update: 1. ASUS A7V400-MX SE 2-5 Select U p d a t e B I n t e r n e t option from the nearest you to manage, save, and update the motherboard BIOS in the optical drive. Click the U t i l i t i e s tab, then click A S U S U p d a t e. Updating the BIOS through the Internet To update the BIOS through a network or an Internet Service Provider (ISP). • Quit all Windows® applications before you update the BIOS using this utility. This utility is available in the support...
A7V400-MX SE user's manual for English version
Page 43
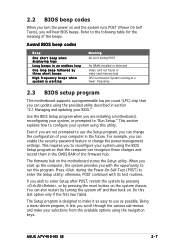
.... ASUS A7V400-MX SE 2-7 System running at a lower frequency 2.3 BIOS setup program This motherboard supports a programmable low pin count (LPC) chip that the computer can enable the security password feature or change the configuration of your computer in the future. For example, you are installing a motherboard, reconfiguring your system, or prompted to enter Setup after POST, restart the system by pressing , or by pressing the reset button on the system chassis. Press during POST...
.... ASUS A7V400-MX SE 2-7 System running at a lower frequency 2.3 BIOS setup program This motherboard supports a programmable low pin count (LPC) chip that the computer can enable the security password feature or change the configuration of your computer in the future. For example, you are installing a motherboard, reconfiguring your system, or prompted to enter Setup after POST, restart the system by pressing , or by pressing the reset button on the system chassis. Press during POST...
A7V400-MX SE user's manual for English version
Page 47
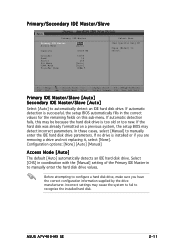
... removing a drive and not replacing it, select [None]. Configuration options: [None] [Auto] [Manual] Access Mode [Auto] The default [Auto] automatically detects an IDE hard disk drive. Select [CHS] in coordination with the [Manual] setting of the Primary IDE Master in the correct values for the remaining fields on a previous system, the setup BIOS may detect incorrect parameters. ASUS A7V400-MX SE 2-11 If no drive is too old or too new. Before attempting to recognize the installed hard disk...
... removing a drive and not replacing it, select [None]. Configuration options: [None] [Auto] [Manual] Access Mode [Auto] The default [Auto] automatically detects an IDE hard disk drive. Select [CHS] in coordination with the [Manual] setting of the Primary IDE Master in the correct values for the remaining fields on a previous system, the setup BIOS may detect incorrect parameters. ASUS A7V400-MX SE 2-11 If no drive is too old or too new. Before attempting to recognize the installed hard disk...

A7V400-MX SE user's manual for English version
Page 48
... IDE hard disk drives to active. Cylinder Configures the number of cylinders, heads and sectors per track for the drive. F1 : Help ↑↓ : Select Item -/+ : Change Value F5 : Setup Defaults ESC : Exit →← : Select Menu Enter : Select Sub-menu F10 : Save and Exit Manually enter the number of cylinders. The Main menu displays the hard disk drive field with more than 504 MB storage capacity. Access Mode [Auto] Select the hard disk drive type from the hard disk...
... IDE hard disk drives to active. Cylinder Configures the number of cylinders, heads and sectors per track for the drive. F1 : Help ↑↓ : Select Item -/+ : Change Value F5 : Setup Defaults ESC : Exit →← : Select Menu Enter : Select Sub-menu F10 : Save and Exit Manually enter the number of cylinders. The Main menu displays the hard disk drive field with more than 504 MB storage capacity. Access Mode [Auto] Select the hard disk drive type from the hard disk...
A7V400-MX SE user's manual for English version
Page 49
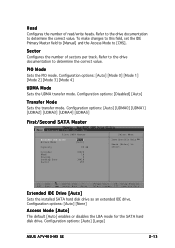
... to [Manual] and the Access Mode to determine the correct value. Configuration options: [Disabled] [Auto] Transfer Mode Sets the transfer mode. F1 : Help ↑↓ : Select Item -/+ : Change Value F5 : Setup Defaults ESC : Exit →← : Select Menu Enter : Select Submenu F10: Save and Exit Extended IDE Drive [Auto] Sets the installed SATA hard disk drive as an extended IDE drive. Configuration options: [Auto] [Large] ASUS A7V400-MX SE 2-13 Configuration options: [Auto] [None] Access Mode [Auto] The default [Auto] enables or disables the LBA mode for the SATA hard disk drive...
... to [Manual] and the Access Mode to determine the correct value. Configuration options: [Disabled] [Auto] Transfer Mode Sets the transfer mode. F1 : Help ↑↓ : Select Item -/+ : Change Value F5 : Setup Defaults ESC : Exit →← : Select Menu Enter : Select Submenu F10: Save and Exit Extended IDE Drive [Auto] Sets the installed SATA hard disk drive as an extended IDE drive. Configuration options: [Auto] [Large] ASUS A7V400-MX SE 2-13 Configuration options: [Auto] [None] Access Mode [Auto] The default [Auto] enables or disables the LBA mode for the SATA hard disk drive...
A7V400-MX SE user's manual for English version
Page 52
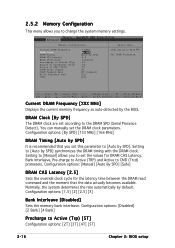
... Select Menu Item Specific Help Set DRAM frequency. F1 : Help ↑↓ : Select Item -/+ : Change Value F5 : Setup Defaults ESC : Exit →← : Select Menu Enter : Select Sub-menu F10 : Save and Exit Current DRAM Frequency [XXX MHz] Displays the current memory frequency as auto-detected by default. Setting to [Manual] allows you to change the system memory settings. Normally, the system determines the rate automatically by the BIOS. Configuration options: [1.5] [2] [2.5] [3] Bank Interleave [Disabled] Sets the memory bank interleave. 2.5.2 Memory Configuration...
... Select Menu Item Specific Help Set DRAM frequency. F1 : Help ↑↓ : Select Item -/+ : Change Value F5 : Setup Defaults ESC : Exit →← : Select Menu Enter : Select Sub-menu F10 : Save and Exit Current DRAM Frequency [XXX MHz] Displays the current memory frequency as auto-detected by default. Setting to [Manual] allows you to change the system memory settings. Normally, the system determines the rate automatically by the BIOS. Configuration options: [1.5] [2] [2.5] [3] Bank Interleave [Disabled] Sets the memory bank interleave. 2.5.2 Memory Configuration...
A7V400-MX SE user's manual for English version
Page 56
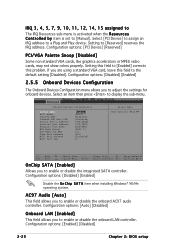
... integrated SATA controller. AC97 Audio [Auto] This field allows you to [Manual]. If you to enable or disable the onboard AC97 audio controller. Onboard Devices Configuration OnChip SATA AC97 Audio Onboard LAN Onboard LAN Boot ROM Serial Port 1 Address Parallel Port Address Parallel Port Mode EPP Mode Select ECP Mode Use DMA Game Port Address MIDI Port Address MIDI Port IRQ [Enabled] [Auto] [Enabled] [Disabled] [3F8/IRQ4] [378/IRQ7] [ECP+EPP] [EPP1.7] [3] [201] [Disabled] 10 Select Menu Item Specific Help F1 : Help ↑↓ : Select Item -/+ : Change Value F5 : Setup Defaults...
... integrated SATA controller. AC97 Audio [Auto] This field allows you to [Manual]. If you to enable or disable the onboard AC97 audio controller. Onboard Devices Configuration OnChip SATA AC97 Audio Onboard LAN Onboard LAN Boot ROM Serial Port 1 Address Parallel Port Address Parallel Port Mode EPP Mode Select ECP Mode Use DMA Game Port Address MIDI Port Address MIDI Port IRQ [Enabled] [Auto] [Enabled] [Disabled] [3F8/IRQ4] [378/IRQ7] [ECP+EPP] [EPP1.7] [3] [201] [Disabled] 10 Select Menu Item Specific Help F1 : Help ↑↓ : Select Item -/+ : Change Value F5 : Setup Defaults...
A7V400-MX SE user's manual for English version
Page 58
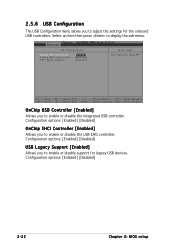
... : Change Value F5 : Setup Defaults ESC : Exit →← : Select Menu Enter : Select Sub-menu F10 : Save and Exit OnChip USB Controller [Enabled] Allows you to enable or disable support for the onboard USB controllers. Select an item then press to enable or disable the USB EHCI controller. Configuration options: [Enabled] [Disabled] OnChip EHCI Controller [Enabled] Allows you to display the sub-menu. Configuration options: [Enabled] [Disabled] 2-22 Chapter 2: BIOS setup 2.5.6 USB Configuration The USB Configuration menu allows you to adjust the settings for legacy USB...
... : Change Value F5 : Setup Defaults ESC : Exit →← : Select Menu Enter : Select Sub-menu F10 : Save and Exit OnChip USB Controller [Enabled] Allows you to enable or disable support for the onboard USB controllers. Select an item then press to enable or disable the USB EHCI controller. Configuration options: [Enabled] [Disabled] OnChip EHCI Controller [Enabled] Allows you to display the sub-menu. Configuration options: [Enabled] [Disabled] 2-22 Chapter 2: BIOS setup 2.5.6 USB Configuration The USB Configuration menu allows you to adjust the settings for legacy USB...

A7V400-MX SE user's manual for English version
Page 59
... enable or disable the ACPI support in the RSDT pointer list. F1 : Help ↑↓ : Select Item -/+ : Change Value F5 : Setup Defaults ESC : Exit →← : Select Menu Enter : Select Submenu F10: Save and Exit ACPI Suspend Mode [S1&S3] Allows you to select the ACPI state to display the configuration options. Select an item, then press to used for the Advanced Power Management (APM). Configuration options: [Disabled] [Enabled] ASUS A7V400-MX SE 2-23 When set to [Enabled...
... enable or disable the ACPI support in the RSDT pointer list. F1 : Help ↑↓ : Select Item -/+ : Change Value F5 : Setup Defaults ESC : Exit →← : Select Menu Enter : Select Submenu F10: Save and Exit ACPI Suspend Mode [S1&S3] Allows you to select the ACPI state to display the configuration options. Select an item, then press to used for the Advanced Power Management (APM). Configuration options: [Disabled] [Enabled] ASUS A7V400-MX SE 2-23 When set to [Enabled...
A7V400-MX SE user's manual for English version
Page 70
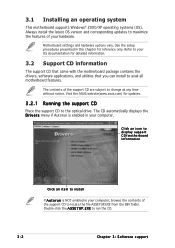
... to display support CD/motherboard information Click an item to install If A u t o r u n is enabled in your hardware. Use the setup procedures presented in your OS documentation for detailed information. 3.2 Support CD information The support CD that came with the motherboard package contains the drivers, software applications, and utilities that you can install to locate the file ASSETUP.EXE from the BIN folder. Always install the latest OS version...
... to display support CD/motherboard information Click an item to install If A u t o r u n is enabled in your hardware. Use the setup procedures presented in your OS documentation for detailed information. 3.2 Support CD information The support CD that came with the motherboard package contains the drivers, software applications, and utilities that you can install to locate the file ASSETUP.EXE from the BIN folder. Always install the latest OS version...
A7V400-MX SE user's manual for English version
Page 71
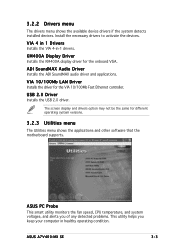
KM400A Display Driver Installs the KM400A display driver for different operating system versions. 3.2.3 Utilities menu The Utilities menu shows the applications and other software that the motherboard supports. The screen display and drivers option may not be the same for the onboard VGA. Install the necessary drivers to activate the devices. ASUS PC Probe This smart utility monitors the fan speed, CPU temperature, and system voltages, and alerts you of any detected problems. This utility helps you keep your computer in -1 drivers. ASUS A7V400-MX SE 3-3 VIA 4 in 1 Drivers Installs ...
KM400A Display Driver Installs the KM400A display driver for different operating system versions. 3.2.3 Utilities menu The Utilities menu shows the applications and other software that the motherboard supports. The screen display and drivers option may not be the same for the onboard VGA. Install the necessary drivers to activate the devices. ASUS PC Probe This smart utility monitors the fan speed, CPU temperature, and system voltages, and alerts you of any detected problems. This utility helps you keep your computer in -1 drivers. ASUS A7V400-MX SE 3-3 VIA 4 in 1 Drivers Installs ...


