
X223W LCD Monitor User's Guide
Page 1
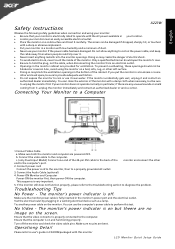
...monitor in the monitor's power port and the electrical outlet. Connect power cord Connect the power cord to the monitor, then to diagnose the problem. This sequence is fully inserted in a bookcase or some other enclosed space, be blocked or covered. You can clean the exterior of ... power indicator is on and functioning properly. Ensure that the computer is off the monitor and check the video cable pins. English Safety Instructions X223W Observe the folowing safety guidelines when connection and using the monitor on a bed, sofa, rug, or other soft surface. · Doing so...
...monitor in the monitor's power port and the electrical outlet. Connect power cord Connect the power cord to the monitor, then to diagnose the problem. This sequence is fully inserted in a bookcase or some other enclosed space, be blocked or covered. You can clean the exterior of ... power indicator is on and functioning properly. Ensure that the computer is off the monitor and check the video cable pins. English Safety Instructions X223W Observe the folowing safety guidelines when connection and using the monitor on a bed, sofa, rug, or other soft surface. · Doing so...
X223W LCD Monitor User's Guide
Page 7
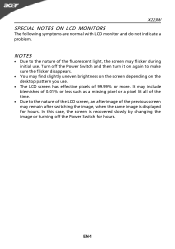
X223W SPECIAL NOTES ON LCD MONITORS The following symptoms are normal with LCD monitor and do not indicate a problem. It may remain after switching the image, when the same image is recovered slowly by changing the image or turning off the Power Switch for ...
X223W SPECIAL NOTES ON LCD MONITORS The following symptoms are normal with LCD monitor and do not indicate a problem. It may remain after switching the image, when the same image is recovered slowly by changing the image or turning off the Power Switch for ...
X223W LCD Monitor User's Guide
Page 18
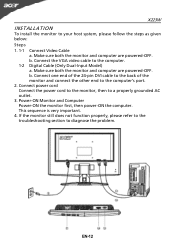
... powered-OFF. Connect one end of the 24-pin DVI cable to the back of the monitor and connect the other end to diagnose the problem. X223W INSTALLATION To install the monitor to your host system, please follow the steps as given below: Steps 1. 1-1 Connect Video Cable a. Power-ON Monitor and Computer...
... powered-OFF. Connect one end of the 24-pin DVI cable to the back of the monitor and connect the other end to diagnose the problem. X223W INSTALLATION To install the monitor to your host system, please follow the steps as given below: Steps 1. 1-1 Connect Video Cable a. Power-ON Monitor and Computer...
X223W LCD Monitor User's Guide
Page 25
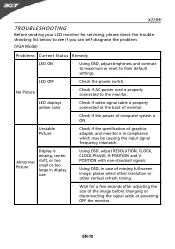
... servicing, please check the troubleshooting list below to see if you can self-diagnose the problem. (VGA Mode) Problems Current Status Remedy LED ON · Using OSD, adjust brightness and contrast to maximum or reset to the monitor. X223W TROUBLESHOOTING Before sending your LCD monitor for a few seconds after adjusting the size of...
... servicing, please check the troubleshooting list below to see if you can self-diagnose the problem. (VGA Mode) Problems Current Status Remedy LED ON · Using OSD, adjust brightness and contrast to maximum or reset to the monitor. X223W TROUBLESHOOTING Before sending your LCD monitor for a few seconds after adjusting the size of...

X223W LCD Monitor User's Guide
Page 26
EN-20 (DVI Mode) X223W Problems No Picture Current Status Remedy LED ON · Using OSD, adjust brightness and contrast to maximum or reset to the monitor. LED displays amber color · Check if video signal cable is properly connected at the back of monitor. · Check if the power of computer system is properly connected to their default settings. LED OFF · Check the power switch. · Check if AC power cord is ON.
EN-20 (DVI Mode) X223W Problems No Picture Current Status Remedy LED ON · Using OSD, adjust brightness and contrast to maximum or reset to the monitor. LED displays amber color · Check if video signal cable is properly connected at the back of monitor. · Check if the power of computer system is properly connected to their default settings. LED OFF · Check the power switch. · Check if AC power cord is ON.
X223W LCD Service Guide
Page 26
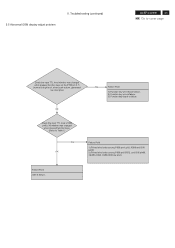
Troubleshooting (continued) ACER X223W 25 Go to cover page Check the input TTL level whether was changed when pressed function keys on the P306 pin 4, 5 (normal is high level, ... 1) Printed wire broke among P306 pin5,R372, and I305 pin89. 3)C386,C388 ,C389,C390 are short. Failure Point I305 is failure. 5.5 Abnormal OSM display adjust problem 5.
Troubleshooting (continued) ACER X223W 25 Go to cover page Check the input TTL level whether was changed when pressed function keys on the P306 pin 4, 5 (normal is high level, ... 1) Printed wire broke among P306 pin5,R372, and I305 pin89. 3)C386,C388 ,C389,C390 are short. Failure Point I305 is failure. 5.5 Abnormal OSM display adjust problem 5.


