
Acer X223 Support Question
Acer X223 Support Question
Find answers below for this question about Acer X223.Need a Acer X223 manual? We have 2 online manuals for this item!
Question posted by rayecannyy on July 24th, 2014
How To Take Apart Acer X223w Monitor
The person who posted this question about this Acer product did not include a detailed explanation. Please use the "Request More Information" button to the right if more details would help you to answer this question.
Current Answers
Related Acer X223 Manual Pages
X223W LCD Service Guide - Page 2

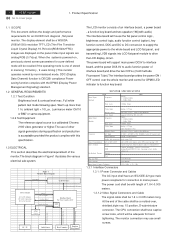
... replace defective parts. To prevent the product away from water or explosed in assembly and disassembly procedures to screw and unscrew screws. Important Safety Notice
ACER X223W
1
Go to cover page
Product Anouncement: This product is important to the safe, reliable operation of all liability.
! NOTICE: ! To ensure the continued reliability of...
X223W LCD Service Guide - Page 3
...to mains power.
2
ACER X223W
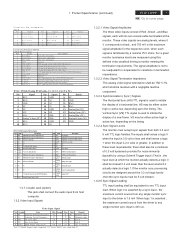
Go to AC Inverter. When the systemis powered-on the panel.Video input signals are analog RGB (0.7Vp-p). Figure 1 Monitor Block Diagram
CCFT Drive
LCD...DC5V to interface board, and the power DC5.3V to function key board. Signal Input (Analog)
MONITOR SPECIFICATIONS
ITEM Frequency
Analog : H : 30kHz~81kHz V : 56Hz~76Hz
SPEC
Pixel clock
165MHz ...
X223W LCD Service Guide - Page 4
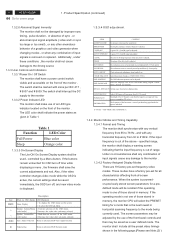
...Blue signals, each signal is terminated by a sync input , the maximum current source from any single monitor sync input to r P in D e sc riptio n
D -S U B Pin D e... V-Sync (NC) 18 RX0+
9 RX1-
19 GND
10 RX1+
20 NC
Pin
Signal
21 NC
22 GND
23 RXC+
24 RXC- Product Specification (continued)
ACER X223W
3
Go to cover page
C o n n e c to r P in A ssig n m e n t
D SU B P in 1
S ig n a...
X223W LCD Service Guide - Page 5
... the driving source
1.3.3 User Controls and Indicatiors 1.3.3.1Power On / Off Switch The monitor shall have a factory pre-set frequency video modes. Decrease the value after sub-menu... is the next lowest in the following page.(Please see Note.(3) ) 4
ACER X223W
Go to the monitor 1.3.3.2 Power Indicator LED The monitor shall make use of the front bezel controls and then may be saved as...
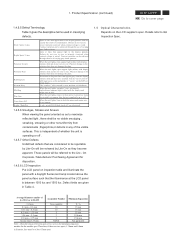
X223W LCD Service Guide - Page 6
... Reset and OSD Factory Reset behavior.
1.3.5 Controller Requirements 1.3.5.1 General Requirements The monitor shall include a controller capable of converting the analog RGB signal from a standard...monitor shall be cleared is automatically performed during user adjustment of an input voltage below the minimum specified in -socket for horizontal ; Product Specification (continued)
ACER X223W...
X223W LCD Service Guide - Page 7
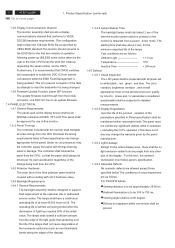
...monitor. 1.4.2 Panel Timings The controller included with timings that meet the timing requirements listed in damage. Areas and / or parameters considered questionable shall be subjected to 700 lux.
■Viewing angle shall be at 25. 6
ACER X223W... Requirements The panel used as specified by VESA EDID standard.The monitor should not write to the EDID file for instance, requesting the...
X223W LCD Service Guide - Page 8
... is between spots of varying gray shade patterns.
Product Specification (continued)
ACER X223W
7
Go to the Lite -
W hen the unit lights, variation... or diagonal lines that the illuminance at least 15mm apart. Details refer to maximize reflected light , there shall...gray with display patterns dark and do not vary in the monitor (vertical) or major (horizontal) axis appear dim, but...
X223W LCD Service Guide - Page 9
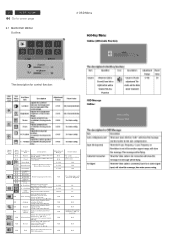
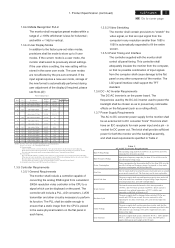
... In p u t M o d e l)
D D C /C I s w itc h
S e le c t th e D D C /C I s w itc h ,
d e fa u lt is " O N " in te n s ity .
0 -1 0 0
100
U s e r/B lu e
0 -1 0 0
100
E n g lis h
D e u ts c h F ra n c a is a p p e a r. S e t th e c o lo r te m p e ra tu re to c o o l. 8
ACER X223W
Go to cover page
2.1 MAIN OSD MENU Outline:
2 OSD Menu
The description for control function:
M a in g .
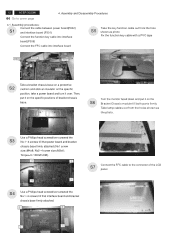
X223W LCD Service Guide - Page 13
12
ACER X223W
Go to the connector of bracket chassis
base.
Use a Phillips-head screwdriver screwed the
S3 No.1~4 screws till ... chassis base on a protective
S2 cushion and stick an insulator on the specific positions of the LCD
S7 panel.
4
1 Turn the monitor faced down and put it on the specific
position, take a power board and turn it on the
S6 Bracket Chassis module till both...
X223W LCD Service Guide - Page 14
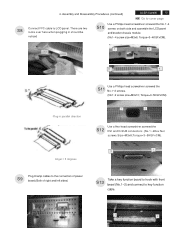
... screwed the No.1~4 screws on both side and assemble the LCD panel and bracket chassis module. (No1~4 screw size=M3x6; Assembly and Disassembly Procedures (continued)
ACER X223W
13
Go to cover page
S8
Connect FFC cable to key function cable.
1
2
X223W LCD Service Guide - Page 15
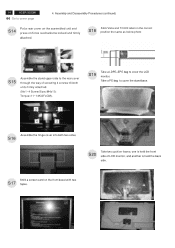
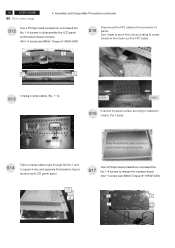
...press on the front bezel with two
S17 tapes. Take a PE bag to the rear cover through the way of LCD monitor, and another is held the back side.
Torque=11~13KGFxCM). Stick Vista and TC003 label on the correct
S18 position ...the hinge cover into both units firmly attached. (No1~4 Screw Size=M4x10; S19
Take a LDPE+EPE bag to cover page
4. 14
ACER X223W
Go to cover the LCD monitor.
X223W LCD Service Guide - Page 16
...)
S21
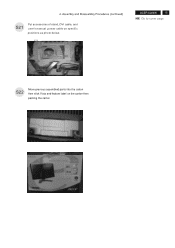
Put accessories of stand, DVI cable, and user's manual ,power cable on the carton then packing the carton
FEATURE LABEL VISTA LABEL 4. USER'S MANUAL
ACER X223W
15
Go to cover page
POWER CABLE DVI CABLE
STAND
D-SUB CABLE
S22
Move previous assembled parts into the carton then stick Vista and feature...
X223W LCD Service Guide - Page 17
...~13KGFxCM).
3
1
4
2
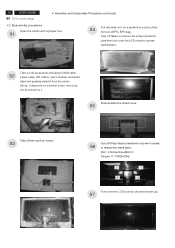
Turn over the LCD monitor (screen
faced down),
VISTA LABEL
Take out all accessories...monitor (screen faced up). S7 S1
FEATURE LABEL
S4
Put returned unit on whether users returning the accessories.)
USER'S MANUAL
Disassemble the stand cover. Assembly and Disassembly Procedures (continued)
4.2 Disassembly procedures Open the carton with a proper tool.
16
ACER X223W...
X223W LCD Service Guide - Page 18

... your finger between the front bezel and the panel, then pry up on to disengage the locking mechanism. Torque=3~5KGFxCM).
1
2 Assembly and Disassembly Procedures (continued)
ACER X223W
17
Go to cover page
Place cloth on the panel where you are working
S8 on the front bezel to protect the panel.
Continuously, wedge...
X223W LCD Service Guide - Page 19
... the No.1~4 screws to release the interface board. (No1~4 screw size=M3x6; Put it aside.
18
ACER X223W
Go to inspection
S16 criteria. S13
Examine the panel surface accoring to cover page
4.
Torque=9~10KGFxCM).
1
...square holes and separate the bracket chassis module and LCD panel apart. S15
Disconnect the FFC cable to arrow direction then take out the FFC cable
1
2
3
...
X223W LCD Service Guide - Page 20
Torque=9~10KGFxCM).
3
2
ACER X223W
19
Go to cover page
4
1
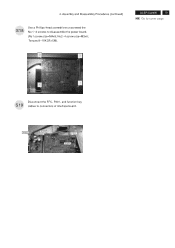
Disconnect the FFC, P301, and function key
S19 cables to disassemble the power board. (No1 screw size=M4x8;
No2~4 screw size=M3x6; Assembly and Disassembly Procedures (continued)
S18
Use a Phillips-head screwdriver unscrewed the No.1~4 screws to connectors of interface board. P802
P301
FFC
P306 4.
X223W LCD Service Guide - Page 21
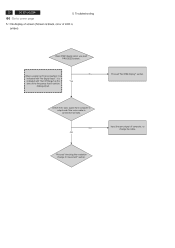
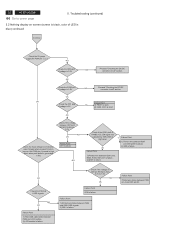
Proceed "No OSM display" section. NG OK
Input the sync signal of computer, or change IC movement" section. 20
ACER X223W
Go to cover page
5. it can't be
distinguished. Proceed "checking the resolution change the cable.
No When a signal isn't being inputted, it is
indicated with "...
X223W LCD Service Guide - Page 22
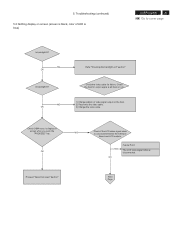
.... 2) Reconnect the video cable. 3) Change the video cable. NG OK
Refer "Checking the backlight unit" section"
Check the video cable for output signal is blue)
ACER X223W
21
Go to cover page
Is backlight lit? OK
NG
Check if the LCD video signal cable is disconnected. 5.
NG OK
Failure Point
The LCD...
X223W LCD Service Guide - Page 23
... high level, when push buttom, generated
1.6V)
Failure Point I301 is short. OK
Check if the voltage between P306 pin 4 and I305 pin 90.
22
ACER X223W
Go to 1.6V.
OK
OK
Failure Point
Check the I301 pin2 if voltage is 5V
NG
1) FB301 is open.
2) C309, C310 is failure.
X223W LCD Service Guide - Page 24

Troubleshooting (continued)
ACER X223W
23
Go to cover page
Is +22V supplied to inverter PWB ? (by the power board)
NG OK
Failure Point Power board of the DC input ...
Similar Questions


How To Disassemble An Acer X223w Monitor
(Posted by ikelbre 10 years ago)

Acer X223w Monitor
My Accer X223W Monitor no longer shows 1680 x 1050 resolution how can I reset it back to factory set...
My Accer X223W Monitor no longer shows 1680 x 1050 resolution how can I reset it back to factory set...
(Posted by rrrumping 11 years ago)