

X1160 User's Guide EN
Page 5
.... • Locations where temperatures may become excessively high, such as opening or removing covers may expose you to dangerous voltage points or other controls may result in following the operating instructions Note: Adjust only those controls that is on the projector first and then signal sources • Do not place the product in damage and will often require extensive work by the operating instructions, since improper adjustment of...
.... • Locations where temperatures may become excessively high, such as opening or removing covers may expose you to dangerous voltage points or other controls may result in following the operating instructions Note: Adjust only those controls that is on the projector first and then signal sources • Do not place the product in damage and will often require extensive work by the operating instructions, since improper adjustment of...
X1160 User's Guide EN
Page 6
... projector lens to removing the lamp assembly for mounting the projector and ensure it . The only user serviceable part is the lamp which may rise and cause damage when the filter/ventilation slots clogged with any object when the projector is showing warning message. • When changing the lamp, please allow unit to cool down, and follow all changing instructions. • Reset the "Lamp Hour Reset" function from the Onscreen display "Management" menu after replacing...
... projector lens to removing the lamp assembly for mounting the projector and ensure it . The only user serviceable part is the lamp which may rise and cause damage when the filter/ventilation slots clogged with any object when the projector is showing warning message. • When changing the lamp, please allow unit to cool down, and follow all changing instructions. • Reset the "Lamp Hour Reset" function from the Onscreen display "Management" menu after replacing...
X1160 User's Guide EN
Page 7
...connection is available. Ensure that could be attracted to the device, and persons with hearing aids should position the device the abovestated distance from your body. Do not place credit cards or other magnetic storage media near your device when its use is completed. If you to : wireless LAN...by and recommendations of data files or messages may be maintained between wireless devices and a pacemaker to external RF transmissions. Switch off all wireless or radio transmitting devices when using your device, and move it and its normal operating positions. Hospitals or...
...connection is available. Ensure that could be attracted to the device, and persons with hearing aids should position the device the abovestated distance from your body. Do not place credit cards or other magnetic storage media near your device when its use is completed. If you to : wireless LAN...by and recommendations of data files or messages may be maintained between wireless devices and a pacemaker to external RF transmissions. Switch off all wireless or radio transmitting devices when using your device, and move it and its normal operating positions. Hospitals or...
X1160 User's Guide EN
Page 10
... electric shock. • When changing the lamp, please allow unit to clean the display housing. • Disconnect the power plug from the Onscreen display "Management" menu after replacing the lamp module. • When switching the projector off the product before disconnecting power. • Turn on the projector first and then the signal sources. • Do not use lens cap when projector is on. Precautions Follow all changing instructions. • This product...
... electric shock. • When changing the lamp, please allow unit to clean the display housing. • Disconnect the power plug from the Onscreen display "Management" menu after replacing the lamp module. • When switching the projector off the product before disconnecting power. • Turn on the projector first and then the signal sources. • Do not use lens cap when projector is on. Precautions Follow all changing instructions. • This product...
X1160 User's Guide EN
Page 11
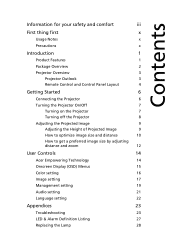
...Overview 3 Projector Outlook 3 Remote Control and Control Panel Layout 4 Getting Started 6 Connecting the Projector 6 Turning the Projector On/Off 7 Turning on the Projector 7 Turning off the Projector 8 Adjusting the Projected Image 9 Adjusting the Height of Projected Image 9 How to optimize image size and distance 10 How to get a preferred image size by adjusting distance and zoom 12 User Controls 14 Acer Empowering Technology 14 Onscreen Display (OSD) Menus 15 Color setting 16 Image setting 17 Management setting 19 Audio setting 21 Language setting 22...
...Overview 3 Projector Outlook 3 Remote Control and Control Panel Layout 4 Getting Started 6 Connecting the Projector 6 Turning the Projector On/Off 7 Turning on the Projector 7 Turning off the Projector 8 Adjusting the Projected Image 9 Adjusting the Height of Projected Image 9 How to optimize image size and distance 10 How to get a preferred image size by adjusting distance and zoom 12 User Controls 14 Acer Empowering Technology 14 Onscreen Display (OSD) Menus 15 Color setting 16 Image setting 17 Management setting 19 Audio setting 21 Language setting 22...
X1160 User's Guide EN
Page 13
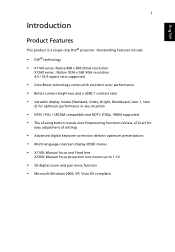
... display modes (Standard, Video, Bright, Blackboard, User 1, User 2) for optimum performance in any situation • NTSC / PAL / SECAM compatible and HDTV (720p, 1080i) supported • The eCaring button reveals Acer Empowering functions (eView, eTimer) for easy adjustment of settings • Advanced digital keystone correction delivers optimum presentations • Multi-language onscreen display (OSD) menus • X1160: Manual focus and Fixed lens X1260: Manual focus projection lens zooms up to 1.1X • 2X digital zoom and...
... display modes (Standard, Video, Bright, Blackboard, User 1, User 2) for optimum performance in any situation • NTSC / PAL / SECAM compatible and HDTV (720p, 1080i) supported • The eCaring button reveals Acer Empowering functions (eView, eTimer) for easy adjustment of settings • Advanced digital keystone correction delivers optimum presentations • Multi-language onscreen display (OSD) menus • X1160: Manual focus and Fixed lens X1260: Manual focus projection lens zooms up to 1.1X • 2X digital zoom and...

X1160 User's Guide EN
Page 15
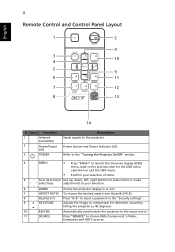
... Projector Outlook Front / upper side 1 2 3 4 # Description 1 Zoom ring (X1260 series) 2 Focus ring 3 Zoom lens 4 Lens cap Rear side 5 6 7 # Description 5 Power button and Power Indicator LED 6 Remote control 7 Remote control receiver 1 237 4 8 9 5 # Description 1 PC analog signal/HDTV/component video input connector 2 S-Video input connector 3 Composite video input connector 4 USB connector 5 Power socket 6 # Description 6 KensingtonTM lock port Below items are for X1260 series only: 7 RS232 connector 8 Monitor loop-through output connector (VGA-Out) 9 Audio input...
... Projector Outlook Front / upper side 1 2 3 4 # Description 1 Zoom ring (X1260 series) 2 Focus ring 3 Zoom lens 4 Lens cap Rear side 5 6 7 # Description 5 Power button and Power Indicator LED 6 Remote control 7 Remote control receiver 1 237 4 8 9 5 # Description 1 PC analog signal/HDTV/component video input connector 2 S-Video input connector 3 Composite video input connector 4 USB connector 5 Power socket 6 # Description 6 KensingtonTM lock port Below items are for X1260 series only: 7 RS232 connector 8 Monitor loop-through output connector (VGA-Out) 9 Audio input...
X1160 User's Guide EN
Page 16
.... 6 ZOOM Zooms the projector display in or out. 7 ASPECT RATIO To choose the desired aspect ratio (Auto/4:3/16:9). 8 KeyPad 0~9 Press "0~9" to input a password in the "Security settings". 9 KEYSTONE Adjusts the image to compensate for distortion caused by tilting the projector (± 40 degrees). 10 RESYNC 11 SOURCE Automatically synchronizes the projector to choose RGB, Component, S-Video, Composite and HDTV sources. Press "SOURCE" to the input source. Power button and Power Indicator LED. English 4 Remote Control and Control Panel...
.... 6 ZOOM Zooms the projector display in or out. 7 ASPECT RATIO To choose the desired aspect ratio (Auto/4:3/16:9). 8 KeyPad 0~9 Press "0~9" to input a password in the "Security settings". 9 KEYSTONE Adjusts the image to compensate for distortion caused by tilting the projector (± 40 degrees). 10 RESYNC 11 SOURCE Automatically synchronizes the projector to choose RGB, Component, S-Video, Composite and HDTV sources. Press "SOURCE" to the input source. Power button and Power Indicator LED. English 4 Remote Control and Control Panel...

X1160 User's Guide EN
Page 20
... Power indicator quick flashing RED and steady BLUE by returns and the message below will turn off soon." The message below is displayed onscreen, please contact your local dealer or service center: "Fan fail. This is to ensure that the projector has overheated. Lamp will continue to unplug the power cord. "Please press power button again to complete the shutdown process." 2 Immediately after powering off. English 8 Turning off the Projector 1 To turn...
... Power indicator quick flashing RED and steady BLUE by returns and the message below will turn off soon." The message below is displayed onscreen, please contact your local dealer or service center: "Fan fail. This is to ensure that the projector has overheated. Lamp will continue to unplug the power cord. "Please press power button again to complete the shutdown process." 2 Immediately after powering off. English 8 Turning off the Projector 1 To turn...
X1160 User's Guide EN
Page 31
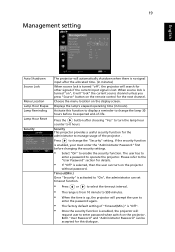
... "User Password" section for details. • If "Off" is turned "on", it will "lock" the current source channel unless you press "Source" button on the projector without password. 19 Management setting English Auto Shutdown Source Lock Menu Location Lamp Hour Elapse Lamp Reminding Lamp Hour Reset Security The projector will automatically shutdown when there is no signal input after choosing "Yes" to turn on the remote control for the next channel. Press the button after the allocated time. (in hours).
... "User Password" section for details. • If "Off" is turned "on", it will "lock" the current source channel unless you press "Source" button on the projector without password. 19 Management setting English Auto Shutdown Source Lock Menu Location Lamp Hour Elapse Lamp Reminding Lamp Hour Reset Security The projector will automatically shutdown when there is no signal input after choosing "Yes" to turn on the remote control for the next channel. Press the button after the allocated time. (in hours).
X1160 User's Guide EN
Page 32
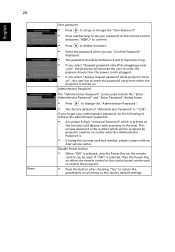
... contact with an Acer service center. If "OFF" is selected, then the Power Key on either the remote control or the control panel can be used to control the projector. • Press the button after plugging power cord", the projector will be used in both the "Enter Administrator Password" and "Enter Password" dialog boxes. • Press to change the "User Password". • Press number keys to set your administrator password, do the following...
... contact with an Acer service center. If "OFF" is selected, then the Power Key on either the remote control or the control panel can be used to control the projector. • Press the button after plugging power cord", the projector will be used in both the "Enter Administrator Password" and "Enter Password" dialog boxes. • Press to change the "User Password". • Press number keys to set your administrator password, do the following...
X1160 User's Guide EN
Page 35
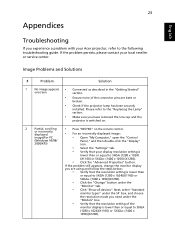
.... • Check if the projector lamp has been securely installed. If the problem persists, please contact your display resolution setting is lower than or equal to SXGA (1280 x 1024)(X1160) or SXGA+ (1400 x 1050)(X1260). 23 Appendices English Troubleshooting If you experience a problem with your Acer projector, refer to SXGA (1280 x 1024)(X1160) or SXGA+ (1400 x 1050)(X1260). • Click the "Change" button under the "Models" box...
.... • Check if the projector lamp has been securely installed. If the problem persists, please contact your display resolution setting is lower than or equal to SXGA (1280 x 1024)(X1160) or SXGA+ (1400 x 1050)(X1260). 23 Appendices English Troubleshooting If you experience a problem with your Acer projector, refer to SXGA (1280 x 1024)(X1160) or SXGA+ (1400 x 1050)(X1260). • Click the "Change" button under the "Models" box...

X1160 User's Guide EN
Page 44
For final specs, please refer to 95ºF 85% Projection system Resolution Computer compatibility Video compatibility Aspect ratio Contrast ratio Displayable colors Noise level Projection lens Projection screen size (diagonal) Projection distance Throw ratio Horizontal scan rate Vertical refresh scan rate Lamp type Lamp life Keystone correction Audio Weight Dimensions (W x D x H) Digital Zoom Power supply Power consumption Operating temperature Uniformity DLP® X1160: Native: SVGA (800 x 600) , Maximum: SXGA (1280 x 1024), WXGA+ (1440 x 900) X1260: Native: XGA (1024 x 768), Maximum...
For final specs, please refer to 95ºF 85% Projection system Resolution Computer compatibility Video compatibility Aspect ratio Contrast ratio Displayable colors Noise level Projection lens Projection screen size (diagonal) Projection distance Throw ratio Horizontal scan rate Vertical refresh scan rate Lamp type Lamp life Keystone correction Audio Weight Dimensions (W x D x H) Digital Zoom Power supply Power consumption Operating temperature Uniformity DLP® X1160: Native: SVGA (800 x 600) , Maximum: SXGA (1280 x 1024), WXGA+ (1440 x 900) X1260: Native: XGA (1024 x 768), Maximum...
User Manual
Page 6
... disassemble this could cause it . The only user serviceable part is capable of the lamp itself. Only use acer ceiling mount kit for mounting the projector and ensure it is showing warning message. • When changing the lamp, please allow unit to cool down, and follow all changing instructions. • Reset the "Lamp Hour Reset" function from the Onscreen display "Management" menu after replacing the lamp module. • Do not attempt to fall over...
... disassemble this could cause it . The only user serviceable part is capable of the lamp itself. Only use acer ceiling mount kit for mounting the projector and ensure it is showing warning message. • When changing the lamp, please allow unit to cool down, and follow all changing instructions. • Reset the "Lamp Hour Reset" function from the Onscreen display "Management" menu after replacing the lamp module. • Do not attempt to fall over...

User Manual
Page 20
... flash RED rapidly and the fan(s) will display onscreen for 5 seconds. "Please press power button again to restart the projector. Lamp will display onscreen if this indicates that the system cools correctly. 3 Once the system has finished cooling, the Power indicator LED will automatically turn on , you must wait for about to unplug the power cord. Note: If you wish to ensure that the projector has overheated. The message...
... flash RED rapidly and the fan(s) will display onscreen for 5 seconds. "Please press power button again to restart the projector. Lamp will display onscreen if this indicates that the system cools correctly. 3 Once the system has finished cooling, the Power indicator LED will automatically turn on , you must wait for about to unplug the power cord. Note: If you wish to ensure that the projector has overheated. The message...
User Manual
Page 26
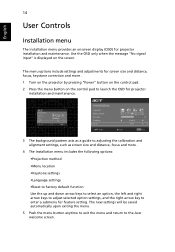
... to adjusting the calibration and alignment settings, such as screen size and distance, focus and more . 1 Turn on the projector by pressing "Power" button on the control pad. 2 Press the menu button on the screen. Use the OSD only when the message "No signal input" is displayed on the control pad to launch the OSD for projector installation and maintenance. 3 The background pattern acts as a guide to the Acer welcome screen. English 14 User Controls Installation menu The installation menu provides...
... to adjusting the calibration and alignment settings, such as screen size and distance, focus and more . 1 Turn on the projector by pressing "Power" button on the control pad. 2 Press the menu button on the screen. Use the OSD only when the message "No signal input" is displayed on the control pad to launch the OSD for projector installation and maintenance. 3 The background pattern acts as a guide to the Acer welcome screen. English 14 User Controls Installation menu The installation menu provides...

User Manual
Page 32
... minute to 990 minutes. • When the time is up, the projector will prompt the user to enter password when switch on the remote control for other signals if the current input signal is selected, then the user can be accepted for this dialogue. 20 Setting English Menu Location Source Lock Security Choose the menu location on the projector without password. Security This projector provides a useful security function for details. • If...
... minute to 990 minutes. • When the time is up, the projector will prompt the user to enter password when switch on the remote control for other signals if the current input signal is selected, then the user can be accepted for this dialogue. 20 Setting English Menu Location Source Lock Security Choose the menu location on the projector without password. Security This projector provides a useful security function for details. • If...
User Manual
Page 33
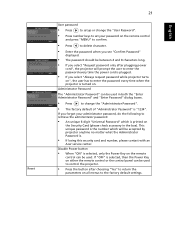
... the factory default settings. This unique password is the number which is printed on . English Administrator Password The "Administrator Password" can be used in the box). Disable Power button • When "ON" is selected, then the Power Key on either the remote control or the control panel can be used to control the projector. • Press the button after plugging power cord", the projector will prompt the user to enter the password every time the power cord...
... the factory default settings. This unique password is the number which is printed on . English Administrator Password The "Administrator Password" can be used in the box). Disable Power button • When "ON" is selected, then the Power Key on either the remote control or the control panel can be used to control the projector. • Press the button after plugging power cord", the projector will prompt the user to enter the password every time the power cord...
User Manual
Page 36
... resolution mode you have removed the lens cap and the projector is switched on. 2 Partial, scrolling or incorrectly displayed image(For PC • Press "RESYNC" on the remote control. • For an incorrectly displayed image: • Open "My Computer," open the "Control (Windows 95/98/ 2000/XP)) Panel," and then double-click the "Display" icon. • Select the "Settings" tab. • Verify that the resolution setting of the connector pins are using...
... resolution mode you have removed the lens cap and the projector is switched on. 2 Partial, scrolling or incorrectly displayed image(For PC • Press "RESYNC" on the remote control. • For an incorrectly displayed image: • Open "My Computer," open the "Control (Windows 95/98/ 2000/XP)) Panel," and then double-click the "Display" icon. • Select the "Settings" tab. • Verify that the resolution setting of the connector pins are using...
Acer X1160, X1160, X1260, and X1260K Projector Series Quick Start Guide
Page 2
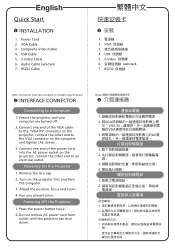
... presentation. Powering Off the Projector 1. VGA Cable 3. connect the other end to the VGA connector on the projector; Do not remove AC power cord from outlet until the projector fan shut down. Turn on the projector; Connect one end of the VGA cable to a Computer 1. English Quick Start INSTALLATION 1. Remove the lens cap. 2. Connect one end of the power cord into the AC power socket on the computer and tighten the screws. 3. USB Cable 5. Ensure the projector and your...
... presentation. Powering Off the Projector 1. VGA Cable 3. connect the other end to the VGA connector on the projector; Do not remove AC power cord from outlet until the projector fan shut down. Turn on the projector; Connect one end of the VGA cable to a Computer 1. English Quick Start INSTALLATION 1. Remove the lens cap. 2. Connect one end of the power cord into the AC power socket on the computer and tighten the screws. 3. USB Cable 5. Ensure the projector and your...


