
Acer Projector H6510BD, P1340W, X1140, X1240 Service Guide
Page 11
The digital gains are defined as color safe gain table with dark scenes in dynamic dimming mode 3. Mode set to eco mode 5~7 minutes. When project is set to extreme dimming mode, which can be operated by the cycle lamp power 30% during content with time (hours) 3. 20.0 ...-Side Horizontal (1080i@50/60Hz) Top-and-Bottom (720p@50/60Hz, [email protected]/24Hz) 1. Behavior: (1) Extreme dimming: Projector lamp power is set up: Extreme dimming mode and Dynamic dimming mode 2. Advantage: (1) Enhance dynamic image contrast (2) Energy can compensate the color distortion due to the performance decay...
The digital gains are defined as color safe gain table with dark scenes in dynamic dimming mode 3. Mode set to eco mode 5~7 minutes. When project is set to extreme dimming mode, which can be operated by the cycle lamp power 30% during content with time (hours) 3. 20.0 ...-Side Horizontal (1080i@50/60Hz) Top-and-Bottom (720p@50/60Hz, [email protected]/24Hz) 1. Behavior: (1) Extreme dimming: Projector lamp power is set up: Extreme dimming mode and Dynamic dimming mode 2. Advantage: (1) Enhance dynamic image contrast (2) Energy can compensate the color distortion due to the performance decay...

Acer Projector H6510BD, P1340W, X1140, X1240 Service Guide
Page 12
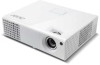
... 10 sec. TI DDP DDP2431 • Can support 120Hz 3D source from PC (2) 3D Function Detail Description : − 3D: DLP 3D, off , HSG only one set as 3D on . (one source one function item in that use only. − If non-3D mode (120Hz), keep normal/same brightness. − 3D function... stored and only for DLP 3D, otherwise it while timing changes. (or adjust to off 3D Warning message) Priority: PWD login screen (Security fn is set value), if end user adjust adjustable items (ex. Not show it will appear after power on ) Lamp life reminder 3D reminder Screen Timer and other...
... 10 sec. TI DDP DDP2431 • Can support 120Hz 3D source from PC (2) 3D Function Detail Description : − 3D: DLP 3D, off , HSG only one set as 3D on . (one source one function item in that use only. − If non-3D mode (120Hz), keep normal/same brightness. − 3D function... stored and only for DLP 3D, otherwise it while timing changes. (or adjust to off 3D Warning message) Priority: PWD login screen (Security fn is set value), if end user adjust adjustable items (ex. Not show it will appear after power on ) Lamp life reminder 3D reminder Screen Timer and other...
Acer Projector H6510BD, P1340W, X1140, X1240 Service Guide
Page 13
... file or DVD with corresponding SW player. − "3D Sync Invert" is adjustable when above "3D" is set value), if end user adjust adjustable items (ex. Reminder screen 13 brightness), the value will not been stored and... only for that source after power on. (one source one set as 3D on ) -> Lamp life reminder -> 3D reminder Screen -> Timer and other OSD pup-up screen and.../120Hz (no matter 3D on . Otherwise gray out. Pop-up fn. For P1340W/H6510BD : (1) This function is enabled, this screen will appear after exit OSD menu.
... file or DVD with corresponding SW player. − "3D Sync Invert" is adjustable when above "3D" is set value), if end user adjust adjustable items (ex. Reminder screen 13 brightness), the value will not been stored and... only for that source after power on. (one source one set as 3D on ) -> Lamp life reminder -> 3D reminder Screen -> Timer and other OSD pup-up screen and.../120Hz (no matter 3D on . Otherwise gray out. Pop-up fn. For P1340W/H6510BD : (1) This function is enabled, this screen will appear after exit OSD menu.
Acer Projector H6510BD, P1340W, X1140, X1240 Service Guide
Page 31
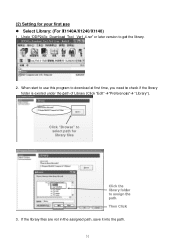
Click "Browse" to select path for your first use this program to download at first time, you need to check if the library folder is existed under the path of Library (Click "Edit" "Preferences" "Library"). If the library files are not in the assigned path, save it into the path. 31 Then Click "OK". 3. (2) Setting for library files Click the library folder to assign the path. Unzip "DDP243x_Download_Tool_ Ver1.4.rar" or later version to use Select Library: (For X1140A/X1240/X1140) 1. When start to get the library. 2.
Click "Browse" to select path for your first use this program to download at first time, you need to check if the library folder is existed under the path of Library (Click "Edit" "Preferences" "Library"). If the library files are not in the assigned path, save it into the path. 31 Then Click "OK". 3. (2) Setting for library files Click the library folder to assign the path. Unzip "DDP243x_Download_Tool_ Ver1.4.rar" or later version to use Select Library: (For X1140A/X1240/X1140) 1. When start to get the library. 2.
Acer Projector H6510BD, P1340W, X1140, X1240 Service Guide
Page 33
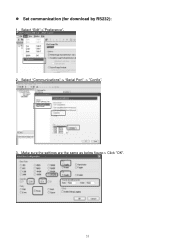
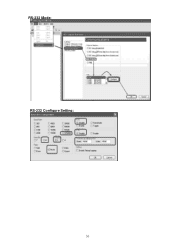
Select "Communications"-> "Serial Port" -> "Config". 3. Make sure the settings are the same as below figure-> Click "OK". 33 Set communication (for download by RS232): 1. Select "Edit"->"Preference". 2.
Select "Communications"-> "Serial Port" -> "Config". 3. Make sure the settings are the same as below figure-> Click "OK". 33 Set communication (for download by RS232): 1. Select "Edit"->"Preference". 2.
Acer Projector H6510BD, P1340W, X1140, X1240 Service Guide
Page 36
RS-232 Mode: RS-232 Configure Setting: 36
RS-232 Mode: RS-232 Configure Setting: 36
Acer Projector H6510BD, P1340W, X1140, X1240 Service Guide
Page 40
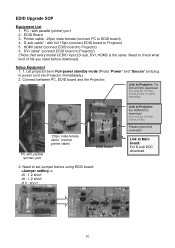
... to set Jumper before download). DVI cable* (connect EDID board to Projector) 6. Connect between PC, EDID board and the Projector: Link to Projector: For DVI-D DDC download (no need for X1140A, X1240,X1140) Please ignore this connector Link to Projector: For HDMI DDC download (no need for X1140A, X1240,X1140, P1340W, H6510BD...
... to set Jumper before download). DVI cable* (connect EDID board to Projector) 6. Connect between PC, EDID board and the Projector: Link to Projector: For DVI-D DDC download (no need for X1140A, X1240,X1140) Please ignore this connector Link to Projector: For HDMI DDC download (no need for X1140A, X1240,X1140, P1340W, H6510BD...

Acer Projector H6510BD, P1340W, X1140, X1240 Service Guide
Page 95
...Area. Pond of pixels on the reset group boundaries that may show up on Digital Micromirror Device (DMD) technology. 2. The Component Set provides the digital imaging functionality based on screen in the image illumination path. Bright pixel A single pixel or mirror that does not... the DMD ceramic package. Eyecatcher Eyecatcher's are due to the DLP®.55SVGA Type X and Series 450 Value Component Set, and DLPTM .65WXGA-800 Value Component Set. Border Artifacts Border artifacts are a general category of pixels. If visible, they will appear as a cluster. The ...
...Area. Pond of pixels on the reset group boundaries that may show up on Digital Micromirror Device (DMD) technology. 2. The Component Set provides the digital imaging functionality based on screen in the image illumination path. Bright pixel A single pixel or mirror that does not... the DMD ceramic package. Eyecatcher Eyecatcher's are due to the DLP®.55SVGA Type X and Series 450 Value Component Set, and DLPTM .65WXGA-800 Value Component Set. Border Artifacts Border artifacts are a general category of pixels. If visible, they will appear as a cluster. The ...

Acer Projector H6510BD, P1340W, X1140, X1240 Service Guide
Page 96
...used to test for major light blemishes. All areas of the screen are colored a Microsoft Paintbrush gray 30 (green, red, and blue set at 30). c. Reflective Edge Reflective Edge is light that is below the super structure (mirrors). NOTE: If linear degamma is not ...as a thin diffuse line outside of the screen are colored a Microsoft Paintbrush gray 10 (green, red, and blue set to nominal. e. Test Set brightness and contrast settings shall be determined under the following projected image test conditions: a. The projection screen shall be inspected from the edge of ...
...used to test for major light blemishes. All areas of the screen are colored a Microsoft Paintbrush gray 30 (green, red, and blue set at 30). c. Reflective Edge Reflective Edge is light that is below the super structure (mirrors). NOTE: If linear degamma is not ...as a thin diffuse line outside of the screen are colored a Microsoft Paintbrush gray 10 (green, red, and blue set to nominal. e. Test Set brightness and contrast settings shall be determined under the following projected image test conditions: a. The projection screen shall be inspected from the edge of ...
Acer Projector H6510BD, P1340W, X1140, X1240 Service Guide
Page 99
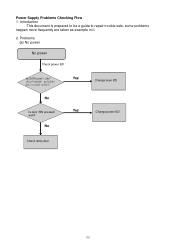
Problems (a) No power No power Check power BD Is CN701 pin11 =5v? (For P1340W : Is CN701 pin7 or pin9 =3.3V?) Yes Change main BD No Is door SW pressed well? No Yes Change power BD Check lamp door 99 Power Supply Problems Checking Flow 1. Introduction This document is prepared to be a guide to repair trouble sets, some problems happen more frequently are taken as example in it. 2.
Problems (a) No power No power Check power BD Is CN701 pin11 =5v? (For P1340W : Is CN701 pin7 or pin9 =3.3V?) Yes Change main BD No Is door SW pressed well? No Yes Change power BD Check lamp door 99 Power Supply Problems Checking Flow 1. Introduction This document is prepared to be a guide to repair trouble sets, some problems happen more frequently are taken as example in it. 2.
Acer Projector H6510BD, P1340W, X1140, X1240 Service Guide
Page 110
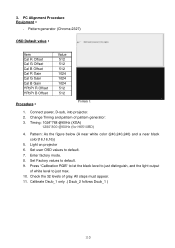
Timing: 1024*768 @60Hz (XGA) 1280*800 @60Hz (for H6510BD) 4. Pattern: As the figure below {A near white color (240,240,240) and a near black color(16,16,16)} 5. Set Factory values to just max. 10. Press "Calibration RGB" to let the black level to just distinguish, and the... of white level to default. 9. All steps must appear. 11. Change Timing and pattern of gray. Calibrate Dsub_1 only .( Dsub_2 follows Dsub_1 ) 110 3. Set user OSD values to default. 7. Light on projector 6. Pattern generator (Chroma-2327) OSD Default value: Item Cal R Offset Cal G Offset Cal B ...
Timing: 1024*768 @60Hz (XGA) 1280*800 @60Hz (for H6510BD) 4. Pattern: As the figure below {A near white color (240,240,240) and a near black color(16,16,16)} 5. Set Factory values to just max. 10. Press "Calibration RGB" to let the black level to just distinguish, and the... of white level to default. 9. All steps must appear. 11. Change Timing and pattern of gray. Calibrate Dsub_1 only .( Dsub_2 follows Dsub_1 ) 110 3. Set user OSD values to default. 7. Light on projector 6. Pattern generator (Chroma-2327) OSD Default value: Item Cal R Offset Cal G Offset Cal B ...
Acer Projector H6510BD, P1340W, X1140, X1240 Service Guide
Page 111
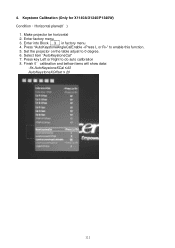
Make projector be horizontal 2. Press key Left or Right to 0 degree. 6. Set the projector on the table adjust to do auto calibration 8. Enter factory menu 3. Enter into Block 3 in factory menu 4. Finish 0∘calibration and bellow items will show data: -5≤ AutoKeystoneXCal ≤43 AutoKeystoneXOffset ≤ 20 111 Select item "AutoKeystoneCal" 7. Press "AutoKeystoneAngleCalEnable " to enable this function. 5. Keystone Calibration (Only for X1140A/X1240/P1340W) Condition:Horizontal plane(0∘) 1. 4.
Make projector be horizontal 2. Press key Left or Right to 0 degree. 6. Set the projector on the table adjust to do auto calibration 8. Enter factory menu 3. Enter into Block 3 in factory menu 4. Finish 0∘calibration and bellow items will show data: -5≤ AutoKeystoneXCal ≤43 AutoKeystoneXOffset ≤ 20 111 Select item "AutoKeystoneCal" 7. Press "AutoKeystoneAngleCalEnable " to enable this function. 5. Keystone Calibration (Only for X1140A/X1240/P1340W) Condition:Horizontal plane(0∘) 1. 4.
Acer Projector H6510BD, P1340W, X1140, X1240 Service Guide
Page 122
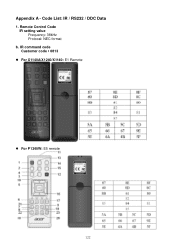
IR command code Customer code:0813 For X1140A/X1240/X1140: E1 Remote For P1340W: E5 remote 122 Appendix A - Code List: IR / RS232 / DDC Data 1. Remote Control Code IR setting value Frequency: 38kHz Protocal: NEC format b.
IR command code Customer code:0813 For X1140A/X1240/X1140: E1 Remote For P1340W: E5 remote 122 Appendix A - Code List: IR / RS232 / DDC Data 1. Remote Control Code IR setting value Frequency: 38kHz Protocal: NEC format b.
User Manual
Page 4
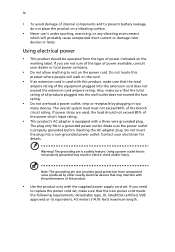
Warning! If you need to replace the power cord set . The plug only fits in too many devices. The overall system load must not exceed 80% of the equipment plugged into the extension cord does ... may interfere with the performance of power available, consult your electrician for details. Also, make sure that is equipped with the supplied power supply cord set , make sure that the total ampere rating of the branch circuit rating. Contact your dealer or local power company. • Do not allow anything to...
Warning! If you need to replace the power cord set . The plug only fits in too many devices. The overall system load must not exceed 80% of the equipment plugged into the extension cord does ... may interfere with the performance of power available, consult your electrician for details. Also, make sure that is equipped with the supplied power supply cord set , make sure that the total ampere rating of the branch circuit rating. Contact your dealer or local power company. • Do not allow anything to...
User Manual
Page 9
... to Optimize Image Size and Distance 13 How to Get a Preferred Image Size by Adjusting Distance and Zoom 16 User Controls 19 Installation Menu 19 Acer Empowering Technology 20 Onscreen Display (OSD) Menus 23 Color 24 Image 27 Setting 30 Management 34 Audio (X1140A/X1240/X1340W/P1340W/H6510BD) 35 3D 36 Language 38
... to Optimize Image Size and Distance 13 How to Get a Preferred Image Size by Adjusting Distance and Zoom 16 User Controls 19 Installation Menu 19 Acer Empowering Technology 20 Onscreen Display (OSD) Menus 23 Color 24 Image 27 Setting 30 Management 34 Audio (X1140A/X1240/X1340W/P1340W/H6510BD) 35 3D 36 Language 38
User Manual
Page 11
... improvement • Empowering Key reveals Acer Empowering Technology functions for 2D contents via DLP Link Technology: Blu-Ray 3D supported (P1340W and H6510BD) and Nvidia 3DTV Play Ready (H6510BD only) • Enriches 3D experience for easy adjustment of settings • Advanced keystone correction delivers ... adjusts the power consumption of the lamp according to the brightness of the lamp by up to the 3D functions (H6510BD only) • Acer ColorBoost technology delivers vivid, life-like images • High brightness and contrast ratio • Versatile display modes enable ...
... improvement • Empowering Key reveals Acer Empowering Technology functions for 2D contents via DLP Link Technology: Blu-Ray 3D supported (P1340W and H6510BD) and Nvidia 3DTV Play Ready (H6510BD only) • Enriches 3D experience for easy adjustment of settings • Advanced keystone correction delivers ... adjusts the power consumption of the lamp according to the brightness of the lamp by up to the 3D functions (H6510BD only) • Acer ColorBoost technology delivers vivid, life-like images • High brightness and contrast ratio • Versatile display modes enable ...
User Manual
Page 15
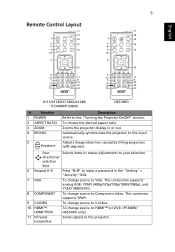
...RGB, YPbPr (480p/576p/720p/1080i/1080p), and YCbCr (480i/576i). 8 COMPONENT To change source to HDMI™ (or DVI). (P1340W/ H6510BD only) 11 Infrared transmitter Sends signals to input a password in or out. Adjusts image distortion caused by tilting projection (±40 degrees). HDMI™...;/DVI To change source to S-Video. 10 HDMI™; 5 Remote Control Layout English X111/X1140/X1140A/X1240/ X1340W/P1340W H6510BD # Function 1 POWER 2 ASPECT RATIO 3 ZOOM 4 RESYNC 5 Keystone Description Refer to the input source. Zooms the projector display in the...
...RGB, YPbPr (480p/576p/720p/1080i/1080p), and YCbCr (480i/576i). 8 COMPONENT To change source to HDMI™ (or DVI). (P1340W/ H6510BD only) 11 Infrared transmitter Sends signals to input a password in or out. Adjusts image distortion caused by tilting projection (±40 degrees). HDMI™...;/DVI To change source to S-Video. 10 HDMI™; 5 Remote Control Layout English X111/X1140/X1140A/X1240/ X1340W/P1340W H6510BD # Function 1 POWER 2 ASPECT RATIO 3 ZOOM 4 RESYNC 5 Keystone Description Refer to the input source. Zooms the projector display in the...
User Manual
Page 16
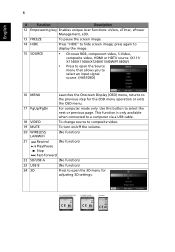
... (No function) 23 USB B (No function) 24 3D Press to hide screen image; English 6 # Function Description 12 Empowering key Enables unique Acer functions: eView, eTimer, ePower Management, e3D. 13 FREEZE To pause the screen image. 14 HIDE Press "HIDE" to open the Source menu that ...allows you to select an input signal source. (H6510BD) 16 MENU Launches the Onscreen Display (OSD) menu, returns to the previous step for adjusting 3D settings. (X111/X1140/X1140A/X1240) (X1340W/P1340W) (H6510BD) VZ.JDW00.001 press again to display the image. 15 SOURCE ...
... (No function) 23 USB B (No function) 24 3D Press to hide screen image; English 6 # Function Description 12 Empowering key Enables unique Acer functions: eView, eTimer, ePower Management, e3D. 13 FREEZE To pause the screen image. 14 HIDE Press "HIDE" to open the Source menu that ...allows you to select an input signal source. (H6510BD) 16 MENU Launches the Onscreen Display (OSD) menu, returns to the previous step for adjusting 3D settings. (X111/X1140/X1140A/X1240) (X1340W/P1340W) (H6510BD) VZ.JDW00.001 press again to display the image. 15 SOURCE ...

User Manual
Page 17
English USB 7 Getting Started Connecting the Projector X111/X1140/X1140A/X1240/X1340W VGA R WY RS232 USB Display RS232 D-Sub 8 7 2 5 Video/S-Video DVD player, Output D-Sub Set-top box, HDTV receiver 2 R RB G 9 RB G 3 6 5 4 Speakers 1 D-Sub HDTV adapter Y W D-Sub RS232 5 # Description 1 Power cord 2 VGA cable 3 VGA to component video/HDTV adapter 4 Composite video cable 5 Audio cable # Description 6 S-Video cable 7 RS232 cable 8 USB cable 9 3 RCA component cable
English USB 7 Getting Started Connecting the Projector X111/X1140/X1140A/X1240/X1340W VGA R WY RS232 USB Display RS232 D-Sub 8 7 2 5 Video/S-Video DVD player, Output D-Sub Set-top box, HDTV receiver 2 R RB G 9 RB G 3 6 5 4 Speakers 1 D-Sub HDTV adapter Y W D-Sub RS232 5 # Description 1 Power cord 2 VGA cable 3 VGA to component video/HDTV adapter 4 Composite video cable 5 Audio cable # Description 6 S-Video cable 7 RS232 cable 8 USB cable 9 3 RCA component cable
User Manual
Page 19
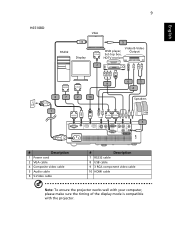
English H6510BD 9 VGA RS232 Display Video/S-Video DVD player, Output Set-top box, HDTV receiver Speakers # Description 1 Power cord 2 VGA cable 4 Composite video cable 5 Audio cable 6 S-Video cable # Description 7 RS232 cable 8 USB cable 9 3 RCA component video cable 10 HDMI cable Note: To ensure the projector works well with your computer, please make sure the timing of the display mode is compatible with the projector.
English H6510BD 9 VGA RS232 Display Video/S-Video DVD player, Output Set-top box, HDTV receiver Speakers # Description 1 Power cord 2 VGA cable 4 Composite video cable 5 Audio cable 6 S-Video cable # Description 7 RS232 cable 8 USB cable 9 3 RCA component video cable 10 HDMI cable Note: To ensure the projector works well with your computer, please make sure the timing of the display mode is compatible with the projector.


