
Acer Projector H6510BD, P1340W, X1140, X1240 Service Guide
Page 2
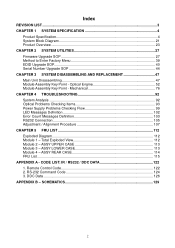
... 99 LED Messages Definition 102 Error Count Messages Definition 103 RS232 Connection ...105 Adjustment / Alignment Procedure 107 CHAPTER 5 FRU LIST 112 Exploded Diagram ...112 Module 1 - Remote Control Code 122 2. Index REVISION LIST ...3 CHAPTER 1 SYSTEM SPECIFICATION 4 Product Specification...4 System Block Diagram 21 Product Overview ...23 CHAPTER 2 SYSTEM UTILITIES 27 Firmware Upgrade SOP...
... 99 LED Messages Definition 102 Error Count Messages Definition 103 RS232 Connection ...105 Adjustment / Alignment Procedure 107 CHAPTER 5 FRU LIST 112 Exploded Diagram ...112 Module 1 - Remote Control Code 122 2. Index REVISION LIST ...3 CHAPTER 1 SYSTEM SPECIFICATION 4 Product Specification...4 System Block Diagram 21 Product Overview ...23 CHAPTER 2 SYSTEM UTILITIES 27 Firmware Upgrade SOP...
Acer Projector H6510BD, P1340W, X1140, X1240 Service Guide
Page 122
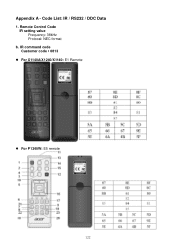
Code List: IR / RS232 / DDC Data 1. Remote Control Code IR setting value Frequency: 38kHz Protocal: NEC format b. Appendix A - IR command code Customer code:0813 For X1140A/X1240/X1140: E1 Remote For P1340W: E5 remote 122
Code List: IR / RS232 / DDC Data 1. Remote Control Code IR setting value Frequency: 38kHz Protocal: NEC format b. Appendix A - IR command code Customer code:0813 For X1140A/X1240/X1140: E1 Remote For P1340W: E5 remote 122
User Manual
Page 6
...clogged with any electronic components unless the projector is the lamp which become heated and deformed or even cause a fire. Only use acer ceiling mount kit for mounting the projector and ensure it is under operation as this case contact your dealer for replacement. • ...not look into the air outlet grille when projector is to suitable qualified professional service personnel. • Do not stand the projector on the remote control. • The lamp becomes extremely hot during operation. The best way is operating. Refer servicing only to wait for ceiling mount ...
...clogged with any electronic components unless the projector is the lamp which become heated and deformed or even cause a fire. Only use acer ceiling mount kit for mounting the projector and ensure it is under operation as this case contact your dealer for replacement. • ...not look into the air outlet grille when projector is to suitable qualified professional service personnel. • Do not stand the projector on the remote control. • The lamp becomes extremely hot during operation. The best way is operating. Refer servicing only to wait for ceiling mount ...
User Manual
Page 9
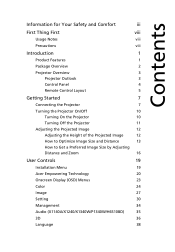
... Thing First viii Usage Notes viii Precautions viii Introduction 1 Product Features 1 Package Overview 2 Projector Overview 3 Projector Outlook 3 Control Panel 4 Remote Control Layout 5 Getting Started 7 Connecting the Projector 7 Turning the Projector On/Off 10 Turning On the Projector 10 Turning Off the Projector... Get a Preferred Image Size by Adjusting Distance and Zoom 16 User Controls 19 Installation Menu 19 Acer Empowering Technology 20 Onscreen Display (OSD) Menus 23 Color 24 Image 27 Setting 30 Management 34 Audio (X1140A/X1240/X1340W/...
... Thing First viii Usage Notes viii Precautions viii Introduction 1 Product Features 1 Package Overview 2 Projector Overview 3 Projector Outlook 3 Control Panel 4 Remote Control Layout 5 Getting Started 7 Connecting the Projector 7 Turning the Projector On/Off 10 Turning On the Projector 10 Turning Off the Projector... Get a Preferred Image Size by Adjusting Distance and Zoom 16 User Controls 19 Installation Menu 19 Acer Empowering Technology 20 Onscreen Display (OSD) Menus 23 Color 24 Image 27 Setting 30 Management 34 Audio (X1140A/X1240/X1340W/...
User Manual
Page 11
...Macintosh OS compliant Extreme Dimming: The projector will decrease the power consumption of the lamp by up to the 3D functions (H6510BD only) • Acer ColorBoost technology delivers vivid, life-like images • High brightness and contrast ratio • Versatile display modes enable optimum ...and further extend lamp life. - Dynamic Black: If turned on remote control allows quick and easy access to 70% when no input signal can be detected for 5 seconds. • Acer EcoProjection Technology delivers Intelligent power management approach and physical efficiency improvement •...
...Macintosh OS compliant Extreme Dimming: The projector will decrease the power consumption of the lamp by up to the 3D functions (H6510BD only) • Acer ColorBoost technology delivers vivid, life-like images • High brightness and contrast ratio • Versatile display modes enable optimum ...and further extend lamp life. - Dynamic Black: If turned on remote control allows quick and easy access to 70% when no input signal can be detected for 5 seconds. • Acer EcoProjection Technology delivers Intelligent power management approach and physical efficiency improvement •...
User Manual
Page 12
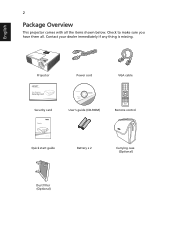
Contact your dealer immediately if any thing is missing. Check to make sure you have them all the items shown below. English Projector Power cord VGA cable Security card User's guide (CD-ROM) Remote control Quick start guide Battery x 2 Carrying case (Optional) Dust filter (Optional) 2 Package Overview This projector comes with all .
Contact your dealer immediately if any thing is missing. Check to make sure you have them all the items shown below. English Projector Power cord VGA cable Security card User's guide (CD-ROM) Remote control Quick start guide Battery x 2 Carrying case (Optional) Dust filter (Optional) 2 Package Overview This projector comes with all .
User Manual
Page 13
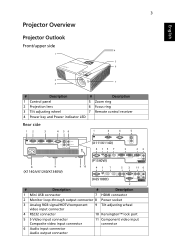
... Outlook Front/upper side 1 3 4 5 6 2 7 3 # Description # Description 1 Control panel 5 Zoom ring 2 Projection lens 6 Focus ring 3 Tilt adjusting wheel 7 Remote control receiver 4 Power key and Power indicator LED Rear side (X111/X1140) (P1340W) (X1140A/X1240/X1340W) (H6510BD) # Description # Description 1 Mini USB connector 7 HDMI connector 2 Monitor loop-through output connector 8 Power socket 3 Analog RGB signal...
... Outlook Front/upper side 1 3 4 5 6 2 7 3 # Description # Description 1 Control panel 5 Zoom ring 2 Projection lens 6 Focus ring 3 Tilt adjusting wheel 7 Remote control receiver 4 Power key and Power indicator LED Rear side (X111/X1140) (P1340W) (X1140A/X1240/X1340W) (H6510BD) # Description # Description 1 Mini USB connector 7 HDMI connector 2 Monitor loop-through output connector 8 Power socket 3 Analog RGB signal...
User Manual
Page 15
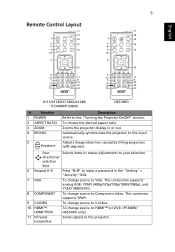
...) 11 Infrared transmitter Sends signals to S-Video. 10 HDMI™; HDMI™/DVI To change source to the projector. 5 Remote Control Layout English X111/X1140/X1140A/X1240/ X1340W/P1340W H6510BD # Function 1 POWER 2 ASPECT RATIO 3 ZOOM 4 RESYNC 5 Keystone Description Refer to the input source. To choose the desired aspect ratio. Four directional selection...
...) 11 Infrared transmitter Sends signals to S-Video. 10 HDMI™; HDMI™/DVI To change source to the projector. 5 Remote Control Layout English X111/X1140/X1140A/X1240/ X1340W/P1340W H6510BD # Function 1 POWER 2 ASPECT RATIO 3 ZOOM 4 RESYNC 5 Keystone Description Refer to the input source. To choose the desired aspect ratio. Four directional selection...
User Manual
Page 20
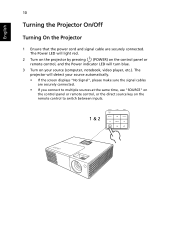
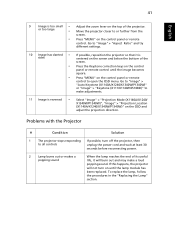
... are securely connected. • If you connect to multiple sources at the same time, use "SOURCE" on the control panel or remote control, or the direct source key on the remote control to switch between inputs. 1 & 2 The Power LED will light red. 2 Turn on the projector by pressing (POWER) on your source... the screen displays "No Signal", please make sure the signal cables are securely connected. The projector will turn blue. 3 Turn on the control panel or remote control, and the Power indicator LED will detect your source (computer, notebook, video player, etc.).
... are securely connected. • If you connect to multiple sources at the same time, use "SOURCE" on the control panel or remote control, or the direct source key on the remote control to switch between inputs. 1 & 2 The Power LED will light red. 2 Turn on the projector by pressing (POWER) on your source... the screen displays "No Signal", please make sure the signal cables are securely connected. The projector will turn blue. 3 Turn on the control panel or remote control, and the Power indicator LED will detect your source (computer, notebook, video player, etc.).
User Manual
Page 29
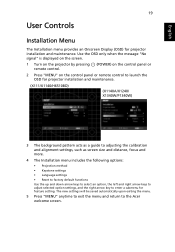
... control panel or 2 Press "MENU" on the control panel or remote control to launch the OSD for projector installation and maintenance. English 19 User Controls Installation Menu The Installation menu provides an Onscreen Display (OSD) for projector installation and maintenance. (X111/X1140/H6510BD) (X1140A/X1240/ X1340W/P1340W) 3 The background pattern acts as... down arrow keys to select an option, the left and right arrow keys to adjust selected option settings, and the right arrow key to the Acer welcome screen.
... control panel or 2 Press "MENU" on the control panel or remote control to launch the OSD for projector installation and maintenance. English 19 User Controls Installation Menu The Installation menu provides an Onscreen Display (OSD) for projector installation and maintenance. (X111/X1140/H6510BD) (X1140A/X1240/ X1340W/P1340W) 3 The background pattern acts as... down arrow keys to select an option, the left and right arrow keys to adjust selected option settings, and the right arrow key to the Acer welcome screen.
User Manual
Page 33
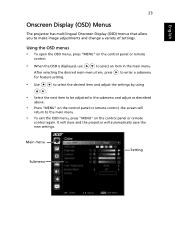
... Display (OSD) menus that allow you to be adjusted in the submenu and adjust as described above. • Press "MENU" on the control panel or remote control, the screen will automatically save the new settings. It will close and the projector will return to the main menu. • To exit the... desired main menu item, press for feature setting. Using the OSD menus • To open the OSD menu, press "MENU" on the control panel or remote control again. Main menu Submenu Setting to enter a submenu • Use to select the desired item and adjust the settings by using . • Select the...
... Display (OSD) menus that allow you to be adjusted in the submenu and adjust as described above. • Press "MENU" on the control panel or remote control, the screen will automatically save the new settings. It will close and the projector will return to the main menu. • To exit the... desired main menu item, press for feature setting. Using the OSD menus • To open the OSD menu, press "MENU" on the control panel or remote control again. Main menu Submenu Setting to enter a submenu • Use to select the desired item and adjust the settings by using . • Select the...
User Manual
Page 42
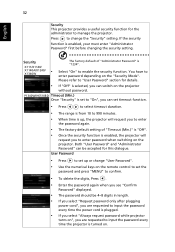
... is selected, you can switch on the projector without password. Please refer to change "User Password". • Use the numerical keys on the remote control to set to "On", you can be 4~8 digits in length. • If you select "Request password only after plugging power cord",...the security function is enabled, the projector will request you see "Confirm Password" displayed. • The password should be accepted for this dialogue. P1340W/H6510BD Timeout (Min.) Once "Security" is set the password and press "MENU" to confirm. • To delete the digits, Press . • ...
... is selected, you can switch on the projector without password. Please refer to change "User Password". • Use the numerical keys on the remote control to set to "On", you can be 4~8 digits in length. • If you select "Request password only after plugging power cord",...the security function is enabled, the projector will request you see "Confirm Password" displayed. • The password should be accepted for this dialogue. P1340W/H6510BD Timeout (Min.) Once "Security" is set the password and press "MENU" to confirm. • To delete the digits, Press . • ...
User Manual
Page 49
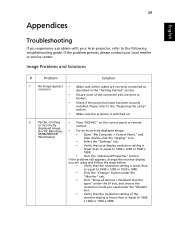
...• Ensure none of the monitor display is switched on. 2 Partial, scrolling • Press "RESYNC" on the control panel or remote or incorrectly displayed image (For PC (Windows • control. 39 Appendices English Troubleshooting If you experience a problem with your local reseller or... service center. If the problem persists, please contact your Acer projector, refer to the "Replacing the Lamp" section. • Make sure the projector is lower than or equal to 1600 x ...
...• Ensure none of the monitor display is switched on. 2 Partial, scrolling • Press "RESYNC" on the control panel or remote or incorrectly displayed image (For PC (Windows • control. 39 Appendices English Troubleshooting If you experience a problem with your local reseller or... service center. If the problem persists, please contact your Acer projector, refer to the "Replacing the Lamp" section. • Make sure the projector is lower than or equal to 1600 x ...
User Manual
Page 50
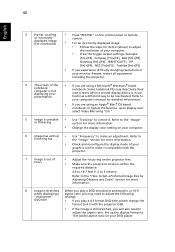
... adjust the resolution of your DVD player. 40 English 3 Partial, scrolling or incorrectly displayed image (For notebooks) • Press "RESYNC" on the control panel or remote control. • For an incorrectly displayed image: • Follow the steps for detailed information. • If you are using an Apple® Mac® OS...
... adjust the resolution of your DVD player. 40 English 3 Partial, scrolling or incorrectly displayed image (For notebooks) • Press "RESYNC" on the control panel or remote control. • For an incorrectly displayed image: • Follow the steps for detailed information. • If you are using an Apple® Mac® OS...
User Manual
Page 51
... image becomes square. • Press "MENU" on the control panel or remote control to make a loud popping sound. Go to "Image" > "Auto Keystone (X1140A/X1240/X1340W/P1340W)" or "Image" > "Keystone (X111/X1140/H6510BD)" to open the OSD menu. Go to all controls unplug the power cord...; Select "Image" > "Projection Mode (X1140A/X1240/ X1340W/P1340W)", "Image" > "Projection Location (X1140A/X1240/X1340W/P1340W)" on the control panel or remote control until the lamp module has been replaced. If this happens, the projector will not turn off the projector, then to "Image" > "Aspect Ratio"...
... image becomes square. • Press "MENU" on the control panel or remote control to make a loud popping sound. Go to "Image" > "Auto Keystone (X1140A/X1240/X1340W/P1340W)" or "Image" > "Keystone (X111/X1140/H6510BD)" to open the OSD menu. Go to all controls unplug the power cord...; Select "Image" > "Projection Mode (X1140A/X1240/ X1340W/P1340W)", "Image" > "Projection Location (X1140A/X1240/X1340W/P1340W)" on the control panel or remote control until the lamp module has been replaced. If this happens, the projector will not turn off the projector, then to "Image" > "Aspect Ratio"...
User Manual
Page 60
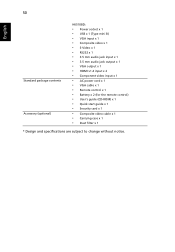
...H6510BD: • Power socket x 1 • USB x 1 (Type mini B) • VGA input x 1 • Composite video x 1 • S-Video x 1 • RS232 x 1 • 3.5 mm audio jack input x 1 • 3.5 mm audio jack output x 1 • VGA output x 1 • HDMI v1.4 input x 2 • Component video input x 1 • AC power cord x 1 • VGA cable x 1 • Remote... control x 1 • Battery x 2 (for the remote control) • User's guide (CD-ROM) x 1 • Quick start guide x 1 • Security...
...H6510BD: • Power socket x 1 • USB x 1 (Type mini B) • VGA input x 1 • Composite video x 1 • S-Video x 1 • RS232 x 1 • 3.5 mm audio jack input x 1 • 3.5 mm audio jack output x 1 • VGA output x 1 • HDMI v1.4 input x 2 • Component video input x 1 • AC power cord x 1 • VGA cable x 1 • Remote... control x 1 • Battery x 2 (for the remote control) • User's guide (CD-ROM) x 1 • Quick start guide x 1 • Security...
User Manual (3D)
Page 5
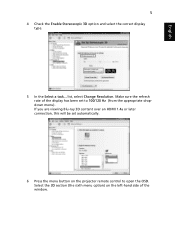
Make sure the refresh rate of the window. If you are viewing Blu-ray 3D content over an HDMI 1.4a or later connection, this will be set automatically. 6 Press the menu button on the left-hand side of the display has been set to open the OSD. Select the 3D section (the sixth menu option) on the projector remote control to 100/120 Hz (from the appropriate dropdown menu). list, select Change Resolution. English 5 4 Check the Enable Stereoscopic 3D option and select the correct display type. 5 In the Select a task...
Make sure the refresh rate of the window. If you are viewing Blu-ray 3D content over an HDMI 1.4a or later connection, this will be set automatically. 6 Press the menu button on the left-hand side of the display has been set to open the OSD. Select the 3D section (the sixth menu option) on the projector remote control to 100/120 Hz (from the appropriate dropdown menu). list, select Change Resolution. English 5 4 Check the Enable Stereoscopic 3D option and select the correct display type. 5 In the Select a task...
User Manual (3D)
Page 6
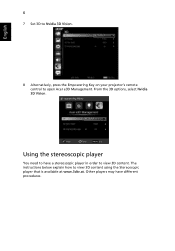
Other players may have a stereoscopic player in order to view 3D content. The instructions below explain how to open Acer e3D Management. From the 3D options, select Nvidia 3D Vision. English 6 7 Set 3D to Nvidia 3D Vision. 8 Alternatively, press the Empowering Key on your projector's remote control to view 3D content using the Stereoscopic player that is available at www.3dtv.at. Using the stereoscopic player You need to have different procedures.
Other players may have a stereoscopic player in order to view 3D content. The instructions below explain how to open Acer e3D Management. From the 3D options, select Nvidia 3D Vision. English 6 7 Set 3D to Nvidia 3D Vision. 8 Alternatively, press the Empowering Key on your projector's remote control to view 3D content using the Stereoscopic player that is available at www.3dtv.at. Using the stereoscopic player You need to have different procedures.
User Manual (3D)
Page 8
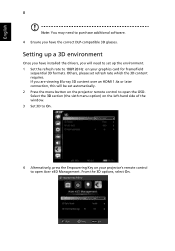
...the environment. 1 Set the refresh rate to 100/120 Hz on your projector's remote control to purchase additional software. 4 Ensure you have installed the drivers, you will...-hand side of the window. 3 Set 3D to On. 4 Alternatively, press the Empowering Key on the projector remote control to set up a 3D environment Once you are viewing Blu-ray 3D content over an HDMI 1.4a or later... From the 3D options, select On. English 8 Note: You may need to open Acer e3D Management. Others, please set automatically. 2 Press the menu button on your graphics card for frame/field sequential 3D...
...the environment. 1 Set the refresh rate to 100/120 Hz on your projector's remote control to purchase additional software. 4 Ensure you have installed the drivers, you will...-hand side of the window. 3 Set 3D to On. 4 Alternatively, press the Empowering Key on the projector remote control to set up a 3D environment Once you are viewing Blu-ray 3D content over an HDMI 1.4a or later... From the 3D options, select On. English 8 Note: You may need to open Acer e3D Management. Others, please set automatically. 2 Press the menu button on your graphics card for frame/field sequential 3D...
User Manual (3D)
Page 11
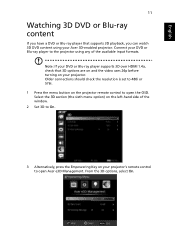
Older connections should check the resolution is set to 480i or 576i. 1 Press the menu button on the projector remote control to open Acer e3D Management. Select the 3D section (the sixth menu option) on the left-hand side of the available input formats. From the 3D options, select ...On. Connect your DVD or Blu-ray player to the projector using your Acer 3D-enabled projector. English 11 Watching 3D DVD or Blu-ray content If you can watch 3D DVD content using any of the window. 2 Set...
Older connections should check the resolution is set to 480i or 576i. 1 Press the menu button on the projector remote control to open Acer e3D Management. Select the 3D section (the sixth menu option) on the left-hand side of the available input formats. From the 3D options, select ...On. Connect your DVD or Blu-ray player to the projector using your Acer 3D-enabled projector. English 11 Watching 3D DVD or Blu-ray content If you can watch 3D DVD content using any of the window. 2 Set...


