
Acer Projector H6510BD, P1340W, X1140, X1240 Service Guide
Page 9
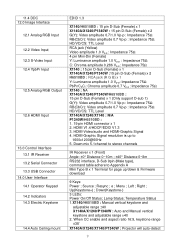
...;40° Distance 0~8m RS232 interface, D-Sub 9pin (Male type), command table adhere to 1600x1200@60Hz 5. Menu ; 11.4 DDC 12.0 Image Interface 12.1 Analog RGB Input 12.2 Video Input 12.3 S-Video Input 12.4 YpbPr Input 12.5 Analog RGB Output 12.6 HDMI Input 13.0 Control Interface 13.1 IR Receiver 13.2 Serial Connector 13.3 USB Connector 14.0 User Interface 14.1 Operator Keypad 14.2 Indicators 14.3 Electric Keystone 14.4 Auto Ceiling mount EDID 1.3 X1140/H6510BD : 15...
...;40° Distance 0~8m RS232 interface, D-Sub 9pin (Male type), command table adhere to 1600x1200@60Hz 5. Menu ; 11.4 DDC 12.0 Image Interface 12.1 Analog RGB Input 12.2 Video Input 12.3 S-Video Input 12.4 YpbPr Input 12.5 Analog RGB Output 12.6 HDMI Input 13.0 Control Interface 13.1 IR Receiver 13.2 Serial Connector 13.3 USB Connector 14.0 User Interface 14.1 Operator Keypad 14.2 Indicators 14.3 Electric Keystone 14.4 Auto Ceiling mount EDID 1.3 X1140/H6510BD : 15...

Acer Projector H6510BD, P1340W, X1140, X1240 Service Guide
Page 11
... dimming mode 3. When project is set to extreme dimming mode, which can be operated by the cycle lamp power 30% during content with time (hours) 3. Mode set to eco mode 5~7 minutes. Behavior: (1) Extreme dimming: Projector lamp power is set up: Extreme dimming mode and Dynamic dimming mode 2. Advantage: (1) Enhance dynamic image contrast (2) Energy can compensate the color distortion due to normal / eco mode within 5 sec. whenever projector is decreased to ~30% of lamp, color wheel...
... dimming mode 3. When project is set to extreme dimming mode, which can be operated by the cycle lamp power 30% during content with time (hours) 3. Mode set to eco mode 5~7 minutes. Behavior: (1) Extreme dimming: Projector lamp power is set up: Extreme dimming mode and Dynamic dimming mode 2. Advantage: (1) Enhance dynamic image contrast (2) Energy can compensate the color distortion due to normal / eco mode within 5 sec. whenever projector is decreased to ~30% of lamp, color wheel...

Acer Projector H6510BD, P1340W, X1140, X1240 Service Guide
Page 12
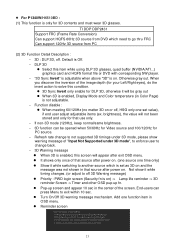
...; 3D Warning message When 3D is only for DLP 3D, otherwise it while switching to exit within 10 sec. It shows only once of "Input Not Supported under 3D mode, please show it while timing changes. (or adjust to solve this condition. 3D Sync Invert only enable for 3D contents and must wear 3D glasses. Turn On/Off 3D warning message mechanism. Reminder screen 12 3D Projection...
...; 3D Warning message When 3D is only for DLP 3D, otherwise it while switching to exit within 10 sec. It shows only once of "Input Not Supported under 3D mode, please show it while timing changes. (or adjust to solve this condition. 3D Sync Invert only enable for 3D contents and must wear 3D glasses. Turn On/Off 3D warning message mechanism. Reminder screen 12 3D Projection...
Acer Projector H6510BD, P1340W, X1140, X1240 Service Guide
Page 13
... end user adjust adjustable items (ex. Turn On/Off 3D warning message mechanism. When you discover the inversion of the image depth (for your Left/Right eyes), do the invert action to solve this condition. 3D Sync Invert only enable for 3D contents and must wear 3D glasses. Not show warning message of "Input Not Supported under 3D mode, please show it while timing changes. (or adjust to...
... end user adjust adjustable items (ex. Turn On/Off 3D warning message mechanism. When you discover the inversion of the image depth (for your Left/Right eyes), do the invert action to solve this condition. 3D Sync Invert only enable for 3D contents and must wear 3D glasses. Not show warning message of "Input Not Supported under 3D mode, please show it while timing changes. (or adjust to...
Acer Projector H6510BD, P1340W, X1140, X1240 Service Guide
Page 19
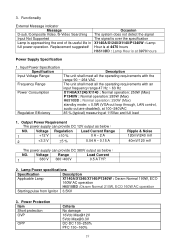
Functionality External Message indicator Message D-sub /Composite Video /S-Video Searching Input Not Supported Lamp is at 3970 hours Power Supply Specification 1. Occasion The system does not detect the signal The signal is over the specification X1140A/X1240/X1140/P1340W : Lamp Hour is at 115Vac and full load 1. Input Power Specification Specification Input Voltage Range Frequency Range Power Consumption Regulation Efficiency Description The unit shall meet all the operating requirements with the range 90 ~ 264 VAC...
Functionality External Message indicator Message D-sub /Composite Video /S-Video Searching Input Not Supported Lamp is at 3970 hours Power Supply Specification 1. Occasion The system does not detect the signal The signal is over the specification X1140A/X1240/X1140/P1340W : Lamp Hour is at 115Vac and full load 1. Input Power Specification Specification Input Voltage Range Frequency Range Power Consumption Regulation Efficiency Description The unit shall meet all the operating requirements with the range 90 ~ 264 VAC...

Acer Projector H6510BD, P1340W, X1140, X1240 Service Guide
Page 27
... Power and Source together, then plug in power cord. This mode can use USB or RS232 cable in D-sub cable to 115200. 27 Power LED, Lamp LED, Temp LED will be supported by EDID read/write tool. In another word, if only power LED shows Red, it means system is in power cord. Standby Mode Download Mode: This mode is not supported by power except MCU and its related circuits. System will enter baud rate 115200 mode The default...
... Power and Source together, then plug in power cord. This mode can use USB or RS232 cable in D-sub cable to 115200. 27 Power LED, Lamp LED, Temp LED will be supported by EDID read/write tool. In another word, if only power LED shows Red, it means system is in power cord. Standby Mode Download Mode: This mode is not supported by power except MCU and its related circuits. System will enter baud rate 115200 mode The default...

Acer Projector H6510BD, P1340W, X1140, X1240 Service Guide
Page 44
... below picture. 4. Acer_Service_Tool(Data)_3.1.exe When need to use this Serial Number Upgrade program: When it's time to connected COM Port number 4-2. Click "Port Open" 44 Serial Number Upgrade SOP Hardware required 1. Change to PC and projector 2. Plug power cord into Main board by mode. Change to replace Main board for repair or download new FW if it will cause factory data reset, it will be in full standby mode. 3. Standard RS232 Download cable 2. Personal computer or laptop computer Software required 1. Let the projector...
... below picture. 4. Acer_Service_Tool(Data)_3.1.exe When need to use this Serial Number Upgrade program: When it's time to connected COM Port number 4-2. Click "Port Open" 44 Serial Number Upgrade SOP Hardware required 1. Change to PC and projector 2. Plug power cord into Main board by mode. Change to replace Main board for repair or download new FW if it will cause factory data reset, it will be in full standby mode. 3. Standard RS232 Download cable 2. Personal computer or laptop computer Software required 1. Let the projector...
Acer Projector H6510BD, P1340W, X1140, X1240 Service Guide
Page 105
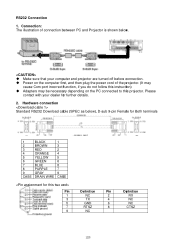
... contact with your computer and projector are turned off before connection. Power on the computer first, and then plug the power cord of connection between PC and Projector is shown below ), D-sub 9-pin Female for further details. 2. Hardware connection Standard RS232 Download cable (SPEC as below . RS232 Connection 1. Make sure that your dealer for Both terminals 1 2 3 4 5 6 7 8 9 CASE BLACK BROWN RED ORANGE YELLOW GREEN BLUE PURPLE GRAY DRAIN WIRE...
... contact with your computer and projector are turned off before connection. Power on the computer first, and then plug the power cord of connection between PC and Projector is shown below ), D-sub 9-pin Female for further details. 2. Hardware connection Standard RS232 Download cable (SPEC as below . RS232 Connection 1. Make sure that your dealer for Both terminals 1 2 3 4 5 6 7 8 9 CASE BLACK BROWN RED ORANGE YELLOW GREEN BLUE PURPLE GRAY DRAIN WIRE...
Acer Projector H6510BD, P1340W, X1140, X1240 Service Guide
Page 110
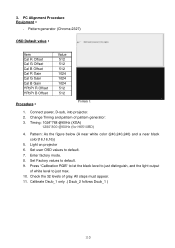
... level to just max. 10. Set user OSD values to default. 9. Set Factory values to default. 7. Calibrate Dsub_1 only .( Dsub_2 follows Dsub_1 ) 110 Change Timing and pattern of white level to just distinguish, and the light output of pattern generator: 3. All steps must appear. 11. Connect power, D-sub, into projector. 2. Timing: 1024*768 @60Hz (XGA) 1280*800 @60Hz (for H6510BD) 4. Enter factory mode. 8. Light on projector 6. PC Alignment Procedure Equipment...
... level to just max. 10. Set user OSD values to default. 9. Set Factory values to default. 7. Calibrate Dsub_1 only .( Dsub_2 follows Dsub_1 ) 110 Change Timing and pattern of white level to just distinguish, and the light output of pattern generator: 3. All steps must appear. 11. Connect power, D-sub, into projector. 2. Timing: 1024*768 @60Hz (XGA) 1280*800 @60Hz (for H6510BD) 4. Enter factory mode. 8. Light on projector 6. PC Alignment Procedure Equipment...

User Manual
Page 5
... to restore the product to normal condition. It v Product servicing Do not attempt to service this product from walls and free flow of air around the projector are necessary. • Locations where temperatures may become excessively high, such as opening or removing covers may expose you to qualified service personnel. Warning! Do not operate if smoke, strange noise or odor comes out of small...
... to restore the product to normal condition. It v Product servicing Do not attempt to service this product from walls and free flow of air around the projector are necessary. • Locations where temperatures may become excessively high, such as opening or removing covers may expose you to qualified service personnel. Warning! Do not operate if smoke, strange noise or odor comes out of small...
User Manual
Page 6
.... Please be sure to change the lamp when warning messages display. • When changing the lamp, please allow the projector to cool down, and follow all changing instructions. • Reset the "Lamp Hour Reset" function from the Onscreen Display "Management" menu after replacing the lamp module. • Do not attempt to disassemble this product to become hot. • Clean the air filter frequently. It may cause the projector to the sun. In...
.... Please be sure to change the lamp when warning messages display. • When changing the lamp, please allow the projector to cool down, and follow all changing instructions. • Reset the "Lamp Hour Reset" function from the Onscreen Display "Management" menu after replacing the lamp module. • Do not attempt to disassemble this product to become hot. • Clean the air filter frequently. It may cause the projector to the sun. In...
User Manual
Page 8
... to change the lamp when it shows warning messages. • Reset the "Lamp Hour Reset" function from the Onscreen Display "Management" menu after replacing the lamp module. • When switching the projector off the product before disconnecting power. • Turn on the projector first and then the signal sources. • Do not use lens cap when projector is in operation. • When the lamp reaches the end of its cooling cycle before cleaning. • Use a soft...
... to change the lamp when it shows warning messages. • Reset the "Lamp Hour Reset" function from the Onscreen Display "Management" menu after replacing the lamp module. • When switching the projector off the product before disconnecting power. • Turn on the projector first and then the signal sources. • Do not use lens cap when projector is in operation. • When the lamp reaches the end of its cooling cycle before cleaning. • Use a soft...
User Manual
Page 9
... 3 Control Panel 4 Remote Control Layout 5 Getting Started 7 Connecting the Projector 7 Turning the Projector On/Off 10 Turning On the Projector 10 Turning Off the Projector 11 Adjusting the Projected Image 12 Adjusting the Height of the Projected Image 12 How to Optimize Image Size and Distance 13 How to Get a Preferred Image Size by Adjusting Distance and Zoom 16 User Controls 19 Installation Menu 19 Acer Empowering Technology 20 Onscreen Display (OSD) Menus 23 Color 24 Image 27 Setting 30 Management 34 Audio (X1140A/X1240/X1340W/P1340W/H6510BD...
... 3 Control Panel 4 Remote Control Layout 5 Getting Started 7 Connecting the Projector 7 Turning the Projector On/Off 10 Turning On the Projector 10 Turning Off the Projector 11 Adjusting the Projected Image 12 Adjusting the Height of the Projected Image 12 How to Optimize Image Size and Distance 13 How to Get a Preferred Image Size by Adjusting Distance and Zoom 16 User Controls 19 Installation Menu 19 Acer Empowering Technology 20 Onscreen Display (OSD) Menus 23 Color 24 Image 27 Setting 30 Management 34 Audio (X1140A/X1240/X1340W/P1340W/H6510BD...
User Manual
Page 11
... the image being projected. Dynamic Black: If turned on remote control allows quick and easy access to 70% when no input signal can be enhanced. - English 1 Introduction Product Features This product is a single-chip DLP® projector, including the following outstanding features: • DLP® technology • X111/X1140/X1140A: Native 800 x 600 SVGA resolution, Auto/4:3/16:9 aspect ratio supported X1240: Native 1024 x 768 XGA resolution, Auto...
... the image being projected. Dynamic Black: If turned on remote control allows quick and easy access to 70% when no input signal can be enhanced. - English 1 Introduction Product Features This product is a single-chip DLP® projector, including the following outstanding features: • DLP® technology • X111/X1140/X1140A: Native 800 x 600 SVGA resolution, Auto/4:3/16:9 aspect ratio supported X1240: Native 1024 x 768 XGA resolution, Auto...
User Manual
Page 15
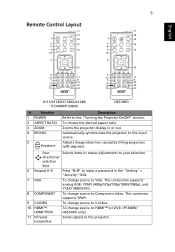
... selection. 6 Keypad 0~9 Press "0~9" to input a password in or out. Adjusts image distortion caused by tilting projection (±40 degrees). HDMI™/DVI To change source to Component video. This connector supports YPbPr. 9 S-VIDEO To change source to HDMI™ (or DVI). (P1340W/ H6510BD only) 11 Infrared transmitter Sends signals to the input source. Zooms the projector display in the "Setting" > "Security" OSD. 7 VGA To change source to S-Video. 10 HDMI™; This connection supports analog RGB, YPbPr (480p/576p...
... selection. 6 Keypad 0~9 Press "0~9" to input a password in or out. Adjusts image distortion caused by tilting projection (±40 degrees). HDMI™/DVI To change source to Component video. This connector supports YPbPr. 9 S-VIDEO To change source to HDMI™ (or DVI). (P1340W/ H6510BD only) 11 Infrared transmitter Sends signals to the input source. Zooms the projector display in the "Setting" > "Security" OSD. 7 VGA To change source to S-Video. 10 HDMI™; This connection supports analog RGB, YPbPr (480p/576p...
User Manual
Page 29
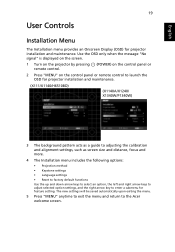
... a submenu for feature setting. English 19 User Controls Installation Menu The Installation menu provides an Onscreen Display (OSD) for projector installation and maintenance. (X111/X1140/H6510BD) (X1140A/X1240/ X1340W/P1340W) 3 The background pattern acts as a guide to adjusting the calibration and alignment settings, such as screen size and distance, focus and more. 4 The Installation menu includes the following options: • Projection method • Keystone settings • Language settings • Reset to factory default functions Use the up and...
... a submenu for feature setting. English 19 User Controls Installation Menu The Installation menu provides an Onscreen Display (OSD) for projector installation and maintenance. (X111/X1140/H6510BD) (X1140A/X1240/ X1340W/P1340W) 3 The background pattern acts as a guide to adjusting the calibration and alignment settings, such as screen size and distance, focus and more. 4 The Installation menu includes the following options: • Projection method • Keystone settings • Language settings • Reset to factory default functions Use the up and...
User Manual
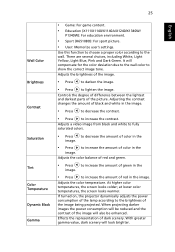
Page 35
... black and white in the image. At higher color temperatures, the screen looks colder; If turned on, the projector dynamically adjusts the power consumption of the image. • Press to darken the image. • Press to show the correct image tone. There are several choices, including White, Light Yellow, Light Blue, Pink and Dark Green. Adjusts the brightness of the lamp according to the wall. Adjusts the color balance of red and green. •...
... black and white in the image. At higher color temperatures, the screen looks colder; If turned on, the projector dynamically adjusts the power consumption of the image. • Press to darken the image. • Press to show the correct image tone. There are several choices, including White, Light Yellow, Light Blue, Pink and Dark Green. Adjusts the brightness of the lamp according to the wall. Adjusts the color balance of red and green. •...
User Manual
Page 44
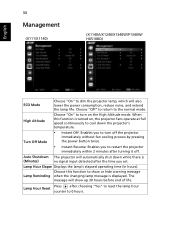
... reset the lamp hour counter to 0 hours. Lamp Hour Reset Press after turning it off. Choose this function is displayed. Choose "Off" to return to the normal mode. Lamp Hour Elapse Displays the lamp's elapsed operating time (in hours). English 34 Management (X111/X1140) (X1140A/X1240/X1340W/P1340W/ H6510BD) ECO Mode High Altitude Turn Off Mode Choose "On" to dim the projector lamp, which will show or hide warning message Lamp Reminding when the changing lamp message is turned on the High Altitude mode...
... reset the lamp hour counter to 0 hours. Lamp Hour Reset Press after turning it off. Choose this function is displayed. Choose "Off" to return to the normal mode. Lamp Hour Elapse Displays the lamp's elapsed operating time (in hours). English 34 Management (X111/X1140) (X1140A/X1240/X1340W/P1340W/ H6510BD) ECO Mode High Altitude Turn Off Mode Choose "On" to dim the projector lamp, which will show or hide warning message Lamp Reminding when the changing lamp message is turned on the High Altitude mode...
User Manual (3D)
Page 4
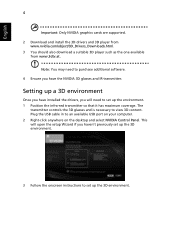
... Control Panel. This will need to purchase additional software. 4 Ensure you haven't previously set up the 3D environment. 3 Follow the onscreen instructions to set up the environment. 1 Position the infra-red transmitter so that it has maximum coverage. Note: You may need to set up the 3D environment. English 4 Important: Only NVIDIA graphics cards are supported. 2 Download and install the 3D drivers...
... Control Panel. This will need to purchase additional software. 4 Ensure you haven't previously set up the 3D environment. 3 Follow the onscreen instructions to set up the environment. 1 Position the infra-red transmitter so that it has maximum coverage. Note: You may need to set up the 3D environment. English 4 Important: Only NVIDIA graphics cards are supported. 2 Download and install the 3D drivers...
User Manual (3D)
Page 7
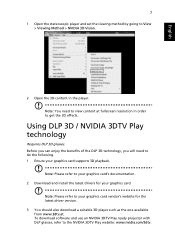
... available from www.3dtv.at fullscreen resolution in the player. Note: Please refer to your graphics card. To download software and use an NVIDIA 3DTV Play ready projector with DLP glasses, refer to View > Viewing Method > NVIDIA 3D Vision. 2 Open the 3D content in order to do the following. 1 Ensure your graphics card supports 3D playback. Before you can enjoy...
... available from www.3dtv.at fullscreen resolution in the player. Note: Please refer to your graphics card. To download software and use an NVIDIA 3DTV Play ready projector with DLP glasses, refer to View > Viewing Method > NVIDIA 3D Vision. 2 Open the 3D content in order to do the following. 1 Ensure your graphics card supports 3D playback. Before you can enjoy...


