Acer Projector H6510BD, P1340W, X1140, X1240 Service Guide
Page 9
... Distance 0~8m RS232 interface, D-Sub 9pin (Male type), command table adhere to 1600x1200@60Hz 5. Resync ; Temperature Status 1.X1140/H6510BD : Manual vertical keystone and adjustable range ±40 X1140A/X1240/P1340W : Auto and Manual vertical keystone and adjustable range ±40... 13.1 IR Receiver 13.2 Serial Connector 13.3 USB Connector 14.0 User Interface 14.1 Operator Keypad 14.2 Indicators 14.3 Electric Keystone 14.4 Auto Ceiling mount EDID 1.3 X1140/H6510BD : 15 pin D-Sub (Female) x 1 X1140A/X1240/P1340W : 15 pin D-Sub (Female) x 2 G(Y): Video amplitude 0.7/1.0 Vp-p :...
... Distance 0~8m RS232 interface, D-Sub 9pin (Male type), command table adhere to 1600x1200@60Hz 5. Resync ; Temperature Status 1.X1140/H6510BD : Manual vertical keystone and adjustable range ±40 X1140A/X1240/P1340W : Auto and Manual vertical keystone and adjustable range ±40... 13.1 IR Receiver 13.2 Serial Connector 13.3 USB Connector 14.0 User Interface 14.1 Operator Keypad 14.2 Indicators 14.3 Electric Keystone 14.4 Auto Ceiling mount EDID 1.3 X1140/H6510BD : 15 pin D-Sub (Female) x 1 X1140A/X1240/P1340W : 15 pin D-Sub (Female) x 2 G(Y): Video amplitude 0.7/1.0 Vp-p :...
User Manual
Page 6
...during operation. It may hurt your dealer for inspection. • Do not face the projector lens to removing the lamp assembly for ceiling mount installation. The best way is unplugged. • The product will detect the life of displaying inverted images for replacement. • Do...Refer servicing only to fire. • When switching the projector off, please ensure the projector completes its own removable cover. Only use acer ceiling mount kit for the fan to disassemble this could cause it is operating. Please be sure to change the lamp when warning messages display....
...during operation. It may hurt your dealer for inspection. • Do not face the projector lens to removing the lamp assembly for ceiling mount installation. The best way is unplugged. • The product will detect the life of displaying inverted images for replacement. • Do...Refer servicing only to fire. • When switching the projector off, please ensure the projector completes its own removable cover. Only use acer ceiling mount kit for the fan to disassemble this could cause it is operating. Please be sure to change the lamp when warning messages display....

User Manual
Page 10
Appendices 39 Troubleshooting 39 LED & Alarm Definition Listing 43 Replacing the Lamp 44 Ceiling Mount Installation 45 Specifications 48 Compatibility Modes 51 Regulations and safety notices 55
Appendices 39 Troubleshooting 39 LED & Alarm Definition Listing 43 Replacing the Lamp 44 Ceiling Mount Installation 45 Specifications 48 Compatibility Modes 51 Regulations and safety notices 55

User Manual
Page 37
.../X1340W) (P1340W) • • Projection (X111/X1140/ • H6510BD) • Projection • Mode (X1140A/ X1240/X1340W/ • P1340W) Front-Desktop: The factory default setting. Front: The factory default setting. Rear-Ceiling: When you select this function, the projector inverts the image for ceiling-mounted projection. Front-Ceiling: When you select this function, the projector reverses...
.../X1340W) (P1340W) • • Projection (X111/X1140/ • H6510BD) • Projection • Mode (X1140A/ X1240/X1340W/ • P1340W) Front-Desktop: The factory default setting. Front: The factory default setting. Rear-Ceiling: When you select this function, the projector inverts the image for ceiling-mounted projection. Front-Ceiling: When you select this function, the projector reverses...
User Manual
Page 55
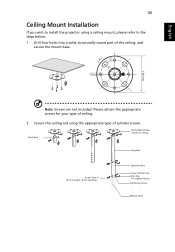
... - Extension Rod Large Cylinder Cap Allen Key - English 45 Ceiling Mount Installation If you wish to install the projector using the appropriate type of the ceiling, and secure the mount base. Attach to the steps below: 1 Drill four holes into a solid, structurally sound part of cylinder screws... 2 0 130 mm Note: Screws are not included. Please obtain the appropriate screws for your type of ceiling. 2 Secure the ceiling rod using a ceiling mount, please refer to ceiling Long Rod Screw Type A 50 mm length / 8 mm diameter - For tighten/loosen Tightening Screw Medium Rod
... - Extension Rod Large Cylinder Cap Allen Key - English 45 Ceiling Mount Installation If you wish to install the projector using the appropriate type of the ceiling, and secure the mount base. Attach to the steps below: 1 Drill four holes into a solid, structurally sound part of cylinder screws... 2 0 130 mm Note: Screws are not included. Please obtain the appropriate screws for your type of ceiling. 2 Secure the ceiling rod using a ceiling mount, please refer to ceiling Long Rod Screw Type A 50 mm length / 8 mm diameter - For tighten/loosen Tightening Screw Medium Rod
User Manual
Page 56
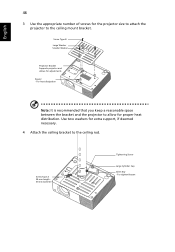
... is recommended that you keep a reasonable space between the bracket and the projector to allow for extra support, if deemed necessary. 4 Attach the ceiling bracket to the ceiling mount bracket. Use two washers for proper heat distribution. For tighten/loosen Screw Type A 50 mm length /8 mm diameter Tightening Screw Large Cylinder Cap Allen... for adjustments Spacer - Screw Type B Large Washer Smaller Washer Projector Bracket Supports projector and allows for the projector size to attach the projector to the ceiling rod.
... is recommended that you keep a reasonable space between the bracket and the projector to allow for extra support, if deemed necessary. 4 Attach the ceiling bracket to the ceiling mount bracket. Use two washers for proper heat distribution. For tighten/loosen Screw Type A 50 mm length /8 mm diameter Tightening Screw Large Cylinder Cap Allen... for adjustments Spacer - Screw Type B Large Washer Smaller Washer Projector Bracket Supports projector and allows for the projector size to attach the projector to the ceiling rod.


