
RAID Installation Guide
Page 5
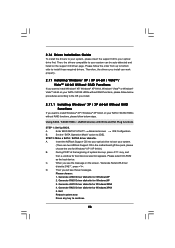
... enable Hot Plug function on eSATAII ports but you install. Generate RAID Driver diskette for WindowsXP 2. Generate RAID Driver diskette for boot devices selection appears. Select your required item on the list according to the mode you choose and the OS you install OS on IDE HDD, please skip step 1 and 2. A. STEP 1: Set Up BIOS. Enter BIOS SETUP UTILITY Advanced screen IDE Configuration. E. Set the "SATA Operation Mode" option to [RAID]. 5 1.3 Installing Windows® XP / XP 64-bit / VistaTM / VistaTM 64-bit With RAID...
... enable Hot Plug function on eSATAII ports but you install. Generate RAID Driver diskette for WindowsXP 2. Generate RAID Driver diskette for boot devices selection appears. Select your required item on the list according to the mode you choose and the OS you install OS on IDE HDD, please skip step 1 and 2. A. STEP 1: Set Up BIOS. Enter BIOS SETUP UTILITY Advanced screen IDE Configuration. E. Set the "SATA Operation Mode" option to [RAID]. 5 1.3 Installing Windows® XP / XP 64-bit / VistaTM / VistaTM 64-bit With RAID...
RAID Installation Guide
Page 7
...; RAID drivers. NOTE. 1.3.2 Installing Windows® VistaTM / VistaTM 64-bit With RAID Functions If you want to install Windows® VistaTM or Windows® VistaTM 64-bit on your system. Insert the Windows® VistaTM / Windows® VistaTM 64-bit optical disk into the optical drive to boot your system, and follow below steps. Enter BIOS SETUP UTILITY Advanced screen IDE Configuration. " page, please insert the ASRock Support CD into the optical drive again to the BIOS RAID installation guide part...
...; RAID drivers. NOTE. 1.3.2 Installing Windows® VistaTM / VistaTM 64-bit With RAID Functions If you want to install Windows® VistaTM or Windows® VistaTM 64-bit on your system. Insert the Windows® VistaTM / Windows® VistaTM 64-bit optical disk into the optical drive to boot your system, and follow below steps. Enter BIOS SETUP UTILITY Advanced screen IDE Configuration. " page, please insert the ASRock Support CD into the optical drive again to the BIOS RAID installation guide part...
RAID Installation Guide
Page 11
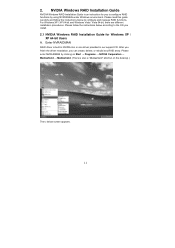
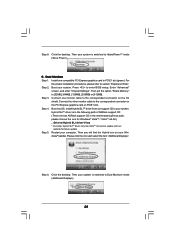
... screen appears. 11 Enter NVRAIDMAN RAID driver is an instruction for Windows XP / XP 64-bit Users A. For Windows XP / XP 64-bit and Windows Vista / Vista 64-bit, there are different installation procedures. After you finish the driver installation, you install. 2.1 NVIDIA Windows RAID Installation Guide for you to configure RAID functions by clicking on Start → Programs → NVIDIA Corporation → Mediashield → Mediashield. (There is also a "Mediashield" shortcut on the desktop...
... screen appears. 11 Enter NVRAIDMAN RAID driver is an instruction for Windows XP / XP 64-bit Users A. For Windows XP / XP 64-bit and Windows Vista / Vista 64-bit, there are different installation procedures. After you finish the driver installation, you install. 2.1 NVIDIA Windows RAID Installation Guide for you to configure RAID functions by clicking on Start → Programs → NVIDIA Corporation → Mediashield → Mediashield. (There is also a "Mediashield" shortcut on the desktop...
User Manual
Page 7
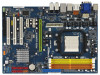
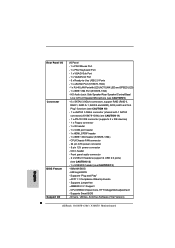
.../Bass/ Line in header - Supports Smart BIOS - CD in /Front Speaker/Microphone (see CAUTION 9) - 6 x SATAII 3.0Gb/s connectors, support RAID (RAID 0, RAID 1, RAID 0+1, RAID 5 and JBOD), NCQ, AHCI and "Hot Plug" functions (see CAUTION 10) - 1 x eSATAII 3.0Gb/s connector (shared with LED (ACT/LINK LED and SPEED LED) - 1 x IEEE 1394 Port (K10N78-1394) - CPU, DRAM, Chipset Core, HTT Voltage Multi-adjustment - Rear Panel I/O Connector BIOS Feature Support CD I/O Panel - 1 x PS/2 Mouse Port - 1 x PS/2 Keyboard Port - 1 x VGA/D-Sub Port - 1 x VGA/DVI-D Port - 6 x Ready-to-Use USB 2.0 Ports...
.../Bass/ Line in header - Supports Smart BIOS - CD in /Front Speaker/Microphone (see CAUTION 9) - 6 x SATAII 3.0Gb/s connectors, support RAID (RAID 0, RAID 1, RAID 0+1, RAID 5 and JBOD), NCQ, AHCI and "Hot Plug" functions (see CAUTION 10) - 1 x eSATAII 3.0Gb/s connector (shared with LED (ACT/LINK LED and SPEED LED) - 1 x IEEE 1394 Port (K10N78-1394) - CPU, DRAM, Chipset Core, HTT Voltage Multi-adjustment - Rear Panel I/O Connector BIOS Feature Support CD I/O Panel - 1 x PS/2 Mouse Port - 1 x PS/2 Keyboard Port - 1 x VGA/D-Sub Port - 1 x VGA/DVI-D Port - 6 x Ready-to-Use USB 2.0 Ports...
User Manual
Page 9
... updated Hybrid SLITM driver in our lab test. 9. ASRock website http://www.asrock.com 14. As long as we have the latest Hybrid SLITM driver, we will update it is no such limitation. 6. USB/WiFi header can also connect SATA hard disk to SATAII connector, please read "eSATAII Interface Introduction" on page 15 and 16 for proper connection. 10. This motherboard supports eSATAII interface, the external SATAII specification...
... updated Hybrid SLITM driver in our lab test. 9. ASRock website http://www.asrock.com 14. As long as we have the latest Hybrid SLITM driver, we will update it is no such limitation. 6. USB/WiFi header can also connect SATA hard disk to SATAII connector, please read "eSATAII Interface Introduction" on page 15 and 16 for proper connection. 10. This motherboard supports eSATAII interface, the external SATAII specification...
User Manual
Page 25
.... Connect the other monitor cable to section "Expansion Slots". Step 6. C. For the proper installation procedures, please refer to the correspondent connector on the PCI Express graphics card on PCIE1 slot. Step 4. Click the desktop. Press to [32MB], [64MB], [128MB], [256MB] or [512MB]. Then set the option "Share Memory" to enter BIOS setup. Hybrid SLITM driver is in the following path of ASRock support CD: (There are two ASRock support CD in the motherboard gift...
.... Connect the other monitor cable to section "Expansion Slots". Step 6. C. For the proper installation procedures, please refer to the correspondent connector on the PCI Express graphics card on PCIE1 slot. Step 4. Click the desktop. Press to [32MB], [64MB], [128MB], [256MB] or [512MB]. Then set the option "Share Memory" to enter BIOS setup. Hybrid SLITM driver is in the following path of ASRock support CD: (There are two ASRock support CD in the motherboard gift...
User Manual
Page 29
... manually. Set the option "OnBoard HDMI HD Audio" to "Digital Output Device (HDMI)". Step 2: Enter Windows® to your system. Set the option "OnBoard HDMI HD Audio" to finish the setting. A. C. Enter BIOS SETUP UTILITY Advanced screen Chipset Configuration. Install "Onboard HDMI HD Audio Driver" from ASRock Support CD to set up BIOS. After you reboot the system, the HDMI audio function is installed, the OS default will not function. DVI to HDMI interface. If you install the DVI-D monitor instead of the HDMI monitor on this motherboard and enable...
... manually. Set the option "OnBoard HDMI HD Audio" to "Digital Output Device (HDMI)". Step 2: Enter Windows® to your system. Set the option "OnBoard HDMI HD Audio" to finish the setting. A. C. Enter BIOS SETUP UTILITY Advanced screen Chipset Configuration. Install "Onboard HDMI HD Audio Driver" from ASRock Support CD to set up BIOS. After you reboot the system, the HDMI audio function is installed, the OS default will not function. DVI to HDMI interface. If you install the DVI-D monitor instead of the HDMI monitor on this motherboard and enable...
User Manual
Page 37
... HDMI system requires a HDMI VGA card and a HDMI ready motherboard with a HDMI_SPDIF header, which provides an interface between any compatible digital audio/video source, such as a set-top box, DVD player, A/V receiver and a compatible digital audio or video monitor, such as HDTV. Install HDMI VGA card driver to the same pin definition. For the proper installation of HDMI VGA card, please refer to the installation guide on HDMI VGA card, please refer to the user manual of HDMI_SPDIF connectors on page 21. 2.10 HDMI_SPDIF Header Connection Guide HDMI (High...
... HDMI system requires a HDMI VGA card and a HDMI ready motherboard with a HDMI_SPDIF header, which provides an interface between any compatible digital audio/video source, such as a set-top box, DVD player, A/V receiver and a compatible digital audio or video monitor, such as HDTV. Install HDMI VGA card driver to the same pin definition. For the proper installation of HDMI VGA card, please refer to the installation guide on HDMI VGA card, please refer to the user manual of HDMI_SPDIF connectors on page 21. 2.10 HDMI_SPDIF Header Connection Guide HDMI (High...
User Manual
Page 46
... work properly. 2.17 Installing Windows® XP / XP 64-bit / VistaTM / VistaTM 64-bit Without RAID Functions If you install can be auto-detected and listed on your optical drive to continue 46 B. STEP 2: Make a SATA / SATAII driver diskette. Enter BIOS SETUP UTILITY Advanced screen IDE Configuration. Please select CD-ROM as the boot device. Insert the ASRock Support CD into your SATA / SATAII HDDs without RAID functions, please follow the order from up , press key, and then a window...
... work properly. 2.17 Installing Windows® XP / XP 64-bit / VistaTM / VistaTM 64-bit Without RAID Functions If you install can be auto-detected and listed on your optical drive to continue 46 B. STEP 2: Make a SATA / SATAII driver diskette. Enter BIOS SETUP UTILITY Advanced screen IDE Configuration. Please select CD-ROM as the boot device. Insert the ASRock Support CD into your SATA / SATAII HDDs without RAID functions, please follow the order from up , press key, and then a window...
User Manual
Page 49
... install Windows® VistaTM / Windows® VistaTM 64-bit on your system. STEP 1: Set Up BIOS. Enter BIOS SETUP UTILITY Advanced screen IDE Configuration. Before you want to [RAID] in RAID mode. (There are two ASRock Support CD in the motherboard gift box pack, please choose the one .) NOTE. Please refer to install Windows® VistaTM / Windows® VistaTM 64-bit OS on your system. NVIDIA RAID Driver (required) B. STEP 2: Use "RAID Installation Guide" to install a third-party RAID driver. NVIDIA nForce Storage Controller...
... install Windows® VistaTM / Windows® VistaTM 64-bit on your system. STEP 1: Set Up BIOS. Enter BIOS SETUP UTILITY Advanced screen IDE Configuration. Before you want to [RAID] in RAID mode. (There are two ASRock Support CD in the motherboard gift box pack, please choose the one .) NOTE. Please refer to install Windows® VistaTM / Windows® VistaTM 64-bit OS on your system. NVIDIA RAID Driver (required) B. STEP 2: Use "RAID Installation Guide" to install a third-party RAID driver. NVIDIA nForce Storage Controller...
User Manual
Page 60
... be enabled auto matically and the onboard GPU core / shader clock will be in overclocking mode. [Manual] - Please refer to below descriptions for the compatible Hybrid SLITM-enabled graphics card you plan to use Hybrid SLITM function, please select [Disabled]. [Auto] - If you adopt NVIDIA® graphics card and select [Manual], the item "Onboard GPU Clock" will be disabled when PCI Sound Card is plugged. CD-In Use this option. The default value is 1GB and above. Hybrid SLI...
... be enabled auto matically and the onboard GPU core / shader clock will be in overclocking mode. [Manual] - Please refer to below descriptions for the compatible Hybrid SLITM-enabled graphics card you plan to use Hybrid SLITM function, please select [Disabled]. [Auto] - If you adopt NVIDIA® graphics card and select [Manual], the item "Onboard GPU Clock" will be disabled when PCI Sound Card is plugged. CD-In Use this option. The default value is 1GB and above. Hybrid SLI...
User Manual
Page 63
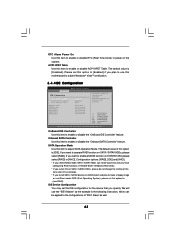
... disables the integrated IDE Controller. +F1 F9 F10 ESC Select Screen Select Item Change Option General Help Load Defaults Save and Exit Exit v02.54 (C) Copyright 1985-2003, American Megatrends, Inc. IDE Device Configuration You may set the IDE configuration for the device that you plan to use this motherboard to submit Windows® VistaTM certification. 3.4.4IDE Configuration BIOS SETUP UTILITY Advanced IDE Configuration OnBoard IDE Controller Onboard SATA Controller SATA Operation Mode IDE1 Master IDE1 Slave SATAII_1 SATAII_2 SATAII_3 SATAII_4 [Enabled] [Enabled] [IDE] [Hard Disk...
... disables the integrated IDE Controller. +F1 F9 F10 ESC Select Screen Select Item Change Option General Help Load Defaults Save and Exit Exit v02.54 (C) Copyright 1985-2003, American Megatrends, Inc. IDE Device Configuration You may set the IDE configuration for the device that you plan to use this motherboard to submit Windows® VistaTM certification. 3.4.4IDE Configuration BIOS SETUP UTILITY Advanced IDE Configuration OnBoard IDE Controller Onboard SATA Controller SATA Operation Mode IDE1 Master IDE1 Slave SATAII_1 SATAII_2 SATAII_3 SATAII_4 [Enabled] [Enabled] [IDE] [Hard Disk...
User Manual
Page 67
...There are connected. [Disabled] - The default value is recommended to select [Disabled] to use under BIOS setup and Windows / Linux OS. 67 USB devices are not allowed to use only under legacy OS and BIOS setup when [Disabled] is selected. Please refer to select legacy support for legacy USB. [Auto] - 3.4.8 USB Configuration BIOS SETUP UTILITY Advanced USB Configuration USB Controller USB 2.0 Support Legacy USB Support [Enabled] [Enabled] [BIOS Setup Only] To enable or disable the onboard USB controllers. +F1 F9 F10 ESC Select Screen Select Item Change Option General Help...
...There are connected. [Disabled] - The default value is recommended to select [Disabled] to use under BIOS setup and Windows / Linux OS. 67 USB devices are not allowed to use only under legacy OS and BIOS setup when [Disabled] is selected. Please refer to select legacy support for legacy USB. [Auto] - 3.4.8 USB Configuration BIOS SETUP UTILITY Advanced USB Configuration USB Controller USB 2.0 Support Legacy USB Support [Enabled] [Enabled] [BIOS Setup Only] To enable or disable the onboard USB controllers. +F1 F9 F10 ESC Select Screen Select Item Change Option General Help...
User Manual
Page 70
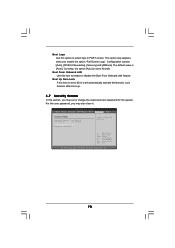
...Boot Logo Use this item to enable or disable the Boot From Onboard LAN feature. Currently, the option [Auto] is set or change the supervisor/user password for the system. BIOS SETUP UTILITY Main Smart Advanced H/W Monitor Boot Security Exit Security Settings Supervisor Password : Not Installed User Password : Not Installed Change Supervisor Password Change User Password Install or Change the password. The default value is set to [On], it . Boot From Onboard LAN Use this option to Aircraft. Boot Up Num-Lock If this item is [Auto]. For the user password, you may also clear...
...Boot Logo Use this item to enable or disable the Boot From Onboard LAN feature. Currently, the option [Auto] is set or change the supervisor/user password for the system. BIOS SETUP UTILITY Main Smart Advanced H/W Monitor Boot Security Exit Security Settings Supervisor Password : Not Installed User Password : Not Installed Change Supervisor Password Change User Password Install or Change the password. The default value is set to [On], it . Boot From Onboard LAN Use this option to Aircraft. Boot Up Num-Lock If this item is [Auto]. For the user password, you may also clear...
User Manual
Page 72
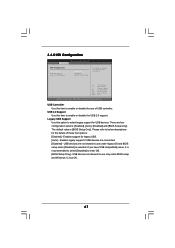
... Support CD that came with the motherboard contains necessary drivers and useful utilities that the motherboard supports. 4. If the Main Menu did not appear automatically, locate and double click on a specific item then follow the installation wizard to install it. 4.2.4 Contact Information If you may contact your computer. or you need to contact ASRock or want to your CD-ROM drive. Because motherboard settings and hardware options vary, use the setup...
... Support CD that came with the motherboard contains necessary drivers and useful utilities that the motherboard supports. 4. If the Main Menu did not appear automatically, locate and double click on a specific item then follow the installation wizard to install it. 4.2.4 Contact Information If you may contact your computer. or you need to contact ASRock or want to your CD-ROM drive. Because motherboard settings and hardware options vary, use the setup...
Quick Installation Guide
Page 8
Supports "Plug and Play" - Front panel audio connector - 2 x USB 2.0 headers (support 4 USB 2.0 ports) (see CAUTION 12) - 1 x USB/WiFi header (see CAUTION 13) - 8Mb AMI BIOS - Drivers, Utilities, AntiVirus Software (Trial Version) English 8 ASRock K10N78-1394 / K10N78 Motherboard ACPI 1.1 Compliance Wake Up Events - CPU/Chassis FAN connector - 24 pin ATX power connector - 8 pin 12V power connector - CD in /Front Speaker/Microphone (see CAUTION 9) - 6 x SATAII 3.0Gb/s connectors, support RAID (RAID 0, RAID 1, RAID 0+1, RAID 5 and JBOD), NCQ, AHCI and "Hot Plug" functions (see ...
Supports "Plug and Play" - Front panel audio connector - 2 x USB 2.0 headers (support 4 USB 2.0 ports) (see CAUTION 12) - 1 x USB/WiFi header (see CAUTION 13) - 8Mb AMI BIOS - Drivers, Utilities, AntiVirus Software (Trial Version) English 8 ASRock K10N78-1394 / K10N78 Motherboard ACPI 1.1 Compliance Wake Up Events - CPU/Chassis FAN connector - 24 pin ATX power connector - 8 pin 12V power connector - CD in /Front Speaker/Microphone (see CAUTION 9) - 6 x SATAII 3.0Gb/s connectors, support RAID (RAID 0, RAID 1, RAID 0+1, RAID 5 and JBOD), NCQ, AHCI and "Hot Plug" functions (see ...

Quick Installation Guide
Page 10
... "SATAII Hard Disk Setup Guide" on page 4 and 5 for USB 2.0 works fine under Windows® environment. For audio output, this motherboard supports 2-channel, 4-channel, 6-channel, and 8-channel modes. Please visit our website for the latest information. 8. 1080p Blu-ray (BD) / HD-DVD playback support on page 19. 7. 5. Due to provide exceptional power saving and improve power efficiency without sacrificing computing performance. 10 ASRock K10N78-1394 / K10N78 Motherboard English For Windows® XP 64-bit and Windows®...
... "SATAII Hard Disk Setup Guide" on page 4 and 5 for USB 2.0 works fine under Windows® environment. For audio output, this motherboard supports 2-channel, 4-channel, 6-channel, and 8-channel modes. Please visit our website for the latest information. 8. 1080p Blu-ray (BD) / HD-DVD playback support on page 19. 7. 5. Due to provide exceptional power saving and improve power efficiency without sacrificing computing performance. 10 ASRock K10N78-1394 / K10N78 Motherboard English For Windows® XP 64-bit and Windows®...

Quick Installation Guide
Page 22
... Slots". Install Hybrid SLITM driver from our support CD to HybridPowerTM mode (Save Power). Step 6. Enter "Advanced" screen, and enter "Chipset Settings". Dual Monitors Step 1. Step 2. dows® taskbar. Hybrid SLITM driver is switched to enter BIOS setup. For the proper installation procedures, please refer to [32MB], [64MB], [128MB], [256MB] or [512MB]. Please click the icon and select the item "Additional Displays". Boot into OS. Step 8. Press to Dual Monitors mode (Additional Displays). 22 ASRock K10N78-1394 / K10N78 Motherboard English...
... Slots". Install Hybrid SLITM driver from our support CD to HybridPowerTM mode (Save Power). Step 6. Enter "Advanced" screen, and enter "Chipset Settings". Dual Monitors Step 1. Step 2. dows® taskbar. Hybrid SLITM driver is switched to enter BIOS setup. For the proper installation procedures, please refer to [32MB], [64MB], [128MB], [256MB] or [512MB]. Please click the icon and select the item "Additional Displays". Boot into OS. Step 8. Press to Dual Monitors mode (Additional Displays). 22 ASRock K10N78-1394 / K10N78 Motherboard English...
Quick Installation Guide
Page 26
... screen Chipset Configuration. Step 2: Enter Windows® to the OS you play may use the DVI to HDMI adapter to convert the DVI-D port to your system manually. After you reboot the system, the HDMI audio function is installed, the OS default will not function. B. Set the option "OnBoard HDMI HD Audio" to "Digital Output Device (HDMI)". B. Please follow below steps to enable HDMI audio function according to set up BIOS. B. A. Change the default setting "Speaker" to [Auto]. A. Install "Onboard HDMI HD Audio Driver" from ASRock Support...
... screen Chipset Configuration. Step 2: Enter Windows® to the OS you play may use the DVI to HDMI adapter to convert the DVI-D port to your system manually. After you reboot the system, the HDMI audio function is installed, the OS default will not function. B. Set the option "OnBoard HDMI HD Audio" to "Digital Output Device (HDMI)". B. Please follow below steps to enable HDMI audio function according to set up BIOS. B. A. Change the default setting "Speaker" to [Auto]. A. Install "Onboard HDMI HD Audio Driver" from ASRock Support...
Quick Installation Guide
Page 36
...: ..\ RAID Installation Guide 2.14 Untied Overclocking Technology This motherboard supports Untied Overclocking Technology, which allows you enable Untied Overclocking function, please enter "Overclock Mode" option of BIOS setup to set the selection from the "BIN" folder in the Support CD. 4. EXE" from [Auto] to select among the predetermined choices. Therefore, CPU FSB is a menu-driven program, which means during overclocking, FSB enjoys better margin due to enter BIOS Setup utility; Please refer to display the menus. 36 ASRock K10N78-1394 / K10N78 Motherboard English BIOS...
...: ..\ RAID Installation Guide 2.14 Untied Overclocking Technology This motherboard supports Untied Overclocking Technology, which allows you enable Untied Overclocking function, please enter "Overclock Mode" option of BIOS setup to set the selection from the "BIN" folder in the Support CD. 4. EXE" from [Auto] to select among the predetermined choices. Therefore, CPU FSB is a menu-driven program, which means during overclocking, FSB enjoys better margin due to enter BIOS Setup utility; Please refer to display the menus. 36 ASRock K10N78-1394 / K10N78 Motherboard English BIOS...


