RAID Installation Guide
Page 2
... advance and follow the instruction in this section to create RAID arrays. 1.1 Introduction to RAID The term "RAID" stands for "Redundant Array of the "User Manual" in our support CD or "Quick Installation Guide", you to set . It will improve data access and storage since the disk array management software will...
... advance and follow the instruction in this section to create RAID arrays. 1.1 Introduction to RAID The term "RAID" stands for "Redundant Array of the "User Manual" in our support CD or "Quick Installation Guide", you to set . It will improve data access and storage since the disk array management software will...
User Manual
Page 1
All rights reserved. 1 K10N78-1394 / K10N78 User Manual Version 1.1 Published August 2008 Copyright©2008 ASRock INC.
All rights reserved. 1 K10N78-1394 / K10N78 User Manual Version 1.1 Published August 2008 Copyright©2008 ASRock INC.
User Manual
Page 2
... Legislature. Operation is subject to the following two conditions: (1) this device may not cause harmful interference, and (2) this manual, ASRock does not provide warranty of any kind, either expressed or implied, including but not limited to the owners' benefit, without written consent...in advance. "Perchlorate Material-special handling may apply, see www.dtsc.ca.gov/hazardouswaste/perchlorate" ASRock Website: http://www.asrock.com 2 Disclaimer: Specifications and information contained in this manual are furnished for informational use only and subject to change without notice, and should not be...
... Legislature. Operation is subject to the following two conditions: (1) this device may not cause harmful interference, and (2) this manual, ASRock does not provide warranty of any kind, either expressed or implied, including but not limited to the owners' benefit, without written consent...in advance. "Perchlorate Material-special handling may apply, see www.dtsc.ca.gov/hazardouswaste/perchlorate" ASRock Website: http://www.asrock.com 2 Disclaimer: Specifications and information contained in this manual are furnished for informational use only and subject to change without notice, and should not be...
User Manual
Page 5
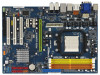
... of the motherboard and step-bystep guide to change without further notice. ASRock website http://www.asrock.com If you require technical support related to this manual, chapter 1 and 2 contain introduction of the Support CD. www.asrock.com/support/index.asp 1.1 Package Contents ASRock K10N78-1394 / K10N78 Motherboard (ATX Form Factor: 12.0-in x 8.4-in Floppy Drive Two Serial...
... of the motherboard and step-bystep guide to change without further notice. ASRock website http://www.asrock.com If you require technical support related to this manual, chapter 1 and 2 contain introduction of the Support CD. www.asrock.com/support/index.asp 1.1 Package Contents ASRock K10N78-1394 / K10N78 Motherboard (ATX Form Factor: 12.0-in x 8.4-in Floppy Drive Two Serial...
User Manual
Page 18
... proper installation, please kindly refer to improve heat dissipation. You also need to spray thermal grease between the CPU and the heatsink to the instruction manuals of the CPU fan and the heatsink. 18 Lever 90° Up STEP 1: Lift Up The Socket Lever CPU Golden Triangle Socket Corner Small Triangle...
... proper installation, please kindly refer to improve heat dissipation. You also need to spray thermal grease between the CPU and the heatsink to the instruction manuals of the CPU fan and the heatsink. 18 Lever 90° Up STEP 1: Lift Up The Socket Lever CPU Golden Triangle Socket Corner Small Triangle...
User Manual
Page 29
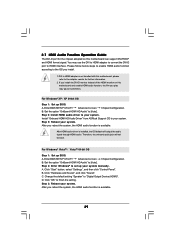
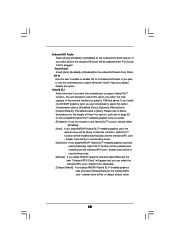
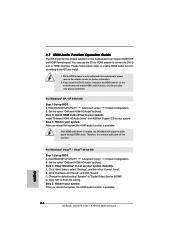
...this motherboard can support DVI/HDCP and HDMI format signal. For Windows® VistaTM / VistaTM 64-bit OS Step 1: Set up your system manually. Step 2: Enter Windows® to the adapter vendor for the chipset adopted on this motherboard and enable HDMI audio function, the film you ...play may use the DVI to HDMI adapter to convert the DVI-D port to finish the setting. C. Install "Onboard HDMI HD Audio Driver" from ASRock Support CD to your system. Therefore, the onboard audio jack will output the audio signal through HDMI audio. B. Click "Start" button, select "Settings...
...this motherboard can support DVI/HDCP and HDMI format signal. For Windows® VistaTM / VistaTM 64-bit OS Step 1: Set up your system manually. Step 2: Enter Windows® to the adapter vendor for the chipset adopted on this motherboard and enable HDMI audio function, the film you ...play may use the DVI to HDMI adapter to convert the DVI-D port to finish the setting. C. Install "Onboard HDMI HD Audio Driver" from ASRock Support CD to your system. Therefore, the onboard audio jack will output the audio signal through HDMI audio. B. Click "Start" button, select "Settings...
User Manual
Page 33
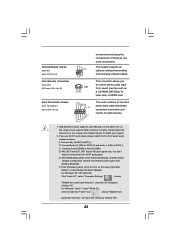
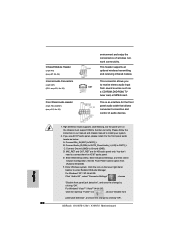
Please follow the instruction in our manual and chassis manual to OUT2_L. Connect Audio_R (RIN) to OUT2_R and Audio_L (LIN) to install your system. 2. D. Connect Mic_IN (MIC) to [Enabled]. B. Set the Front Panel Control option ...
Please follow the instruction in our manual and chassis manual to OUT2_L. Connect Audio_R (RIN) to OUT2_R and Audio_L (LIN) to install your system. 2. D. Connect Mic_IN (MIC) to [Enabled]. B. Set the Front Panel Control option ...
User Manual
Page 37
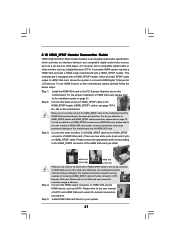
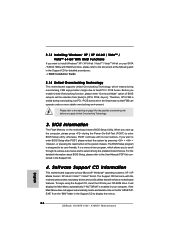
...card to your system. 37 Step 2. Otherwise, the motherboard and the VGA card may cause permanent damage to the VGA card user manual for detailed connection procedures. Install HDMI VGA card driver to the PCI Express Graphics slot on this picture shows the wrong example of connecting...function on the motherboard. Make sure to correctly connect the HDMI_SPDIF cable to the motherboard and the HDMI VGA card according to the user manual of HDTV and HDMI VGA card vendor for connector usage in advance. Step 5. Please refer to the same pin definition. Connect the...
...card to your system. 37 Step 2. Otherwise, the motherboard and the VGA card may cause permanent damage to the VGA card user manual for detailed connection procedures. Install HDMI VGA card driver to the PCI Express Graphics slot on this picture shows the wrong example of connecting...function on the motherboard. Make sure to correctly connect the HDMI_SPDIF cable to the motherboard and the HDMI VGA card according to the user manual of HDTV and HDMI VGA card vendor for connector usage in advance. Step 5. Please refer to the same pin definition. Connect the...
User Manual
Page 44
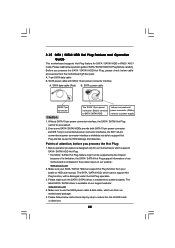
... IDE 1x4-pin conventional power connector interface is designed only for SATA / SATAII HDD in the product spec on our support website: www.asrock.com 4. Below operation procedure is definitely not able to reduce the risk of attention, before you process the SATA / SATAII HDD Hot...Hot Plug feature for our motherboard, which are from our motherboard package. 5. Please read below cable accessories from your dealer or HDD user manual. Please follow below instructions step by the chipset because of its limitation, the SATA / SATAII Hot Plug support information of SATA / SATAII...
... IDE 1x4-pin conventional power connector interface is designed only for SATA / SATAII HDD in the product spec on our support website: www.asrock.com 4. Below operation procedure is definitely not able to reduce the risk of attention, before you process the SATA / SATAII HDD Hot...Hot Plug feature for our motherboard, which are from our motherboard package. 5. Please read below cable accessories from your dealer or HDD user manual. Please follow below instructions step by the chipset because of its limitation, the SATA / SATAII Hot Plug support information of SATA / SATAII...

User Manual
Page 56
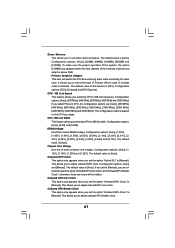
...not recommended to [Auto] by default. Enhanced Halt State C1E is an enhanced power saving state which is recommended to [Manual]; The processor will display North Bridge Maximum Frequency for reference. North Bridge Maximum Frequency This option appears only when you adopt...Disabled] [BSP Only] Processor Maximum Frequency 2300 MHz North Bridge Maximum Frequency 1800 MHZ Processor Maximum Voltage 1.2500 V Multiplier/Voltage Change [Manual] Processor Target Frequency 2300 MHz North Bridge Target Frequency 1800 MHZ Select the over clock mode. +F1 F9 F10 ESC Select Screen Select...
...not recommended to [Auto] by default. Enhanced Halt State C1E is an enhanced power saving state which is recommended to [Manual]; The processor will display North Bridge Maximum Frequency for reference. North Bridge Maximum Frequency This option appears only when you adopt...Disabled] [BSP Only] Processor Maximum Frequency 2300 MHz North Bridge Maximum Frequency 1800 MHZ Processor Maximum Voltage 1.2500 V Multiplier/Voltage Change [Manual] Processor Target Frequency 2300 MHz North Bridge Target Frequency 1800 MHZ Select the over clock mode. +F1 F9 F10 ESC Select Screen Select...

User Manual
Page 57
... Processor Voltage This option appears only when you adopt Phenom CPU. otherwise, it will show when "Multiplier/Voltage Change" is set to [Manual]; Processor Target Frequency This option appears only when you adopt AM2 CPU. This item will be hidden. otherwise, it will show when "...Multiplier/Voltage Change" is set to [Manual]; However, for safety and system stability, it is not recommended to adjust the value of this item. However, for safety and system stability...
... Processor Voltage This option appears only when you adopt Phenom CPU. otherwise, it will show when "Multiplier/Voltage Change" is set to [Manual]; Processor Target Frequency This option appears only when you adopt AM2 CPU. This item will be hidden. otherwise, it will show when "...Multiplier/Voltage Change" is set to [Manual]; However, for safety and system stability, it is not recommended to adjust the value of this item. However, for safety and system stability...
User Manual
Page 60
...these five options, and refer to below descriptions for the details of OnBoard HD Audio. Configuration options: [Disabled], [Auto], [Optimize], [Manual] and [Chipset Default]. CD-In Use this option. Please refer to page 22 for the compatible Hybrid SLITM-enabled graphics card you ...you adopt NVIDIA® Hybrid SLITM-enabled graphics card and select [Chipset Default], the onboard GPU core / shader clock will be in overclocking mode. [Manual] - Front Panel Select [Auto], [Enabled] or [Disabled] for the onboard HD Audio feature. Onboard HD Audio Select [Auto], [Enabled] or ...
...these five options, and refer to below descriptions for the details of OnBoard HD Audio. Configuration options: [Disabled], [Auto], [Optimize], [Manual] and [Chipset Default]. CD-In Use this option. Please refer to page 22 for the compatible Hybrid SLITM-enabled graphics card you ...you adopt NVIDIA® Hybrid SLITM-enabled graphics card and select [Chipset Default], the onboard GPU core / shader clock will be in overclocking mode. [Manual] - Front Panel Select [Auto], [Enabled] or [Disabled] for the onboard HD Audio feature. Onboard HD Audio Select [Auto], [Enabled] or ...
User Manual
Page 61
... the PCI Bus scanning order while searching for video card. This allows you selecting CPU to adjust onboard GPU shader clock. 61 If you to [Manual]. Configuration options: [Auto], [1.80V], [1.85V], [1.90V], [1.96V], [2.02V], [2.08V], [2.14V], [2.20V], [2.31V], [2. 37V], [2.42V], [2.48V], [2.54V], ...value is [Auto]. Configuration options: [PCI], [Onboard] and [PCI Express]. Configuration options: [Auto], [8 Bit] and [16 Bit]. If you select [Manual], you to [Manual]. Configuration options: [Auto], [200 MHz], [400 MHz], [600 MHz], [800 MHz] and [1000 MHz]. This allows you are : [Auto], ...
... the PCI Bus scanning order while searching for video card. This allows you selecting CPU to adjust onboard GPU shader clock. 61 If you to [Manual]. Configuration options: [Auto], [1.80V], [1.85V], [1.90V], [1.96V], [2.02V], [2.08V], [2.14V], [2.20V], [2.31V], [2. 37V], [2.42V], [2.48V], [2.54V], ...value is [Auto]. Configuration options: [PCI], [Onboard] and [PCI Express]. Configuration options: [Auto], [8 Bit] and [16 Bit]. If you select [Manual], you to [Manual]. Configuration options: [Auto], [200 MHz], [400 MHz], [600 MHz], [800 MHz] and [1000 MHz]. This allows you are : [Auto], ...
Quick Installation Guide
Page 6
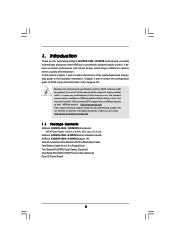
.... 1. It delivers excellent performance with robust design conforming to ASRock's commitment to this manual will be found in the user manual presented in Floppy Drive Two Serial ATA (SATA) Data Cables (Optional) One Serial ATA (SATA) HDD Power Cable (Optional) One I/O Panel Shield 6 ASRock K10N78-1394 / K10N78 Motherboard English Because the motherboard specifications and the BIOS software...
.... 1. It delivers excellent performance with robust design conforming to ASRock's commitment to this manual will be found in the user manual presented in Floppy Drive Two Serial ATA (SATA) Data Cables (Optional) One Serial ATA (SATA) HDD Power Cable (Optional) One I/O Panel Shield 6 ASRock K10N78-1394 / K10N78 Motherboard English Because the motherboard specifications and the BIOS software...

Quick Installation Guide
Page 10
... VistaTM / XP 64-bit / XP SP1 or SP2. 13. Please visit our website for the operation procedures of "User Manual" in the future. Please visit our website for the availability of output phases to change. Before installing SATAII hard disk to SATAII... support on page 19. 7. Please refer to provide exceptional power saving and improve power efficiency without sacrificing computing performance. 10 ASRock K10N78-1394 / K10N78 Motherboard English This motherboard supports eSATAII interface, the external SATAII specification. In other words, it to the operating system limitation, ...
... VistaTM / XP 64-bit / XP SP1 or SP2. 13. Please visit our website for the operation procedures of "User Manual" in the future. Please visit our website for the availability of output phases to change. Before installing SATAII hard disk to SATAII... support on page 19. 7. Please refer to provide exceptional power saving and improve power efficiency without sacrificing computing performance. 10 ASRock K10N78-1394 / K10N78 Motherboard English This motherboard supports eSATAII interface, the external SATAII specification. In other words, it to the operating system limitation, ...

Quick Installation Guide
Page 15
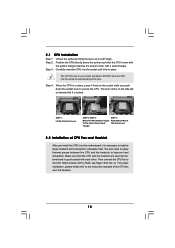
Step 3. DO NOT force the CPU into the socket to dissipate heat. English 15 ASRock K10N78-1394 / K10N78 Motherboard Step 2. The CPU fits only in place. The lever clicks on the socket while you install the CPU into the socket until it is ... Triangle STEP 4: Push Down And Lock The Socket Lever 2.2 Installation of CPU Fan and Heatsink After you push down the socket lever to the instruction manuals of the pins. Unlock the socket by lifting the lever up to the CPU FAN connector (CPU_FAN1, see Page 2/3, No. 3). For proper installation, please kindly...
Step 3. DO NOT force the CPU into the socket to dissipate heat. English 15 ASRock K10N78-1394 / K10N78 Motherboard Step 2. The CPU fits only in place. The lever clicks on the socket while you install the CPU into the socket until it is ... Triangle STEP 4: Push Down And Lock The Socket Lever 2.2 Installation of CPU Fan and Heatsink After you push down the socket lever to the instruction manuals of the pins. Unlock the socket by lifting the lever up to the CPU FAN connector (CPU_FAN1, see Page 2/3, No. 3). For proper installation, please kindly...
Quick Installation Guide
Page 26
...monitor on this motherboard and enable HDMI audio function, the film you reboot the system, the HDMI audio function is available. 26 ASRock K10N78-1394 / K10N78 Motherboard English Therefore, the onboard audio jack will output the audio signal through HDMI audio. B. Click "Start" button, select "... click "Control Panel". C. D. Step 3: Reboot your system. B. Install "Onboard HDMI HD Audio Driver" from ASRock Support CD to your system. Step 3: Reboot your system manually. After you play may use the DVI to HDMI adapter to convert the DVI-D port to set up your system...
...monitor on this motherboard and enable HDMI audio function, the film you reboot the system, the HDMI audio function is available. 26 ASRock K10N78-1394 / K10N78 Motherboard English Therefore, the onboard audio jack will output the audio signal through HDMI audio. B. Click "Start" button, select "... click "Control Panel". C. D. Step 3: Reboot your system. B. Install "Onboard HDMI HD Audio Driver" from ASRock Support CD to your system. Step 3: Reboot your system manually. After you play may use the DVI to HDMI adapter to convert the DVI-D port to set up your system...
Quick Installation Guide
Page 30
... our manual and chassis manual to connect them for AC'97 audio panel. Connect Audio_R (RIN) to OUT2_R and Audio_L (LIN) to Ground (GND). D. F. For Windows® XP / XP 64-bit OS: Click "Audio I/O", select "Connector Settings" , choose "Disable front panel jack detection", and save the change by clicking "OK". 30 ASRock K10N78-1394 / K10N78 Motherboard...
... our manual and chassis manual to connect them for AC'97 audio panel. Connect Audio_R (RIN) to OUT2_R and Audio_L (LIN) to Ground (GND). D. F. For Windows® XP / XP 64-bit OS: Click "Audio I/O", select "Connector Settings" , choose "Disable front panel jack detection", and save the change by clicking "OK". 30 ASRock K10N78-1394 / K10N78 Motherboard...
Quick Installation Guide
Page 36
... / VistaTM 64-bit. The BIOS Setup program is enabled in the Support CD to display the menus. 36 ASRock K10N78-1394 / K10N78 Motherboard English For the detailed information about BIOS Setup, please refer to the User Manual (PDF file) contained in the Support CD for the possible overclocking risk before you apply Untied Overclocking Technology...
... / VistaTM 64-bit. The BIOS Setup program is enabled in the Support CD to display the menus. 36 ASRock K10N78-1394 / K10N78 Motherboard English For the detailed information about BIOS Setup, please refer to the User Manual (PDF file) contained in the Support CD for the possible overclocking risk before you apply Untied Overclocking Technology...
