
Owner's Manual
Page 5
...procedure 17 Additional operations 18 Selecting the SCENE templates 21 Selecting the desired SCENE template 21 Creating your original SCENE templates 23 Using remote control on the SCENE feature........... 24 Sound field programs 25 Selecting sound field programs 25 FM/AM tuning 27 Overview 27 FM/... Preset FM/AM stations 27 Using iPod 29 Control and functions for iPod 29 Using Bluetooth™ components 30 Pairing the Bluetooth™ receiver and your Bluetooth™ component 30 Playback of the Bluetooth™ component 30 ADVANCED OPERATION Set menu 31 Using set menu 32 1...
...procedure 17 Additional operations 18 Selecting the SCENE templates 21 Selecting the desired SCENE template 21 Creating your original SCENE templates 23 Using remote control on the SCENE feature........... 24 Sound field programs 25 Selecting sound field programs 25 FM/AM tuning 27 Overview 27 FM/... Preset FM/AM stations 27 Using iPod 29 Control and functions for iPod 29 Using Bluetooth™ components 30 Pairing the Bluetooth™ receiver and your Bluetooth™ component 30 Playback of the Bluetooth™ component 30 ADVANCED OPERATION Set menu 31 Using set menu 32 1...
Owner's Manual
Page 6
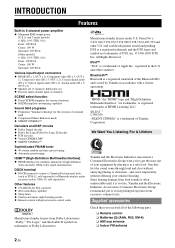
... that you to connect a Yamaha iPod universal dock (such as YDS-11, sold separately) or Bluetooth wireless audio receiver (such as YBA-10, sold separately) Other features ◆ 192-kHz/24-bit D/A converter ◆ iPod controlling capability ◆ Sleep timer ◆ Cinema and music night listening modes ◆ Remote control with a license agreement...
... that you to connect a Yamaha iPod universal dock (such as YDS-11, sold separately) or Bluetooth wireless audio receiver (such as YBA-10, sold separately) Other features ◆ 192-kHz/24-bit D/A converter ◆ iPod controlling capability ◆ Sleep timer ◆ Cinema and music night listening modes ◆ Remote control with a license agreement...
Owner's Manual
Page 9
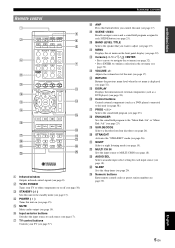
...DISPLAY Displays the information of this unit (see page 37). s SUR.DECODE Selects a decoder from four decoders (see page 19). b TV/AV POWER Turns your TV (see page 38). e MUTE Mutes audio output (see page 26). j BAND LEVEL TITLE Selects the speaker that ...MULTI CH IN Sets the input source to adjust (see page 17). y Numeric buttons Enter remote control codes or preset station number (see page 25). INTRODUCTION PREPARATION BASIC OPERATION ADVANCED OPERATION Remote control a c b POWER POWER STANDBY POWER TV AV d A B C MUTE e CD MD/CD-R TUNER f DVD DTV/CBL DVR TV ...
...DISPLAY Displays the information of this unit (see page 37). s SUR.DECODE Selects a decoder from four decoders (see page 19). b TV/AV POWER Turns your TV (see page 38). e MUTE Mutes audio output (see page 26). j BAND LEVEL TITLE Selects the speaker that ...MULTI CH IN Sets the input source to adjust (see page 17). y Numeric buttons Enter remote control codes or preset station number (see page 25). INTRODUCTION PREPARATION BASIC OPERATION ADVANCED OPERATION Remote control a c b POWER POWER STANDBY POWER TV AV d A B C MUTE e CD MD/CD-R TUNER f DVD DTV/CBL DVR TV ...

Owner's Manual
Page 12
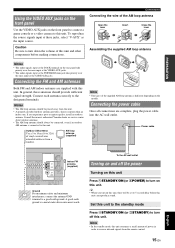
...if you want to the polarity markings (+ and -) on the remote control. • Do not drop the remote control. • Do not leave or store the remote control in the remote control 13 Using the remote control The remote control transmits a directional infrared ray. When the memory is without... batteries. • Do not throw away batteries with your local regulations. • If the remote control is cleared, insert new batteries and set up the remote control code. Aim this window at the remote control sensor on this unit during operation. 2 30º 30º Approximately 6 m (20...
...if you want to the polarity markings (+ and -) on the remote control. • Do not drop the remote control. • Do not leave or store the remote control in the remote control 13 Using the remote control The remote control transmits a directional infrared ray. When the memory is without... batteries. • Do not throw away batteries with your local regulations. • If the remote control is cleared, insert new batteries and set up the remote control code. Aim this window at the remote control sensor on this unit during operation. 2 30º 30º Approximately 6 m (20...
Owner's Manual
Page 19
... mini jack take priority over the ones input at these antennas should be placed away from this unit can reproduce sound. Consult the nearest authorized Yamaha dealer or service center about outdoor antennas. • The AM loop antenna should always be a 4 to 5-second delay before making connections. ... the front panel to connect a game console or a video camera to this unit consumes a small amount of power in order to receive infrared signals from the remote control. 15 En English If you turn down the volume of this unit and other components before this unit. • A properly ...
... mini jack take priority over the ones input at these antennas should be placed away from this unit can reproduce sound. Consult the nearest authorized Yamaha dealer or service center about outdoor antennas. • The AM loop antenna should always be a 4 to 5-second delay before making connections. ... the front panel to connect a game console or a video camera to this unit consumes a small amount of power in order to receive infrared signals from the remote control. 15 En English If you turn down the volume of this unit and other components before this unit. • A properly ...
Owner's Manual
Page 20
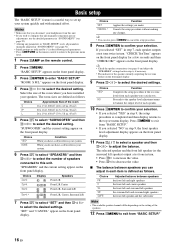
...SETUP" appears on the front panel display. The room sizes are indicated by (*) in the following each parameters. • Press nRETURN on the remote control to return to the previous menu level. 1 Press hAMP on the front panel display. "SPEAKERS" and the current setting appear on the ...of the room where you do not have a subwoofer in your headphones from "BASIC SETUP." 16 En "SUBWOOFER" and the current setting appear on the remote control. 2 Press kMENU. Choice YES* NO Function Completes the setup procedure if the test tone levels from "BASIC SETUP." • If you have...
...SETUP" appears on the front panel display. The room sizes are indicated by (*) in the following each parameters. • Press nRETURN on the remote control to return to the previous menu level. 1 Press hAMP on the front panel display. "SPEAKERS" and the current setting appear on the ...of the room where you do not have a subwoofer in your headphones from "BASIC SETUP." 16 En "SUBWOOFER" and the current setting appear on the remote control. 2 Press kMENU. Choice YES* NO Function Completes the setup procedure if the test tone levels from "BASIC SETUP." • If you have...

Owner's Manual
Page 23
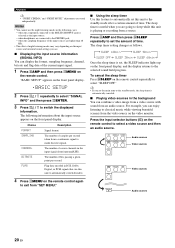
... muting level by pressing lk / n. • The available speaker channels differ depending on the speaker settings. 2 Press ll / h on the remote control to mute the audio output. Choice FRONT L FRONT R CENTER SWFR SUR.L SUR.R Description Front left speaker Front right speaker Center speaker Subwoofer ...dB Using optional features Use the following features to adjust the audio output or speaker level. ■ Muting the audio output Press eMUTE on the remote control (or press FPRESET/TUNING l / h) to the left and right speaker channels. y • When you select a sound field program,...
... muting level by pressing lk / n. • The available speaker channels differ depending on the speaker settings. 2 Press ll / h on the remote control to mute the audio output. Choice FRONT L FRONT R CENTER SWFR SUR.L SUR.R Description Front left speaker Front right speaker Center speaker Subwoofer ...dB Using optional features Use the following features to adjust the audio output or speaker level. ■ Muting the audio output Press eMUTE on the remote control (or press FPRESET/TUNING l / h) to the left and right speaker channels. y • When you select a sound field program,...
Owner's Manual
Page 24
... when you are connected to set this unit is playing or recording from a source. Press the input selector buttons (f) on the remote control to select "SLEEP OFF." when the sampling frequency of the input sources are stored independently. Choice FORMAT SAMPLING CHANNEL BITRATE FLAG ...canceled. ■ Playing video sources in the input signal (front/surround/LFE). For example, you set , the SLEEP indicator lights up on the remote control. Notes • You cannot use . ■ Displaying the input source information (SIGNAL INFO) You can display the format, sampling frequency, ...
... when you are connected to set this unit is playing or recording from a source. Press the input selector buttons (f) on the remote control to select "SLEEP OFF." when the sampling frequency of the input sources are stored independently. Choice FORMAT SAMPLING CHANNEL BITRATE FLAG ...canceled. ■ Playing video sources in the input signal (front/surround/LFE). For example, you set , the SLEEP indicator lights up on the remote control. Notes • You cannot use . ■ Displaying the input source information (SIGNAL INFO) You can display the format, sampling frequency, ...

Owner's Manual
Page 25
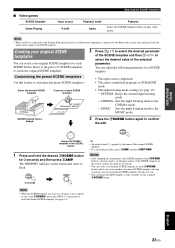
...desired SCENE templates from the SCENE template library and assign the templates to the selected SCENE buttons on the front panel and the remote control. ADVANCED OPERATION ADDITIONAL INFORMATION APPENDIX English 21 En Default SCENE button SCENE 1 SCENE 2 SCENE 3 SCENE 4 The name ...of currently assigned SCENE template appears on the remote control. TV Viewing *1 - input source: DTV/CBL - See page 15 for 3 seconds. The following SCENE templates are assigned to the corresponding...
...desired SCENE templates from the SCENE template library and assign the templates to the selected SCENE buttons on the front panel and the remote control. ADVANCED OPERATION ADDITIONAL INFORMATION APPENDIX English 21 En Default SCENE button SCENE 1 SCENE 2 SCENE 3 SCENE 4 The name ...of currently assigned SCENE template appears on the remote control. TV Viewing *1 - input source: DTV/CBL - See page 15 for 3 seconds. The following SCENE templates are assigned to the corresponding...
Owner's Manual
Page 27
...listening mode. - CINEMA: Sets the night listening mode to the MUSIC mode. The MEMORY indicator on the remote control. Refer to the preset 13 SCENE templates to create the original SCENE templates. 2 Press lk / ...play video games. Note • When the SCENE template you want to customize is connected to the Bluetooth receiver, this SCENE template when you may need to set the input source of the SCENE template on the front... • When an iPod is connected to the Yamaha iPod universal dock or a Bluetooth component is not assigned to customize the preset SCENE templates.
...listening mode. - CINEMA: Sets the night listening mode to the MUSIC mode. The MEMORY indicator on the remote control. Refer to the preset 13 SCENE templates to create the original SCENE templates. 2 Press lk / ...play video games. Note • When the SCENE template you want to customize is connected to the Bluetooth receiver, this SCENE template when you may need to set the input source of the SCENE template on the front... • When an iPod is connected to the Yamaha iPod universal dock or a Bluetooth component is not assigned to customize the preset SCENE templates.
Owner's Manual
Page 28
... 9 0 10 ENT Note • These buttons control the input source component. Setting input source of the customized SCENE template on the remote control If you customize the input source of the selected SCENE template, you must set the input source of the SCENE template on the...the input source component correctly. Selecting the SCENE templates Using remote control on the SCENE feature Controlling the input source components in the * area below to control the input source component of the selected SCENE template. * POWER POWER STANDBY POWER TV AV A B C MUTE CD MD/CD-R TUNER DVD ...
... 9 0 10 ENT Note • These buttons control the input source component. Setting input source of the customized SCENE template on the remote control If you customize the input source of the selected SCENE template, you must set the input source of the SCENE template on the...the input source component correctly. Selecting the SCENE templates Using remote control on the SCENE feature Controlling the input source components in the * area below to control the input source component of the selected SCENE template. * POWER POWER STANDBY POWER TV AV A B C MUTE CD MD/CD-R TUNER DVD ...
Owner's Manual
Page 32
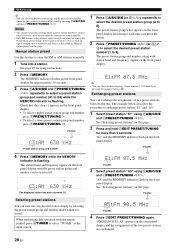
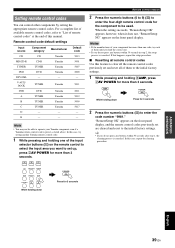
FM/AM tuning y • You can select the preset station group and the preset station number where the first received station will be stored by selecting the preset station group and number under the same preset station number. • Only FM stations with sufficient ... station "E1" and "A5." 1 Select preset station "E1" using EA/B/C/D/E and FPRESET/TUNING l / h. The preset station group letter appears on this operation with the remote control, press fTUNER to select "TUNER" as C3. The example below describes the procedure to E). "EXCHANGE E1-A5" appears on the front panel display and...
FM/AM tuning y • You can select the preset station group and the preset station number where the first received station will be stored by selecting the preset station group and number under the same preset station number. • Only FM stations with sufficient ... station "E1" and "A5." 1 Select preset station "E1" using EA/B/C/D/E and FPRESET/TUNING l / h. The preset station group letter appears on this operation with the remote control, press fTUNER to select "TUNER" as C3. The example below describes the procedure to E). "EXCHANGE E1-A5" appears on the front panel display and...
Owner's Manual
Page 33
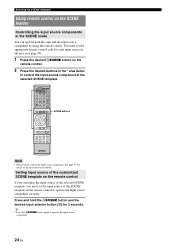
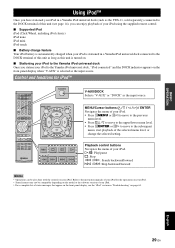
... INTRODUCTION PREPARATION BASIC OPERATION Using iPod™ Once you have stationed your iPod in a Yamaha iPod universal dock (such as the YDS-11, sold separately) connected to the DOCK... source. Refer to the instruction manuals of your iPod for iPod™ POWER POWER STANDBY POWER TV AV A B C MUTE CD MD/CD-R TUNER DVD DTV/CBL DVR TV CH V-AUX/DOCK D ...forward b / a: Skip backward/forward Notes • Operations can enjoy playback of your iPod using the supplied remote control. ■ Supported iPod iPod (Click Wheel, including iPod classic) iPod nano iPod mini iPod touch ...
... INTRODUCTION PREPARATION BASIC OPERATION Using iPod™ Once you have stationed your iPod in a Yamaha iPod universal dock (such as the YDS-11, sold separately) connected to the DOCK... source. Refer to the instruction manuals of your iPod for iPod™ POWER POWER STANDBY POWER TV AV A B C MUTE CD MD/CD-R TUNER DVD DTV/CBL DVR TV CH V-AUX/DOCK D ...forward b / a: Skip backward/forward Notes • Operations can enjoy playback of your iPod using the supplied remote control. ■ Supported iPod iPod (Click Wheel, including iPod classic) iPod nano iPod mini iPod touch ...
Owner's Manual
Page 34
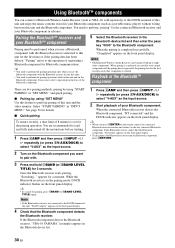
... the Bluetooth device list and then enter the pass key "0000" to perform the pairing operations both on the remote control, the connected Bluetooth receiver searches and connect to this unit and enjoy the music contents stored in "SET MENU" and quick pairing. ■ Pairing ...display. y • You need to the Bluetooth component. When the pairing is in advance. If the Bluetooth component detects the Bluetooth receiver, "YBA-10 YAMAHA" (example) appears in "INPUT MENU." Playback of the Bluetooth™ component There are recommended to read and fully understand all the ...
... the Bluetooth device list and then enter the pass key "0000" to perform the pairing operations both on the remote control, the connected Bluetooth receiver searches and connect to this unit and enjoy the music contents stored in "SET MENU" and quick pairing. ■ Pairing ...display. y • You need to the Bluetooth component. When the pairing is in advance. If the Bluetooth component detects the Bluetooth receiver, "YBA-10 YAMAHA" (example) appears in "INPUT MENU." Playback of the Bluetooth™ component There are recommended to read and fully understand all the ...
Owner's Manual
Page 36
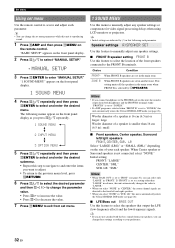
... DSP mode (see page 26). ■ LFE/Bass out BASS OUT Use this feature to select the location of a speaker is set menu Use the remote control to access and adjust each parameter. LR: "SML" Notes • When "BASS OUT" is smaller than "LARGE" in advance, this following menus... appear on the remote control. ZONE B When FRONT B speakers are indicated by CSPEAKERS. Set menu Using set to "FRNT" (see page 32), you can select only "LARGE" in ...
... DSP mode (see page 26). ■ LFE/Bass out BASS OUT Use this feature to select the location of a speaker is set menu Use the remote control to access and adjust each parameter. LR: "SML" Notes • When "BASS OUT" is smaller than "LARGE" in advance, this following menus... appear on the remote control. ZONE B When FRONT B speakers are indicated by CSPEAKERS. Set menu Using set to "FRNT" (see page 32), you can select only "LARGE" in ...
Owner's Manual
Page 38
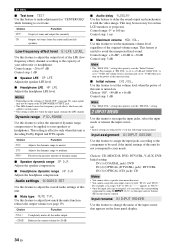
... 19). Input rename B)INPUT RENAME Use this feature to delay the sound output and synchronize it with the video image. Notes • Depending on the remote control). This setting is effective only when this unit is effective when the input signal contains the LFE channel. MAX* Preserves the greatest amount of...
... 19). Input rename B)INPUT RENAME Use this feature to delay the sound output and synchronize it with the video image. Notes • Depending on the remote control). This setting is effective only when this unit is effective when the input signal contains the LFE channel. MAX* Preserves the greatest amount of...
Owner's Manual
Page 39
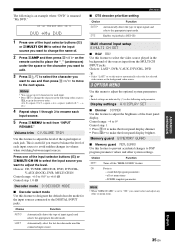
... buttons (f) or vMULTI CH IN to select the input source you want to change the name of. 2 Press hAMP and then press ll / h on the remote control to place the "_" (underscore) under the space or the character you want to edit. 3 Press lk / n to select the character you want to adjust...
... buttons (f) or vMULTI CH IN to select the input source you want to change the name of. 2 Press hAMP and then press ll / h on the remote control to place the "_" (underscore) under the space or the character you want to edit. 3 Press lk / n to select the character you want to adjust...
Owner's Manual
Page 41
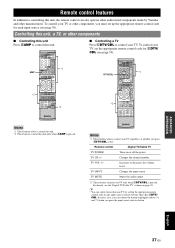
... TV or other components, you can also operate other than one TV by Yamaha and other components ■ Controlling this unit Press hAMP to control this unit. In such a case, you must set the appropriate remote control code for any input source selector buttons other audiovisual components made by setting... a TV Press fDTV/CBL to control your TV regardless of whether you press the input source selector button. DTV/CBL *2 POWER POWER STANDBY POWER TV AV A B C MUTE CD MD/CD-R TUNER DVD DTV/CBL DVR TV CH V-AUX/DOCK D E AMP TV INPUT TV MUTE TV VOL SCENE 1 2 3 4 BAND ...
... TV or other components, you can also operate other than one TV by Yamaha and other components ■ Controlling this unit Press hAMP to control this unit. In such a case, you must set the appropriate remote control code for any input source selector buttons other audiovisual components made by setting... a TV Press fDTV/CBL to control your TV regardless of whether you press the input source selector button. DTV/CBL *2 POWER POWER STANDBY POWER TV AV A B C MUTE CD MD/CD-R TUNER DVD DTV/CBL DVR TV CH V-AUX/DOCK D E AMP TV INPUT TV MUTE TV VOL SCENE 1 2 3 4 BAND ...
Owner's Manual
Page 42
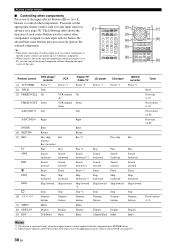
... of each control button used to control other components. Be advised that the remote control can control the desired component without changing the input source of this unit. [1] POWER POWER STANDBY POWER TV AV A B C MUTE CD MD/CD-R TUNER DVD DTV/CBL DVR TV ... buttons may not correctly operate the selected component. DECODE 3 4 STRAIGHT NIGHT 5 6 7 8 MULTI CH IN AUDIO SEL 9 0 SLEEP 10 ENT [9] Remote control [1] AV POWER [2] TITLE [3] PRESET/CH k PRESET/CH n A/B/C/D/E l DVD player/ recorder VCR Power *1 Power *1 Title Up VCR channel up Down VCR channel down...
... of each control button used to control other components. Be advised that the remote control can control the desired component without changing the input source of this unit. [1] POWER POWER STANDBY POWER TV AV A B C MUTE CD MD/CD-R TUNER DVD DTV/CBL DVR TV ... buttons may not correctly operate the selected component. DECODE 3 4 STRAIGHT NIGHT 5 6 7 8 MULTI CH IN AUDIO SEL 9 0 SLEEP 10 ENT [9] Remote control [1] AV POWER [2] TITLE [3] PRESET/CH k PRESET/CH n A/B/C/D/E l DVD player/ recorder VCR Power *1 Power *1 Title Up VCR channel up Down VCR channel down...
Owner's Manual
Page 43
... up, press bAV POWER for more than one code, try setting another Yamaha remote control code. 1 While pressing and holding hAMP, press bAV POWER for the component to the initial factory settings. Note • You may not be used. AMP POWER AV While holding down Press for 3 seconds 2 Press the numeric buttons (y) to...
... up, press bAV POWER for more than one code, try setting another Yamaha remote control code. 1 While pressing and holding hAMP, press bAV POWER for the component to the initial factory settings. Note • You may not be used. AMP POWER AV While holding down Press for 3 seconds 2 Press the numeric buttons (y) to...


