Owner's Manual
Page 4
... disconnecting the power cord from the AC power source as long as it is connected to the wall outlet, even if this unit itself is plugged into a wall outlet, do not place your eyes close to the opening of the disc tray and other than specified is needed. The cabinet should remove the cover or attempt to modify or fix this...
... disconnecting the power cord from the AC power source as long as it is connected to the wall outlet, even if this unit itself is plugged into a wall outlet, do not place your eyes close to the opening of the disc tray and other than specified is needed. The cabinet should remove the cover or attempt to modify or fix this...
Owner's Manual
Page 5
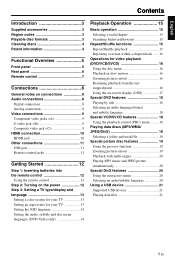
English Contents Introduction 3 Supplied accessories 3 Region codes 3 Playable disc formats 3 Cleaning discs 4 Patent information 4 Functional Overview 5 Front panel 5 Rear panel 6 Remote control 7 Connections 8 General notes on connections 8 Audio connections 8 Digital connection 8 Analog connection 8 Video connections 9 Component video jacks
English Contents Introduction 3 Supplied accessories 3 Region codes 3 Playable disc formats 3 Cleaning discs 4 Patent information 4 Functional Overview 5 Front panel 5 Rear panel 6 Remote control 7 Connections 8 General notes on connections 8 Audio connections 8 Digital connection 8 Analog connection 8 Video connections 9 Component video jacks

Owner's Manual
Page 6
... the TV display 27 Turning the progressive scan function on/off ...28 Adjusting picture settings 29 Turning the black level on/off 29 Turning the closed caption on/off 30 Setting the HDMI video 30 Preference setup menu 31 Audio, subtitle and disc menu 31 Restricting playback with parental control .......31 Selecting playback of VR format 32 Selecting the MP3/JPEG menu 32 Displaying DivX external subtitle files 33 Selecting the PBC (playback control) function 33 Changing the password 34 Resetting the system 34 Language Codes 35 Troubleshooting 36 Glossary 39 Specifications 41...
... the TV display 27 Turning the progressive scan function on/off ...28 Adjusting picture settings 29 Turning the black level on/off 29 Turning the closed caption on/off 30 Setting the HDMI video 30 Preference setup menu 31 Audio, subtitle and disc menu 31 Restricting playback with parental control .......31 Selecting playback of VR format 32 Selecting the MP3/JPEG menu 32 Displaying DivX external subtitle files 33 Selecting the PBC (playback control) function 33 Changing the password 34 Resetting the system 34 Language Codes 35 Troubleshooting 36 Glossary 39 Specifications 41...
Owner's Manual
Page 7
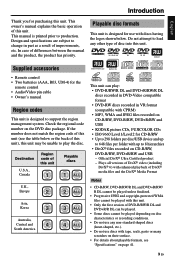
... the remote control • Audio/Video pin cable • Owner's manual Region codes This unit is designed to play : • DVD-R/RW/R DL and DVD+R/RW/R DL discs recorded in DVD-Video compatible format • DVD-RW discs recorded in part as a result of DivX® media files and the DivX® Media Format Notes • CD-R/RW, DVD-R/RW/R DL and DVD+R/RW/ R DL cannot be played unless finalized. • Progressive JPEG and copyright-protected WMA files cannot be played with...
... the remote control • Audio/Video pin cable • Owner's manual Region codes This unit is designed to play : • DVD-R/RW/R DL and DVD+R/RW/R DL discs recorded in DVD-Video compatible format • DVD-RW discs recorded in part as a result of DivX® media files and the DivX® Media Format Notes • CD-R/RW, DVD-R/RW/R DL and DVD+R/RW/ R DL cannot be played unless finalized. • Progressive JPEG and copyright-protected WMA files cannot be played with...
Owner's Manual
Page 10
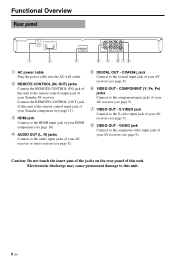
... composite video input jack of your AV receiver (see page 8). 5 DIGITAL OUT - S VIDEO jack Connect to the coaxial input jack of your AV receiver (see page 8). 6 VIDEO OUT - Functional Overview Rear panel REMOTE CONTROL OUT IN 1 2 HDMI 3 PR COMPONENT Y VIDEO COAXIAL PB S VIDEO AUDIO OUT DIGITALOUT VIDEO OUT 4 5 678 1 AC power cable Plug the power cable into the AC wall outlet. 2 REMOTE CONTROL (IN, OUT) jacks Connect the REMOTE CONTROL (IN) jack of this unit. COAXIAL jack Connect to the S-video input...
... composite video input jack of your AV receiver (see page 8). 5 DIGITAL OUT - S VIDEO jack Connect to the coaxial input jack of your AV receiver (see page 8). 6 VIDEO OUT - Functional Overview Rear panel REMOTE CONTROL OUT IN 1 2 HDMI 3 PR COMPONENT Y VIDEO COAXIAL PB S VIDEO AUDIO OUT DIGITALOUT VIDEO OUT 4 5 678 1 AC power cable Plug the power cable into the AC wall outlet. 2 REMOTE CONTROL (IN, OUT) jacks Connect the REMOTE CONTROL (IN) jack of this unit. COAXIAL jack Connect to the S-video input...

Owner's Manual
Page 12
... S VIDEO VIDEO OUT C C AV receiver This unit Notes • You need to set [DIGITAL OUTPUT] to your AV receiver equipped with your receiver, the receiver produces a distorted sound or no sound at all. Pressing AUDIO on the disc. The selected format appears in jack of this unit to select the appropriate audio format from the menu screen on the remote control once or more may change connections. • Depending on the component you want to enjoy Dolby Digital...
... S VIDEO VIDEO OUT C C AV receiver This unit Notes • You need to set [DIGITAL OUTPUT] to your AV receiver equipped with your receiver, the receiver produces a distorted sound or no sound at all. Pressing AUDIO on the disc. The selected format appears in jack of this unit to select the appropriate audio format from the menu screen on the remote control once or more may change connections. • Depending on the component you want to enjoy Dolby Digital...

Owner's Manual
Page 14
... AV receiver, and then to that case, adjust the picture setting of the connected DVI component. • Do not disconnect or turn off the power of the HDMI/DVI component connected to the HDMI jack of this unit directly to the HDMI input jack of this unit while data is not compatible with HDCPincompatible HDMI or DVI components. • You need to make an appropriate audio connections if the connected component does not output audio signals (see...
... AV receiver, and then to that case, adjust the picture setting of the connected DVI component. • Do not disconnect or turn off the power of the HDMI/DVI component connected to the HDMI jack of this unit directly to the HDMI input jack of this unit while data is not compatible with HDCPincompatible HDMI or DVI components. • You need to make an appropriate audio connections if the connected component does not output audio signals (see...

Owner's Manual
Page 17
... TYPE TV DISPLAY PROGRESSIVE PICTURE SETTING BLACK LEVEL CLOSED CAPTION HDMI SETUP PAL NTSC MULTI 1 Press SET UP. 2 Press 3 repeatedly to select "VIDEO SETUP PAGE". 3 Press 5/a to highlight [TV TYPE], and then press 3. 4 Press 5/a to highlight one of NTSC discs and output them in PAL format. ENSURE THAT YOUR TV SUPPORTS PAL STANDARD. 2. For details, see "Setting the TV display" on the TV screen. Notes • Unless stated otherwise, all operations described here are carried out using the setup menu displayed...
... TYPE TV DISPLAY PROGRESSIVE PICTURE SETTING BLACK LEVEL CLOSED CAPTION HDMI SETUP PAL NTSC MULTI 1 Press SET UP. 2 Press 3 repeatedly to select "VIDEO SETUP PAGE". 3 Press 5/a to highlight [TV TYPE], and then press 3. 4 Press 5/a to highlight one of NTSC discs and output them in PAL format. ENSURE THAT YOUR TV SUPPORTS PAL STANDARD. 2. For details, see "Setting the TV display" on the TV screen. Notes • Unless stated otherwise, all operations described here are carried out using the setup menu displayed...
Owner's Manual
Page 18
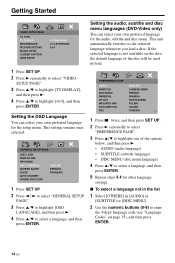
...used instead. GENERAL SETUP PAGE DISC LOCK DISPLAY DIM PROGRAM OSD LANGUAGE SCREEN SAVER SLEEP AUTO STANDBY DIVX(R) VOD CODE ENGLISH ESPAÑOL FRANÇAIS 1 Press SET UP. 2 Press 2 / 3 to select "GENERAL SETUP PAGE". 3 Press 5/a to highlight [OSD LANGUAGE], and then press 3. 4 Press 5/a to the selected language whenever you load a disc. This setting remains once selected. Getting Started VIDEO SETUP PAGE TV TYPE TV DISPLAY PROGRESSIVE PICTURE SETTING BLACK LEVEL CLOSED CAPTION HDMI SETUP 4:3 PAN SCAN 4:3 LETTER BOX 16:9 1 Press SET UP. 2 Press 3 repeatedly to select "VIDEO SETUP...
...used instead. GENERAL SETUP PAGE DISC LOCK DISPLAY DIM PROGRAM OSD LANGUAGE SCREEN SAVER SLEEP AUTO STANDBY DIVX(R) VOD CODE ENGLISH ESPAÑOL FRANÇAIS 1 Press SET UP. 2 Press 2 / 3 to select "GENERAL SETUP PAGE". 3 Press 5/a to highlight [OSD LANGUAGE], and then press 3. 4 Press 5/a to the selected language whenever you load a disc. This setting remains once selected. Getting Started VIDEO SETUP PAGE TV TYPE TV DISPLAY PROGRESSIVE PICTURE SETTING BLACK LEVEL CLOSED CAPTION HDMI SETUP 4:3 PAN SCAN 4:3 LETTER BOX 16:9 1 Press SET UP. 2 Press 3 repeatedly to select "VIDEO SETUP...
Owner's Manual
Page 25
... USB mode key to switch device" appears on the TV screen. 2 Press USB. • The reading time may be displayed if some files are tested after you connect the USB device, follow the procedure below. - The first slot has priority. • For an external hard disk drive, this case, record the file at once, though it can recognize up to stop playback, and then press USB. English Playback Operation Using a USB device You can play back files of...
... USB mode key to switch device" appears on the TV screen. 2 Press USB. • The reading time may be displayed if some files are tested after you connect the USB device, follow the procedure below. - The first slot has priority. • For an external hard disk drive, this case, record the file at once, though it can recognize up to stop playback, and then press USB. English Playback Operation Using a USB device You can play back files of...
Owner's Manual
Page 30
... ENTER. Turning the night mode on the HDMI audio output. OFF Select this when you want to enjoy the full dynamic range of surround sound. 2 Press 5/a to select a setting, and then press ENTER. 26 En This feature is muted when audio format plays back the DTS source. Setup Menu 48KHz Select this to play back discs recorded at the sampling rate of 96 kHz. All 96 kHz PCM data streams...
... ENTER. Turning the night mode on the HDMI audio output. OFF Select this when you want to enjoy the full dynamic range of surround sound. 2 Press 5/a to select a setting, and then press ENTER. 26 En This feature is muted when audio format plays back the DTS source. Setup Menu 48KHz Select this to play back discs recorded at the sampling rate of 96 kHz. All 96 kHz PCM data streams...
Owner's Manual
Page 32
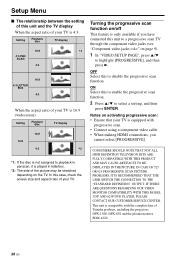
... is compatible with progressive scan. • Connect using a component video cable. • When making HDMI connections, you have connected this unit to a progressive scan TV through the component video jacks (see "Component video jacks " on page 9). 1 In "VIDEO SETUP PAGE", press 5/a to disable the progressive scan function. Turning the progressive scan function on/off This feature is only available if you cannot select [PROGRESSIVE]. ON Select this case, check the screen size and aspect ratio of the picture may be stretched depending on activating progressive scan: •...
... is compatible with progressive scan. • Connect using a component video cable. • When making HDMI connections, you have connected this unit to a progressive scan TV through the component video jacks (see "Component video jacks " on page 9). 1 In "VIDEO SETUP PAGE", press 5/a to disable the progressive scan function. Turning the progressive scan function on/off This feature is only available if you cannot select [PROGRESSIVE]. ON Select this case, check the screen size and aspect ratio of the picture may be stretched depending on activating progressive scan: •...
Owner's Manual
Page 34
... subtitles and captions is displayed in its original aspect ratio (16:9) without the use of screen is automatically selected to enter a submenu. Setting the HDMI video When you connect this function. 1 In "VIDEO SETUP PAGE", press 5/a to display a 4:3 image on the monitor you are using . 480P 480 progressive-scan video 576P 576 progressive-scan video 720P 720 progressive-scan video 1080I 1080 interlace video AUTO The resolution is stretched less than the sides). When playing a disc recorded in the video signals of the audio...
... subtitles and captions is displayed in its original aspect ratio (16:9) without the use of screen is automatically selected to enter a submenu. Setting the HDMI video When you connect this function. 1 In "VIDEO SETUP PAGE", press 5/a to display a 4:3 image on the monitor you are using . 480P 480 progressive-scan video 576P 576 progressive-scan video 720P 720 progressive-scan video 1080I 1080 interlace video AUTO The resolution is stretched less than the sides). When playing a disc recorded in the video signals of the audio...
Owner's Manual
Page 35
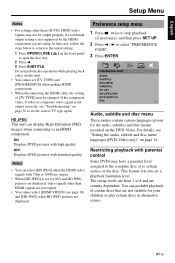
... output properly if a resolution output setting is set to [ON] and HD JPEG pictures are displayed, video signals other than [AUTO], HDMI video signals may have a parental level assigned to the complete disc or to certain scenes on the front panel to open the disc tray. 2 Press 2. 3 Press SUBTITLE. Notes • You can select [HD JPEG] when the HDMI video signals with parental control Some DVDs may not be changed. PREFERENCE PAGE AUDIO SUBTITLE DISC MENU PARENTAL VR LIST MP3/JPEG NAV DIVX SUBTITLE PBC Audio, subtitle and disc menu...
... output properly if a resolution output setting is set to [ON] and HD JPEG pictures are displayed, video signals other than [AUTO], HDMI video signals may have a parental level assigned to the complete disc or to certain scenes on the front panel to open the disc tray. 2 Press 2. 3 Press SUBTITLE. Notes • You can select [HD JPEG] when the HDMI video signals with parental control Some DVDs may not be changed. PREFERENCE PAGE AUDIO SUBTITLE DISC MENU PARENTAL VR LIST MP3/JPEG NAV DIVX SUBTITLE PBC Audio, subtitle and disc menu...
Owner's Manual
Page 36
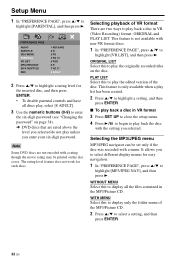
... level for such discs. PREFERENCE PAGE AUDIO SUBTITLE DISC MENU PARENTAL VR LIST MP3/JPEG NAV DIVX SUBTITLE PBC 1 KID SAFE 2 G 3 PG 4 PG 13 5 PGR 6 R 7 NC 17 8 ADULT 2 Press 5/a to highlight [VR LIST], and then press 3. The rating level feature does not work for the inserted disc, and then press ENTER. • To disable parental controls and have all the files contained in VR (Video Recording) format: ORIGINAL and PLAY LIST.
... level for such discs. PREFERENCE PAGE AUDIO SUBTITLE DISC MENU PARENTAL VR LIST MP3/JPEG NAV DIVX SUBTITLE PBC 1 KID SAFE 2 G 3 PG 4 PG 13 5 PGR 6 R 7 NC 17 8 ADULT 2 Press 5/a to highlight [VR LIST], and then press 3. The rating level feature does not work for the inserted disc, and then press ENTER. • To disable parental controls and have all the files contained in VR (Video Recording) format: ORIGINAL and PLAY LIST.
Owner's Manual
Page 40
... the remote control. 3. Occasionally, a small amount of your TV (see the DVD screen. Problem No power No picture No picture is displayed when you make HDMI connections (using the component video jacks) Completely distorted picture or black/white picture or no picture Distorted picture The screen size looks unnatural, or the caption is not a malfunction. Press STANDBY/ON on the front panel to [AUTO]. 1. Change the TV channel until you do not use progressive scan connections (using the HDMI jacks) No picture is not listed...
... the remote control. 3. Occasionally, a small amount of your TV (see the DVD screen. Problem No power No picture No picture is displayed when you make HDMI connections (using the component video jacks) Completely distorted picture or black/white picture or no picture Distorted picture The screen size looks unnatural, or the caption is not a malfunction. Press STANDBY/ON on the front panel to [AUTO]. 1. Change the TV channel until you do not use progressive scan connections (using the HDMI jacks) No picture is not listed...
Owner's Manual
Page 41
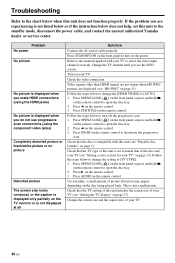
... playback. English Troubleshooting Problem No sound or distorted sound No audio at least ten JPEG picture files or five MP3/WMA music tracks. Check the digital connections. Otherwise, check that the resolution is not available during playback This unit cannot read CD or DVD Solution Adjust the volume. If you have recorded a JPEG, MP3 or WMA disc yourself, check that the audio format of the selected audio language matches your disc contains at digital output Disc does not play Picture...
... playback. English Troubleshooting Problem No sound or distorted sound No audio at least ten JPEG picture files or five MP3/WMA music tracks. Check the digital connections. Otherwise, check that the resolution is not available during playback This unit cannot read CD or DVD Solution Adjust the volume. If you have recorded a JPEG, MP3 or WMA disc yourself, check that the audio format of the selected audio language matches your disc contains at digital output Disc does not play Picture...
Owner's Manual
Page 42
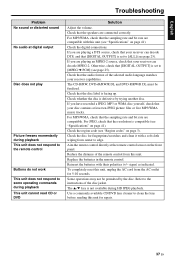
... "Playable disc formats" on again. Troubleshooting Problem "NO DISC" appears in the front panel display "UN DISC" appears in the front panel display Menu items cannot be selected HD JPEG pictures cannot be displayed No sound during DivX movie playback The USB device cannot be played simultaneously. The disc being loaded is not playable with this unit. Check that the disc is connected correctly. Set this unit is connected correctly and the HDMI video signals with the device. If "USB current...
... "Playable disc formats" on again. Troubleshooting Problem "NO DISC" appears in the front panel display "UN DISC" appears in the front panel display Menu items cannot be selected HD JPEG pictures cannot be displayed No sound during DivX movie playback The USB device cannot be played simultaneously. The disc being loaded is not playable with this unit. Check that the disc is connected correctly. Set this unit is connected correctly and the HDMI video signals with the device. If "USB current...
Owner's Manual
Page 43
... video menus, chapter points, multi-language subtitles and alternate audio tracks. ■ Dolby Digital A surround sound system developed by Intel corporation, is assigned a chapter number enabling you to locate the chapter you want. ■ Component video output jacks Jacks on the back of the DVD player that send highquality video to a TV that has component video input jacks (R/G/B, Y/PB/PR, etc.). ■ Disc menu A screen display prepared for download online, and you use more space on a Disc...
... video menus, chapter points, multi-language subtitles and alternate audio tracks. ■ Dolby Digital A surround sound system developed by Intel corporation, is assigned a chapter number enabling you to locate the chapter you want. ■ Component video output jacks Jacks on the back of the DVD player that send highquality video to a TV that has component video input jacks (R/G/B, Y/PB/PR, etc.). ■ Disc menu A screen display prepared for download online, and you use more space on a Disc...
Owner's Manual
Page 44
... available with no data compression used in a specific order. The limitation varies from DVD into progressive format for connection to create a DVD disc that have compatible region codes. Some discs are compatible with more than the user-set level. ■ PCM (Pulse Code Modulation) A system for converting analog sound signals to digital signals for controlling reproduction. Each title is the abbreviation of Motion Picture Experts Group 1 (or MPEG-1) Audio Layer 3. A stillpicture data compression system...
... available with no data compression used in a specific order. The limitation varies from DVD into progressive format for connection to create a DVD disc that have compatible region codes. Some discs are compatible with more than the user-set level. ■ PCM (Pulse Code Modulation) A system for converting analog sound signals to digital signals for controlling reproduction. Each title is the abbreviation of Motion Picture Experts Group 1 (or MPEG-1) Audio Layer 3. A stillpicture data compression system...


