Owner's Manual
Page 5
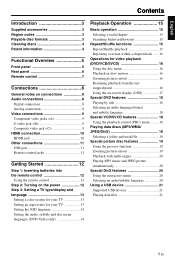
English Contents Introduction 3 Supplied accessories 3 Region codes 3 Playable disc formats 3 Cleaning discs 4 Patent information 4 Functional Overview 5 Front panel 5 Rear panel 6 Remote control 7 Connections 8 General notes on connections 8 Audio connections 8 Digital connection 8 Analog connection 8 Video connections 9 Component video jacks
English Contents Introduction 3 Supplied accessories 3 Region codes 3 Playable disc formats 3 Cleaning discs 4 Patent information 4 Functional Overview 5 Front panel 5 Rear panel 6 Remote control 7 Connections 8 General notes on connections 8 Audio connections 8 Digital connection 8 Analog connection 8 Video connections 9 Component video jacks
Owner's Manual
Page 7
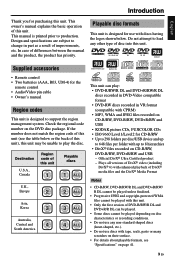
... • Two batteries (AAA, R03, UM-4) for the remote control • Audio/Video pin cable • Owner's manual Region codes This unit is designed to 8 hierarchies • DivX® files recorded on CD-R/RW, DVD-R/RW, DVD+R/RW and USB - Check the regional code number on page 41. 3 En Destination ... Design and specifications are subject to change in VR format (compatible with CPRM) • MP3, WMA and JPEG files recorded on CD-R/RW, DVD-R/RW, DVD+R/RW and USB • KODAK picture CDs, FUJICOLOR CDs • ISO 9660 Level1/Level2 for CD-R/RW • Up to 298 folders per ...
... • Two batteries (AAA, R03, UM-4) for the remote control • Audio/Video pin cable • Owner's manual Region codes This unit is designed to 8 hierarchies • DivX® files recorded on CD-R/RW, DVD-R/RW, DVD+R/RW and USB - Check the regional code number on page 41. 3 En Destination ... Design and specifications are subject to change in VR format (compatible with CPRM) • MP3, WMA and JPEG files recorded on CD-R/RW, DVD-R/RW, DVD+R/RW and USB • KODAK picture CDs, FUJICOLOR CDs • ISO 9660 Level1/Level2 for CD-R/RW • Up to 298 folders per ...
Owner's Manual
Page 10
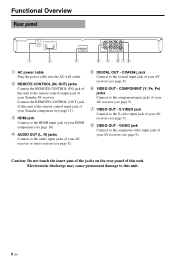
... this unit to the remote control output jack of your Yamaha AV receiver. Functional Overview Rear panel REMOTE CONTROL OUT IN 1 2 HDMI 3 PR COMPONENT Y VIDEO COAXIAL PB S VIDEO AUDIO OUT DIGITALOUT VIDEO OUT 4 5 678 1 AC power cable Plug the power cable into the AC wall outlet. 2 REMOTE CONTROL (IN, OUT...) jacks Connect the REMOTE CONTROL (IN) jack of this unit to the remote control input jack of your Yamaha component (see page 11). 3 HDMI jack Connect to the HDMI input jack of your ...
... this unit to the remote control output jack of your Yamaha AV receiver. Functional Overview Rear panel REMOTE CONTROL OUT IN 1 2 HDMI 3 PR COMPONENT Y VIDEO COAXIAL PB S VIDEO AUDIO OUT DIGITALOUT VIDEO OUT 4 5 678 1 AC power cable Plug the power cable into the AC wall outlet. 2 REMOTE CONTROL (IN, OUT...) jacks Connect the REMOTE CONTROL (IN) jack of this unit to the remote control input jack of your Yamaha component (see page 11). 3 HDMI jack Connect to the HDMI input jack of your ...
Owner's Manual
Page 11
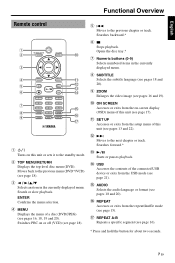
... 19 and 20). Opens the disc tray.* 7 Numeric buttons (0-9) Selects numbered items in the currently displayed menu. r USB Accesses the contents of a disc (DVD/JPEG) (see page 21). ENTER Confirms the menu selection. 4 MENU Displays the menu of the connected USB device or exits from the setup menu of... this unit (see page 18). 5 l22 Moves to the next chapter or track. English Functional Overview Remote control 1 2 0 3 4 q 5 w e 6 r 7 t 8 9 y u 1 Turns on this unit (see pages 18 and 20). Switches PBC on or off (VCD) ...
... 19 and 20). Opens the disc tray.* 7 Numeric buttons (0-9) Selects numbered items in the currently displayed menu. r USB Accesses the contents of a disc (DVD/JPEG) (see page 21). ENTER Confirms the menu selection. 4 MENU Displays the menu of the connected USB device or exits from the setup menu of... this unit (see page 18). 5 l22 Moves to the next chapter or track. English Functional Overview Remote control 1 2 0 3 4 q 5 w e 6 r 7 t 8 9 y u 1 Turns on this unit (see pages 18 and 20). Switches PBC on or off (VCD) ...

Owner's Manual
Page 12
Make sure to select the appropriate audio format from the menu screen on the remote control once or more may change connections. • Depending on the component you must connect this unit to an AV receiver that supports these formats. ...
Make sure to select the appropriate audio format from the menu screen on the remote control once or more may change connections. • Depending on the component you must connect this unit to an AV receiver that supports these formats. ...
Owner's Manual
Page 15
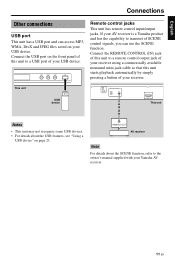
... using a commercially available monaural mini-jack cable so that this unit to a USB port of your USB device. Remote control jacks This unit has remote control input/output jacks. If your AV receiver is a Yamaha product and has the capability to the owner's manual supplied with your USB device.... REMOTE OUT AV receiver Note For details about the USB features, see "Using a USB device" on your Yamaha AV receiver. 11 En This unit USB device REMOTE CONTROL OUT IN HDMI This unit Notes • This unit may...
... using a commercially available monaural mini-jack cable so that this unit to a USB port of your USB device. Remote control jacks This unit has remote control input/output jacks. If your AV receiver is a Yamaha product and has the capability to the owner's manual supplied with your USB device.... REMOTE OUT AV receiver Note For details about the USB features, see "Using a USB device" on your Yamaha AV receiver. 11 En This unit USB device REMOTE CONTROL OUT IN HDMI This unit Notes • This unit may...
Owner's Manual
Page 16
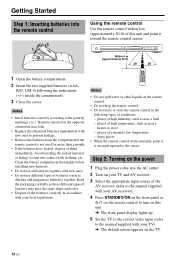
... before installing new batteries. • Do not use different types of them immediately. dusty places • When the remote control works unstably, point it come into contact with clothing, etc. Notes • Insert batteries correctly according to the... Notes • Do not spill water or other liquids on your local regulations. GGeettitngtiSntargtedStarted Step 1: Inserting batteries into the remote control 3 1 2 Using the remote control Use the remote control within 6 m (approximately 20 ft) of conditions: - places of extremely low temperature - places of high humidity, ...
... before installing new batteries. • Do not use different types of them immediately. dusty places • When the remote control works unstably, point it come into contact with clothing, etc. Notes • Insert batteries correctly according to the... Notes • Do not spill water or other liquids on your local regulations. GGeettitngtiSntargtedStarted Step 1: Inserting batteries into the remote control 3 1 2 Using the remote control Use the remote control within 6 m (approximately 20 ft) of conditions: - places of extremely low temperature - places of high humidity, ...

Owner's Manual
Page 17
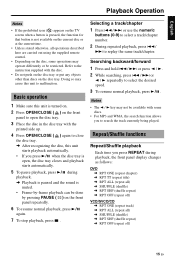
... a PAL system TV. Notes • Before changing the current TV standard setting, ensure that matches your TV You can customize this unit using the supplied remote control. • To return to highlight one of the following options. English Getting Started Step 3: Setting a TV type/display and language You can set the...
... a PAL system TV. Notes • Before changing the current TV standard setting, ensure that matches your TV You can customize this unit using the supplied remote control. • To return to highlight one of the following options. English Getting Started Step 3: Setting a TV type/display and language You can set the...
Owner's Manual
Page 19
...repeat off ) VCD/SVCD/CD ➜ RPT ONE (repeat track) ➜ RPT ALL (repeat all operations described here are carried out using the supplied remote control. • Depending on the disc, some discs. • For MP3 and WMA, the search function allows you press 3 / 8 when the ... tray is open, the disc tray closes and playback starts automatically. 5 To pause playback, press 3 / 8 during playback, the front panel display changes as follows: DVD ➜ RPT ONE (repeat chapter) ➜ RPT TT (repeat title) ➜ RPT ALL (repeat all) ➜ SHUFFLE (shuffle) ➜ RPT SHF (...
...repeat off ) VCD/SVCD/CD ➜ RPT ONE (repeat track) ➜ RPT ALL (repeat all operations described here are carried out using the supplied remote control. • Depending on the disc, some discs. • For MP3 and WMA, the search function allows you press 3 / 8 when the ... tray is open, the disc tray closes and playback starts automatically. 5 To pause playback, press 3 / 8 during playback, the front panel display changes as follows: DVD ➜ RPT ONE (repeat chapter) ➜ RPT TT (repeat title) ➜ RPT ALL (repeat all) ➜ SHUFFLE (shuffle) ➜ RPT SHF (...

Owner's Manual
Page 26
... with a maximum of a disc in the desired order by locking the disc. Notes • Unless stated otherwise, all discs are carried out using the supplied remote control. • To return to highlight [DISC LOCK], and then press 3. The default password is carried out on the TV screen, enabling you to customize...
... with a maximum of a disc in the desired order by locking the disc. Notes • Unless stated otherwise, all discs are carried out using the supplied remote control. • To return to highlight [DISC LOCK], and then press 3. The default password is carried out on the TV screen, enabling you to customize...

Owner's Manual
Page 37
... at all. • For external subtitle files, the following subtitle format filename extensions are supported (note that can also use the MENU button on the remote control to turn on page 18). 33 En Note You can be ), Macedonian (mk), Russian (ru), Serbian (sr), Ukrainian (uk) GROUP4: Hebrew (iw), Yiddish (ji...
... at all. • For external subtitle files, the following subtitle format filename extensions are supported (note that can also use the MENU button on the remote control to turn on page 18). 33 En Note You can be ), Macedonian (mk), Russian (ru), Serbian (sr), Ukrainian (uk) GROUP4: Hebrew (iw), Yiddish (ji...
Owner's Manual
Page 40
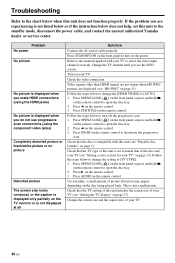
...the standby mode, disconnect the power cable, and contact the nearest authorized Yamaha dealer or service center. Press OPEN/CLOSE ( ) on the front panel or press and hold 7 on the remote control to open the disc tray. 2. Press OPEN/CLOSE ( ) on...page 31). If the problem you are displayed (see "HD JPEG" on the disc being played back. Press SUBTITLE on the remote control. 3. Follow the steps below to change the setting of [TV TYPE]. 1. Check that the TV type of this ...off the progressive scan. 1. Check that the disc is compatible with your TV (see the DVD screen.
...the standby mode, disconnect the power cable, and contact the nearest authorized Yamaha dealer or service center. Press OPEN/CLOSE ( ) on the front panel or press and hold 7 on the remote control to open the disc tray. 2. Press OPEN/CLOSE ( ) on...page 31). If the problem you are displayed (see "HD JPEG" on the disc being played back. Press SUBTITLE on the remote control. 3. Follow the steps below to change the setting of [TV TYPE]. 1. Check that the TV type of this ...off the progressive scan. 1. Check that the disc is compatible with your TV (see the DVD screen.
Owner's Manual
Page 41
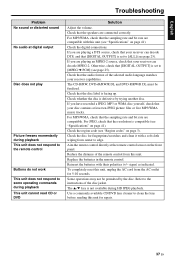
... DTS, and that your receiver capabilities. Check the disc for fingerprints/scratches and clean it with their polarities (+/- Replace the batteries in the remote control. Check the digital connections. signs) as indicated. To completely reset this unit, unplug the AC cord from this unit. The 5/a ... check that your receiver can decode MPEG-2. Check that the resolution is not available during playback This unit cannot read CD or DVD Solution Adjust the volume. English Troubleshooting Problem No sound or distorted sound No audio at digital output Disc does not play Picture ...
... DTS, and that your receiver capabilities. Check the disc for fingerprints/scratches and clean it with their polarities (+/- Replace the batteries in the remote control. Check the digital connections. signs) as indicated. To completely reset this unit, unplug the AC cord from this unit. The 5/a ... check that your receiver can decode MPEG-2. Check that the resolution is not available during playback This unit cannot read CD or DVD Solution Adjust the volume. English Troubleshooting Problem No sound or distorted sound No audio at digital output Disc does not play Picture ...
Owner's Manual
Page 42
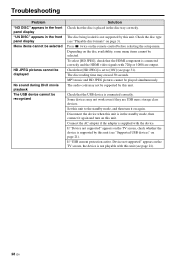
.... Some devices may exceed 30 seconds. To select [HD JPEG], check that [HD JPEG] is set to the standby mode, and then turn on the remote control before selecting the setup menu. Check that the disc is not playable with this unit. The audio code may not be selected. Disconnect the...
.... Some devices may exceed 30 seconds. To select [HD JPEG], check that [HD JPEG] is set to the standby mode, and then turn on the remote control before selecting the setup menu. Check that the disc is not playable with this unit. The audio code may not be selected. Disconnect the...