
Owner's Manual
Page 3
... distribute this type of the following measures: Relocate either this manual, meets FCC requirements. In the case of this information for US customers) 1. Buena Park, CA90622. We Want You Listening For A Lifetime Yamaha and the Electronic Industries Association's Consumer Electronics Group want you ...with this product to coaxial type cable. If these requirements provides a reasonable level of assurance that your authority, granted by Yamaha Corporation of other electronic devices. If this product in to accessories and/or another product use of your sensitive hearing. ...
... distribute this type of the following measures: Relocate either this manual, meets FCC requirements. In the case of this information for US customers) 1. Buena Park, CA90622. We Want You Listening For A Lifetime Yamaha and the Electronic Industries Association's Consumer Electronics Group want you ...with this product to coaxial type cable. If these requirements provides a reasonable level of assurance that your authority, granted by Yamaha Corporation of other electronic devices. If this product in to accessories and/or another product use of your sensitive hearing. ...
Owner's Manual
Page 4
...inside . this might damage the finish. The unit is plugged into a wall outlet, do not place your eyes close to read this manual carefully. LASER SAFETY This unit employs a laser. Avoid direct eye exposure to wide slot and fully insert. When this unit is not ... or transformers to avoid humming sounds. 4 Do not expose this unit to sudden temperature changes from cold to obstruct heat radiation. Contact qualified Yamaha service personnel when any damage resulting from use this unit for adequate ventilation. 3 Locate this unit away from direct sunlight, heat sources, vibration,...
...inside . this might damage the finish. The unit is plugged into a wall outlet, do not place your eyes close to read this manual carefully. LASER SAFETY This unit employs a laser. Avoid direct eye exposure to wide slot and fully insert. When this unit is not ... or transformers to avoid humming sounds. 4 Do not expose this unit to sudden temperature changes from cold to obstruct heat radiation. Contact qualified Yamaha service personnel when any damage resulting from use this unit for adequate ventilation. 3 Locate this unit away from direct sunlight, heat sources, vibration,...
Owner's Manual
Page 7
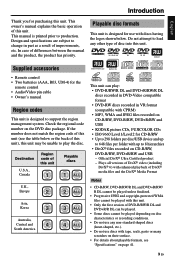
.../R DL and DVD+R/RW/ R DL cannot be played unless finalized. • Progressive JPEG and copyright-protected WMA files cannot be played with this unit (see "Specifications" on page 41. 3 En This owner's manual explains the basic operation of differences between the manual and the product, ..., DVD+R/RW and USB • KODAK picture CDs, FUJICOLOR CDs • ISO 9660 Level1/Level2 for the remote control • Audio/Video pin cable • Owner's manual Region codes This unit is designed to production. This manual is designed for purchasing this unit. Design and ...
.../R DL and DVD+R/RW/ R DL cannot be played unless finalized. • Progressive JPEG and copyright-protected WMA files cannot be played with this unit (see "Specifications" on page 41. 3 En This owner's manual explains the basic operation of differences between the manual and the product, ..., DVD+R/RW and USB • KODAK picture CDs, FUJICOLOR CDs • ISO 9660 Level1/Level2 for the remote control • Audio/Video pin cable • Owner's manual Region codes This unit is designed to production. This manual is designed for purchasing this unit. Design and ...

Owner's Manual
Page 12
... seconds. • If you want to enjoy Dolby Digital, DTS and MPEG formats, you want to connect, there are described below. • Refer to the manuals supplied with a Dolby Digital, DTS, or MPEG decoder using the supplied audio pin cable. CCoonnnecntioensctions General notes on connections Be sure to turn off this...
... seconds. • If you want to enjoy Dolby Digital, DTS and MPEG formats, you want to connect, there are described below. • Refer to the manuals supplied with a Dolby Digital, DTS, or MPEG decoder using the supplied audio pin cable. CCoonnnecntioensctions General notes on connections Be sure to turn off this...

Owner's Manual
Page 14
... the connected DVI component, black and white in the image may disrupt playback or cause noise. • When connecting an HDMI component, refer to the manual supplied with HDCPincompatible HDMI or DVI components. • You need to make an appropriate audio connections if the connected component does not output audio signals...
... the connected DVI component, black and white in the image may disrupt playback or cause noise. • When connecting an HDMI component, refer to the manual supplied with HDCPincompatible HDMI or DVI components. • You need to make an appropriate audio connections if the connected component does not output audio signals...
Owner's Manual
Page 15
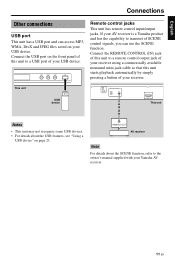
... simply pressing a button of your USB device. Remote control jacks This unit has remote control input/output jacks. If your AV receiver is a Yamaha product and has the capability to transmit of SCENE control signals, you can access MP3, WMA, DivX and JPEG files saved on page 21. ... this unit to a remote control output jack of your receiver using a commercially available monaural mini-jack cable so that this unit to the owner's manual supplied with your receiver. REMOTE OUT AV receiver Note For details about the USB features, see "Using a USB device" on your USB device. ...
... simply pressing a button of your USB device. Remote control jacks This unit has remote control input/output jacks. If your AV receiver is a Yamaha product and has the capability to transmit of SCENE control signals, you can access MP3, WMA, DivX and JPEG files saved on page 21. ... this unit to a remote control output jack of your receiver using a commercially available monaural mini-jack cable so that this unit to the owner's manual supplied with your receiver. REMOTE OUT AV receiver Note For details about the USB features, see "Using a USB device" on your USB device. ...
Owner's Manual
Page 16
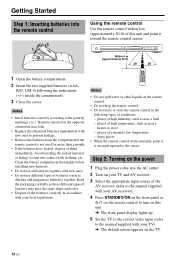
... cable into the AC outlet. 2 Turn on your TV and AV receiver. 3 Select the appropriate input source of the AV receiver (refer to the manual supplied with your AV receiver). 4 Press STANDBY/ON on the front panel or on the remote control to turn on this unit and point it...low temperature - Read the packaging carefully as these different types of batteries may leak. • Replace the exhausted batteries immediately with new ones to the manual supplied with clothing, etc. Notes • Do not spill water or other liquids on the TV. 12 En places of high temperature, such as near...
... cable into the AC outlet. 2 Turn on your TV and AV receiver. 3 Select the appropriate input source of the AV receiver (refer to the manual supplied with your AV receiver). 4 Press STANDBY/ON on the front panel or on the remote control to turn on this unit and point it...low temperature - Read the packaging carefully as these different types of batteries may leak. • Replace the exhausted batteries immediately with new ones to the manual supplied with clothing, etc. Notes • Do not spill water or other liquids on the TV. 12 En places of high temperature, such as near...
Owner's Manual
Page 40
Refer to the manual supplied with this unit matches the screen size of the disc and your TV (see "Setting...your TV to [AUTO]. 1. Press 3 on the remote control. Change the TV channel until you are displayed (see the DVD screen. Change the screen size and the aspect ratio of picture distortion may appear depending on the TV monitor or is set ...see "HD JPEG" on the front panel to the standby mode, disconnect the power cable, and contact the nearest authorized Yamaha dealer or service center. Check that of your TV. Press STANDBY/ON on page 31). Press ZOOM on the remote ...
Refer to the manual supplied with this unit matches the screen size of the disc and your TV (see "Setting...your TV to [AUTO]. 1. Press 3 on the remote control. Change the TV channel until you are displayed (see the DVD screen. Change the screen size and the aspect ratio of picture distortion may appear depending on the TV monitor or is set ...see "HD JPEG" on the front panel to the standby mode, disconnect the power cable, and contact the nearest authorized Yamaha dealer or service center. Check that of your TV. Press STANDBY/ON on page 31). Press ZOOM on the remote ...